background image

8

ENGLISH

SPRAYER


CONTROLS

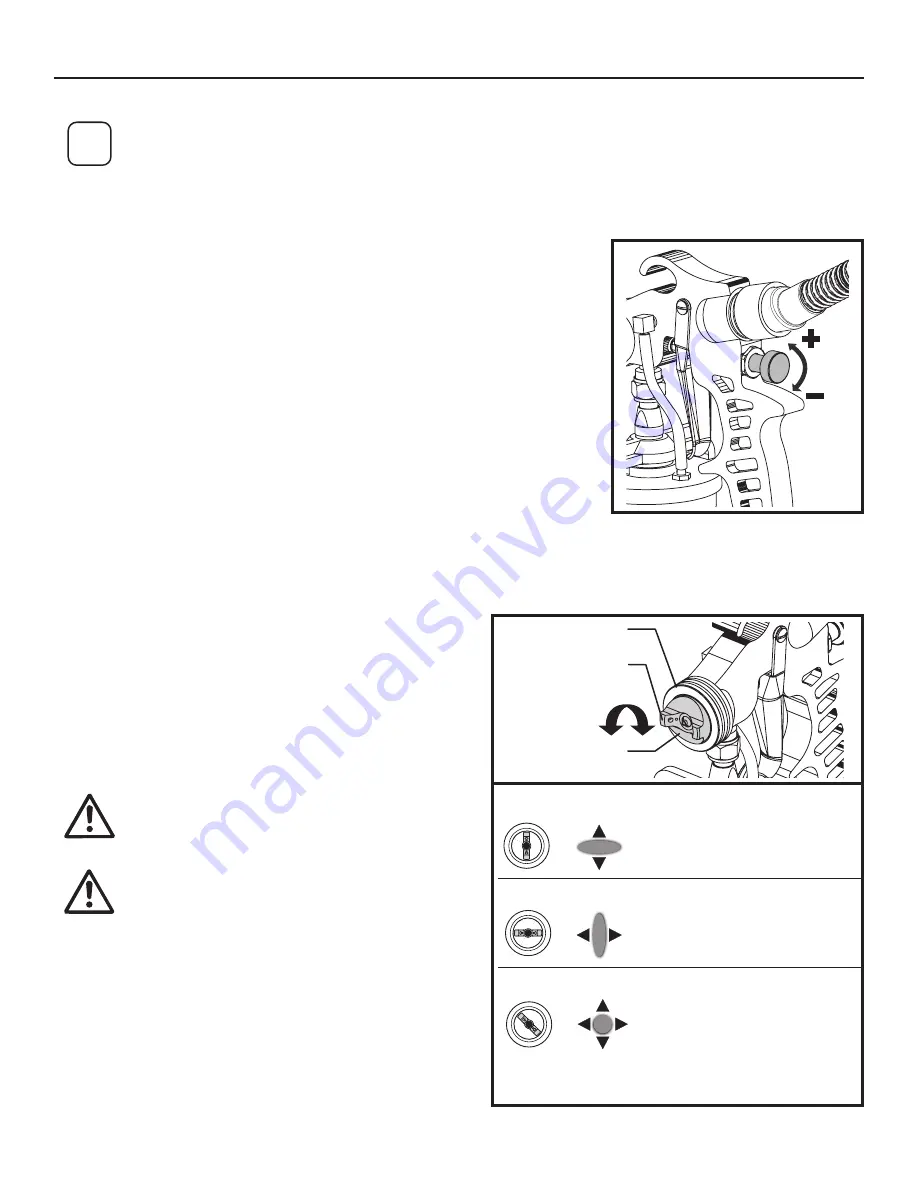
MATERIAL FLOW CONTROL

The material flow control determines the amount of material that is sprayed from the 

spray gun.
Set the material flow by turning the knob on the rear of the spray gun.


For thicker materials, it is recommended that you start with the highest material 

flow setting and then gradually decrease the flow to suit your particular spraying 

needs.


For thinner materials, it is recommended that you start with a low material flow 

setting, and then gradually increase the flow to suit your particular spraying needs.  


The higher the flow setting, the quicker you will have to work in order to avoid drips 

and sags in your spray pattern. 

Tip:  Spraying with the control set too high will result in a spray pattern that runs and 

sags (too much material).
Tip:  Spraying with the control set too low will result in a spray pattern that does not 

cover (not enough material).  Also, if the knob is loosened too much, it can fall out.  

Replace by threading it back in.  

ADJUST SPRAY PATTERN

Adjust the spray pattern by turning the air cap ears.
The  positions  of  the  air  cap  and  the  corresponding  spray 

pattern shapes are illustrated below.
Test  each  pattern  and  use  whichever  pattern  is  suitable  for 

your application.

NEVER  trigger  the  gun  while  turning  the  air 

cap.  NEVER point the spray gun at any part of 

the body.

Aenon

When  changing  the  spray  pattern,  make  sure 

the air cap ring is not loosened.

i

Spray performance will depend upon a number of factors: material thickness, spray pattern selected, and material 

flow.  Testing different control settings will help you achieve the desired results.  See descriptions below to help 

with your project.

AIR CAP EARS

AIR CAP

AIR CAP RING

Horizontal pattern

=

=

=


Use ‘up and down’ spraying 

motion

Vertical pattern

=

=

=

Use ‘side to side’ spraying 

motion

Round pattern

=

Use ‘up and down’ or ‘side to 

side’ spraying motion

Use lower material flow

For coating smaller areas, 

corners and edges

Содержание Earlex 5700

Страница 1: ...O READ THIS MANUAL FOR COMPLETE INSTRUCTIONS LIRE CE MANUEL POUR OBTENIR DES DIRECTIVES COMPL TES LEA ESTE MANUAL PARA OBTENER LAS INSTRUCCIONES COMPLETAS PLEASE READ AND SAVE THIS INSTRUCTION MANUAL...

Страница 2: ...ns is provided on a double insulated product nor should a means for grounding be added to the product Servicing of a double insulated product requires extreme care and knowledge of the system and shou...

Страница 3: ...equipment shall be present and working HAZARD ELECTRIC SHOCK This product can cause injury due to electric shock PREVENTION Never submerge electrical parts Never expose the equipment to rain Store ind...

Страница 4: ...ities You may find that the 1 5mm fluid tip and needle supplied with this spray gun does not enable you to spray your particular choice of finish exactly as you would like In such cases a change of fl...

Страница 5: ...zzle Set the material flow by turning the knob on the rear of the spray gun TRIGGER Pulling the trigger will deliver spray material from the material container to the nozzle assembly where it is spray...

Страница 6: ...nt or material If it is above this then thinning will be required Your Wagner Earlex 5700 comes equipped with a Viscosity Cup A which will help you determine the thickness of the paint To test a liqui...

Страница 7: ...e pickup tube should be pointing toward the front of the container B If spraying upward the angled end of the pickup tube should be pointing toward the rear of the container 3 Make sure the clamp leve...

Страница 8: ...does not cover not enough material Also if the knob is loosened too much it can fall out Replace by threading it back in ADJUST SPRAY PATTERN Adjust the spray pattern by turning the air cap ears The p...

Страница 9: ...e sprayed to the surface Position the spray gun perpendicular to and six 6 to eight 8 inches from the spray surface depending upon the spray pattern size desired With reduced material flow you can get...

Страница 10: ...ay gun outside Area must be free of flammable vapors Cleaning area must be well ventilated Do not submerge turbine 1 Turn turbine OFF 2 Remove the container and empty any remaining material 3 Thorough...

Страница 11: ...e the seal underneath is free from spray materials 5 Carefully unscrew the material volume control knob 7 Remove the spring 8 Pull back on the trigger and remove the needle 9 Clean all parts with a cl...

Страница 12: ...ng information Make sure the turbine is unplugged and the air hose has been removed from the spray gun 1 Unscrew the air cap ring 1 and remove the air cap 2 and spray directional plate 3 2 Using the f...

Страница 13: ...n is very light and splotchy 1 Moving the spray gun too fast 2 Material flow setting too low 1 Adjust material flow or decrease movement of spray gun 2 Increase material flow setting This unit contain...

Страница 14: ...38 ENGLISH FRAN AIS ESPA OL PARTS LIST LISTE DE PI CES LISTA DE PIEZAS 29 30 31 33 32 28 29 30 31...

Страница 15: ...her 3 pcs Rondelle d crou de garniture 3 pi ces Arandela del prensaestopas 3 piezas 17 2353992 Paint Container water based coatings R servoir de peinture mat riaux base d eau Contenedor de pintura mat...

Страница 16: ...RANTIE OU POUR TOUTE AUTRE RAISON LA GARANTIE NE COUVRE PAS LES ACCESSOIRES CET ARTICLE A T CON U EXCLUSIVEMENT EN VUE D UN USAGE DOMESTIQUE LA GARANTIE NE SERA VALABLE QUE POUR 30 JOURS COMPTER DE LA...

Отзывы: