background image

92

Contents

Index

92

Index

Contents

92

Index

Contents

WARRANTY SERVICE 

The full product warranty and licensing agreement is provided in the Important Product Information document 
included on your product CD.

WARRANTY SERVICE IN THE U.S. AND CANADA

To obtain Warranty service within the U.S. or Canada contact:

Wacom Support Center

Phone: 1.360.896.9833

Email Inquiry form: http://wacom.us/en/contact-support

WARRANTY SERVICE OUTSIDE OF THE U.S. AND CANADA

For products purchased or used outside the United States and Canada, the warranty period may be determined by 
regional requirements. The warranty period for your pen display is described on the Support page of the Wacom web 
site for your region, or contact Wacom Support.

Wacom Technical Support in Asia Pacific (except Japan and China)

Detailed Asia Pacific Limited Warranty policy and product registration may be found online at 
http://wacom.asia.

To obtain technical support or Warranty service within Southeast Asia, Oceania and Taiwan, please contact Wacom 
Customer Support Service for your region. 

Phone numbers can be found at: http://wacom.asia/customer-care.

Should you have any questions about this Agreement, or if you want to contact Wacom, please write to:

IN NORTH AND SOUTH AMERICA CONTACT:

IN JAPAN CONTACT:

Wacom Technology Corporation

Wacom Co., Ltd.

1311 SE Cardinal Court

Sumitomo Fudosan Grand Tower 31F

Vancouver, Washington 98683

8-17-1 Nishi-shinjuku, Shinjuku-ku

U.S.A.

Tokyo, 160-6131, Japan

IN ASIA PACIFIC CONTACT:

IN MAINLAND CHINA (EXCEPT HONG KONG) 
CONTACT:

Wacom Co., Ltd.

Wacom China Corporation

Asia Pacific Office

1103 Beijing IFC West Tower

Sumitomo Fudosan Grand Tower 31F

No. 8 Jianguomenwai Street

8-17-1 Nishi-shinjuku, Shinjuku-ku

Chaoyang District

Tokyo, 160-6131, Japan 

Beijing, 100022, China

E-mail: [email protected]

Содержание PTH-451

Страница 1: ...1 PTH 851 Setting up Intuos Pro Using the Pen Tablet controls The Intuos pro multi touch experience Customizing Intuos pro Application specific settings Working with multiple tools Going wireless with...

Страница 2: ...ntroduction into the market of the applicable Wacom product Intuos and Wacom are registered trademarks of Wacom Co Ltd Adobe and Photoshop are either registered trademarks or trademarks of Adobe Syste...

Страница 3: ...tool buttons 32 Customizing the ExpressKeys 33 Customizing the Touch Ring 34 Tablet to screen mapping 35 Portion of screen area 37 Portion of tablet area 38 Button functions 39 Working with Display To...

Страница 4: ...porting expert settings 84 Using the optional Airbrush and Art Pen 85 Using the optional mouse 86 Customizing the mouse 87 Testing the mouse 89 Pen and digital ink capabilities in Windows 90 Product i...

Страница 5: ...ludes safety precautions specifications and license agreement The following information is not included with this product information about your specific computer hardware or operating system or infor...

Страница 6: ...Intuos Pro tablet Pen Pen holder with nib storage Intuos wireless kit which includes battery wireless receiver and module Installation CD Quick Start Guide booklet Extra pen nibs Nib removal tool Pen...

Страница 7: ...t the center of the ring Press to Toggle between Touch Ring modes Wake tablet from sleep mode when operating wirelessly Customizable ExpressKeys Small Intuos Pro tablets model PTH 451 have six Express...

Страница 8: ...partment Small sized tablets are equipped with a single cover used to access the Wacom wireless module and rechargeable battery Wacom wireless module slot Storage compartment for Wacom wireless receiv...

Страница 9: ...removal tool and assorted replacement nibs Nib removal tool Replacement nibs See Product information to learn more about which applications currently support the special features of your Intuos Pro P...

Страница 10: ...LEDs will light white Touch the active area of the Intuos pro with your pen or your finger The Status LEDs will brighten USB CABLE INSTALLATION The tablet active area Control panel overview 1 The USB...

Страница 11: ...eting the software installation make sure you can use your pen on the Intuos pro to move the screen cursor When you place the pen tip on or close to the active area the cursor should immediately jump...

Страница 12: ...e tablet driver automatically configures all aspects of the tablet including the Wacom Tablet control panel options for correct right handed use Next physically rotate your tablet so the tablet Expres...

Страница 13: ...e touch Wherever you place the pen on the tablet the screen pointer will jump to the corresponding point on the screen The screen pointer indicates pen position and follows the movement of the pen acr...

Страница 14: ...on of the monitor area See Tablet to screen mapping When your system is configured with multiple monitors you can assign the DISPLAY TOGGLE function to an ExpressKey This enables you to toggle the cur...

Страница 15: ...r placing the tablet below the keyboard and centered underneath your monitor Using the Pen Tablet controls USING THE PEN The Intuos Pro Pen is cordless and battery free It senses the amount of pressur...

Страница 16: ...at feels most comfortable Place the pen stand within easy reach of your tablet The stand allows for vertical or horizontal placement of the pen Important When not in use place the pen in the pen stand...

Страница 17: ...ess in supporting applications This is like working with an airbrush where tilt can be used to make a line thin when the tool is vertical or wide when the tool is tilted In other applications you can...

Страница 18: ...e screen cursor as you move the pen tip In others it will simply move in the same general direction as the screen cursor To assign new switch functions see Customizing tool buttons TABLET CONTROLS To...

Страница 19: ...an application for which you have already customized your ExpressKeys those settings will take precedence over any automatic ExpressKey default settings provided by the driver for that application Set...

Страница 20: ...ou can view the display by pressing an ExpressKey set to SETTINGS You can also use the ExpressKeys to Set a key to a commonly used keyboard shortcut Set a key to launch a commonly used file or applica...

Страница 21: ...omizable modes As you toggle between settings a corresponding status LED illuminates Any disabled settings are skipped in the toggle sequence A diagram of the current Touch Ring settings appears brief...

Страница 22: ...ms bar to access the Start screen Windows 7 and Vista Click on the Windows START button and choose ALL PROGRAMS then select WACOM TABLET and choose the WACOM TABLET PROPERTIES option Mac Open SYSTEM P...

Страница 23: ...tings shown below the list apply to the selected tablet or pen display The control panel will not launch unless a supported tablet or pen display is connected to the computer Settings can only be view...

Страница 24: ...the tablet See The tablet active area When using touch you can generally position your fingers as far apart as is comfortable However placing your fingers too closely together may be interpreted by th...

Страница 25: ...ustomize your touch experience and also customize the ExpressKeys to perform some touch functions Select the TOUCH icon in the TOOL list Then select an appropriate tab to customize and change settings...

Страница 26: ...sts how fast you must tap to register a double click To test your setting position the screen cursor over the TEST area and tap twice Sets the scrolling speed of the SCROLL touch gesture Sets the acce...

Страница 27: ...selection from the drop down menus Position the screen cursor over a touch option to see a static image of that function If you do not choose a specific option to view then the control panel will dis...

Страница 28: ...the pop up menu If you are using Windows 8 Classic Desktop press the Windows key on your keyboard or select the Windows icon in the Charms bar to access the Start screen Windows 7 and Vista Click on t...

Страница 29: ...rol the application of digital paint These tools are fully supported in the Wacom driver software They will appear in the TOOL list of the Wacom Tablet control panel after you touch the tablet surface...

Страница 30: ...justs the size of the double click area Drag slider to OFF if you do not want double click assist Tips Use a soft TIP FEEL for a wider range of pressure values in most pressure sensitive applications...

Страница 31: ...amount of pressure needed to erase Click to further customize the eraser sensitivity With your screen cursor positioned over an empty area of the control panel press down on the tablet with the pen e...

Страница 32: ...ing easier set the side switch to DOUBLE CLICK Double click here to change the pen tip function At least one tool button should be set to the CLICK function The tip must be set to CLICK in order to dr...

Страница 33: ...t Some applications can override and control the ExpressKey functions For details see Using integrated applications Choose a function to perform when the key is pressed ExpressKey functions can be def...

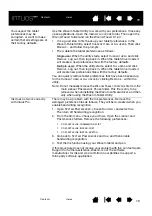
Страница 34: ...of the screen cursor in Adobe Photoshop CS3 or later open the Adobe Photoshop general preferences pane Check the ZOOM WITH SCROLL WHEEL option and click OK To set the brightness of the Touch Ring sta...

Страница 35: ...E MODE enables you to move the screen cursor with a pick up and slide motion similar to using a standard mouse Select a Portion of screen area for tablet to screen mapping Select a Portion of tablet a...

Страница 36: ...he position of your pen on the tablet Wherever you place your pen on the tablet the cursor will jump to a corresponding point on the screen This is known as absolute positing and is the default settin...

Страница 37: ...oose If more than one monitor is connected to your system an option will be available for each detected monitor PORTION In the dialog box that appears choose a method for defining a portion of the dis...

Страница 38: ...f the tablet is mapped This is the default setting PORTION In the dialog box that appears choose a method for defining a portion of the tablet Drag the corners of the rectangle to select the tablet ar...

Страница 39: ...tton click Be sure at least one button performs this function so you can always navigate and click RIGHT CLICK Simulates a right mouse button click which displays a context menu MIDDLE CLICK Simulates...

Страница 40: ...y cannot be used to select OK You must use your Intuos pro tool to click on the OK button Enter a name for the keystroke definition The name will be displayed with the respective control or in the Rad...

Страница 41: ...L Enables you to position a document or image in any direction within the active pane Do this by pressing a pen button set for PAN SCROLL and then dragging with the pen tip across the tablet active ar...

Страница 42: ...mizing the ExpressKeys INK TOGGLE Mac only Toggles the ink in any application function of Ink on and off Ink automatically recognizes and converts your handwriting into text and inserts it into a docu...

Страница 43: ...ns within the control panel However only one MOUSE ACCELERATION and SPEED setting can be made for each tool and application that you are customizing The mouse mode settings are independent of system s...

Страница 44: ...screen an interactive diagram of the current ExpressKey Touch Ring pen and touch settings The current functions for each control are shown Click on any section of the diagram to open the appropriate...

Страница 45: ...PC Input Panel Sets the button function according to settings found in the Windows 8 Windows 7 and Vista TABLET PC SETTINGS and PEN AND INPUT DEVICES control panels DISABLED Disables the button funct...

Страница 46: ...menu for additional options The menu closes after you make a selection To close without making a selection click on the X located at the center of the Radial Menu or on a control slice that has no fun...

Страница 47: ...multi monitor system This tab lets you set which monitor s will be included in the toggle sequence After setting an ExpressKey or pen side switch to DISPLAY TOGGLE you can use that button to sequentia...

Страница 48: ...at supports pressure sensitivity Logging out of or rebooting the system Switching users Fast User Switching Placing the system in sleep mode Changing the MAPPING or DISPLAY TOGGLE settings Changing th...

Страница 49: ...gs are added or when automatic default setting from the driver are in effect the ALL icon changes to ALL OTHER and an application icon is displayed for the newly added application s In the above examp...

Страница 50: ...list select the application you want to remove from the list 3 Click on the APPLICATION list button In the dialog box that appears click DELETE to confirm your selection The selected application is r...

Страница 51: ...ded back to the TOOL list by placing it back onto the tablet CHANGING THE TABLET MODE Intuos pro is configured for optimum performance in most applications However some handwriting recognition softwar...

Страница 52: ...press the side switch then touch the pen tip to the tablet surface in order to perform the function Hover click Click tap MOUSE HANDEDNESS options change the button orientation of the optional Mouse...

Страница 53: ...up your preferences click BACKUP under MY PREFERENCES To restore preferences that you had previously backed up click RESTORE under MY PREFERENCES To remove preferences for the current user click REMO...

Страница 54: ...ule removal Wireless receiver storage Rechargeable battery Lithium Ion Li Ion Installs within the Intuos Pro tablet Warning See the Important Product Information guide for safety precautions Located o...

Страница 55: ...d 5 Continue to connect wirelessly Establishing a wireless connection Optimizing the wireless connection A Install the battery Align contacts B as shown and press into place See also Battery replaceme...

Страница 56: ...wireless module and Wacom wireless receiver are factory paired and work together as a discrete set Intuos Pro can operate wirelessly for up to 10 meters 33 feet away from your computer It is not neces...

Страница 57: ...Information guide Power off your tablet in locations where when electronic devices are not allowed Because the tablet may cause other electronic devices to malfunction in some locations where when the...

Страница 58: ...wireless time See Power saving features and Battery life information Connect the USB cable between Intuos Pro and a primary USB port located directly on your computer or to a powered USB hub The batte...

Страница 59: ...leep mode or wireless mode off Amber USB cable connected and tablet battery charging Green USB cable connected and tablet battery fully charged Off USB cable connected tablet is in USB suspend mode or...

Страница 60: ...nnection status Depending on your tablet model wake from power saving mode by touching the tablet pressing an ExpressKey or placing the pen in proximity Sleep mode Tablet enters sleep mode When there...

Страница 61: ...wireless module off before leaving the tablet unused for a number of days Once the battery voltage has fallen below a minimum safety level an internal protection circuit within the battery prevents an...

Страница 62: ...Align and slide into place 5 Connect the USB cable and charge the battery for optimum performance See Charging the battery Important When replacing the battery be careful not to drop it on hard surfac...

Страница 63: ...to place 5 Store the wireless module in a safe place after removal WIRELESS RECEIVER STORAGE The Wacom wireless receiver is designed for portability Plug it into a USB port on your computer Then leave...

Страница 64: ...tery power See Battery and wireless connection status If the battery charge is low connect the USB cable and charge the battery See Charging the battery 5 Switch the wireless module off and then back...

Страница 65: ...d choose the Wacom web site for your region to view the product FAQs Frequently Asked Questions 4 If you are having a compatibility conflict between Intuos Pro and a new hardware or software product s...

Страница 66: ...when troubleshooting no power to the tablet a status LED does not light plug the tablet directly into the system USB port located on your computer Temporarily eliminate any external hubs in use until...

Страница 67: ...should brighten See also Testing the tablet controls and tools and Testing a pen 5 Check touch Attempt to move the screen cursor by tracking your finger across the tablet surface Then tap to select an...

Страница 68: ...he tablet surface The tool will be added back to the TOOL list with its default settings Open the Wacom Tablet control panel and click on the ABOUT button In the dialog box that appears click DIAGNOSE...

Страница 69: ...mn 2 Slide your finger around the entire circumference of the Touch Ring As you touch and move your finger along the Touch Ring a LEFT TOUCH number will indicate your current finger position on the To...

Страница 70: ...t The SWITCHES state and PRESSURE value should change PRESSURE should change from approximately 0 with no pressure applied to approximately 100 when full pressure is applied For the optional Airbrush...

Страница 71: ...lso connecting to another USB port or using another USB cable If using Intuos Pro in wireless mode see also Wireless connection problems The computer does not go to sleep When you are not using your I...

Страница 72: ...justing tip feel and double click Double clicking is difficult Be sure you are quickly tapping the tablet twice in the same place on the tablet active area Wacom recommends using the side switch to do...

Страница 73: ...within 10 mm 0 4 inch of the tablet active area Do this without pressing down on the pen tip In the Wacom Tablet control panel verify that the side switch is set to the function you are expecting to o...

Страница 74: ...er does not load properly basic touch movement will be recognized but other actions and gestures will not Install the driver software for the tablet The tablet does not reliably recognize multi finger...

Страница 75: ...en correctly Review using the Grip Pen Switch the wireless module off then back on If the battery charge is low try Charging the battery A wireless connection has been made but the tablet does not see...

Страница 76: ...the wireless module check the battery status LED Amber indicates the battery is charging Green indicates the battery is fully charged If the LED remains off the battery may be defective Replace the ba...

Страница 77: ...up your tablet preferences In the TABLET PREFERENCE FILE UTILITY dialog box click BACKUP and follow the prompts Then use the Tablet Preference File Utility to delete the tablet preferences as follows...

Страница 78: ...t listed check the wireless connection If connected with the provided USB cable Make sure the USB cable is securely connected to an active USB port on your computer or USB hub Check to be sure that a...

Страница 79: ...ces that have been backed up for the CURRENT USER or ALL USERS by clicking RESTORE within the utility Note Do not manually remove the WACOM TABLET PREFPANE file from the main LIBRARY PREFERENCE PANES...

Страница 80: ...m Support by visiting the Wacom web site for your region and completing an Email Inquiry form OBTAINING SOFTWARE UPDATES Wacom periodically updates the tablet software driver to maintain compatibility...

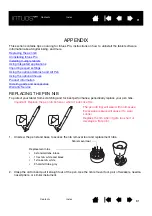
Страница 81: ...CING THE PEN NIB To protect your tablet from scratching and for best performance periodically replace your pen nibs Important Replace the pen nib before or when it looks like this 1 Unscrew the pen st...

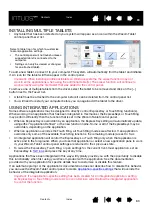
Страница 82: ...c Desktop press the Windows key on your keyboard or select the Windows icon in the Charms bar to access the Start screen 2 Choose UNINSTALL A PROGRAM or ADD OR REMOVE PROGRAMS 3 Select WACOM TABLET an...

Страница 83: ...e overridden depending on the application When an application overrides the Touch Ring all Touch Ring modes are affected If an application overrides only some of the available Touch Ring functions the...

Страница 84: ...Ring Radial Menu or pen button and eraser functions To import expert settings 1 Choose an XML file with settings for use with a particular application Double click on your file selection 2 Carefully r...

Страница 85: ...on the tablet may interfere with screen cursor positioning when using other pointing devices See Product information to learn more about which applications currently support the Airbrush fingerwheel o...

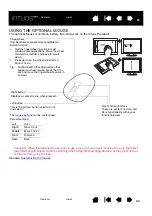
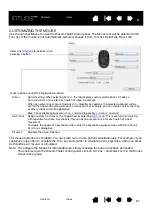
Страница 86: ...and BACK functionality within your Internet browser Right button Displays a context menu when pressed Left button This is the primary button used to CLICK and select The mouse buttons can be customize...

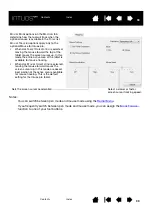
Страница 87: ...group Select the functions to perform when pressing a button WHEEL options control the fingerwheel function SCROLL Default setting When selecting SCROLL the tab displays custom scroll options Choose...

Страница 88: ...E TRACKING options apply only to the optional Mouse for Intuos pro When USE TABLET ORIENTATION is selected moving the mouse toward the top of the tablet moves the screen cursor up In this mode the ent...

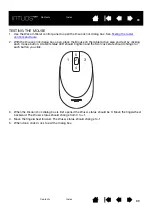
Страница 89: ...on the tablet active area and test by clicking each mouse button A tablet status LED should brighten and the SWITCHES state should change for each button you click 3 When the DIAGNOSTICS dialog box i...

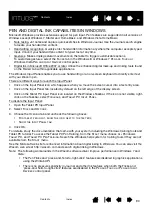
Страница 90: ...rea Click on the Input Panel tab located by default on the left edge of the display screen Click on the Tablet PC Input Panel icon located on the Windows Taskbar If the icon is not visible right click...

Страница 91: ...r visit Wacom s web site at https store wacom com us USA only In Europe call 49 0 180 500 03 75 or send an email to spareparts wacom eu Or visit http shop wacom eu You can also contact your local deal...

Страница 92: ...ed Asia Pacific Limited Warranty policy and product registration may be found online at http wacom asia To obtain technical support or Warranty service within Southeast Asia Oceania and Taiwan please...

Страница 93: ...r tablet on all displays or on one display at a time Available only on multiple monitor systems See working with Display Toggle Double click assist A function of the Wacom Tablet control panel that ma...

Страница 94: ...ame direction Pen input A method of controlling a computer using the pen tool on your Intuos Pro tablet Pen mode A pen input method of positioning the screen cursor Wherever you place your pen tool on...

Страница 95: ...is used to create natural looking pen brush and eraser strokes in applications that are tilt sensitive Touch A method of interacting with a computer using only your fingers on the Intuos Pro tablet M...

Страница 96: ...68 Display Toggle working with 47 Double click customizing 30 Driver downloads obtaining 80 Eraser feel advanced 31 customizing 31 Expert settings importing 84 Express View display 20 ExpressKeys cus...

Страница 97: ...6 Tablet area portion of 38 ExpressKeys customizing 33 testing 69 using 18 mode options changing 51 orientation configuring 12 preferences managing 53 testing 66 Touch Ring customizing 34 testing 69 u...

Страница 98: ...operation 54 battery charging 58 life 61 management 58 replacement 62 components 54 connection problems 74 establishing a connection 56 optimizing the connection 57 power management 58 power saving 60...

Отзывы: