background image

1

Introduction and Overview

The Wacom® DTU-710™ Interactive Pen Display combines an LCD monitor with a 
Wacom tablet.   
This gives you a direct point-and-draw-on-screen interface that can be used with a 
Personal Computer (PC) or Macintosh computer.  DTU-710's basic components include 
a Wacom tablet internally mounted behind a 17.0" diagonal TFT color LCD monitor, and 
Wacom's pen.


Your DTU-710 Interactive Pen Display offers a number of significant advantages over a 
standard monitor:

  Reduced power consumption

  Reduced heat generation

  Requires less work space

  Flicker free and easier on the eyes

  Integrated input and display

  Pressure-sensitive drawing directly on the display screen.

This manual describes how to install DTU-710 hardware and software.  It also describes 
how to use DTU-710 and the pen.  

Note that the computer treats the two parts of 

DTU-710 (the LCD monitor and the Wacom tablet)

 as separate pieces of hardware.  

Therefore, the installation process is completed in two stages.  First, you will install the 
LCD monitor portion of DTU-710.  In the second stage you will install DTU-710's tablet 
functionality.  
You can find information on using the Wacom Tablet Control Panel for customizing your 
tablet and pen settings in the online Help, located under the

 Help

 menu in the Wacom 

Tablet Control Panel.
The following are not included with this product:

  Information about your specific computer hardware

  Information about your operating system

  Information about application software.   

Please refer also to your computer hardware, operating system, or software application 
manuals.
To use the pressure-sensitivity of the pen with your favorite drawing application, refer to 
instructions in that application's manuals.

English

Содержание DTU-710

Страница 1: ...ribes how to use DTU 710 and the pen Note that the computer treats the two parts of DTU 710 the LCD monitor and the Wacom tablet as separate pieces of hardware Therefore the installation process is co...

Страница 2: ...ant In case of contact with skin eyes or mouth rinse immediately with running water for at least 15 minutes or more If contact is made with the eyes or mouth also consult a physician Prevent your chil...

Страница 3: ...710 or pen to malfunction In this case Wacom shall have no responsibility to repair or replace the product Do not use or store DTU 710 where Temperature changes are severe e g outdoors or inside a ve...

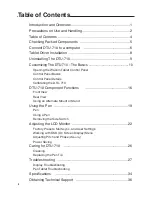
Страница 4: ...trol Panel Details Calibrating the DTU 710 DTU 710 Component Functions 16 Front View Rear View Using an Alternate Mount or Stand Using the Pen 19 Pen Using a Pen Removing the Side Switch Adjusting the...

Страница 5: ...710 main unit Pen with Pen Stand User s Guide Wacom Tablet CD Contains the driver soft ware Windows Macintosh AC Adaptor and Cable For DTU 710 only Do not use with other devices Please retain the pack...

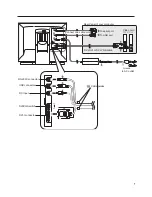
Страница 6: ...e using analog VGA mode you may also want to fine tune the display Please refer to Adjusting the LCD Monitor on page 22 for more information 9 To install the Wacom tablet software turn off your comput...

Страница 7: ...onnector DVI VGA switch to AC outlet Ground Rear Panel of your computer Connect one cable only RS 232C connector Cable guides USB connector DC input DVI DVI or DVI VGA cable To USB port To serial port...

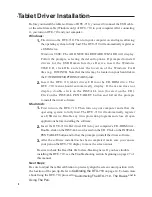
Страница 8: ...k on the INSTALL PEN TABLET button and follow the prompts to install the driver software Macintosh 1 First turn on the DTU 710 Then turn on your computer and allow the operating system to fully load T...

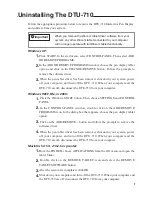
Страница 9: ...disconnect the DTU 710 from your computer Windows 98SE Me or 2000 1 Click the Windows START button Then choose SETTINGS and CONTROL PANEL 2 In the CONTROL PANEL window double click on the ADD REMOVE...

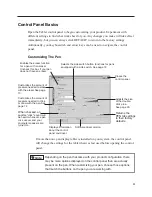
Страница 10: ...sed before opening the control panel Opening the Wacom Tablet Control Panel To open the control panel use the DTU 710 pen on the pen display tablet Windows Click on the Windows START button and choose...

Страница 11: ...ccurs and your computer speakers are turned on Displays information about the control panel and driver Software driver version Returns the PEN tab settings to their factory defaults Adjusts the size o...

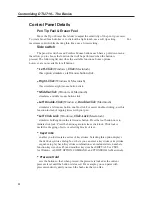
Страница 12: ...Click Macintosh simulates a left mouse button double click For easier double clicking use this function instead of tapping twice with your pen Left Click Lock Windows Click Lock Macintosh simulates ho...

Страница 13: ...t support the Erase function MODIFIER Enables you to assign modi er key s such as SHIFT or CTRL Many applications use modi er keys to constrain the size or placement of objects Selecting this option d...

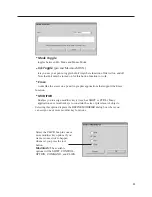
Страница 14: ...n the CALIBTRATE button to display the monitor calibration screen Cross hairs Adjustment pattern for phase and pitch See Adjusting Pitch and Phase VGA Only on page 26 for details Customizing DTU 710 T...

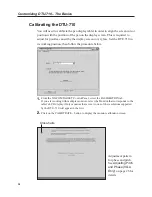
Страница 15: ...structions and additional options The calibration setting applies to all applications To calibrate two pen display tablets rst touch the pen to tablet 1 and open the control panel without touching the...

Страница 16: ...10 and the computer and a video signal is present Glows orange when no video signal is received by the DTU 710 e g Your computer is turned off starting up or has entered a power management mode in whi...

Страница 17: ...d in place Be sure to adjust the tilt angle of the stand to the low tilt position before packaging DTU 710 If you do not close the stand the notched mechanism may be damaged during transportation and...

Страница 18: ...mbly away from the body of DTU 710 4 Using the appropriate screws for your mounting platform rmly attach DTU 710 to the alternate mounting platform 5 Rettach the cabling If you will be using DTU 710 i...

Страница 19: ...eraser The eraser can be used as an eraser or assigned to another function depending on the application The tablet distinguishes the tip switch from the eraser switch Side Switch and Second Side Swit...

Страница 20: ...the pen tip across DTU 710 screen to move the object Erasing In supporting applications the pen s eraser works like the eraser on a pencil In text applications use the eraser to select text then lift...

Страница 21: ...he grip forward over the pen tip NEVER adjust the trimmer capacitor that became visible as it is ne tuned When using the pen without the side switch always istall the optional grip in order to protect...

Страница 22: ...isplay OSD function the settings are stored within DTU 710 for use the next time the unit receives a similar signal This is applicable to all display modes Working with OSD On Screen Display Menu To o...

Страница 23: ...VGA only Menu Position Reset Backlight Language Provides two options Use Auto Adjust to reset only the image parameters Use Recall to reset all screen options to the factory default Selecting the exi...

Страница 24: ...menu 2 Click on the CALIBRATE button to display the monitor calibration screen Adjustment pattern Adjusting the LCD Monitor Some computers and video cards may not allow the multi sync function to ful...

Страница 25: ...also adjust Pitch and Phase in the closing Windows display If the pitch is not calibrated vertical moire appears in the darkened area And if the phase is not calibrated the darkened area rif es Hint D...

Страница 26: ...not use paint thinner benzine alcohol or other organic solvents to clean DTU 710 casing or pen To clean the display screen use a soft dry cloth If necessary slightly moisten the cloth with water and...

Страница 27: ...properly connect the video cable Your computer may be in a power management mode Touch the pen tip to the display screen move the mouse or depress any key on your keyboard Verify that the graphics car...

Страница 28: ...ent refer to your operating system and application documentation Verify that the video cable and connector are fully connected Problem Hint The display ripples or ickers Open the OSD menu go to the RE...

Страница 29: ...ward FIRM Double clicking is dif cult Be sure you are quickly tapping the display screen twice in the same place on the pen display tablet s active area Using the side switch when equipped to double c...

Страница 30: ...is moved across the display Make sure the pen tablet driver has loaded properly by opening the tablet control panel If the driver did not load you will see an error message If an error message appears...

Страница 31: ...g out then log back in When the tablet driver loads it will create new preferences les with the factory defaults Note Do not manually remove the WACOM TABLET PREFPANE le from the main LIBRARY PREFEREN...

Страница 32: ...nd bring it back into proximity over an area of the pen display tablet that is mapped to a display area Windows 98SE or Me Your pen does not function inside a full screen DOS window You must use a mou...

Страница 33: ...See Uninstalling the DTU 710 on page 41 for details 2 Within your computer s OS X SYSTEM folder select highlight the LIBRARY folder Then access folder information by typing COMMAND i 3 Select and unlo...

Страница 34: ...CD Display Display a Si TFT active matrix LCD Screen size 17 inch Resolution 75Hz Max 1280x1024 pixels SXGA 1024x768 pixels XGA 800x600 pixels SVGA 640x480 pixels VGA Pixel pitch 0 264 W x 0 264 H mm...

Страница 35: ...oz Side switch type Rocker switch Pen Accessories Extra nib PSI A021 Pen holder PST A026 Tablet Reading technology Electromagnetic reasonance method Active area 337 9 x 270 3mm Resolution 100 lpmm 0 0...

Страница 36: ...solution offered You can also check the product FAQs Frequently Asked Questions on the Wacom web site Asia Tel 81 3 3371 1595 English Fax 81 3 3371 1468 English Email asia paci c wacom co jp Sales an...

Страница 37: ...include such changes in this manual TRADEMARKS WACOM is a registered trademark of WACOM Company Limited Macintosh is a registered trademarks of Apple Computer Inc regis tered in the U S and other cou...

Отзывы: