


Disassembly/Assembly Procedures
PG Repair
wc_tx000608gb.fm
46
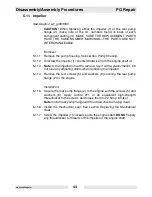
5.12 Replacing the Mechanical Seal
See Graphic: wc_gr003500
Removal:
5.12.1
Remove the impeller (1). See section
Impeller.
Note:
Do not lose any adjusting shims (7).
5.12.2
Remove the mechanical seal spring (8) and the carbon face (9) from
the engine shaft.
5.12.3
Remove the mechanical seal ceramic face (10) and L-ring (11) from
the rear pump flange.
Installation:
5.12.4
Clean the engine shaft and remove any rust. Clean the contact surface
of the mechanical seal ceramic and carbon faces with a clean cloth.
DO NOT lubricate the seal faces.
5.12.5
Place the ceramic face (10) in the L-ring (11) and install it in the pump
flange.
5.12.6
Carefully place the carbon face (9) and the seal spring (8) on the
engine shaft.
5.12.7
Install the impeller to the engine shaft.
Содержание PG 2
Страница 1: ...www wackergroup com Pump PG 2 PG 2A PG 3 PG 3A REPAIR MANUAL 0163172en 001 0806 0 1 6 3 1 7 2 E N...
Страница 2: ......
Страница 11: ...PG Pumps Safety Information wc_si000180gb fm 7 1 4 Label Locations w c _ g r 0 0 0 8 3 3...
Страница 39: ...PG Repair Disassembly Assembly Procedures wc_tx000608gb fm 35 4 9 10 2 3 1 6 5 7 wc_gr003495 8...
Страница 47: ...PG Repair Disassembly Assembly Procedures wc_tx000608gb fm 43 8 11 12 9 7 10 6 5 wc_gr003499...
Страница 49: ...PG Repair Disassembly Assembly Procedures wc_tx000608gb fm 45 wc_gr003500 PE 50 E 50 1 7 8 9 10 11 4 2 3 6 5 3...
Страница 51: ...PG Repair Disassembly Assembly Procedures wc_tx000608gb fm 47 wc_gr003500 PE 50 E 50 1 7 8 9 10 11 4 2 3 6 5 3...
Страница 53: ...PG Repair Disassembly Assembly Procedures wc_tx000608gb fm 49 1 wc_gr003501...
Страница 54: ...Disassembly Assembly Procedures PG Repair wc_tx000608gb fm 50...
Страница 59: ......


