

Overview
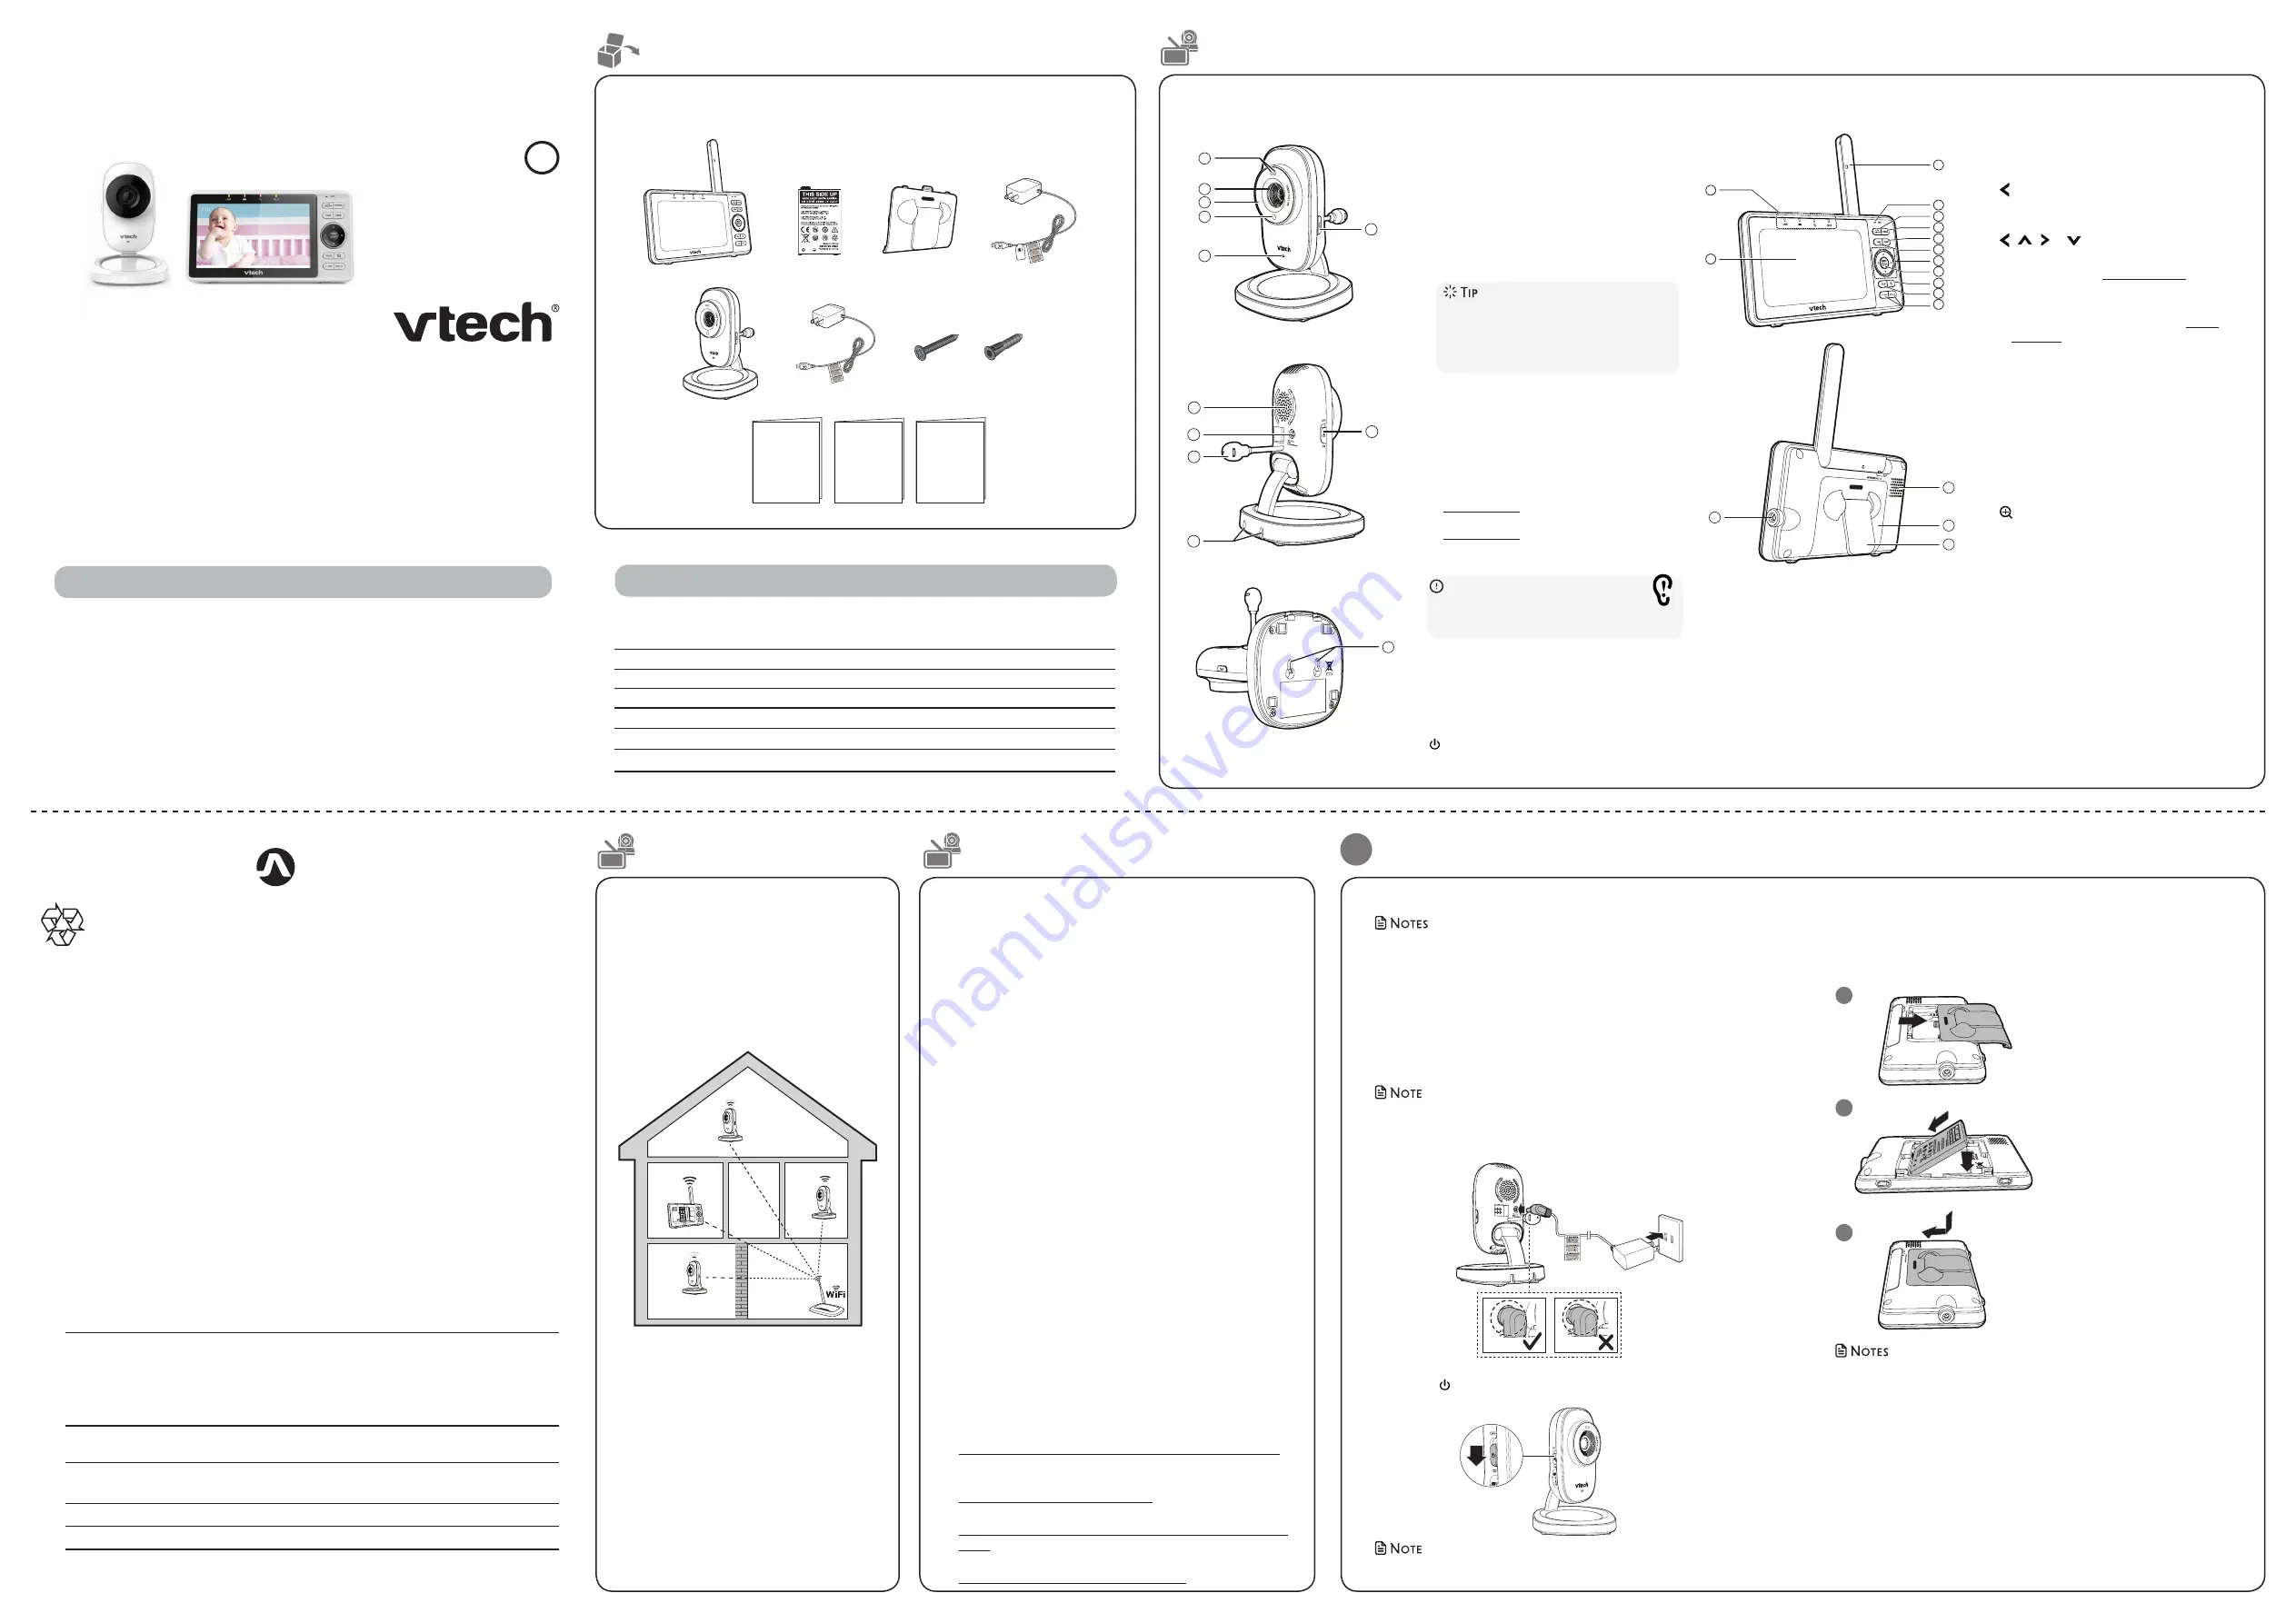
What’s in the box
RM5752
RM5752-2
Wi-Fi Full HD Video Monitor
Go to
to register your product for
enhanced warranty support and
the latest VTech product news.
BC
Installation guide
What does HD Video Monitor do?
VTech Wi-Fi HD Video Monitor allows you to stay close to your baby when you are on the move
or away.
This monitor is Wi-Fi enabled, which uses your home wireless network to stream live video and
audio through the HD camera unit and 5-inch touch screen parent unit. It allows you to maintain
a constant connection to your baby.
You can also monitor from your smartphone and mobile tablet.
VTech Wi-Fi HD Video Monitor uses MyVTech Baby app to let you instantly see and hear what’s
happening with your baby from anywhere in the world.
The app can be downloaded from the App Store or the Google Play
TM
Store, directly from your
smartphone or mobile tablet.
Congratulations
on purchasing your new VTech product. Before using this HD video monitor, please read
Important safety instructions
.
For support, shopping, and everything new at VTech, visit our website at
In Canada, visit
.
How the system works
1
Connect and charge the battery
Protect your privacy and
online security
Frequency
Camera unit: 2412 - 2462 MHz
Channels
11
LCD
5’’ C
olor L
CD
(IPS 480x272 pixels
)
Nominal effective range
Maximum power allowed by FCC and IC. Actual operating range may
vary according to environmental conditions at the time of use.
Pow
er requir
ement
1.
Par
ent unit
pow
er adap
ter:
Output: 5V DC 1.2A
2.
Par
ent unit: 3.7
V Li-polymer
batt
ery is built
-in.
Camera unit
pow
er adap
ter:
Output: 5V DC 1500mA
Go
og
le P
lay
and t
he
Go
og
le P
lay
lo
go a
re t
rad
em
ark
s of G
oo
gle L
LC
.
Ap
p Sto
re
is a t
rad
em
ark o
f Ap
ple I
nc.
, re
gis
te
re
d in t
he U
.S. a
nd o
th
er c
ou
ntr
ie
s.
Speci
fic
atio
ns a
re s
ub
jec
t to
cha
nge w
itho
ut no
tic
e.
© 2
018
VTe
ch
Com
mun
ica
tion
s, I
nc.
All r
ig
hts r
ese
rve
d. 1
2/1
8. R
M575
2_
IG
_V
1.0
Doc
um
en
t o
rd
er n
um
be
r: 9
1-0
11404
-0
10
-10
0
Technical
specifica
tions
Connect and charge the parent unit battery
Install the parent unit battery
The parent unit runs on rechargeable battery or AC power. To continuously
monitor your baby, keep the parent unit connected to AC power. With the
battery alone, the parent unit can cordlessly run for a short only.
• Use only the battery supplied with this product.
• If the parent unit will not be used for a long time, disconnect and remove the
battery to prevent possible leakage.
Replace the battery
To replace the battery, press down on the battery compartment cover and
pull it out, then follow the steps above to install the battery.
x 2
x 2
Requirements
Make sure your system includes the following components, and they meet the minimum
requirement.
Network
Wi-Fi
Wi-Fi router
2.4GHz IEEE 802.11 b/g/n
Internet connection
At least 1.0 Mbps upload bandwidth per camera
micro SD card
Support Class 4 or higher, with storage capacity up to 32GB
Parent unit
Connect up to 4 camera units
MyVTech Baby
mobile app
Connect up to 10 camera units
Installation guide
Important safety
instructions
Quick start guide
Your HD video monitor package contains the following items. Save your sales receipt and
original packaging in the event warranty service is necessary.
The Wi-Fi router (not included) provides Internet
connectivity to your HD video monitor system.
It serves as a communicating channel between
your camera unit and parent unit, allowing you
to monitor and/or control your camera unit
wherever you are.
VTech cares about your privacy and peace of mind. That’s why we’ve
put together a list of industry-recommended best practices to help
keep your wireless connection private and your devices protected
when online. We recommend you carefully review and consider
complying with the following tips.
Ensure your wireless connection is secure.
• Before installing a device, ensure your router’s wireless signal is
encrypted by selecting the “WPA2-PSK with AES” setting in your
router’s wireless security menu.
Change default settings.
• Change your wireless router’s default wireless network name
(SSID) to something unique.
• Change default passwords to unique, strong passwords. A strong
password:
- Is at least 10 characters long.
- Is complex.
- Does not contain dictionary words or personal information.
- Contains a mix of uppercase letters, lowercase letters, special
characters and numbers.
Keep your devices up to date.
• Download security patches from manufacturers as soon as they
become available. This will ensure you always have the latest
security updates.
• If the feature is available, enable automatic updates for future
releases.
Disable Universal Plug and Play (UPnP) on your router.
• UPnP enabled on a router can limit the effectiveness of your
firewall by allowing other network devices to open inbound
ports without any intervention or approval from you. A virus or
other malware program could use this function to compromise
security for the entire network.
For more information on wireless connections and protecting your
data, please review the following resources from industry experts:
1. Federal Communications Commission: Wireless Connections and
Bluetooth Security Tips –
www.fcc.gov/consumers/guides/how-protect-yourself-online
.
2. U.S. Department of Homeland Security: Before You Connect a
New Computer to the Internet –
www.us-cert.gov/ncas/tips/ST15-003
.
3. Federal Trade Commission: Using IP Cameras Safely –
https://www.consumer.ftc.gov/articles/0382-using-ip-cameras-
safely
.
4. Wi-Fi Alliance: Discover Wi-Fi Security –
http://www.wi-fi.org/discover-wi-fi/security
.
Connect the baby monitor
• Use only the power adapters supplied with this product.
• Make sure the parent unit and the camera unit are not connected to the switch
controlled electric outlets.
• Connect the power adapters in a vertical or floor mount position only. The adapters’
prongs are not designed to hold the weight of the parent unit and the camera
unit, so do not connect them to any ceiling, under-the-table, or cabinet outlets.
Otherwise, the adapters may not properly connect to the outlets.
• Make sure the parent unit, the camera unit and the power adapter cords are out of
reach of children.
Connect the camera unit
• To maintain compliance with the FCC’s RF exposure guidelines, place the camera
unit at least 20cm from nearby persons.
1. Connect the power adapter to the camera unit and a power supply.
2. Slide the
ON/OFF
switch leftward to power on your camera.
• To turn off the HD camera, slide the
ON/OFF
switch to
OFF
.
B
B
A
C ad
ap
te
r
fo
r
ca
m
er
a
Camera unit overview
11
12
13
14
15
16
17
7
2
3
4
5
1
6
10
9
8
1
LED indicators
• Flash orange and blue alternately when the
camera unit is in pairing mode.
• Orange is steady on when the camera unit is
connecting to the Internet.
• Orange and blue are steady on when the
camera unit is idle.
• Flash orange and blue slowly during video
streaming.
• Flash orange and blue quickly and alternately
when the camera unit is updating its firmware.
• You can turn off the camera unit’s LEDs if
you find them too bright. Read the
LED
online indicator
section under
Camera
settings
in your parent unit’s app manual
for instructions.
2
Camera lens
3
Infrared LEDs
• Allow you to see clearly in a dark surrounding.
4
Light sensor
5
Microphone
6
PAIR button
• Press and hold for 3 seconds to enter pairing
mode.
• Press and hold for 20 seconds to reset the
camera settings to factory default.
7
Speaker
Caution
•
For hearing protection, do not stand close
to the HD camera when the camera’s alarm goes
off. The loud alarm may damage your hearing.
8
Power jack
9
Wall mount holes for upright mounting
10
Temperature sensor
11
Wall mount holes for lateral mounting
12
ON/OFF switch
Parent unit overview
1
LED light indicators
2
LCD display
3
Antenna
4
Microphone
5
LCD ON/OFF
6
Speaker
7
VIEW
•
Press to select monitoring mode if there
are two or more camera units.
1
6
12
2
4
8
9
10
11
5
3
7
1
6
12
2
4
8
9
10
11
5
3
7
1
6
12
2
4
8
9
10
11
5
3
7
11
12
13
14
15
16
17
7
2
3
4
5
1
6
10
9
8
8
CAM
•
Press to switch to another camera if
there are two or more camera units.
9
Arrow keys
• While in a menu, press to return to the
main menu or idle screen.
,
,
or
• While viewing images in
Single
CAM
or
Patrol
mode, press and hold to
pan the baby unit camera leftward,
upward, rightward or downward.
• While viewing zoomed image, press
and hold to move the zoomed image
leftward, upward, rightward or
downward.
• While in
Split
mode, press to move
the selection box leftward, upward,
rightward or downward.
10
MENU/SELECT
• Press to enter the menu.
• While in a menu, press to choose an
item, or save a setting.
11
Zoom
12
TALK
13
+ / VOL / -
• Press to increase or decrease the
speaker volume.
14
Power jack
15
Speaker
16
Battery compartment cover
17
Stand
1
2
3
Press down on the battery
compartment cover to pull it out.
Make sure the label
THIS SIDE
UP
is facing up while inserting
the battery.


