background image

52

ET635 User Manual


Directories

 -

Enter the phone number in the text field of 

Number

 (Fig. 3).

 -

Select "Fixed" from the drop-down menu of 

Number Type

 (Fig. 3).


-

Optional:

  Select a contact type and an outgoing identity from drop-down lists (Fig. 3).

 -

Click 

Add Sub

 (Fig. 3).


◦  John Miller's entry has a SIP number and a private number. In this example, his cell phone number will 

be added as a third number.

 -

 Click 

 in the line containing John Miller's name. The data is shown in th "Add or Edit Entry" area.

 -

Enter the phone number in the text field of "Number".

 -

Select the number type.

 -  

Optional:

  Select a contact type and an outgoing identity from the respective drop-down list.

 -

Click 

Add Sub

.

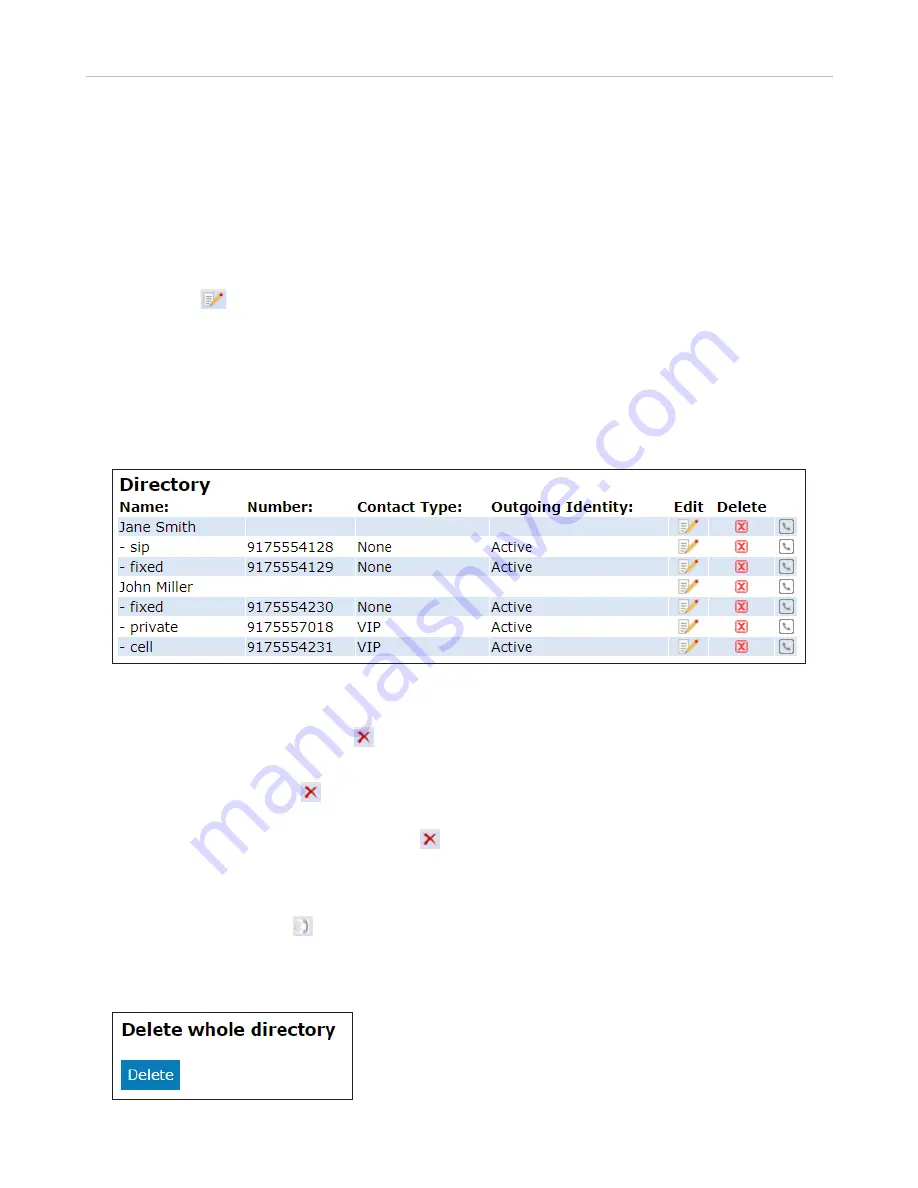
The directory now contains Jane Smith's landline number and John Miller's mobile phone number (Fig. 4).

Fig. 4

Deleting entry on web interface  

• 

 Entry with one phone number. Click   in the entry's lines to delete the entry.

• 

Entry with more than one phone number.


◦  Deleting the entry. Click   in the line of the master record to delete the name and all associated phone 

numbers.


◦  Deleting one of the phone numbers. Click   in the line of a phone number subentry to delete that 

subentry, but keeping the master record and all other subentries.

Dialing from phone directory  

To dial, click the phone symbol   on the right side of the line with the phone number.

Deleting whole directory  

Deletes the entire directory irretrievably!

Содержание ErisTerminal ET635

Страница 1: ...ErisTerminal SIP Deskset ET635 User Guide ...

Страница 2: ...ation are unsuccessful 20 Correcting the clock 20 Getting to know your phone 21 At a glance 21 LED indicators 23 Call indicator 23 Function key LEDs 23 Hard keys 24 Context sensitive programmable function keys F1 F4 24 Navigation confirmation and cancel keys 24 Page toggle key 25 Freely programmable SmartLabel function keys P1 P32 with LEDs 25 Alphanumeric Keypad 26 Input modes and navigation 26 E...

Страница 3: ...utgoing identity 46 Group 46 Ringtones 46 Adding Editing Entries on the Phone 47 Adding new entry manually 47 Adding new entry from call list 47 Adding current caller 48 Sorting entries 48 Editing existing entry 48 Deleting an entry 49 Adding editing entries on the web interface 50 Adding new entry 50 Editing an entry 51 Deleting entry on web interface 52 Dialing from phone directory 52 Deleting w...

Страница 4: ...s 58 Call completion 58 Number guessing auto completion 59 Accepting calls 60 Using different audio devices 60 Automatically accepting calls 60 Call pick up from another extension 60 Call waiting 61 Active calls 62 Hold 62 One call on hold 62 Holding multiple calls 63 Conference 64 Initiating a conference 64 Conference screen navigation 64 Transferring calls 65 Attended transfer 65 Blind transfer ...

Страница 5: ...all pick up on ET6 expansion module 81 Example 3 Speed dialing 82 Example 4 Changing setting of context sensitive key 83 Display option for SmartLabel keys 84 Settings on the phone 84 Display mode settings 84 Timer setting for returning display mode to default 86 Timer setting for returning label page to page 1 87 Settings on the web interface 88 Customizing the phone settings 89 Identities accoun...

Страница 6: ...03 Troubleshooting 104 Reboot 104 Hard reboot 104 Reset to factory values 104 Appendix 1 Display Symbols and Icons 105 Symbols found in the function key line 105 SmartLabel function symbols 107 Display indications 109 Appendix 2 Status Messages 111 Appendix 3 Wall Mounting 112 Appendix 4 Programmable Functions 114 Freely programmable functions 114 Key Events 117 ...

Страница 7: ...an also visit our website at businessphones vtech com or call 1 888 370 2006 Please note the serial number of your product which can be found on the back of the deskset Save your sales receipt and original packaging in case it is necessary to return your telephone for warranty service This user guide contains detailed instructions for using your ET635 SIP deskset with software version 8 10 1 x Ope...

Страница 8: ...ent or shower 7 Do not place this product on an unstable table shelf stand or other unstable surfaces 8 Slots and openings in the back or bottom of the telephone base and handset are provided for ventilation To protect them from overheating these openings must not be blocked by placing the product on a soft surface such as a bed sofa or rug This product should never be placed near or over a radiat...

Страница 9: ...ed with the closing of any electrical circuit The user should not plug the phone into a power outlet if the phone is located in an environment containing concentrations of flammable or flame supporting gases unless there is adequate ventilation A spark in such an environment could create a fire or explosion Such environments might include medical use of oxygen without adequate ventilation industri...

Страница 10: ...oîtier de l appareil est doté de fentes et d ouvertures d aération situées à l arrière ou en dessous Afin d empêcher la surchauffe ces ouvertures ne doivent pas être obstruées en plaçant l appareil sur un lit divan tapis ou autre surface similaires Ne placez pas cet appareil à proximité d un élément de chauffage ni d une plinthe électrique De plus ne l installez pas dans une unité murale ou un cab...

Страница 11: ...t pas brancher le téléphone dans une prise de courant et ne devrait pas déposer le combiné chargé sur le socle si le téléphone se trouve dans un environnement ou la concentration de gaz inflammables sans ventilation adéquate Une étincelle dans ces endroits pourrait provoquer un incendie ou une explosion Ces environnements pourraient être l utilisation médicale de l oxygène sans ventilation adéquat...

Страница 12: ... equipment Industry Canada This Class A digital apparatus complies with Canadian requirements CAN ICES 3 A NMB 3 A Cet appareil numérique de la classe A est conforme à la norme NMB 003 du Canada This device complies with Industry Canada licence exempt RSS standard s Operation is subject to the following two conditions 1 this device may not cause harmful interference and 2 this device must accept a...

Страница 13: ...tart Guide Attaching and detaching the footstand The footstand can be attached at two different angles 46 and 28 Note Before attaching the footstand to the phone plug the long end of the handset cord into the connector labelled on the back of the phone and place the cord in the cable guide 1 Place the top of the grooves on the footstand below the slideguides on the back of the phone ...

Страница 14: ...dle If you are going to mount the phone on a wall we recommend that you rotate the tab 180 After rotation the tip of the tab will protrude slightly above the edge of the cradle The small rectangular hole in the receiver casing fits perfectly over the now protruding tip holding the receiver safely in place in the upright position on the wall Fig 1 Fig 2 Fig 3 1 Slide the plastic tab from the cradle...

Страница 15: ...can be operated with Power over Ethernet PoE provided via the network cable or if PoE is not avaible in your network with the separately available 5V DC power adapter model number VSP PWR2000 EHS 2 3 2 3 1 2 2 3 2 3 1 If no PoE available 2 Not included in delivery 3 Optional ...

Страница 16: ...sets If you want to use a wired headset connect it to the RJ audio jack labeled Note If both a wired and a wireless headset are connected to the phone incoming calls will go to the wireless headset Wireless headsets Connecting the base station of your headset via the VTech EHS Adapter Please refer to the Quick Start Guide of the VTech EHS Advanced that came with the device Please refer to the manu...

Страница 17: ...r name authentication name and outbound proxy may also be required These are settings that can only be configured on the web interface of the phone after it has been successfully registered If your provider or your network provides a mailbox account that setting is also configured on the web interface For more information see Identities accounts on page 89 Initialization VTech phones are plug and ...

Страница 18: ...he selected phone language is spoken If you have selected English all time zones are shown Fig 2 Press to save the selected time zone indicated by the white bar Fig 3 3 Next you will be prompted to select the tone scheme of a country This affects the dial tone you hear when you pick up the receiver Different countries use different dial tones Fig 4 Press or to move up or down the list one item at ...

Страница 19: ...ccessful registration you will see the identity symbol and the registered account identity in the identity line underneath the date time bar Note If you see the account on the display preceded by or and the phone is not working the server may be down either for servicing or due to a malfunction The registration and initialization should be completed as soon as the server is up and running again Yo...

Страница 20: ... information Note A number of IP telephony service providers and a number of SIP PBXs require settings that are different from VTech s standard factory settings Do not change the standard configuration unless you know what you are doing Expert help may be required Correcting the clock The phone receives the time and date from your NTP time server If the time and or date on the display are incorrec...

Страница 21: ... phone directory Call lists missed received dialled calls Forwarding all calls turning CFwd on off Status information call forwarding active passwords not set missed calls etc or if no status info to show URL of the phone s web interface and VTech s web address MWI key with LED Call LED Blinking fast Incoming call Steady light Busy or missed call Blinking slowly Call on hold Page key for SmartLabe...

Страница 22: ...numerals lower case upper case Press briefly to type On idle screen Press for 3 seconds to lock unlock the keypad Default setting Line Fast blinking LED Incoming call Press key or to accept Steadily lit LED In call Slow blinking LED Call on hold Freely programmable SmartLabel function keys P1 P32 with LEDs Navigation keys Confirming saving actions input and returning to previous screen Accepting c...

Страница 23: ... The factory setting is red LED and line The LEDs of a line key will blink rapidly when a call is ringing on the line glow steadily when there is an ongoing call on the line blink slowly when a call is on hold on the line be off when the line is free When other functions are mapped onto the keys the LEDs may glow or blink For example When the extension function has been mapped onto a key and monit...

Страница 24: ...een press to open list of received calls In text fields press to move the cursor to the left one character at a time On idle screen press to open the list of missed calls and simultaneously turn off the missed call LED In text fields press to move the cursor to the right one character at a time On idle screen Redial view list of dialed calls Press to accept calls on speakerphone and in headset mod...

Страница 25: ... mode Dialing numbers on speakerphone Accepting calls on speakersphone Toggling between headset and handset modes Note Handset mode overrides headset mode When the handset is picked up the headset symbol in the status line will be replaced by the handset symbol indicating that you can now use only the handset for the call To return audio to the headset press again The headset symbol will reappear ...

Страница 26: ...Upper case letters Delete character to the left of the cursor Current input mode Status info Next input mode Changing input mode Fig 2 Press any key on the alphanumeric keypad or pick up the handset to open the Enter Number screen When dialing a number Fig 1 the input mode is always numerals When editing directory entries Fig 2 and identities the current input mode is indicated in the line underne...

Страница 27: ...r case letter mode press the 2 key once to type an a twice to type a b and three times to type a c Letters with accents and umlauts In input modes lower and upper case letters press the alphanumeric key with the basic form of the respective letter as many times as necessary Pause briefly after each letter Available letters with accents and umlauts depend on the phone s language setting Example If ...

Страница 28: ...ill be shown Some of the status messages you may see in idle mode are The text Missed and the total number of missed calls since the last time you turned off the misssed call indication the text in the info bar as well as the call LED The missed calls will remain in your missed call list however The texts Forward All Forward when busy or Forward after timeout and the phone number calls will be for...

Страница 29: ...rver is down Note Identities can be deactivated without removing the registration settings by changing their status to inactive on the phone s web interface Inactive identities are not displayed on the idle screen They cannot be called or selected as the outgoing identity To deactivate the identity open the phone s web interface Identity 1 12 1 Change the Identity active setting to off 2 Click Re ...

Страница 30: ...ow available on this key again If you have mapped the Status messages function onto the key the key will remain blank until a new status message becomes available or until a reboot when all current status messages will be displayed anew When the phone is active The display will inform you of any activity the phone is engaged in see Fig 1 on page 28 This information is presented in the form of text...

Страница 31: ...ch label page is on screen or Press to change the page from 1 to 2 3 and 4 and back to 1 Fig 4 The default is the display will return to the default after 10 seconds The settings can be adjusted on the phone s web interface See Configuring the function keys on page 75 for more information Sensor Page key Fig 1 Fig 2 Fig 3 The LED of the key associated with the label of the on screen page will reac...

Страница 32: ...own on the function key page of the phone s web interface below the phone s function keys and above the Apply button Their settings are stored on the phone not on the expansion module For more information see Example 2 Extension monitoring and call pick up on ET6 expansion module on page 81 Fig 6 Function keys of connected ET6 expansion module Settings A comparatively small number of settings can ...

Страница 33: ...olume Settings 5 Hide own outgoing ID 1 VLAN ID 4 Display 3 Incoming calls 2 VLAN Priority 1 Primary Display 1 Call Waiting 4 WLAN 1 Backlight on activity 2 Auto Answer 1 On off 2 Backlight when idle 3 Reject Anonymous 2 Scan WLAN 3 SmartLabel Options 4 Silent Mode 3 Manual Setup 2 Expansion modules 2 4 Speed dial 5 Advanced 1 Backlight on activity 1 802 1X 2 Backlight when idle 2 Hardware 3 Contr...

Страница 34: ...tivity 1 Call Waiting 2 Backlight when idle 2 Auto Answer 3 SmartLabel Options 3 Reject Anonymous 2 Expansion modules 2 4 Silent Mode 1 Backlight on activity 4 Speed Dial 2 Backlight when idle 3 Contrast 4 Appearance 5 Fkeys 1 SmartLabel Keys 2 4 Expansion Keys 1 3 2 6 General 1 Quick Dial Contacts 1 Only if phone model has a built in adapter for wireless technology 2 Only when an expansion module...

Страница 35: ...ys on page 84 Adjusting the backlight on the phone s display Intensity of backlight The setting adjusts the intensity of the backlight for the phone display 1 Press 2 With Preferences selected press 3 Press to select Display and press 4 If you have an expansion module connected to the phone press to select Primary Display 5 Press to select Backlight on activity or Backlight when idle and press Fig...

Страница 36: ...ting the backlight on the phone s display on page 35 Appearance Layout The available options are line or tile layout Line layout is the default The layout is adjusted separately for each module and only connected modules appear in the menu If there is more than one the first ET6 in the daisy chain is listed as Expansion Module 1 the second one as Expansion Module 2 and the third one as Expansion M...

Страница 37: ... and press 5 Press to select Appearance and press 6 Press to select Font size Line Layout or Font size Tile Layout respectively and press Fig 1 7 Use the alphanumeric keypad to enter the font size Fig 2 and 3 Press the function key underneath to delete the character to the left of the cursor if you need to correct your input Fig 3 Fig 4 8 Press to save the setting and to return to the Appearance m...

Страница 38: ... menu Fig 1 Contrast The setting is applied to all ET6 expansion modules connected to the phone 1 Press 2 With Preferences selected press 3 Press to select Display and press 4 Press to select Expansion Modules and press 5 Press to select Contrast Fig 1 and press 6 Press the right or left arrow on the navigation key or the function key underneath or in the function key line to decrease or increase ...

Страница 39: ...ssword you will not be able to return the phone and the web interface from user mode to administrator mode many settings will be inaccessible If you do not set the HTTP user name and HTTP password you make it easier for experienced hackers to break into your system Without the HTTP user name and HTTP password you cannot open the phone s web interface You can set and change the administrator and HT...

Страница 40: ...lank User name Valid values are character strings of letters and numerals e g john or jh24 Password Text string Opening the web interface 1 Look up the phone s IP address Press if available or Information Help 2 Open a web browser on your PC Enter the IP address preceded by http or https in the address bar for example http 192 168 10 115 and press ENTER The home screen opens ...

Страница 41: ...t visible click on its tab The font weight of the characters on the active tab is bold Only one tab can be active at a time Note Any changes you make will not take effect until you click on Apply Changes will be lost if you open another page of the web interface or if you close the web interface without first clicking on Apply After you have clicked on Apply in some cases the Save button will appe...

Страница 42: ...g manual phone settings In some cases settings activated on the web interface override manual settings on the phone If a setting you have made on the phone does not appear to take effect look for a conflicting setting on the web interface or check with your administrator ...

Страница 43: ... security reasons Note Do not forget the new password without it a TFTP reset to factory values is necessary to return the phone to administrator mode If your phone is administered centrally user mode may be the rule Please check with your administrator User mode on the phone The Network menu and various other settings are inaccessible in user mode See Settings on page 32 To switch to administrato...

Страница 44: ...ble in user mode but the settings normally found on the Advanced Settings page are not In user mode the two pages look like this Fig 1 Fig 2 To return the phone and its web interface to administrator mode open the Advanced Settings page enter the administrator password in Administrator Login and click Apply Fig 2 The default password is 0000 4 x zero In administrator mode the two pages look like t...

Страница 45: ...ple associated phone numbers are possible If you do not enter a first and or last name and or nickname the phone number will appear under both Name and Number Entry with one phone number Entry with several associated phone numbers Name area Same data for the master record and all subentries Info area Data can be different for each associated phone number If subentry textfields are blank the data f...

Страница 46: ... to use a specific VoIP provider for these calls Note To use an outgoing identity specified in the directory you must dial the number from the directory If you simply type it on the keypad the current outgoing identity as indicated on the display will be used Group The available group types are Friends Family Work Colleagues or None The default setting is none You can assign a distinct ringtone to...

Страница 47: ...l If you don t enter either one the entry will be listed under the phone number You can add a first and last name later by editing the entry on the phone or on the web interface 6 Press to add the caller to the directory See Editing existing entry on page 48 for details about how to add a name phone type group etc to the entry Adding new entry from call list For further information about call list...

Страница 48: ...t Name Last Name organization etc and press to sort Editing existing entry 1 Press to open the phone s directory 2 Selecting an entry Press to scroll to the entry or enter the first letter of the name 3 Press The Details screen for the entry will be displayed 4 Editing a detail a Press and to select a detail Depending on the detail b In some cases you will see the prompt screen where you can enter...

Страница 49: ...g 2 Editing phone numbers associated with entry Note If there is more than one phone number associated with the entry and you want to delete only one of them press Fig 2 Select the number you want to delete with Fig 3 and press Fig 3 Selecting Fig 4 Deleting one phone associated with entry 3 Press Fig 1 and 4 You will be asked Are you sure 4 Press to delete the entry or phone number or press to ca...

Страница 50: ...at number initiated from the phone book will show that identity on the callee s phone Info area The data entered in the textfields will be displayed when the entry is opened on the phone The data can be used to sort entries by group name organization etc and can be edited on the phone Group drop down menu Available types are Friends Family Colleagues or Work You can assign a distinct ringtone to e...

Страница 51: ...of the date of birth and the data in the info area applicable to the master record Click in a phone number s line if you want to edit the subentry s data phone number number contact type outgoing identity and any info area data applicable to this subentry only Make changes as necessary and click Change Adding additional phone number subentry for a name Jane Smith s entry has only one phone number ...

Страница 52: ...ype and an outgoing identity from the respective drop down list Click Add Sub The directory now contains Jane Smith s landline number and John Miller s mobile phone number Fig 4 Fig 4 Deleting entry on web interface Entry with one phone number Click in the entry s lines to delete the entry Entry with more than one phone number Deleting the entry Click in the line of the master record to delete the...

Страница 53: ... page Select the CSV file from the storage medium Import files must be in UTF 8 unicode format in order to display special characters properly A CSV file has entries separated by a comma without spaces between the comma and the preceding and following entry It could look like the following example If the CSV file has a header line you can select Skip first line Click the Load button 2125551234 non...

Страница 54: ...ab LDAP section and click Apply and click Save LDAP search on the phone Enter the first letter of the name you are searching for Type more letters if the name shown isn t the right one or scroll through the list Press to dial Contacts If you want to use an external contacts list the Contact list and Contact list URI settings are mandatory Publish presence is optional when enabled the phone sends o...

Страница 55: ... User Manual Directories To dial a contact on the phone enter the first letter of the name you are searching for Type more letters if the name shown isn t the right one or scroll through the list Press to dial ...

Страница 56: ...l characters Selecting identity for current outgoing call See Identities accounts on page 89 on how to configure identities If more than one identity is shown on the display the one on the white bar with the white and green rings around the green circle is the outgoing identity for the call and the number name that will show on the callee s phone Use the up or down arrow on the navigation key to s...

Страница 57: ...story missed received dialed calls 1 Press dialed calls received calls or missed calls to open the respective call list 2 Use on the navigation key to select a call 3 Press to dial the number Calling number from phone directory 1 Press to open the phone s directory 2 Use to select a name or enter the first letter s of the name on the alphanumeric keypad 3 Press to dial the number Calling number fr...

Страница 58: ...ncy numbers Several numbers 911 112 110 999 have been preconfigured On an unlocked keyboard Enter the number and press to dial On a locked keyboard Enter the number The phone dials the number as soon as you have entered all the digits of one of the programmed emergency numbers Call completion Note This function depends on whether it is available in your network or not On VTech phones call completi...

Страница 59: ...ss to dial Press to turn off call completion for this call Number guessing auto completion Note The default setting for Number guessing is off To be able to use it open the phone s web interface to the Advanced Settings page Behavior tab Phone Behavior section change the setting to on and enter the minimum number of characters that must be entered before number guessing will start When number gues...

Страница 60: ... extensions whose calls you want to pick up on your own extension must permit this function It is possible but not required to restrict the permission for monitoring to certain users or groups of users Settings See Example 1 Extension monitoring and call pick up on page 80 Each extension to be monitored must be programmed onto one of the freely programmable function keys with LEDs on the phone or ...

Страница 61: ...99 157 x 7899 Fig 2 indicates that 7899 is connected to 157 and that 157 is the caller 7899 the callee Press to close the Calls screen and return to the idle screen Call waiting When you are in a call another call coming in will be announced visually by the flashing call LED and Call Waiting displayed on the screen Fig 2 It will also be announced acoustically by a double beep If you want to switch...

Страница 62: ...re is more than one call waiting Fig 5 and 6 press the keys and respectively to bring them on screen and to return to the connected call If you do not wish to accept the waiting call you can ignore the announcement If you have set call forwarding when busy the call will be transferred to that phone reject the incoming call by putting the Call waiting screen on the display and pressing The caller h...

Страница 63: ... on hold the symbol is available in the function key line You can switch back and forth between the active call and any call on hold Up to 12 simultaneous calls are possible if supported by the PBX In Fig 1 and 2 the phone is in one active call with a second call on hold Press the function key underneath to show the call not currently on screen Fig 1 Fig 2 In Fig 3 and 4 there are two calls are on...

Страница 64: ...ers of the other participants are shown on screen Fig 1 3 Fig 1 shows the conference screen i e all of your conference partners while Fig 2 and 3 show the screens for the individual participants Fig 1 Fig 2 Fig 3 Selecting individual participants On the conference screen Fig 1 press to select the first participant of the conference press again to select the next participant Fig 2 When viewing the ...

Страница 65: ...l is ringing on your phone you can transfer it to a third party without answering it first blind transfer only Attended transfer With a single call on the phone 1 Put the call on hold In our example the caller on hold is 7781 2 Dial the number you want to transfer the call to and announce the call Fig 1 3 If the third party wants to accept the call press The holding 7781 screen appears Fig 2 4 Pre...

Страница 66: ...ind transfer of active call 1 With a call on the line Fig 1 press The dial screen will appear Fig 1 Fig 2 2 Dial the number Fig 2 and press You may briefly see the message Disconnected followed by the caller s name number indicating that the transfer was completed If a call is waiting Fig 3 you must reject the call waiting before you can transfer your active call blindly Fig 3 Press to reject the ...

Страница 67: ...nging call 1 With a call ringing Fig 4 press Fig 4 2 The dial screen Fig 2 above appears 3 Enter the number of the third party you intend to transfer the call to and press Terminating calls When using the handset Place the handset in the cradle or press When using speakerphone or a headset Press Missed Calls Missed calls are indicated by the call LED steady light and by the text Missed and the num...

Страница 68: ...info screen 1 Press if available Fig 1 or open the Settings menu Information Status Info to view the status info messages 2 Press the function key underneath to delete the Missed message line Fig 2 If there are other status info messages you may need to use the up down arrows on the navigation key to select the Missed message line Note This will only remove the status message missed and turn off t...

Страница 69: ...y default setting Missed calls Press the right arrow on the navigation key Received calls Press the left arrow on the navigation key Dialed calls Press 3 On each list the latest call is at the top of the list Fig 1 above Scroll through the list with the up down arrows on the navigation key The icons indicate the type of call missed call received call dialed call Press to dial the number of the sel...

Страница 70: ...rgency numbers on page 95 Rejecting or redirecting incoming calls This includes manual and automatic rejection and redirection and automatic rejection of anonymous calls Manually If you do not wish to pick up a ringing call you have three options Letting the call ring and not picking it up Rejecting a ringing call manually 1 Press The caller will hear the busy signal 2 Press for two seconds to rej...

Страница 71: ... VIP in your phone s directory will ring on your phone even when DND is on Call forwarding For further information see Call forwarding on page 72 and 96 Rejecting anonymous calls See next section Rejecting anonymous calls With this setting you can have your phone reject calls from phones that are blocking or not transmitting their numbers Please note Calls from analog phone connections without cal...

Страница 72: ...s are forwarded In the default setting the symbol is available in the function key line and can be used to turn forwarding of all calls on and off respectively by pressing the function key underneath the symbol but you can also map the function onto another function key or use the settings menu as shown in the table below Forward when Busy Forwarding calls ringing while the phone is busy to the nu...

Страница 73: ...til it displays Yes or Enable forwarding until it displays Yes The setting will change from off to on and the setting for the forwarding target will appear In the case of Forwarding after Timeout the setting for Call Forwarding time will also appear Press Target Target Target Type phone number phone number phone number Press Press Call Forwarding time Type number of seconds Press Press for two sec...

Страница 74: ...screen for two seconds to return to the idle screen Turning forwarding of all calls on off with a function key Turning call forwarding on Note Call forwarding is set for each configured identity separately When the setting is done on the phone it applies to the identity selected as outgoing identity 1 Press The display will show the Target when Forwarding screen Note If is not available when the d...

Страница 75: ...isplay Symbols and Icons on page 105 for the lists of symbols and their description Navigation confirmation and cancel keys For the default settings see At a glance on page 21 You can select a different key event to be available on each respective key when the phone is in idle mode You cannot change the functions that are available when the phone is active for example when you are in a call when t...

Страница 76: ...eed to be dialed i e type the number without spaces or punctuation marks between the digits For example a number with an area code that might conventionally be notated as 617 555 0704 should be entered as 6175550704 Short Text This setting is for the context sensitive programmable function keys F1 F4 on the phone and the freely programmable function keys on the ET6 expansion modules Optional Enter...

Страница 77: ...alk and Line Info Layer If the LP feature of a key has been disabled use the Preferences menu to access the key s configuration menu See Settings on the phone on page 77 Fig 1 Fig 2 Programming the function keys The freely programmable function keys on the phone and on all connected expansion modules can be mapped on the phone and on the phone s web interface We recommend using the web interface w...

Страница 78: ...on number and press Fig 10 Fig 8 Fig 9 Fig 10 7 Optional Press to select Short Label Fig 11 and press Enter a name or other descriptive text Fig 12 for the SmartLabel key when displayed in SmartLabel display mode Short and press This is the data displayed on the key s label area on the phone s screen and on the ET6 s display respectively If you leave the field blank the number will be displayed in...

Страница 79: ...n the selected functionality there will be a text field or a drop down menu in the Number column Enter the number or select an item from the list 5 For Context Sensitive Keys context sensitive programmable function keys F1 F4 Optional In the Short Text text field of the key enter a name or descriptive text This is the text that will be displayed in the key s label area on the phone s screen or on ...

Страница 80: ...ension monitoring group ID Enter an ID any character string into the textfield Note The first character of the ID must not be a curly brace The extension to be monitored must be programmed onto one of the freely programmable function keys with LEDs In our example we are monitoring extension 7899 on key P7 which is located on page 1 of the screen 1 On the phone s web interface click on Function Key...

Страница 81: ...he left 2 Under Context of the key on the expansion module select Active or one of the configured identities from the drop down list 3 Under Type select Extension from the drop down list 4 In the Number text field enter the phone number whose calls you want to pick up In our example it is extension 157 on key 1 and extension 167 on key 10 the left and right top keys on the ET6 5 Optional In the Sh...

Страница 82: ...ield of Page 3 P19 enter the phone number that you want to be able to speed dial In our example it is phone number 555 0704 in area code 617 Type each phone number with any necessary area code and or country code etc without spaces hyphens etc Example In conventional notation you might write the number as 917 555 0184 Type 6175550704 into the text field 5 Under Short Label Mode of Page 3 P19 selec...

Страница 83: ... a call when the phone is ringing etc In the following example the setting of key F1 the left key will be changed from Directory to LDAP Directory 1 On the phone s web interface click on Function Keys in the menu on the left 2 Click on the drop down list of F1 3 Select LDAP Directory from the drop down list 4 Click Apply and click Save By pressing key F1 you now have direct access to your LDAP dir...

Страница 84: ...is Proximity sensor moving your hand or an object across the proximity sensor see At a glance on page 21 triggers the switch Return Reset to default mode timer after sec This setting defines after how many seconds the appearance of the SmartLabels will automatically return to the default Valid values are 0 to 360 seconds the default is 3 seconds Selecting 0 turns automatic reversion off Manually r...

Страница 85: ...ort Press Page Key Short Press Page Key Long Press Page Key Long Press Page Key Long Press Page Key Proximity Sensor Proximity Sensor 5 The configuration of the settings for all screens and other screens is done the same way Default Display Mode and Alternative Display Mode a Use the navigation key to select the display mode you want to change for example the default mode Fig 3 and press In the fo...

Страница 86: ...re the line underneath Alternative Display Trigger now reads Proximity Sensor Fig 10 Fig 10 6 Press to return to the SmartLabel Options menu Fig 2 Timer setting for returning display mode to default 1 Press and select Preferences Display SmartLabel Options 2 Use the navigation key to select Return to Default Mode Timer Fig 11 and press The preset default is 3 seconds Fig 11 Fig 12 Fig 13 3 Enter a...

Страница 87: ... Use the navigation key to select Timer Fig 16 and press 4 Enter a different number of seconds between 0 and 1209600 seconds Fig 17 on the alphanumeric keypad and press to save and return to the Return to First Page menu The timer now shows the new seconds setting Fig 18 Fig 17 Fig 18 Fig 19 Note If you do not want the on screen page to return to page 1 automatically use the navigation key to sele...

Страница 88: ...tive display mode Full Full Short Short Alternative mode trigger Off Off Off Short Press Page Key Short Press page Key Short Press Page Key Long Press Page Key Long Press page Key Long Press Page Key Proximity Sensor Proximity Sensor 4 Click the drop down list of the setting you want to change and select a setting 5 If you want to change the default timer settings for returning the display mode to...

Страница 89: ...ccounts The phone supports up to twelve accounts or phone numbers with one or more providers or within an office or organization network On VTech phones these accounts or phone numbers are called identities Note If your phone is part of an office network you may need to contact your administrator to configure new or change existing identities as this can only be done when the phone is running in a...

Страница 90: ...lody and to turn off the ringer by selecting Silent See Assigning ringtones on page 91 2 SIP settings Click on the SIP tab to bring the page to the front It contains a number of technical settings and text fields for entering URIs URLs to various servers for music on hold for example as well as some behavior settings These are Automatic acceptance of incoming calls Auto Answer The default setting ...

Страница 91: ... the PBX Assigning ringtones to contact type VIP and group types See Ringtones on page 46 Selecting identity ringtones On the phone Preferences Audio Ringer If there is more than one configured identity on the phone they are shown on the display Select an identity with and press The ringtones are shown on the display Press to navigate up and down the list of ringtones Press Play to play the select...

Страница 92: ...uropean date and time formats are shown in Fig 3 and 4 US date and time formats in Fig 5 and 6 Fig 1 Fig 2 Fig 3 Fig 4 Fig 5 Fig 6 Date Phone settings 1 Press Preferences Date Time The default setting is US date format US Date Format Date Setting On Setting Off March 5 2018 03 05 2018 05 03 2018 March 12 2018 03 12 2018 12 03 2018 December 5 2017 12 05 2017 05 12 2017 December 10 2017 12 10 2017 1...

Страница 93: ...ve to off Fig 5 above scroll down to it and press 3 Press briefly to return to the previous menu or for two seconds to return to the idle screen Web interface settings 1 Open the Preferences page Appearance tab Interface Elements section 24 Hour clock The default is on 2 Click Apply and click Save Time zone Note The time zone setting is accessible in administrator mode only The phone receives the ...

Страница 94: ...ss to save your selection 3 Press briefly to return to the previous menu or for two seconds to return to the idle screen On the web interface 1 Open the Advanced Settings page Network tab Time section Timezone 2 Select your time zone country city from the drop down list 3 Click Apply and click Save Language settings of phone and web interface The language used on the phone can be changed on the ph...

Страница 95: ... the previous menu or for two seconds to return to the idle screen Setting on the Web Interface 1 Open Preferences page Audio tab General Information section Tone Scheme 2 Select the country from the drop down list 3 Click Apply and click Save Emergency numbers These are numbers that can be dialed when the keyboard is locked They must be set beforehand on the web interface The numbers 911 112 110 ...

Страница 96: ...ed as this function s target When a call starts ringing the phone will wait for the number of seconds specified as call forwarding time If the call has not been accepted by the end of this time period it is forwarded to the number of the phone extension or mailbox specified as this function s target Configuring the settings on the phone See Making changing the settings on the phone and turning on ...

Страница 97: ...ave Turning call forwarding off 1 Web interface Identity 1 12 page Features tab Call Forwarding 2 Click on Off after the forwarding event Always Busy Timeout 3 Click Apply and click Save Call completion On VTech phones call completion means that when a called number is busy or not available your phone will call you back as soon as the dialed number is not busy anymore or available again The factor...

Страница 98: ...ustically callers hear the busy signal Call waiting can be set independently for each identity on the phone s web user interface If you use the phone to change the setting it will apply to the current outgoing identity Setting on the phone The setting is applied to the outgoing identity at the time it is saved If you want to change the setting for other identities select each one as the outgoing i...

Страница 99: ...setting Call Waiting Indication is the second to last on the page 3 To turn call waiting off select off from the drop down menu Select visual only or ringer if you want waiting calls announced only by the phone ringing symbol or by the double beep respectively 4 Click on Apply and Save Hiding my caller ID With this setting your phone number will not be transmitted to any phones you call Please not...

Страница 100: ...he idle screen Setting on the web interface 1 Open the Preferences page General tab Privacy Settings section Reject incoming anonymous calls 2 Select the radio button Reject or Accept 3 Click on Apply and Save Number guessing When you have typed the minimum number of characters you have specified for this function the phone will look for numbers containing that string of characters in its call lis...

Страница 101: ... numbers without having to enter the complete phone number The numbers must be set on the phone or on the phone s web interface first Note You can also map a phone number onto one of the SmartLabel keys P1 P32 See Example 3 Speed dialing on page 82 for the instructions Setting on the phone 1 Press and select Call Features Outgoing Calls Number Guessing 2 Use to scroll up or down one number at a ti...

Страница 102: ...without spaces or punctuation between the digits For example You want to be able to speed dial phone number 555 0784 in area code 917 by pressing the key In conventional notation you might write the number down as 917 555 0784 In the speed dial table type 9175550784 into the text field of the number 1 3 Click on Apply and Save You can now speed dial the number by pressing and on the phone Note You...

Страница 103: ...depends on your browser 8 Open the phone s web interface Software Update page 9 In the Manual Software Update area paste the link into the Firmware text field 10 Click Load The phone begins to reboot 11 If the phone asks Reboot press 12 DO NOT DISCONNECT THE POWER WHILE THE PHONE IS REBOOTING Auto provisioning 1 Open the phone s web interface Advanced Settings page Update tab 2 In the Update area ...

Страница 104: ...ect Wait for the idle screen to reappear Warning Never disconnect the power during a firmware update Reset to factory values The phone can be reset to factory values in administrator mode only 1 Press 2 Press to select Maintenance and press 3 Press to select Reset values and press 4 Enter the administrator password and press 5 Wait for the idle screen to reappear 6 See Initializing and registering...

Страница 105: ...ected on the phone s web interface Function Keys page See At a glance on page 21 for the default settings Symbol Description Server directory Call list menu missed received and dialed calls Available status messages Turning DND on and off Contacts list Forwarding all calls turning on turning off Presence signaling on off Retrieving messages from mailbox Settings menu Directory URL of the phone s w...

Страница 106: ...ng selected directory call list entry Details of missed calls to from date time total number and of received and dialed calls to from date time duration Deleting entire call list Moving to beginning of next previous time zone Expanding the list of time zones to show all Collapsing the list of time zones to show only time zones relevant to the language setting i e countries where the language is sp...

Страница 107: ...ese are the symbols of the functionalities selectable under Type Please note that not all available functionalities are represented by a symbol If the selected type is Key event please see the table Key event symbols on page 108 Symbol Description Action URL Auto answer off on Busy lamp field Conference DTMF Extension Forwarding all calls turning on turning off Intercom off on IVR Interactive Voic...

Страница 108: ...e Deny all reject current and all future calls from the number Directory internal phonebook Directory DND turning on turning off Favorites Forwarding all calls turning on turning off Headset select turn off Help Hold Login e g hotel Return to previous move forward to next label page LDAP directory Settings menu Monitor calls Multicast zones Mute microphone unmute microphone Select outgoing identit...

Страница 109: ...f turn on Server directory Status Transfer current call Display indications On activity Outgoing call ringing Incoming call ringing Connected single connection or conference Call disconnected terminated Dialed number is busy Holding call Call being held by other party ...

Страница 110: ... identities can be called Active identities can be selected as the outgoing identity for making calls by pressing or on the navigation key Identity not properly registered By changing the status of an identity to inactive on the phone s web interface it can be deregistered without removing its registration settings Inactive identities are not shown on the idle screen They cannot be called or selec...

Страница 111: ...rward when Busy name number Call forwarding is on When your phone is busy incoming calls will be forwarded to the phone number indicated Forward after Timeout name number Call forwarding is on When an incoming call is not picked up within the set number of seconds the call will be forwarded to the phone number indicated Forward all name number Forwarding of all incoming calls is on All incoming ca...

Страница 112: ...n the wall using the measurements given in Fig 1 and Fig 2 2 Unscrew the slide guides for the footstand from the back of the phone Fig 3 3 Plug the long end of the handset cord into the connector labelled on the back of the phone and place the cord in the cable guide Fig 4 4 Hang the phone on the screws by placing the holes on the back of the phone over them Fig 5 Distance to wall 4 mm 0 157 ø max...

Страница 113: ...113 ET635 User Manual Appendix 3 Fig 3 Fig 4 Fig 5 ...

Страница 114: ...ion please check the PBX manual With Asterisk generally use this feature rather than extension Button This is a function key that is connected to your PBX to perform a task specified in the buttons document Call Agent This function key can be used by call agents to perform one of three different functions depending on the value entered in the Number text field Logging onto and off the system Text ...

Страница 115: ...all the extension specified in the Number text field where it will be treated like any other incoming call i e ring be forwarded etc IVR This function key can be used for regular calls to an extension that is reached via an IVR or auto attendant and a number of voice prompts where the caller has to make a selection by pressing a key after or during the prompt If you know which keys need to be pres...

Страница 116: ...ven time will override the others Park Orbit If a park orbit has been set up on the server a function key mapped with the Park Orbit functionality can EITHER serve to park calls on the park orbit OR to park as well as retrieve calls depending on the type of server used Select the server type on the Identity page of the context identity SIP tab from the Server Type Support drop down menu Enter the ...

Страница 117: ... ringing call If the text field is empty pressing the key will put the Enter number screen on the display Enter the number and press to complete the transfer For further information see Transferring calls on page 65 Voice Recorder The phone does not record the voice streams at all they must be recorded on the PBX where a recording account must be set up Pressing the key when the phone is idle will...

Страница 118: ...vity on any monitored extensions the list is empty Mute Mutes unmutes the microphone handset speakerphone headset during active call Next Outgoing ID Selecting the next identity as the outgoing identity Presence State Providing access to a list where the Presence state of each registered SIP Identity can be defined online offline busy invisible Prev Outgoing ID Selecting the previous identity as t...

Страница 119: ...E VTECH GROUP OF COMPANIES Distributed in the U S A by VTech Communications Inc Beaverton Oregon 97008 VTech is a registered trademark of VTech Holdings Limited Copyright 2018 for VTECH COMMUNICATIONS LTD All rights reserved Version 1 07 18 ...

Отзывы: