background image

10

LOCATION

Place your VTech 15500/15550 within  metres of the 

mains power socket and telephone socket so that the 

cables will reach.
Make sure it is at least 1 metre away from other 

electrical appliances to avoid interference. Your VTech 

15500/15550 works by sending radio signals between 

the base and handset. The strength of the signal 

depends on where you locate the base. Putting it as high 

as possible ensures the best signal.
The maximum range between the base station and the 

handset is approximately 300 meters.

GETTING sTARTED

Содержание 15500

Страница 1: ...For product support please call 1 300 369 193 Models VTech 15500 VTech 15550 User Guide ...

Страница 2: ...ber Display service to be able to see the caller s number or name when called or in the Calls List See page 64 for more details This User Guide provides you with all the information you need to get the most from your phone Before you make your first call you will need to set up your phone Follow the simple instructions on the next few pages NEED HELP PLEASE LOOK IN THE HELP SECTION AT THE END OF T...

Страница 3: ...machine unit Power adaptor Telephone line cord and adaptor Battery compartment cover NiMH rechargeable battery pack Wall mount bracket User guide If you have purchased multi handset pack there will be an extra handset charger power adaptor battery compartment cover and NiMH rechargeable battery pack for each additional handset ...

Страница 4: ...ate and time 21 Getting to know your phone 22 Handset overview 22 Telephone base overview VTech 15500 25 Telephone base overview VTech 15550 26 Navigating the menus 28 Handset menu layout 28 Keystroke table 29 Handset display icons 30 Bluetooth 32 Introducing Bluetooth 32 Important information 32 Bluetooth setup 34 Add a mobile phone 34 Replace a paired mobile phone 35 Delete a paired mobile phone...

Страница 5: ... silencing 40 Redial 41 Chain dialing 42 Find handset 43 Multiple handsets if you have purchased a VTech 15500 15550 multi handset pack 44 Power Fail Back up 47 Phonebook 50 Add a phonebook entry 50 Review phonebook entries 50 Alphabetical search 51 Edit a phonebook entry 51 Delete a phonebook entry 52 Delete all phonebook entries 52 Check the phonebook usage 52 Handset settings 53 Using the menu ...

Страница 6: ...ngs 61 Ringer volume 61 Ringer melody 61 Flash time 62 Change system PIN code 62 ECO mode 63 Telephone Network Services 64 Calling Number Display 64 Memory match 65 Call list display screen message 66 Missed call indicator 66 Review the call list 67 Dial from the call list 67 Save a call list entry to the phonebook 68 Delete an entry in the call list 68 Delete the entire call list 69 ...

Страница 7: ... or delete memos 75 Answer mode 75 Announcement 76 Number of rings 77 Recording time 77 Call screening setting 78 Call screening 80 Call intercept 80 Message window displays 81 Remote access 83 Help 85 General information 97 Replacing the handset batteries 97 Safety 97 Cleaning 98 Environmental 99 How many telephones can you have 99 Customer service Product warranty 100 ...

Страница 8: ... for cleaning Do not use this product near water for example near a bath tub kitchen sink swimming pool or in humid areas Do not overload wall outlets and extension cords as this can result in the risk of fire or electric shock Unplug this product from the wall outlet and contact TecHelp on 1300 369 193 under the following conditions When the power supply cord or plug is damaged or frayed If the p...

Страница 9: ...rence and or unit damage VTech will not be held liable for damage arising from such noncompliance Use only the power adaptors supplied with this product Please contact TecHelp on 1300 369 193 for replacement adaptors Please ensure that the batteries are inserted according to the correct polarity as indicated on the re chargeable batteries and the internal markings inside the handset battery compar...

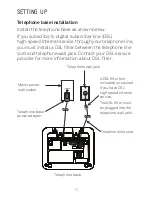
Страница 10: ...e away from other electrical appliances to avoid interference Your VTech 15500 15550 works by sending radio signals between the base and handset The strength of the signal depends on where you locate the base Putting it as high as possible ensures the best signal The maximum range between the base station and the handset is approximately 300 meters Getting started ...

Страница 11: ...install a DSL filter between the telephone line cord and telephone wall jack Contact your DSL service provider for more information about DSL filter Telephone base Mains power wall socket Telephone base power adapter Telephone line cord Telephone wall jack A DSL filter not included is required if you have DSL high speed Internet service The DSL filter must be plugged into the telephone wall jack ...

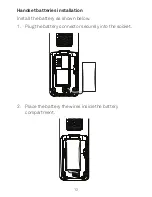
Страница 12: ...12 Handset batteries installation Install the battery as shown below Place the battery the wires inside the battery compartment Plug the battery connector securely into the socket 1 ...

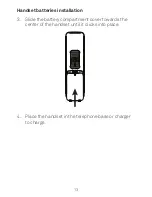
Страница 13: ...13 Handset batteries installation Slide the battery compartment cover towards the center of the handset until it clicks into place 3 Place the handset in the telephone base or charger to charge ...

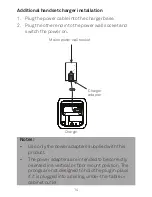
Страница 14: ...ch the power on 1 Charger Charger adapter Mains power wall socket Notes Use only the power adapters supplied with this product The power adapters are intended to be correctly oriented in a vertical or floor mount position The prongs are not designed to hold the plug in place if it is plugged into a ceiling under the table or cabinet outlet ...

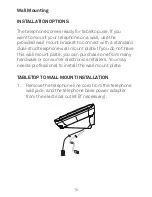
Страница 15: ...rd dual stud telephone wall mount plate If you do not have this wall mount plate you can purchase one from many hardware or consumer electronics retailers You may need a professional to install the wall mount plate Tabletop to wall mount installation Remove the telephone line cord from the telephone wall jack and the telephone base power adapter from the electrical outlet if necessary 1 ...

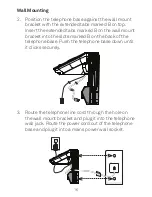
Страница 16: ...d B on the wall mount bracket into the slots marked B on the back of the telephone base Push the telephone base down until it clicks securely 3 Route the telephone line cord through the hole on the wall mount bracket and plug it into the telephone wall jack Route the power cord out of the telephone base and plug it into a mains power wall socket ...

Страница 17: ... 4 Align the holes on the bracket with the standard wall plate and slide the bracket down until it locks securely Bundle the telephone line cord and power adapter cord neatly with twist ties Wall Mounting ...

Страница 18: ... them first Slide the wall mount bracket up and remove it from the wall mount plate Unplug the telephone line cord or DSL filter from the telephone wall jack Unplug the power adapter from the power outlet Slide the telephone base up and remove it from the wall mount bracket See Telephone base installation on page 11 1 3 ...

Страница 19: ... be plugged into the mains power socket at all times Do not connect the telephone line until the handset is fully charged Only use the power adaptor telephone cables and NiMH rechargeable batteries supplied with the product Battery low warning If the icon flashes in the handset display you will need to recharge the handset before you can use it again During charging the icon will appear to be fill...

Страница 20: ...ime Running the battery right down at least once a week will help it last as long as possible The charge capacity of the rechargeable battery will reduce with time as it wears out giving the handset less talk standby time Eventually it will need to be replaced A replacement battery can be obtained by contacting TecHelp on 1300 369 193 or from your local electrical retailer After charging your hand...

Страница 21: ...ay service the date and time are set automatically with each incoming call The date and time is recorded with each answering machine message you receive If you have not subscribed to a Network Calling Number Display Service you can set the date and time manually Set the date and time manually Press MENU when the handset is not in use Press or to scroll to HS SETTINGS Press OK and or to scroll to D...

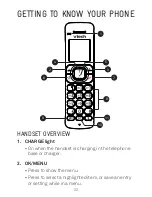
Страница 22: ...ht On when the handset is charging in the telephone base or charger OK MENU Press to show the menu Press to select a highlighted item or save an entry or setting while in a menu 1 2 Getting to know your phone 10 6 5 3 2 1 7 8 9 4 11 ...

Страница 23: ...scroll up while in a menu or reviewing the phonebook call list or redial list Press to move the cursor to the left while entering numbers or names in the phonebook Press to review the call list when the phone is not in use Press to decrease the listening volume during a call or message playback Press to scroll down while in a menu or reviewing the phonebook call list or redial list Press to move t...

Страница 24: ...urn on or turn off the ringer Press and hold to lock or unlock the keypad Press and hold 1 to access Network Voicemail Press and hold 0 to insert a dialing pause while pre dialing SPEAKERPHONE Press to make or answer a call using the handset speakerphone Press to switch between the handset speakerphone and the handset earpiece during a call VOLUME BOOST Press to enhance the clarity and loudness of...

Страница 25: ...25 Telephone base overview VTech 15500 HANDSET LOCATOR Press to locate the handset s CHARGING CRADLE 3 IN USE LIGHT On when the telephone is in use 1 2 1 2 3 ...

Страница 26: ...message When the phone is not in use press and hold to delete all previously reviewed messages ANS ON OFF Press to turn the answering system on or off HANDSET LOCATOR Press to locate the handset s Press to decrease the volume during message playback 1 2 3 4 4 3 2 1 5 7 6 10 8 9 ...

Страница 27: ...repeat the playing message Press twice to play the previous message IN USE LIGHT On when the telephone is in use Flashes when there is an incoming call or the phone has new voicemail message Press to play messages Press to stop message playback Press to skip to the next message 10 Message window Shows the number of messages and other information of the answering system or telephone base 5 6 7 8 9 ...

Страница 28: ... menu Press OK to enter that menu To return to the previous menu press C INT MUTE or To return to idle mode press and hold C INT MUTE or except in the DEFAULT menu Handset menu layout PHONEBOOK CALL LIST BS SETTINGS HS SETTINGS ADD VIEW EDIT DELETE DELETE ALL PB STATUS DETAILS ADD TO PB DELETE DELETE ALL CATEGORY BS RINGER RING VOLUME DELETE HS FLASH TIME CHANGE PIN ECO MODE DIRECT CALL ALARM RING...

Страница 29: ...nly READY BASE 1 BASE 2 BASE 3 BASE 4 PIN MSG PLAYBACK DEL ALL OLD MEMO TAM ON OFF TAM SETTINGS Keystroke table 1 1 2 A B C a b c 2 3 D E F d e f 3 4 G H I g h i 4 5 J K L j k l 5 6 M N O m n o 6 7 P Q R S p q r s 7 8 T U V t u v 8 9 W X Y Z w x y z 9 0 space 0 ...

Страница 30: ...ption signal Less blocks indicate a weaker reception signal Steadily on when a home call is in progress Steadily on when the ringer is switched off Steady when an alarm is set Flashes when the alarm time set before reaches Steadily on when the keypad is locked Steadily on when the battery is fully charged Animates when the battery is charging Flashes when low battery is detected indicating that it...

Страница 31: ...the handset booster is activated or Steadily on when a mobile phone is paired and connected Steadily on when a mobile call is in progress Steadily on when a Bluetooth mobile phone is paired and connected INT Press to initial an intercom call when idle BACK Press to go back to previous menu level or cancel the current action if applicable Press to clear a character or stop the alarm if applicable p...

Страница 32: ...nly one mobile phone can be connected and active on a call at a time Important information After plugging in the telephone base wait at least 20 seconds before connecting a Bluetooth device The screen shows Bluetooth system busy if you try to connect too soon Refer to the User Guide of your Bluetooth enabled mobile phone for more information about how that device uses Bluetooth connectivity Blueto...

Страница 33: ...ttery discharges faster while it is connected to the telephone base via Bluetooth wireless technology Monitor your mobile phone s usage because minutes may be deducted from your mobile plan for the duration of all mobile calls depending on the terms of your plan Refer to the BLUETOOTH SETUP section to learn how to set up your Bluetooth device Refer to the USING THE PHONE section on how to operate ...

Страница 34: ...l performance Add a mobile phone Before you begin make sure that you have mobile coverage and your Bluetooth enabled mobile phone is not connected to any other Bluetooth device Refer to your mobile phone s user guide to learn how to search for or add new Bluetooth devices To pair and connect a mobile phone Press MENU on the handset in idle mode to enter the main menu Press or to scroll to PAIR MOB...

Страница 35: ... process may vary for different mobile phones If this happens follow the prompts on your mobile phone and your VTech 15500 15550 to complete the pairing process Refer to the User s manual of your Bluetooth enabled mobile phone to learn how to search for or add new Bluetooth devices Replace a paired mobile phone If you have already paired up a Bluetooth enabled phone you will need to remove it if y...

Страница 36: ...15550 telephone select it and continue the pairing process When the Bluetooth enabled phone is successfully paired the screen will display COMPLETED with a confirmation tone Delete a paired mobile phone Press MENU on the handset in idle mode to enter the main menu Press or to scroll to PAIR MOBILE Press OK and or to scroll to REMOVE Press OK and the handset screen displays REMOVE Press OK the hand...

Страница 37: ...o enter the main menu Press or to scroll to PAIR MOBILE Press OK and or to scroll to CONNECT Press OK and the handset screen displays CONNECTING Using your Bluetooth enabled mobile phone turn on the Bluetooth feature When the Bluetooth enabled mobile phone is successfully connected there will be a confirmation tone and the screen will display CONNECTED Note The screen will show FAILED if the Bluet...

Страница 38: ...l a home call Enter the number with the dialing keys 0 9 Press or to dial To answer a home call If the handset is not on the base station or charger Press or If the handset is on the base station or charger and if AUTO ANSWER is set to ON When the phone rings lift the handset to answer a call To end a home call Press or place the handset in the telephone base or charger 1 1 ...

Страница 39: ...set in the telephone base or charger Speakerphone Handset speakerphone During a call press to switch between speakerphone and normal handset use When the speakerphone is active the handset displays SPEAKER ON and Volume boost Use the VOLUME BOOST feature to enhance the clarity and loudness of the voice on handset earpiece To turn on VOLUME BOOST on the handset While you are on a call using the han...

Страница 40: ...again to resume the conversation The handset displays LINE IN USE Temporary ringer silencing When the telephone is ringing you can temporarily silence the ringer of the handset or the telephone base without disconnecting the call The next call rings normally at the preset volume To silence the ringer temporary on a handset Press To silence the ringer temporary at the telephone base Press repeatedl...

Страница 41: ... dial a redial entry Press when the phone is not in use Press or to scroll to the desired entry displays Press or to dial To save a redial entry to phonebook Press when the handset is not in use Press or to scroll to the desired entry displays Press OK and or to scroll to ADD TO PB Press OK and then enter the name Press OK and then edit the number if necessary Press OK and or to choose a desired m...

Страница 42: ...l to the desired entry displays Press OK and or to scroll to DELETE ALL Press OK The screen displays CONFIRM Press OK You hear a confirmation tone Chain dialing Use this feature on the cordless handsets to initiate a dialing sequence from numbers stored in the phonebook call list or redial list while you are on a call To access a number in the directory Press MENU while on a call Press or to scrol...

Страница 43: ... call Press or to scroll to REDIAL LIST Press OK and or to scroll to desired entry Press OK or to dial the displayed number Find handset Use this feature to find all system handsets To start paging Press HANDSET LOCATOR on the telephone base when not in use All idle handsets ring and display PAGING To end paging Press HANDSET LOCATOR on the telephone base OR Press or DELETE on the handset OR Place...

Страница 44: ...andset In idle mode press MUTE If you have two handsets the screen displays CALLING HS X If you have three or more handsets the screen displays all registered handsets except the calling handset Enter the desired handset number to intercom with 2 The called handset rings Press or or lift the called handset from the base or charger to establish the internal call Notes If only one handset is registe...

Страница 45: ... displays CALLING HS X If you have three or more handsets the screen displays all registered handsets except the calling handset Enter the desired handset number to intercom with 3 The external call is put on hold automatically and the called handset rings 4 Press or lift the called handset to establish an internal call 5 Press on the calling handset or put the calling handset on the charging crad...

Страница 46: ...he conversation and no network subscription is required During an external call Follow Steps 1 to 4 in To transfer an external call to another handset Press and hold on the calling handset to establish the 3 way conference call Note If either handset hangs up during a conference call it will leave the other handset still in connection with the external call 1 ...

Страница 47: ...ail Back Up mode is activated Do not touch the charging contacts of the power supplying handset during Power Fail Back Up mode In Power Fail Back Up mode none of the base functions including the answering machine will operate It may take up to 90 seconds to transition through the Power Fail Back Up activation process as the base and handset s synchronise with each other To make a call using Power ...

Страница 48: ...f the call To answer a call using Power Fail Back Up mode If there is only one handset registered to the base When the phone rings keep the handset on the main base unit and press or to answer the call The speakerphone will be turned on automatically and call is made To end the call press Notes If there is more than one handset registered to the base the handset on the main base unit should be lef...

Страница 49: ...ins power interruption occurs Place the handset with sufficient battery power usually not lower than level 2 onto the main base unit to activate Power Fail Back Up and start up the base If handset is already on the main base unit it will automatically activate the Power Fail Back Up mode if it has sufficient battery power and start up the base If AUTO is selected and handset is not returned to bas...

Страница 50: ... a number and then press OK Press or to scroll to the desired ringer melody for your phonebook entry a total of 10 melodies for your selection Press OK to confirm You hear a confirmation tone Review phonebook entries Phonebook entries appear alphabetically Press MENU when the telephone is not in use and then press or to scroll to PHONEBOOK Press OK Press or to scroll to the desired entry Press OK ...

Страница 51: ... once to see Jennifer when Jennifer displays press to see Jessie twice to see Kevin or three times to see Linda If necessary press or to browse Edit a phonebook entry Search for the desired entry in the phonebook see Review phonebook entries on page 50 or Alphabetical search on page 51 Press MENU and or to scroll to EDIT and then press OK Edit the name and then press OK Edit the number and then pr...

Страница 52: ... or to scroll to PHONEBOOK Press OK Press OK and or to scroll to DELETE ALL and then press OK The screen will display CONFIRM Press OK to confirm Check the phonebook usage You can check how many entries have been stored in your phone and how many phonebook entries are available for you to store in the phonebook Press MENU when the telephone in idle and then press or to scroll to PHONEBOOK Press OK...

Страница 53: ...nswering system records the date and time of each message you receive Before using the answering system or alarm set the date and time as follows If you subscribe to a Network Calling Number Display service the date and time are set automatically with each incoming call Make sure the settings are correct so that the alarm feature works properly To set the date format Press MENU when the handset is...

Страница 54: ...to DATE TIME Press OK and or to scroll to TIME FORMAT Press OK and or to select your desired time format 12 HR or 24 HR Press OK to confirm To set the time Press MENU when the handset is not in use Press or to scroll to HS SETTINGS Press OK and or to scroll to DATE TIME Press OK and or to scroll to SET TIME Press OK and use the dialing keys to enter the hour and minute Press OK to save the setting...

Страница 55: ...default 0000 Press OK and or to scroll to ON or OFF Press OK to confirm Note If ON is selected you will be asked to set the direct call number To set the direct call number if direct call is set to ON Follow Steps 1 to 5 in the section To turn on off the direct call function Enter the direct call number Press OK to confirm WARNING WHEN DIRECT CALL IS SET TO ON THE DISPLAY SHOWS DIRECT CALL AND YOU...

Страница 56: ...u will be asked to set the alarm time To set the alarm time if the alarm is set to ON Follow Steps 1 to 5 in the section To turn on off the alarm Enter the time Press OK to confirm Ringer volume You can adjust the ringer volume or turn the ringer off on each handset When the ringer is turned off the handset displays Press MENU when the handset is not in use Press or to scroll to HS SETTINGS Press ...

Страница 57: ...use Press or to scroll to HS SETTINGS Press OK and or to scroll to RING SETUP Press OK and or to scroll to EXT RING Press OK and or to select the desired ringer melody a total of 10 melodies for your selection Press OK to confirm You hear a confirmation tone To set the ringer melody for internal calls You can choose from different ringer tones on each handset Press MENU when the handset is not in ...

Страница 58: ...to scroll to MOBILE RING Press OK and or to select the desired ringer melody a total of 10 melodies for your selection Press OK to confirm You hear a confirmation tone Key tone The handset is set to beep with each key press If you turn off the key tone there are no beeps when you press keys To set the key tone Press MENU when the handset is not in use Press or to scroll to HS SETTINGS Press OK and...

Страница 59: ...E Press OK and or to select ON or OFF Press OK to save your selection You hear a confirmation tone Out of range tone When a handset is out of range of the telephone base an alert tone will be emitted if no coverage tone is set to ON You need to move the handset closer to the telephone base To set the out of range tone Press MENU when the handset is not in use Press or to scroll to HS SETTINGS Pres...

Страница 60: ...ER Press OK and or to select ON or OFF Press OK to save your selection You hear a confirmation tone Rename handset You can change the name of each device The new name of each device cannot exceed 10 characters To rename the handset Press MENU when the handset is not in use Press or to scroll to HS SETTINGS Press OK and or to scroll to RENAME HS Press OK and use the dialing keys to edit the name Pr...

Страница 61: ...S Press OK and or toscrolltoRINGVOLUME Press OK and or to sample each ringer volume level a total of 6 levels for your selection including VOLUME OFF Press OK to save your selection You hear a confirmation tone Ringer melody Press MENU when the handset is not in use Press or to scroll to BS SETTINGS Press OK and or to scroll to BS RINGER Press OK and or to select the desired ringer melody a total ...

Страница 62: ... a confirmation tone Change system PIN code A 4 digit system PIN code is used for changing the system settings of the base station It is used to protect your phone against unauthorized use The default system PIN code is 0000 Press MENU when the handset is not in use Press or to scroll to BS SETTINGS Press OK and or to scroll to CHANGE PIN Press OK and enter the old system PIN Press OK and enter th...

Страница 63: ...s well as the transmission range will be halved Press MENU when the handset is not in use Press or to scroll to BS SETTINGS Press OK and or to scroll to ECO MODE Press OK and or to select the ON or OFF Press OK to confirm You hear a confirmation tone 1 3 5 ...

Страница 64: ... the name number date and time of the incoming calls The Calling Number Display may appear differently if the caller is matched to a phonebook entry see Memory match on page 65 When a Network Calling Number Display is active on your service incoming numbers will be saved in the telephone s Call list The number will be shown on the display when the phone is ringing If the number matches with one of...

Страница 65: ... Entries appear in reverse chronological order The call list information might not be available for every missed call The callers might intentionally block their names and or telephone numbers Memory match If the incoming telephone number matches the last 7 digits telephone number in your phonebook the name that appears on the screen matches the corresponding name in your phonebook For example if ...

Страница 66: ... Calling Number Display you must first subscribe to the service from your service provider For more information on Network Services call your service provider To ensure the caller s name is displayed make sure you have stored the full telephone number in the phonebook Missed call indicator When there are calls that have not been reviewed in the call list the screens display XX NEW CALL S When you ...

Страница 67: ...n use and then press or to scroll to CALL LIST Press OK Press or to scroll to the desired entry Press OK and or to scroll to DETAILS Press OK to review the details of the selected entry Dial from the call list Press when the telephone is not in use OR Press MENU when the telephone is not in use and then press or to scroll to CALL LIST Press OK Press or to scroll to the desired entry Press or to di...

Страница 68: ...he name Press OK to edit the number Press OK and or to scroll to the desired melody Press OK to confirm You hear a confirmation tone Delete an entry in the call list Press when the telephone is not in use OR Press MENU when the telephone is not in use and then press or to scroll to CALL LIST Press OK 2 Press or to scroll to the desired entry 3 Press OK and or to scroll to DELETE 4 Press OK and the...

Страница 69: ...to confirm You hear a confirmation tone and the screen displays EMPTY Set the category for call list entries You can the call type to be displayed in the call list Press when the telephone is not in use OR Press MENU when the telephone is not in use and then press or to scroll to CALL LIST Press OK 2 Press or to scroll to the desired entry 3 Press OK and or to scroll to CATEGORY 4 Press OK and or ...

Страница 70: ...om the phone busy on another call or using the Internet Callers will hear a standard greeting inviting them to leave a message To call Network Voicemail While the handset is in idle mode press and hold The handset will dial 125101 OR Press or then press and hold The handset will dial 125101 ...

Страница 71: ...r off the answering system at the telephone base Answer on off The answering system must be turned on to answer and record messages When the answering system is turned on the icon displays on the handset To turn on or off with the telephone base Press to turn the built in answering system on or off when the phone is not in use Answering machine for 15550 only Note Your answering machine will answe...

Страница 72: ...ack If you have new messages the telephone plays the new messages and then the old messages If there are no new messages the telephone plays back all messages oldest first To play messages at the telephone base Press when the telephone is not in use Options during playback Press or to adjust the speaker volume Press to skip to the next message Press to repeat the playing message Press twice to lis...

Страница 73: ...handset displays TAM EMPTY and prompts You have no messages Options during playback Press or to adjust the speaker volume Press to switch between the speakerphone and the handset earpiece Press 6 to skip to the next message Press 4 to repeat the playing message Press 4 twice to listen to the previous message Press 2 to delete the current message Press 5 to stop the playback or to exit message play...

Страница 74: ...with the telephone base Press and hold X when the phone is not in use To delete all messages with a handset Press MENU when the phone is not in use And then press or to scroll to ANS MACHINE Press OK and or to scroll to DEL ALL OLD Press OK The handset displays CONFIRM Press OK to confirm your selection 1 3 Note You can only delete old message which are messages you have played ...

Страница 75: ...is not in use And then press or to scroll to ANS MACHINE Press OK and or to scroll to MEMO Press OK and the handset displays RECORDING Now speak into handset to record your message Press OK to confirm Answer mode Press MENU when the phone is not in use And then press or to scroll to ANS MACHINE Press OK and or to scroll to TAM SETTINGS Press OK and or to scroll to ANSWER MODE Press OK and or to ch...

Страница 76: ...ess OK and or to scroll to OGM SETTINGS Press OK and or to scroll to ANS REC or ANSWER ONLY Press OK and or to scroll to RECORD MESS Press OK The handset displays RECORDING Now speak into handset to record your message Press OK to confirm To play the announcement Press MENU when the phone is not in use And then press or to scroll to ANS MACHINE Press OK and or to scroll to TAM SETTINGS Press OK an...

Страница 77: ...t in use And then press or to scroll to ANS MACHINE Press OK and or to scroll to TAM SETTINGS Press OK and or to scroll to ANSWER DELAY Press OK and or to choose 2 RINGS 4 RINGS 6 RINGS 8 RINGS or TIME SAVER Press OK to confirm your selection You hear a confirmation tone Recording time You can set the recording time limit for each incoming message Press MENU when the phone is not in use And then p...

Страница 78: ... OK and or to scroll to BS SCREENING Press OK and or to choose ON or OFF Press OK to confirm your selection You hear a confirmation tone Remote access setting You can turn on or off the remote access feature Press MENU when the phone is not in use And then press or to scroll to ANS MACHINE Press OK and or to scroll to TAM SETTINGS Press OK and or to scroll to REMOTE ACC Press OK and or to choose O...

Страница 79: ...roll to TAM SETTINGS Press OK and or to scroll to COMPRESSION Press OK and or to choose HIGH MID or OFF Press OK to confirm your selection You hear a confirmation tone Change PIN Press MENU when the phone is not in use And then press or to scroll to ANS MACHINE Press OK and or to scroll to TAM SETTINGS Press OK and or to scroll to CHANGE PIN Press OK and enter the old system PIN default 0000 Press...

Страница 80: ...g recorded Press or to adjust the call screening volume To screen a call at a handset If the answering system is on and your answering system is recording a message the handset displays SCREENING Press OK to screen the call on your handset Options while a message is being recorded Press or to adjust the call screening volume Press to switch between the handset speakerphone and the handset earpiece...

Страница 81: ...e messages kept in the TAM memory no new voice messages X X F Flashing XX alternatively with F There are XX new voice messages received where XX is from 1 to 59 and the TAM memory is full F F Steadily ON TAM memory is full and there are no new messages only old messages are kept in TAM memory X X Flashing XX alternatively with Time is not set and there are XX new voice messages received where XX i...

Страница 82: ...1 is the ANSWER RECORD OGM and A2 is the ANSWER ONLY OGM X X A n Flashing XX alternatively with An XX new incoming message is now recording An denotes that the incoming message recording is in progress r A Flashing Remote access is in progress or you are using the answering machine from the handset L X Steadily ON Indicate the current volume level where X is from 1 to 8 non cyclic ...

Страница 83: ...mber from any touch tone telephone When the answering system answers press and then enter the four digit remote access code Then you can enter one of the following remote commands Command Description 1 Main menu 2 Play all messages 4 Repeat the current message or press twice for the previous message 5 Delete the message currently being played 6 Skip to the next message 7 Turn on the answering mach...

Страница 84: ...of key inactivity the answering machine automatically cuts off communication When the answering machine is turned off the telephone answers after 14 rings and plays the recording corresponding to the answering machine only mode ...

Страница 85: ...nt on before use Reset the telephone base Unplug the electrical power Remove the handset battery Wait for approximately 15 seconds then plug the power cord back in and re install the batteries Allow up to one minute for the handset and telephone base to reset You may need to purchase a new handset battery I cannot get a dial tone Try all the suggestions above Move the handset closer to the telepho...

Страница 86: ...roperly If you cannot eliminate the background noise first try muting the handset before dialing or dial from another room with less background noise If other phones in your home are having the same problem contact your telephone service provider charges may apply If you have changed your telephone service to digital service from a cable company or a VoIP service provider the telephone line may ne...

Страница 87: ... devices Out of range OR Base no power appears on my handset Ensure you plug the telephone base in properly and the power is on Place the handset closer to the telephone base for synchronization Move the handset closer to the telephone base You may have moved out of range Reset the telephone base Unplug the electrical power Remove the handset battery Wait for 15 seconds then plug the power cord ba...

Страница 88: ...r the telephone base If you subscribe to high speed Internet service DSL digital subscriber line through your telephone line you must install a DSL filter between the telephone line cord and the telephone wall jack The filter prevents noise and Calling Number Display problems as a result of DSL interference Contact your DSL service provider for more information about DSL filters You may be able to...

Страница 89: ...rotector Relocate your phone to a higher location The phone may have better reception in a high area If other phones in your home are having the same problem contact your telephone service provider charges may apply I experience poor sound quality when using the handset speakerphone For increased sound quality while using the handset speakerphone place the handset on a flat surface with the dialin...

Страница 90: ...rn the cordless handset to the handset charger when not in use You may have too many extension phones on your telephone line to allow all of them to ring simultaneously Try unplugging some of the other phones The layout of your home might be limiting the operating range Try moving the telephone base to another location preferably to a higher location If other phones in your home are having the sam...

Страница 91: ...cts can cause interference with your phone Try installing your phone as far away as possible from these types of electronic devices Do not install this phone near a microwave oven or on the same electrical outlet You may experience decreased performance while the microwave oven is operating If you plug your phone in with a modem or surge protector plug the phone or modem surge protector into a dif...

Страница 92: ...dless handset pendant and telephone base to reset Clean the charging contacts on the handset and the handset charger each month with a pencil eraser or cloth Make sure that the handset battery is installed properly My Calling Number Display isn t working properly Calling Number Display is a subscription service You must subscribe to this service from your telephone service provider for this featur...

Страница 93: ...ervice provider Calling Number Display feature works only if both you and the caller are in areas offering Calling Number Display service and if both telephone service providers use compatible equipment The messages on the answering machine are incomplete For 15550 If a caller leaves a very long message part of it may be lost when the answering machine disconnects the call after the preset recordi...

Страница 94: ...f the memory is full or the machine is off the machine will answer after 14 rings In some cases the answering machine is affected by the ringing system used by your telephone service provider If you subscribe to voicemail service change the number of rings so that your answering machine answers before your voicemail answers To determine how many rings activate your voicemail contact your telephone...

Страница 95: ... waiting until the announcement is over before entering the code There may be interference on the phone line you are using Press dialing keys firmly The answering machine does not record messages Make sure that the answering machine is on should show on the cordless handset and light on the telephone base should be on Make sure the memory of the answering machine is not full If you subscribe to vo...

Страница 96: ...etc while recording Common cure for electronic equipment If the telephone is not responding normally try resetting the telephone Do the following in the order listed Disconnect the power to the telephone base Disconnect the handset battery Wait a few minutes Connect power to the telephone base Re install the battery and place the handset into the cordless charger Wait for the handset to reestablis...

Страница 97: ...d replace the compartment cover until it clicks into place Safety Only use the power supply included with the product Using an unauthorised power supply will invalidate your guarantee and may damage the telephone Use only the approved rechargeable batteries supplied Spare rechargeable batteries can be purchased from TecHelp on 1300 369 193 or your local electrical retailer Do not open the handset ...

Страница 98: ...ch appliances to minimise any risk of interference Please note VTech accepts no responsibility for damage caused to your VTech 15500 15550 handset by using any other type of batteries Never dispose of batteries in a fire There is a serious risk of explosion and or the release of highly toxic chemicals Dispose of batteries as per local state requirements Cleaning Simply clean the handset and base w...

Страница 99: ...uch as bathrooms Do not expose your product to fire explosive or other hazardous conditions There is a slight chance that your phone could be damaged by an electrical storm We recommend that you unplug the power and telephone line cord from the base for the duration of the storm How many telephones can you have All items of telephone equipment have a Ringer Equivalence Number REN which is used to ...

Страница 100: ...e trying to access a Telephone Network Service and require assistance specifically related to the network service or would like to subscribe to the service contact your service provider Voluntary Product Warranty In addition to your Statutory Rights and subject to the conditions below VTech warrants that this product will be free from any defect in materials or workmanship under conditions of norm...

Страница 101: ...sonable time Subject to your Statutory Rights if your claim under this Voluntary Product Warranty is not valid you may be charged a fee under this Voluntary Product Warranty for the service and for any direct costs associated with having the product delivered for service To make a claim under this Voluntary Product Warranty you must call the TecHelp Information Line on 1300 369 193 or contact VTec...

Страница 102: ... your receipt The benefits conferred by this Voluntary Product Warranty are in addition to other rights and remedies that are available to you under law which cannot be excluded The processes for this Voluntary Product Warranty in no way limit your rights which arise as a result of your Statutory Rights This Voluntary Product Warranty is given by VTech Telecommunications Australia Pty Ltd ABN 70 1...

Страница 103: ...hone number 1300 369 193 Email address tcpsupport_au vtech com Statutory Rights Our goods come with guarantees that cannot be excluded under the Australian Consumer Law You are entitled to a replacement or refund for a major failure and compensation for any other reasonably foreseeable loss or damage You are also entitled to have the goods repaired or replaced if the goods fail to be of acceptable...

Страница 104: ...ed trademark of VTech Holdings Limited Copyright 2015 for VTech Telecommunications Australia All rights reserved Printed in China Version A FOR MORE INFORMATION CALL TECHELP ON 1300 369 193 OR EMAIL TCPSUPPORT_AU VTECH COM ...

Отзывы: