background image

VMAC 

– 

Vehicle Mounted Air Compressors


Toll Free:


1-800-738-8622  Local: 1-250-740-3200 

Fax: 1-250-740-3201 

23 


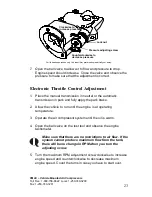
Clockwise to
increase pressure

Counterclockwise to
decrease pressure

Locknut

Pressure adjusting screw


For illustration purposes only, the inner filter plate is shown partially cut away.   

 
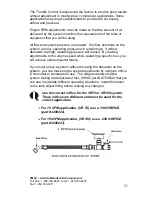
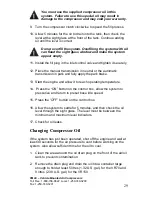
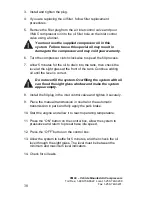
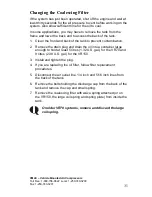
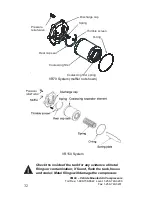
7.  Open the ball valve to allow air to flow and pressure to drop.  

Engine speed should increase.  Close the valve and observe the 
pressure to make sure that the adjustment is correct. 


Electronic Throttle Control Adjustment  

 
1.  Place the manual transmission in neutral or the automatic 

transmission in park and fully apply the park brake.  

 
2.  Allow the vehicle to run until the engine is at operating 

temperature.  

 
3.  Operate the air compressor system until the oil is warm.  
 
4.  Open the ball valve on the test tool and observe the engine 

tachometer.  


Make sure that there are no restrictions to air flow. If the 
system cannot produce maximum flow from the tank, 
there will be no change in RPM when you turn the 
adjusting screw. 

 
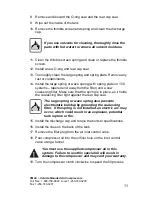
5.  Turn the maximum RPM adjustment screw clockwise to increase 

engine speed and counterclockwise to decrease maximum 
engine speed. Count the turns in case you have to start over. 


Содержание VR150

Страница 1: ...VR70 VR150 UNDERHOOD AIR COMPRESSOR OWNERS MANUAL Keep with vehicle ...

Страница 2: ......

Страница 3: ...gine Speed Control 11 Safety Devices 11 Line Protection 12 Special Installation Notes 12 System Operation 13 Cold Climate Operation 14 Control Box Features and Operation 15 Automatic Shutdown 19 Adding Oil to the System 19 Adjusting the System 20 Adjusting the Pressure Regulator 22 Electronic Throttle Control Adjustment 23 Routine Maintenance 25 Maintenance Schedule 25 Inspect the Drive Belt 26 In...

Страница 4: ... phone general IB 10 Jan 2007 RD 26 Jan 2007 29 Jan 2007 e ECN 07 099 lack of use failure IB 18 Jun 2007 SC 18 Jun 2007 24 Jun 2007 f ECN 08 242 General updates SL 15 Oct 2009 SC SM 22Sep2010 22 Sep 2010 g ECN 12 003 General updates SR 06 Jan 2012 SJC 17 JAN 2012 19 JAN 2012 h ECN 12 169 PRV and muffler RK 10Dec 2012 MH 12 Dec 2012 17 Dec 2012 h Cor warranty info card MP 23Sep 2016 N A 26 Sept 201...

Страница 5: ...from the air stream Adds atomized tool oil to lubricate tools Reduces pressure for longer tool life Hose Reel Part Number A700007 Secure compact retractable hose storage in a sturdy reel Air Receiver Tank Part Number A300010 Thirty five gallon capacity in a compact tank complete with fittings and a gauge DE ICING HEATER De icer Kit Part Number A700031 Insulated rope heater prevents freezing of lin...

Страница 6: ...contact VMAC prior to initiating or proceeding with service Current information may clarify the matter Any person with knowledge of such discrepancies who performs any work on the system service and repair assumes all risks Only proven service procedures are recommended Anyone who departs from the specific instructions provided in this manual must first assure that their safety and that of others ...

Страница 7: ...t Your personal safety is involved Read the message that follows and be alert to the possibility of personal injury or death Be alert your safety is involved While it is impossible to warn about every conceivable hazard let good common sense be your guide This symbol is used to call your attention to instructions on a specific procedure that if not followed may damage or reduce the useful life of ...

Страница 8: ... compressor explosion or fire make sure that the air entering the compressor is free of flammable vapors To prevent compressor explosion or fire make sure that correct servicing procedures and intervals are observed Vaporized oil propelled by high pressure air is an explosive mixture Do not breathe the compressor air Vaporized oil is a severe respiratory hazard Avoid contact with drive belts and s...

Страница 9: ...k for automatic transmissions or neutral for manual transmissions with the park brake or air spring brake fully applied before starting the compressor and at all times during compressor operation Use a regulator in the output line to precisely control the final air delivery pressure Run the system at idle speed under no load conditions for 1 minute before turning the system off to allow system coo...

Страница 10: ...ecommendations and other important information for correct installation The information in the installation manual is intended for use by trained professional technicians with the knowledge tools and equipment to do the job properly and safely Installation should not be performed by persons without the appropriate skills Do not attempt to install any of these systems without the appropriate instal...

Страница 11: ... response to demand Engine Controls throttle control to modulate between idle and upper limit RPM to maintain air requirements NOTE Some trucks have onboard computers that must be programmed by the OEM dealer to permit operation of the electronic throttle control Safety Features 200 PSI 1379 KPA relief valve in oil air tank temperature safety sensor in compressor rapid blow down valve to discharge...

Страница 12: ...an integral serviceable coalescing element A liquid to liquid cooler connected to the engine cooling system cools the oil This maintains the oil temperature in an optimal performance range that increases system durability and reduces the temperature of the compressed air Filtration The rotary screw compressor is designed and machined to exacting tolerances Foreign particles entering the system wil...

Страница 13: ...ponse to air flow demands reduction of standby noise reduction of cooling system load fuel conservation when not using air For information an adjustment please refer to the section titled Adjusting the System An external regulator is recommended for operation at pressures lower than 145 PSI 999 7 KPA Safety Devices A 200 PSI 1379 KPA pressure relief valve in the tank to prevent system over pressur...

Страница 14: ... away from hot surfaces such as turbocharger housings or exhaust system components Hoses should not be bent tightly around sharp metal edges Ensure that hoses are kept away from fan blades or belts If the hoses are secured in a bundle protect them from abrasion by insulating them from each other using rubber padding or plastic loom Special Installation Notes If you intend to use an auxiliary air t...

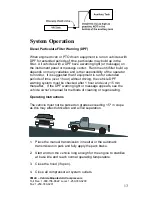
Страница 15: ...that if equipment is run for extended periods of time over 1 hour without driving the vehicle DPF warning system must be checked after 1 hour and every 15 min thereafter If the DPF warning light or message appears see the vehicle owner s manual for methods of cleaning or regenerating Operating Instructions The vehicle must not be parked on grades exceeding 15 º in slope as this may affect lubricat...

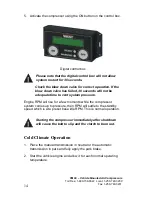
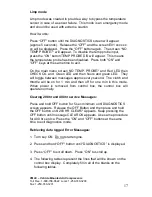
Страница 16: ...conds will not be adequate time to vent system pressure Engine RPM will rise for a few moments while the compressor system comes up to pressure then RPM will settle to the standby speed which is at a preset base idle RPM This is normal operation Starting the compressor immediately after shutdown will cause the belt to slip and the clutch to burn out Cold Climate Operation 1 Place the manual transm...

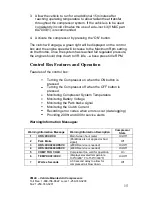
Страница 17: ... Features and Operation Features of the control box Turning the Compressor on when the ON button is pressed Turning the Compressor off when the OFF button is pressed Monitoring Compressor System Temperature Monitoring Battery Voltage Monitoring the Park brake signal Monitoring the Clutch Current Recording error codes when errors occur data logging Providing 200hr and 400hr service alerts Warning I...

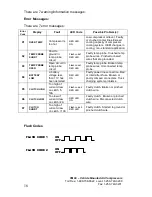
Страница 18: ...robe Crushed temp probe wires Pinched or bared wires that are grounded 03 TEMP PROBE OPEN Open circuit in temp probe circuit Flash code1 RED LED Faulty temp probe Broken temp probe wires Unconnected temp probe 04 BATTERY LOW A battery voltage less than 11V has been detected RED LED ON Faulty power line connection Bad or intermittent fuse Broken or poorly crimped connecters Truck charging system pr...

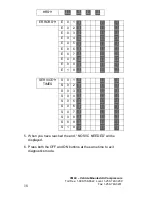
Страница 19: ...een LED and then hours and green LED They will toggle between messages approx every second The clutch and throttle will be on for 1 min and then off for one min in this mode When power is removed from control box the control box will operate normally Clearing 200hr and 400hr service Messages Press and hold OFF button for 5 sec minimum until DIAGNOSTICS screen appears Release the OFF Button and the...

Страница 20: ...0 3201 18 HRS ERRORS E 0 1 E 0 2 E 0 3 E 0 4 E 0 5 E 0 6 E 0 7 E 0 8 E 0 9 E 1 0 SERVICE TIMES S 0 1 S 0 2 S 0 3 S 0 4 S 0 5 S 0 6 S 0 7 S 0 8 S 0 9 S 1 0 5 When you have reached the end NO SVC NEEDED will be displayed 6 Press both the OFF and ON buttons at the same time to exit diagnostics mode ...

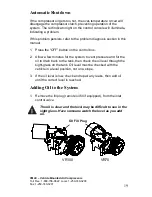
Страница 21: ...Press the OFF button on the control box 2 Allow a few minutes for the system to vent pressure and for the oil to drain back to the tank then check the oil level through the sight glass on the tank Oil level must be checked with the vehicle in a level position not on a slope 3 If the oil level is low check and repair any leaks then add oil until the correct level is reached Adding Oil to the System...

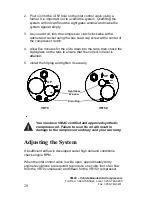
Страница 22: ... for the oil to drain into the tank then check the sight glass on the tank to ensure that the correct oil level is attained 5 Install the fill plug and tighten it securely MAX ADD ADD MAX UP UP Sight Glass Window Drain Plug VR70 V 150 R You must use VMAC certified and approved synthetic compressor oil Failure to use this oil will result in damage to the compressor and may void your warranty Adjust...

Страница 23: ... high If airflow demands are high operating pressure will reduce By making adjustments to the engine speed while operating a specific tool you will achieve optimum performance If you must set up a system without knowing the demands on the system you can make engine speed adjustments by using an orifice in the outlet to simulate tool use The diagram below shows a system testing and adjustment tool ...

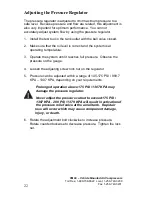
Страница 24: ...ystem is at operating temperature 3 Operate the system until it reaches full pressure Observe the pressure on the gauge 4 Loosen the adjusting screw lock nut on the regulator 5 Pressure can be adjusted within a range of 145 175 PSI 999 7 KPA 1307 KPA depending on your requirements Prolonged operation above 175 PSI 1307 KPA may damage the pressure regulator Never adjust the pressure cutout to excee...

Страница 25: ...le Control Adjustment 1 Place the manual transmission in neutral or the automatic transmission in park and fully apply the park brake 2 Allow the vehicle to run until the engine is at operating temperature 3 Operate the air compressor system until the oil is warm 4 Open the ball valve on the test tool and observe the engine tachometer Make sure that there are no restrictions to air flow If the sys...

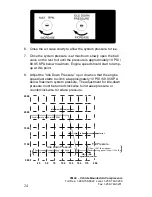
Страница 26: ...ssure up or down so that the engine speed just starts to climb at approximately 10 PSI 68 95 KPA below maximum system pressure The adjustment for idle down pressure must be turned clockwise to increase pressure or counterclockwise to reduce pressure 25 50 75 100 125 150 175 200 2500 2000 1500 1100 500 Factory setting typically 1800 RPM Factory setting typically 140 psi 965 3 kPa Recommend 10 psi 6...

Страница 27: ...em and your warranty The most critical aspect of maintenance is proper air filtration and clean oil If any particles enter the compressor through the air inlet they can contaminate roller bearings gears and the rotors in the compressor Contamination will cause severe rapid damage to components Never run the compressor drive the vehicle or even allow the vehicle to sit parked without the recommende...

Страница 28: ...stall a new drive belt Inspect all pulleys and idlers for damage If any component shows cracks chipping impact damage or any other indications of physical damage replace the pulley or idler If the damage indicates possible misalignment check pulley alignment If the pulleys are not properly aligned check all fasteners to ensure that they are properly torqued and that there are no loose components I...

Страница 29: ...conds for the air pressure to vent before working on the system 1 Clean loose debris from the area around the compressor and the filter cover to prevent contamination entering the compressor 2 Remove the filter cover retaining nut the filter cover and the filter element 3 Immediately cover the air inlet opening by masking with tape or with a clean cloth to prevent contamination Do not use compress...

Страница 30: ... the threaded nipple did not unscrew with the filter If the nipple is in the filter remove it carefully to avoid thread damage and replace it in the tank housing Do not fully thread the nipple into the tank as this could inhibit the oil cross drilling causing system failure and potential compressor damage 5 Check the gasket sealing surface on the front of the tank for contamination old gasket mate...

Страница 31: ...utomatic transmission in park and fully apply the park brake 13 Start the engine and allow it to reach operating temperature 14 Press the ON button on the control box allow the system to pressurize and return to preset base idle speed 15 Press the OFF button on the control box 16 Allow the system to settle for 5 minutes and then check the oil level through the sight glass The level must be between...

Страница 32: ... tank then check the level at the sight glass at the front of the tank Continue adding oil until the level is correct Do not overfill the system Overfilling the system with oil can flood the sight glass window and make the system appear empty 8 Install the fill plug in the inlet control valve and tighten it securely 9 Place the manual transmission in neutral or the automatic transmission in park a...

Страница 33: ...ank to prevent contamination 2 Remove the drain plug and drain the oil into a container large enough to hold at least 5 litres 1 32 U S gal for the VR70 and 9 litres 2 38 U S gal for the VR150 3 Install and tighten the plug 4 If you are replacing the oil filter follow filter replacement procedures 5 Disconnect the air outlet line 1 4 inch and 5 16 inch lines from the back of the tank 6 Remove the ...

Страница 34: ...m muffler not shown VR150 System Check the inside of the tank for any evidence of metal filings or contamination if found flush the tank hoses and cooler Metal filings will damage the compressor Pressure relief valve Discharge cap Spring Thimble screen Rear cap seal Coalescing filter Coalescing filter spring O ring ...

Страница 35: ...d away from the filter and a new coalescing filter Make sure that the spring is in place as it holds the coalescing filter tight against the rear cap seal The large spring or wave spring also prevents electrostatic buildup by grounding the coalescing filter If the spring is not installed an electric arc may occur which could result in an explosion potential tank rupture or fire 15 Install the disc...

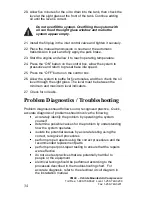
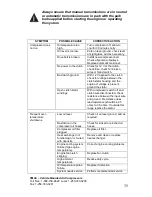
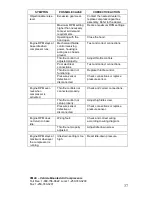
Страница 36: ... system to settle for five minutes and then check the oil level through the sight glass The level must be between the minimum and maximum level indicators 27 Check for oil leaks Problem Diagnostics Troubleshooting Problem diagnosis should follow sound recognized practice Quick accurate diagnosis of problems should involve the following accurately identify the problem by operating the system yourse...

Страница 37: ...o the clutch check for voltage between the clutch stator housing and the engine If voltage is present ground the stator Open clutch stator windings With compressor switch off and clutch wire disconnected check resistance between the input wire and ground Resistance less lead resistance should be 2 5 ohms to 3 0 ohms If outside this range replace the stator Frequent over temperature shutdowns Low o...

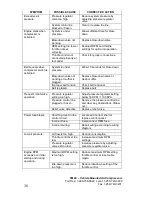
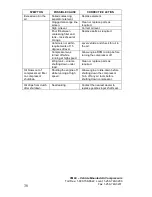
Страница 38: ...e blow down valve or clean muffler Improper belt tension Check belt tensioner Belt is glazed Replace belt Frequent relief valve operation Pressure regulator setting too high Adjust pressure regulator setting below 160 PSI 1103 KPA Pressure control line plugged or frozen Remove the pressure control line and clear any obstructions Blow out Relief valve defective Replace relief valve Power fuse blows...

Страница 39: ...ntrol not adjusted properly Adjust throttle controls Poor electrical connections Test and correct connections Throttle control not functioning Replace throttle control Pressure sensor defective or disconnected Check connections or replace pressure sensor Engine RPM over revs when compressor is activated Throttle controls not connected properly Check and correct connections Throttle control not set...

Страница 40: ...s not within requirements of 15 degrees of level Level vehicle and check for oil in the air Compressor was turned off while running at high speed Allow engine RPM to drop before turning the compressor off Wing tank volume shutting down under load Clean or replace parts as required Oil blows out of compressor air filter on compressor shutdown Shutting the engine off while running at high speed Allo...

Страница 41: ...t manufacturer defects in materials and workmanship for the lifetime of the Compressor Assembly Restrictions apply refer to VMAC Warranty Policy and VMAC Limited Lifetime Warranty for full details Warranty Registration The VMAC warranty form is located at the back of this manual This warranty form must be completed and sent to VMAC at the time of installation for any subsequent warranty claim to b...

Страница 42: ...This page intentionally left blank ...

Страница 43: ...______________ Installation Date _____ _____ _____ Day Month Year Owner Information Company Name __________________________________________ Address ________________________________________________ City _____________________ State Province _______________ Zip Postal ________________ Phone ____ ____ _____ Email Address ___________________________________________ Vehicle Information Year ____________...

Страница 44: ...This page intentionally left blank ...

Страница 45: ...This page intentionally left blank ...

Страница 46: ...This page intentionally left blank ...

Страница 47: ......

Страница 48: ......

Отзывы: