background image


24 

ASSEMBLY INSTRUCTIONS 


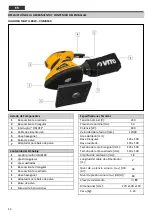
Dust collection bag assembly 

1. Put the dust bag (6) into the adapter (7);  

2. Fit the dust bag adapter (7) by pushing it all the way 
in;  The  dust  is  extracted  directly  into  the  dust  bag 
through the sanding sheet and the sanding base plate 
(1/2). 

3.  Pull the dust bag adapter to remove it once again; 

For  safety  reasons  it  is  essential  to  use  the  dust 
collection bag or a dust extraction system. 

Installing and changing the sanding base plates 


Snap the sanding base plate (1 / 2) onto the sander 
(the base plate only fits one way); 


The  groove  in  the  spindle  must  be  in  line  with  the 
sanding base plate hole; 


Place  the  washer  and  tighten  the  screw  with  the 
supplied hex key (5); 

To  remove/change  just  follow  the  previous  steps  in 
reverse. 

Installing and changing the sanding sheets 

Use  only  sanding  sheets  with  the  corresponding 
dimensions and perforated holes. 


Place  the  sanding  sheet  on  the  base  plate  (1/2). 
Check that the holes in the sanding sheet match the 
base plate. 


To remove the sanding sheet, you only need to pull it 
out. 

OPERATING INSTRUCTIONS 

When  working  with  the  sander  multi,  you  should 
consider some precautions and operating procedures: 


Hold the sander firmly.  Loss of control of the sander 
can cause serious injury;   


When  working  on  loose  or  small  parts,  use  fixing 
devices to secure the parts firmly and securely; 


Do not apply excessive pressure to the sander against 
the  workpiece/object.    If  the  speed  decreases 
abruptly,  reduce  the  pressure  on  the  sander 
immediately; 


Never  put  down  the  sander  before  the  base  plate 
(1/2) is completely stopped; 


Wear  hearing  protection  when  using  the  sander.  
Noise exposure may cause hearing loss; 


Switch the sander multi off immediately if any of the 
following problems occur: 

- Leakage of lubricant through ventilation holes; 

- Damage to the sander housing; 

- Damage to the ON/OFF switch; 

- Appearance of smoke or characteristic burning smell; 

Starting and stopping the sander 

1. Before plugging in the power cord (4), make sure the 
ON/OFF switch (3) is turned off; 

2. Hold the sander by the handle; 

3. To switch on the sander, press the ON/OFF switch (1) 
to position I; 

4. To switch off the sander, press the ON/OFF switch, to 
position 0; 

Sander handling 

1. Place the entire surface area of the sanding sheet on 
the material; 

2. Switch on the sander multi, and move it with some 
pressure on the workpiece, making circular/transverse 
and linear movements; 

3.  Use  a  thicker  sanding  sheet  for  greater  material 
removal  and  a  thinner  sanding  sheet  for  finishing 
stages. To decide on the best type of sanding sheet to 
use, perform tests before use on the final product. 

The dust created while the equipment is in use can 
be hazardous to health: 

Always wear goggles and dust mask when sanding; 

All individuals working with the sander or coming into 
the work area should wear a dust mask; 


It is forbidden to eat, drink and smoke while using 
the sander; 


This sander is used for sanding wood, iron, plastic 
and similar materials; 


It is prohibited to use this sander on plaster and 
surfaces that have leaded paint; 

Содержание PRO-POWER VILMB180

Страница 1: ...PT EN LIXADORA MULTI SANDER MULTI ES FR LIJADORA MULTI PONCEUSE MULTI VILMB180...

Страница 2: ...FORMIDADE 11 ES DESCRIPCI N DE LA HERRAMIENTA Y CONTENIDO DEL EMBALAJE 12 INSTRUCCIONES GENERALES DE SEGURIDAD Y UTILIZACI N 13 General 13 Seguridad el ctrica 14 Antes de empezar a trabajar 14 Durante...

Страница 3: ...NFORMITY 27 FR D SCRIPTION DE L QUIPEMENT ET CONTENU DE L EMBALLAGE 28 INSTRUCTIONS G N RALES DE S CURIT ET D UTILISATION 29 R gles g n rales 29 S curit lectrique 30 Avant de commencer travailler 30 P...

Страница 4: ...nte quadrada 1 Chave sextavada 1 Adaptador para saco do p 1 Saco do p 1 Manual de instru es Especifica es T cnicas Tens o nominal V 230 Frequ ncia nominal Hz 50 Pot ncia W 180 Velocidade de rota o rpm...

Страница 5: ...ositivos de comando e com a utiliza o da ferramenta el trica O utilizador tem de saber nomeadamente como parar rapidamente a ferramenta el trica Mantenha se atento e use o bom senso enquanto trabalha...

Страница 6: ...ss rios rotativos Verifique regularmente o estado do cabo de alimenta o se estiver danificado deve ser substitu do por um t cnico qualificado n o permitido repara lo Nunca modifique a ficha do cabo de...

Страница 7: ...a el trica n o podem ser retirados nem inibidos Para evitar acidentes deve ter tamb m em considera o as seguintes precau es e procedimentos A velocidade nominal da lixa tem que ser no m nimo igual vel...

Страница 8: ...soal qualificado apenas com pe as de substitui o originais INSTRU ES DE MONTAGEM Montagem do saco do p 1 Coloque o saco do p 6 no adaptador 7 2 Encaixe o adaptador do saco do p 7 empurrando o mesmo at...

Страница 9: ...cara antip durante os trabalhos de lixagem Todas as pessoas que trabalham com a lixadora ou que entrem no espa o de trabalho devem utilizar uma m scara de prote o antip proibido comer beber e fumar du...

Страница 10: ...do ou danificado Contatos do interruptor n o est o em bom estado ou o interruptor n o funciona Enrolamentos do induzido ou do indutor danificados Enrolamentos do induzido em curto circuito Ligar ou re...

Страница 11: ...VITO assim como qualquer estrago causado pela utiliza o da mesma DECLARA O DE CONFORMIDADE Declaramos sob nossa exclusiva responsabilidade que este artigo com a designa o LIXADORA MULTI 180W com o c...

Страница 12: ...ase oscilante cuadrada 1 Llave hexagonal 1 Adaptador para bolsa de polvo 1 Bolsa de polvo 1 Manual de instrucciones Especificaciones T cnicas Tensi n nominal V 230 Frecuencia nominal Hz 50 Potencia W...

Страница 13: ...on los dispositivos de control y el uso de la herramienta el ctrica En particular el usuario debe saber c mo detener r pidamente la herramienta el ctrica Vigila y usa el sentido com n mientras trabaja...

Страница 14: ...rramienta de la toma de corriente Los cables de alimentaci n da ados aumentan el riesgo de sufrir una descarga el ctrica Mantenga el cable de alimentaci n y el enchufe alejados de las fuentes de calor...

Страница 15: ...No use ropa suelta o bisuter a Mantenga el pelo la ropa y los guantes alejados de las partes m viles Los dispositivos de mando y seguridad instalados en la herramienta el ctrica no deben ser retirados...

Страница 16: ...y siempre con piezas de recambio originales INSTRUCCIONES DE MONTAJE Montaje de la bolsa de polvo 1 Ponga la bolsa de polvo 6 en el adaptador 7 2 Ponga el adaptador de la bolsa 7 empuj ndolo hasta el...

Страница 17: ...para la salud Siempre utilice gafas de protecci n y mascara anti polvo durante los trabajos de lijado Todas las personas que manejen la lijadora o que entren en el espacio de trabajo deben utilizar un...

Страница 18: ...ntactos del interruptor no est n en buenas condiciones o el interruptor no funciona Est tor y rotor da ados Est tor y rotor en cortocircuito Conectar o reparar el cable de alimentaci n Reparar o cambi...

Страница 19: ...da os causados por su uso est n excluidos de la garant a DECLARACI N DE CONFORMIDAD Declaramos bajo nuestra exclusiva responsabilidad que este art culo con la designaci n LIJADORA MULTI 180W con la r...

Страница 20: ...sanding base plate 1 Hex key 1 Dust bag adapter 1 Dust collection bag 1 Instruction manual Technical data Rated voltage V 230 Rated frequency Hz 50 Input power W 180 Rotation speed rpm 12000 Sanding s...

Страница 21: ...sidered an integral part of the sander multi and must always be made available alongside the product Familiarize yourself with the control devices and usage of the power tool In particular the user mu...

Страница 22: ...of extension cords to connect the power cord is not recommended However if you use an extension cord you should take some precautions such as If you use the power tool outdoors use only an extension c...

Страница 23: ...entilation slots are not blocked while operating the sander Do not place any objects over the slots Make sure that you don t damage the electrical circuits gas and water pipes when operating the equip...

Страница 24: ...the speed decreases abruptly reduce the pressure on the sander immediately Never put down the sander before the base plate 1 2 is completely stopped Wear hearing protection when using the sander Nois...

Страница 25: ...ilation slots regularly or whenever they become blocked Storage When not in use store the sander in a dry clean place free of corrosive smoke and out of the reach of children ENVIRONMENTAL POLICY The...

Страница 26: ...ly or turns slowly ON OFF switch contacts are damaged Mechanical obstruction The sander multi is running over excessive pressure motor in overload Carbon brushes are worn out Repair or replace the swi...

Страница 27: ...nter of the brand VITO as well as any damage caused by the use of it DECLARATION OF CONFORMITY We declare under our sole responsibility that the product labelled 180W SANDER MULTI with code VILMB180 c...

Страница 28: ...pon age carr 1 Cl hexagonale 1 Adaptateur pour sac poussi re 1 Sac poussi re 1 Mode d emploi Caract ristiques techniques Tension nominale V 230 Fr quence Hz 50 Puissance W 180 Vitesse de rotation tpm...

Страница 29: ...Familiarisez vous avec les dispositifs de commande et l utilisation de l outil lectrique En particulier l utilisateur doit savoir comment arr ter rapidement l outil lectrique Soyez vigilant et faites...

Страница 30: ...bjets tranchants et des accessoires rotatifs V rifiez r guli rement l tat du c ble d alimentation S il est endommag il doit tre remplac par un technicien qualifi Ne modifiez jamais la fiche du c ble d...

Страница 31: ...s ou bloqu s Les pr cautions et proc dures suivantes doivent galement tre suivies pour viter les accidents La vitesse de rotation nominale de la feuille abrasive doit tre au moins gale la vitesse max...

Страница 32: ...sac poussi re 7 jusqu il s enclenche en position La poussi re est extraite directement dans le sac poussi re travers de la feuille abrasive et du plateau de pon age 1 2 3 Tirez sur l adaptateur du sac...

Страница 33: ...sque anti poussi re lors du pon age Toutes les personnes travaillant avec la ponceuse ou qui se trouvent dans la zone de travail doivent porter un masque anti poussi re Il est interdit de manger boire...

Страница 34: ...e sont pas en bon tat ou l interrupteur ne fonctionne pas Enroulements de rotor ou stator endommag s Enroulements du rotor en court circuit Branchez ou r parez le c ble d alimentation R parez ou rempl...

Страница 35: ...e la marque VITO ainsi que n importe quel dommage caus par l utilisation de l appareil D CLARATION DE CONFORMIT Nous d clarons sous notre responsabilit exclusive que ce produit avec la d nomination PO...

Страница 36: ...tes normas ou documentos normativos EN 62841 1 2015 AC 15 EN 62841 2 4 2014 AC 15 EK9 BE 88 2014 AfPS GS 2014 01 PAK EN 55014 1 2006 A1 2009 A2 2011 EN 55014 2 2015 EN 61000 3 2 2014 e EN 61000 3 3 20...

Страница 37: ...VILMB180_REV02_SET20...

Отзывы: