Battery InstallatIon
1. Open the battery compartment.
2. Insert eight DC 1.5V C (UM-2) batteries (not included) following the
correct polarity (+/-) marked.
3. Close the battery compartment.
note
: Installing the batteries incorrectly could result in damage.
Do
not
mix old and new batteries.
Do not
mix Alkaline, Carbon-Zinc or
Nickel-Cadmium batteries. For the best performance, we recommend
you use good quality Alkaline batteries. Remove batteries if not used a
long period of time.
aC Power
This device operates on a 120V~60Hz connection or eight DC 1.5V
C (UM-2) batteries (not included).
Do not
attempt to connect to any
other power source, as it may cause damage to this device.
1. Plug the AC power cord into the radio's rear AC power socket, and
into a power outlet.
2. The unit will automatically disconnect from the batteries and operate
solely on AC power.
oPeratIng InstruCtIons
raDIo
1. Press the power button to turn the radio ON. FM is the default station,
set to 87.5MHz.
2. To search stations, press the skip forward button. Press and hold the
skip forward button to access auto scan.
3. To memorize stations into presets, press and hold the program button
while listening to your desired station. "MEM" and "P01" will blink on
the LCD display. Press skip forward to choose which memory preset
you'd like to assign the station, up to "P20", press "PROGRAM" to
confirm. You can save up to twenty stations for both FM and AM.
4. To access preset stations, press program once and skip forward until
you find your chosen preset.
5. Press mode to automatically scan and save all stations that are
received.
6. Press band to switch between FM and AM.
CD
Compatible with CD/CD-R/CD-RW
1. Press the "FUNCTION" button to select CD mode.
2. Open the CD door and place a CD (with the label side up) into the CD
compartment.
3. Close the CD door.
4. A focus search is performed on the inserted CD. The total number of
tracks is read and appears on the display.
5. Press the play/pause button to listen to your CD. The track number will
appear on the LCD display. Press stop to stop listening to your CD.
6. Press the skip forward button to skip to the next song. Press and hold
the skip forward button to fast forward the current song.
7. Press the skip backward button to return to the beginning of the
current song. Press and hold the skip backward button to rewind the
current song.
8. Press mode once to repeat the song being played. "REP" will be
displayed. Press mode twice to repeat all the tracks. "REP ALL" will
be displayed. Press mode three times to randomly play the songs.
"RAND" will be displayed. Press mode one time to cancel previous
functions.
9. Press program when you're not playing a CD. "P01" and "PROG"
will flash. Press skip forward to select the song you'd like to save,
and press program again to store your selection. You can save up to
20 songs. Press play/pause to play the programmed songs. While
"PROG" is flashing press STOP twice to cancel programming.
taPe
1. Press the tape stop/eject button to open the cassette compartment.
Insert your cassette tape, bottom side up and tape facing you. Close
the compartment.
2. Press the "FUNCTION" button to switch into cassette mode. "TAP" will
be displayed. Adjust the volume to your desired level.
3. Press the tape pause button to stop the tape during recording or
8082761
CD Cassette BoomBox
Instruction Manual
FEATURES:
1. Play CDs, cassettes and AM/FM radio
2. Record on cassette tapes
WHAT’S INCLUDED:
• CD cassette boombox
• Detachable AC cord
• Instruction manual
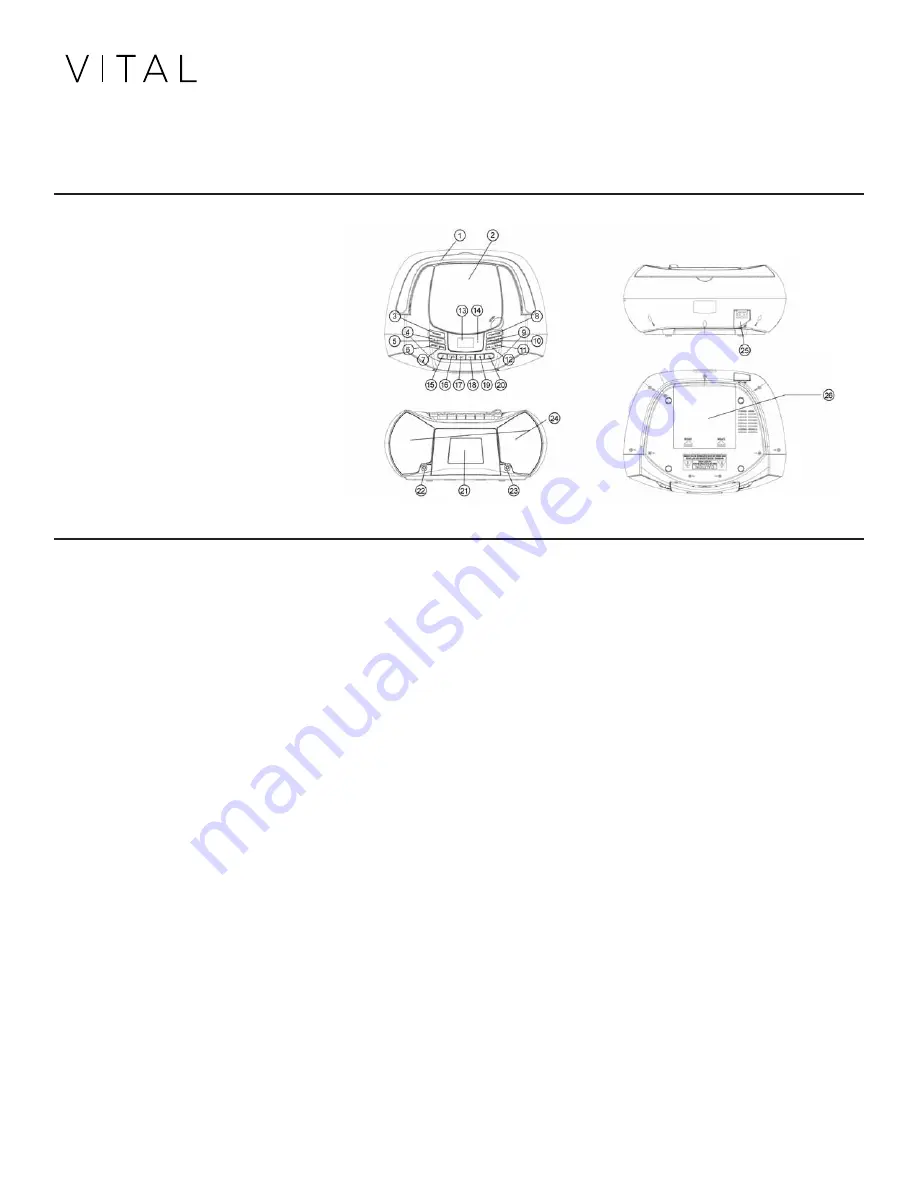
CompoNENT IDENTIFICATIoN:
1. Handle
2. CD door
3. Power button
4. Play/Pause
5. Stop/Band
6. Program
7. Mode button
8. Function
9. Skip forward
10. Skip backward
11. Volume up
12. Volume down
13. LCD display
14. Power indicator
15. Tape pause
16. Tape stop/Eject
17. Tape skip forward
18. Tape skip backward
19. Tape play
20. Record
21. Tape door
22. Phone jack
23. AUX IN jack
24. Speakers
25. AC power socket
26. Battery compartment


