background image


Operators Manual 


Operation 


M55-ML3-UG, Rev A


24


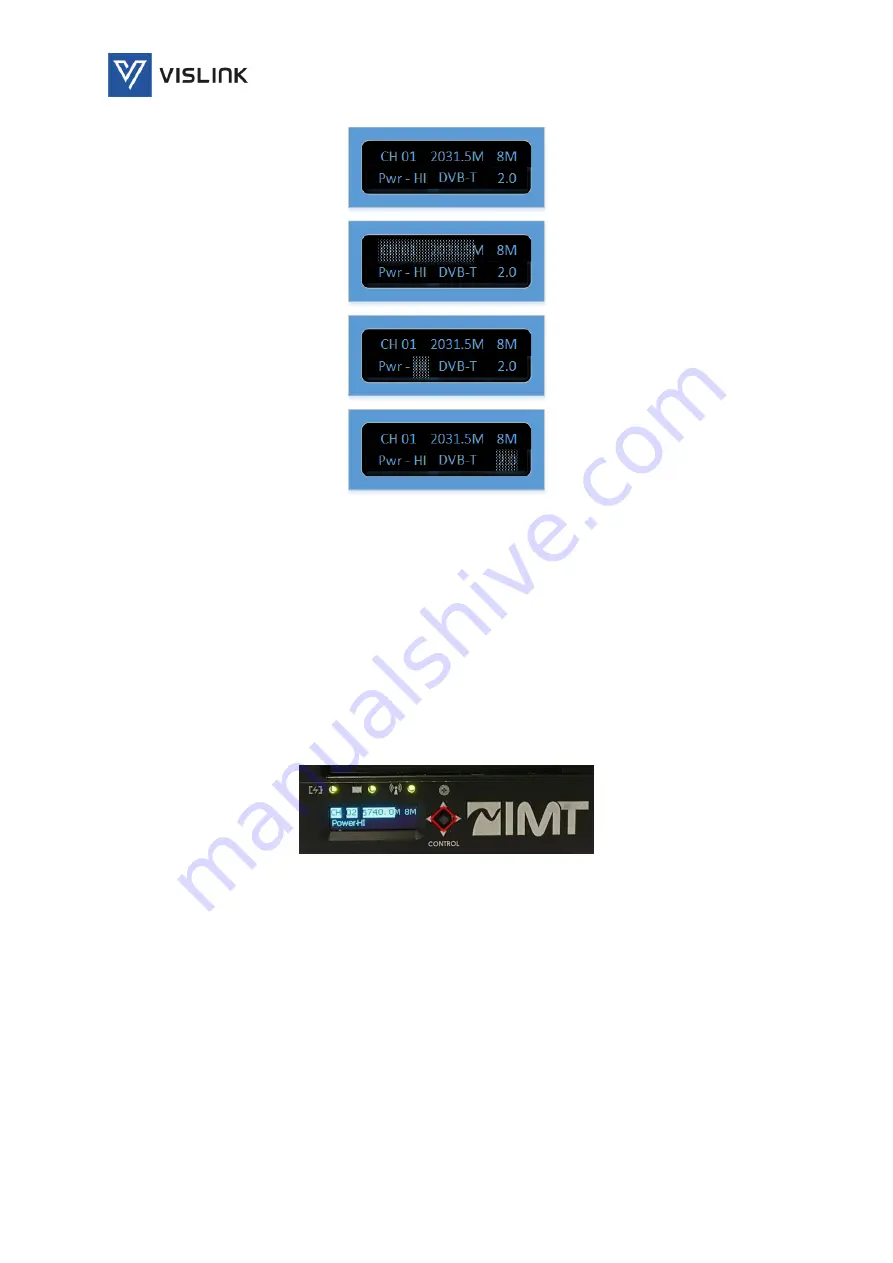
Figure 10  User Interface - Shadowing Shown on Parameters being Changed or Set 

 
The Local User Interface consists of an OLED display and a 4-way joystick. 
To make changes to these features you: 

1)


Click the center of the joystick to initiate 

2)


Click joystick Left/Right to outline the parameter you wish to change 

3)


Click the joystick Up/Down to scroll through values. 

4)


Once the required value is chosen, click the center of the joystick again to exit. 

5)


To choose the next feature, move toggle left/right. 


Figure 11: Joystick for Control 


8.2.1.


Power settings from OLED Display 

High, Low and StandBy show up on the OLED display as HI, LO, and STB. 


Содержание Microlite 3

Страница 1: ...Microlite 3 HD Ultra Compact Wireless Video System Camera Transmission System ...

Страница 2: ...onventions NOTE Notes show to convey additional information where potential equipment damage could occur CAUTION Cautions show where potential equipment damage could occur WARNING Warnings show where there is potential for personal danger or risk of death Read all warnings and understand them before carrying out work on any equipment This includes peripherals and any related equipment in use The d...

Страница 3: ...Operators Manual Document History M55 ML3 UG Rev A iii 2 Document History Version Date Modification Firmware Version A 6 26 2020 First release of document n a ...

Страница 4: ...ations 14 Frequency Bands and RF Performance 14 Modulation Modes 14 MPEG Encoder 14 Control 15 Wi Fi Wireless Web page 15 Power Requirements 15 Environmental 15 Altitude 16 Physical Characteristics 16 Installation 17 Overview 17 Physical Description 17 Outline Drawing 17 Ship Kit and Accessories 18 Physical Installation 18 Connectors 18 Power Serial Port Connections Item 5 19 Antenna Connection 20...

Страница 5: ...ion 41 Manage Transmitters 41 Manage Selected Transmitters 42 Remote Control Action Keys 42 Remote Control 43 Remote Control Commands 43 Usage Examples 45 Example 1 To Request Unit Model Number 45 Example 2 To Request Unit Serial Number 45 Alarm Reporting 46 Alarm Example 46 Table of Figures Figure 1 MLT3 Functional Block Diagram 13 Figure 2 Outline Drawing 17 Figure 3 MLT3 Connectors 18 Figure 4 ...

Страница 6: ...equency Plans 33 Figure 25 MLT3 Connectors 35 Figure 26 MLT3 RC and CC Typical Set Up with Direct Connect 36 Figure 27 MLT3 Camera Control with Fiber Extension 37 Figure 28 Adding MicroLite to RC Application 38 Figure 29 Adding new Transmitter 38 Figure 30 Retrieving MLT3 Status from RC Application 39 Figure 31 Applying Parameter Using the RC Application 40 Figure 32 Saved Presets 40 Figure 33 Rem...

Страница 7: ... processed In the case of Beryllium Oxide a white ceramic material the principal hazard is from the dust or fumes which are carcinogenic if ingested inhaled or entering damaged skin Please consult your local authority before disposing of these components CAUTION Tantalum Capacitors When subjected to reverse or excess forward voltage ripple current or temperature these components may rupture and co...

Страница 8: ...onizing radiation It is important to note that the guidelines adopted differ throughout the world and are from time to time re issued with revised guidelines For VISLINK use a maximum power density limit w of 1w m is to be applied when calculating minimum safe working distances Appendix A refers WARNING Any transmitting equipment radiating power at frequencies of 100 kHz and higher has the potenti...

Страница 9: ...to the RF radiation may be unaware of and has no control over the radiation energy received The uncontrolled environment conditions can arise even in the best regulated operations and for this reason the limits defined for the uncontrolled environment have been assumed for the VISLINK recommended limit Documents a and b also show the RF power density guidelines to be frequency dependent Different ...

Страница 10: ...mW of power in a small package providing long range reliable HD video transmission The Microlite 3 is a compelling choice when video quality exceptional range and reliability are required Vislink s COFDM technology ensures the transmission of uninterrupted live pictures over long ranges despite the effects of foliage challenging terrain buildings and other common non line of sight limitations This...

Страница 11: ...oad spectrum of camera sizes platforms and markets Microlite 3 applications include Sporting Events Live Production REMI Steadicam Event Coverage Drones 5 1 Features and Benefit Table 1 Features and Benefits Feature Benefit Light Weight 6 5 ounces 185 grams Inputs HDMI or SDI camera Outputs HDMI or SDI video Video Transmission Broadcast quality Frequencies Licensed and ISM Latency Very Low Encodin...

Страница 12: ...listen for instructions Hibernate to full power takes less than 12 seconds 5 4 Wi Fi Controller The MLT3 features a Wi Fi transceiver for external status control and configuration via an iOS or Android device Controls include Transmitter status On Off Hibernate Product Information Channel modulation and Constellation Control Frequency Plan Update Optional 900 MHz Control 5 5 Transmitter Electrical...

Страница 13: ...the carrier frequency modulates and amplifies the signal The detected output from the amplifier is looped back for the ALC circuitry It also carries both the Wi Fi and 900 MHz transceivers with an embedded ARM Processor for the transmitters main controller Figure 1 MLT3 Functional Block Diagram ...

Страница 14: ... 5 200 7 55MLT3 23 5 1 6 0 200 7 23 55MLT3 23 2 0 2 5 5 1 6 0 200 7 64MLT3 20 6 4 7 1 100 13 6 2 Modulation Modes Modulation DVB T LMST Carriers 2K Constellation QPSK 16QAM Code Rate 1 2 2 3 3 4 5 6 7 8 Guard Interval 1 32 1 16 1 8 1 4 Bandwidth 5 6 7 8 MHz 6 3 MPEG Encoder Video Coding MPEG 4 Part 10 H 264 Video Input HD SDI HDMI Video Formats 720p 24 25 50 59 94 60 1080i 24 25 50 59 94 60 Audio ...

Страница 15: ...Fi Wireless Web page Settings Frequency Bandwidth Modulation Camera Status Power Frequency Battery Run Time Meter Alarms Power Video Battery Temperature overheat 6 6 Power Requirements Input range 6 28 VDC Power consumption Version dependent 6 7 Environmental Temperature range Full specification 10 to 50 C Ambient Storage 40 to 80 C Humidity 0 to 95 non condensing ...

Страница 16: ...G Rev A 16 6 8 Altitude Operating 20 000 ft 6 000 m Storage 50 000 ft 15 000 m 6 9 Physical Characteristics Size 4 21 D x 2 25 W x 1 51 H 107 D mm x 57 W mm x 38 H mm Volume 14 2 cubic inches 2318 cubic centimeters Weight 6 5 ounces 185 grams ...

Страница 17: ... small size and power consumption of the MicroLite 3 it may be used in various applications MicorLite 3 s low power consumption and small size make it an ideal solution for production and PoV cameras as well as a drone robotic and mobile solutions 7 2 Physical Description MicroLite 3 is housed in an aluminum chassis with a black anodized finish 7 2 1 Outline Drawing Figure 2 Outline Drawing ...

Страница 18: ...0053 001 R CABLE MICRO USB B TO STD A 1 5M 1 3 940 SCC2 18A R SCC2 18 MicroLite 3 TX Kit Case 1 4 922 B1172 01A Cable Super Slim High Speed HDMI Cable M M 1 foot 1 5 921 B437 01A Cable 1 0 2 3 DIN to BNC Male 18 L 2 5CHD 3G HD SDI 1 6 691 00442 00A General Brand right angle bracket with a vertical and horizontal flash shoe ML3 1 7 865 00083 000 Vello Multifunction ball head with removable top bott...

Страница 19: ...edded in SDI DIN Bottom of unit 5 User Data In RS232 Lemo 7 pin Bottom of unit 5 Camera Control Data External control data Lemo 7 pin Bottom of unit 6 Wi Fi Remote Control Embedded Antenna Embedded 7 Software USB Micro USB Bottom of unit 7 4 2 Power Serial Port Connections Item 5 Item 5 is a 7 pin Lemo connector that provides connectivity for the following Power Input 6 5 28VDC RS232 RS422 485 S B...

Страница 20: ...ere are three different mounting models of the MLT3 with different RF output connectors Standard Hotshoe SMA Clamshell N Male L Bracket SMA 7 4 4 Connecting Power The Microlite 3 operating voltage with 6 28VDC The MLT3 kit includes 2 power cable options 1 Lemo to D Tap for connecting to a battery or camera Item 8 in the accessory kit 2 Lemo to the bare tinned wire for application specific or OEM i...

Страница 21: ...ing Channel and frequency Modulation Type Band Width Transmission State The 3 LED indicators above the OLED display are for DC Power detection also low or overvoltage alarms Video input detection RF Transmission state Figure 5 Powering up Microlite 3 The OLED display and control joystick and allows you to set the following locally Channels Set to channels 1 10 The channels are programmed via the w...

Страница 22: ...ng Figure 6 Green LED indicators and OLED Display Figure 7 No Video Input Sensed and RF is on Standby 8 2 Using the Local User Interface to Control the Microlite 3 The MLT3 local user interface displays the following Channel and Frequency Bandwidth Power State Modulation Type Band optional Only 3 of the parameters may be changed via the front panel joystick see wireframe below Channel Power State ...

Страница 23: ...Operators Manual Operation M55 ML3 UG Rev A 23 Figure 8 User Interface Wire Frame Figure 9 Local User Interface ...

Страница 24: ...lick the center of the joystick to initiate 2 Click joystick Left Right to outline the parameter you wish to change 3 Click the joystick Up Down to scroll through values 4 Once the required value is chosen click the center of the joystick again to exit 5 To choose the next feature move toggle left right Figure 11 Joystick for Control 8 2 1 Power settings from OLED Display High Low and StandBy show...

Страница 25: ... Power Setting When you switch to HI LO SB from Hibernate the system would reboot power cycle automatically Figure 14 Microlite 3 Rebooting from Hibernate 8 2 2 SCAN Feature The scan feature is used by the Microlite 3 to select a non adjacent clear frequency channel based on an algorithm To access this feature long press the center of the toggle button A screen DFS SCAN would be displayed Once the...

Страница 26: ...umber The serial number location is located on the back of the unit opposite the User Interface The MLT3 may be connected to 4 devices at a time 8 3 1 Connecting to the Web Page Connect to the Microlite 3 Web page Open the Wi Fi option on any Wi Fi enabled devices such as a smartphone tablet or laptop Check for the serial number on the backside of Microlite 3 for example MLT301241 Select the seria...

Страница 27: ...igure 17 Webpage Connection via Wi Fi 8 3 2 Home Page Features Transmission Mode Device Status System information Alarms No Video Overheating Low Voltage this appears as an orange banner across all pages Figure 18 Home Page RF Transmission in Standby ...

Страница 28: ...t the power levels are kept up so that it could be turned ON within few seconds HIBERNATE In this mode most of the transmitter features are turned off except for the Wi Fi It requires a few seconds to transition out of the hibernate mode Figure 19 Power Modes 8 3 4 Device Status The Status Bar displays the transmitter s operational status Transmitter Status Band optional Frequency Modulation Video...

Страница 29: ...Operators Manual Operation M55 ML3 UG Rev A 29 Figure 20 MLT3 Device Status Clicking this icon on the top right corner of the Web page opens the Options Menu Figure 21 Microlite 3 Options Menu ...

Страница 30: ... selection Click Apply to apply the changes A blue outline indicates the current channel 2 Modulation Type DVB T or LMST depending on application and pair receiver 3 Modulation The modulation section features 2 modulation schemes 2 presets and one manual The preset values are chosen for 2 different applications High Quality This gives a high bit rate when quality is a premium The range will be sho...

Страница 31: ... Constellation 16QAM Code rate 3 4 Guard Interval 1 8 Bandwidth 8 MHz Data rate 16 59 Mbps 2 Long Range Constellation QPSK Code rate 1 2 Guard Interval 1 8 Bandwidth 8 MHz Data rate 5 53 Mbps 8 3 5 4 Manual Settings Each field under manual setting can be specifically chosen based on the application Constellation 16QAM QPSK Code Rate 1 2 2 3 3 4 5 6 7 8 Guard Interval 1 32 1 16 1 8 1 4 Bandwidth 5 ...

Страница 32: ...rol Channels 1 5 8 3 6 3 Encryption Optional Click the menu button to choose the Settings page and then navigate to the Encryption section via the Advanced tab Use the Encryption drop down menu to choose the needed settings The options are Disabled Key 1 Key 2 Key 3 Key 4 Key 5 Click Apply a setting saved banner appears when changes have been saved 8 3 7 Frequency Plan Page Ten channels may be pro...

Страница 33: ...gs page To remove a frequency click on the trash can icon 8 3 7 2 Adding a New Frequency to the List The list cannot exceed 10 frequencies Whenever a new frequency needs to be added an unused frequency must be deleted Click the add channel button at the bottom of the page The Channel number is present by default Enter the required frequency value without the decimal point For example enter 2031500...

Страница 34: ...Number Description FCDT ASSY 7101 Focal Point Outdoor Unit SC APC 410 490MHz 900MHz FCDT ASSY 7102 Focal Point Outdoor Unit SC APC 410 490MHz 900MHz IDX FCDT ASSY 7103 Focal Point Outdoor Unit SC APC 410 490MHz 900MHz A B FCDT ASSY 7105 Focal Point Outdoor Unit LC UPC 410 490MHz 900MHz FCDT ASSY 7106 Focal Point Outdoor Unit LC UPC 410 490MHz 900MHz IDX FCDT ASSY 7110 Focal Point Outdoor Unit ST U...

Страница 35: ... FCDF to Antenna LMR 400 10ft 1 7 USB Stick USB stick with RC application and user guide 1 8 MLT3 ASSY 2101 Power Serial Cable 7 Pin Lemo to Breakout 1 8 5 2 MicroLite 3 Connectors Figure 25 MLT3 Connectors Table 7 MLT3 Connectors Reference Name Description Physical Type Placement 1 RF Output COFDM Output SMA Female 1 Top of Unit 2 Telemetry Telemetry Input output SMA Female 2 Top of Unit 3 Video ...

Страница 36: ...3 UG Rev A 36 8 5 3 Set Up Set the system as shown in the figure below Note The ULRX or L2174 must be on the inverted spectrum for the video to lock with the MicroLite in LMST Figure 26 MLT3 RC and CC Typical Set Up with Direct Connect ...

Страница 37: ...ct the MLT3 Power Serial Cable to both the power source and the RS485 input output of the camera 5 Power on all units 6 Open the application and enter the MLT3 Transmitters name serial number and channel into the application a The VRC may control up to 5 MicroLite s at a time b The MicroLite s must be set to an individual telemetry channel using the Wi Fi control application c The Microlite has be...

Страница 38: ...display one MicroLite information at a time however it can set the parameters of all 5 transmitters at the same time a To get the transmitter parameters press the control button b Wait for the time bar to finish the MicroLite parameters will populate automatically Preprogramed channels Enter DF name SN and channel Press Add The laptop must have only one USB port running for the VRC to detect ...

Страница 39: ...ly to Device button for the FCDF to send the changes to the MLT3 When the time bar reaches 100 the changes will have taken effect g You may verify changes by press the Control button 9 Saving setting to a preset a You may set and recall presets and store them for later use b Press Save Preset to save parameters You may verify the preset by pressing the Preset tab 10 Retrieving a preset a Press the...

Страница 40: ...n c Wait for the parameters to load d Press the Apply to Selected button Waiting for the unit to transmit the command 12 Camera Control Operation use the manual for the manufacturer s camera OCP combination Notes 1 Do not check a box if the transmitter is not on The transceiver will not finish the sequence 2 The VRC application will not read the new changes from the MLT3s That will need to be done...

Страница 41: ...ust be configured for each individual channel using the Wi Fi local interface MicroLite s channel cannot be programmed from the VRC application The Manage Transmitter section includes 1 Name Name given to the individual transmitter 2 Port The port connection on the device 3 Channel Transmitter telemetry channel 4 Control allows to ping and retrieve transmitters status and set up to remote control ...

Страница 42: ...T or LMST push to activate Bandwidth Buttons Modulation type dependent push to activate Constellation Buttons QPSK or 16QAM push to activate Code Rate Drop Down Modulation type dependent pick a value Guard Interval Drop Down Modulation type dependent pick value 1 8 recommended if the camera is moving Video Format Drop Down Choose camera format 8 6 3 Remote Control Action Keys The 3rd section contr...

Страница 43: ...4 Unless command 0x6F is used you must wait 5 seconds between each set command Wait for a response to each command before sending the next command PR Command R W Command String I Set Response Factory Parameters 3 NOTE Internal Factory uses to align the I Q modulator RW NU tt ss 60 dd dd CS CR LF 1 dd Factory Parameter Type 00 RF loop control 2 dd lower power loop mode 00 open loop 01 closed loop 3...

Страница 44: ... Data NOTE Internal Factory uses to support system tracker R NU tt ss 6E dd dd CS CR LF 0 to request number of data lines available 1 to request specific data line 1 dd Number of data lines available or dd dd Configuration data I Request Configuration Data W NU tt ss 02 EE dd CS CR LF 1 dd 00 Get number of data lines available 01 nn Get specified data line Error Responses In the event of a communi...

Страница 45: ...s complement of Target address to end of data CR Carriage Return LF Line Feed In all examples shown the packets are as they would be displayed on an ASCII terminal the s has been added to the packet for visual delimiters only and do not appear on the terminal A 01 is transmitted as a 2 digit ASCII code 30h and 31h 8 7 1 2 Example 1 To Request Unit Model Number There are two commands to request the...

Страница 46: ...m Code Range High Priority 0x01 0x1f 0x20 0x3F 0x40 0x5F 0x60 0x7F Medium Priority 0x80 0x9F 0xA0 0xBF 0xC0 0xDF Low Priority 0xE0 0xFF High priority alarms generally reflect major problems such as FPGA failures or catastrophic failures Medium priority alarms are significant and need to be corrected but may not impact the system Low priority alarms are considered warnings To attain the alarm descr...

Страница 47: ...Operators Manual Operation M55 ML3 UG Rev A 47 Figure 34 Clamshell Goldmount Assembly Instruction Appendix B Mounting Assembly Instruction ...

Страница 48: ...Operators Manual Operation M55 ML3 UG Rev A 48 Figure 35 Clamshell V Clip Assembly Instruction Figure 36 L Bracket Goldmount Assembly Instruction ...

Страница 49: ...Operators Manual Operation M55 ML3 UG Rev A 49 This page is intentionally unused ...

Отзывы: