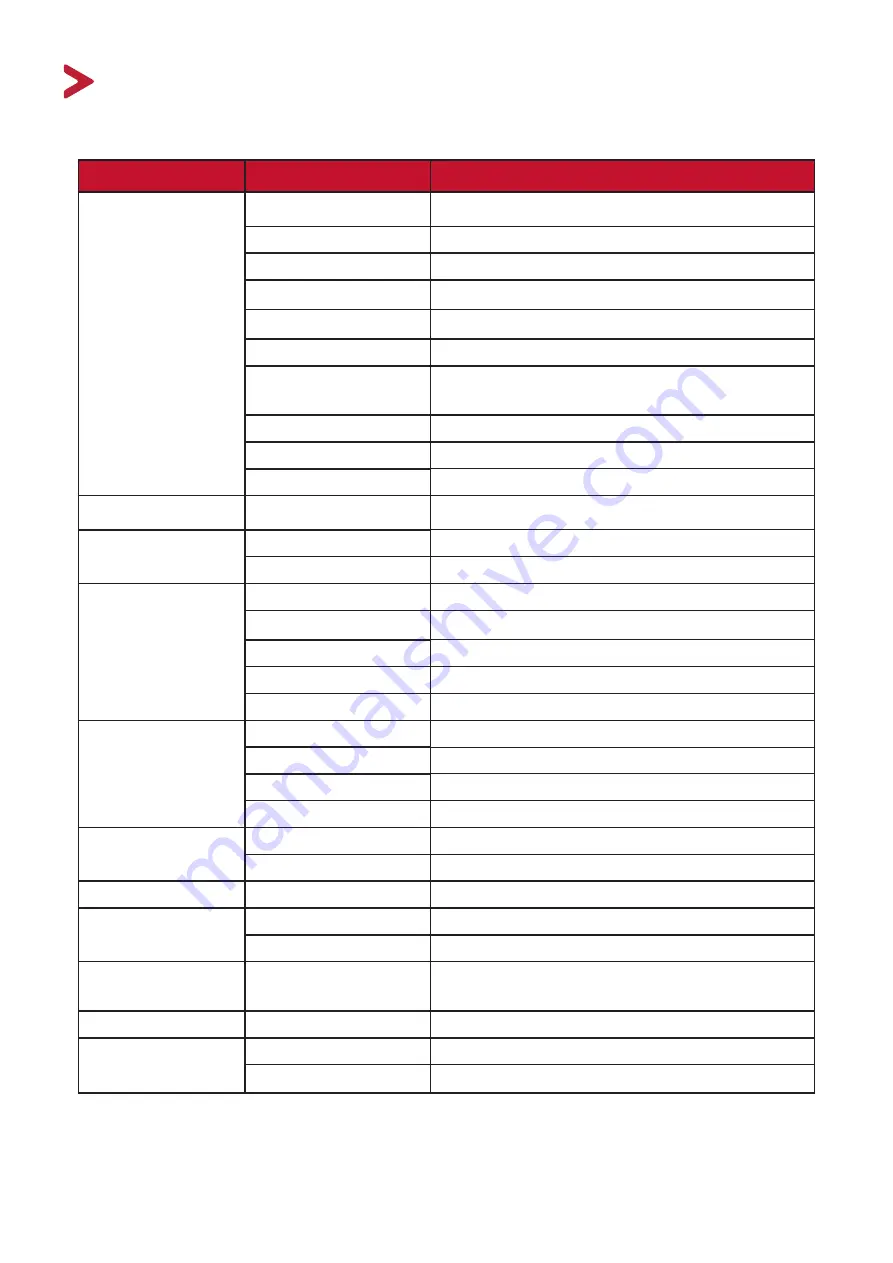
ViewSonic M1+ G2 Скачать руководство пользователя страница 70

70

Appendix

Specifications

Item

Category

Specifications

Projector

Type

0.2” WVGA, LED

Display Size

24”~100”

Throw Distance

0.64-2.66 m (38”@1 m)

Lens

F=1.7, f=5.5 mm

Optical Zoom

Fixed

Light Source Type

RGB LED

Light Source Life 

(Normal)

up to 30,000 hours

Display Color

1.07 Billion Colors

Keystone

-/+ 40 (Vertical)

Battery Capacity

12,000 mAh, 3.7Vx3

Input Signal

HDMI

f

h

: 15K~102KHz, f

v

:23~120Hz,

Resolution

Native

854 x 480

Support

VGA (640 x 480) to Full HD (1920 x 1080)

Input

HDMI

1 (HDMI 1.4, HDCP 1.4)

Audio In

Bluetooth 4.2

USB Type-A

1 (USB 2.0 Reader)

USB Type-C

1 (Power input - 5V/2A)

Wi-Fi

1 (5G)

Ouput

Speaker

3W Cube x 2

USB Type A (Power)

1 (USB 2.0, 5V/1A; share with USB reader)

Audio Out (Bluetooth) Bluetooth 4.2
Audio Out (3.5 mm)

1

Power Adapter

Input Voltage

AC 100-240V, 50/60 Hz (auto switch)

Output Voltage

DC 19V/3.42A

Local Storage

Total: 16 GB

Available: 12 GB

Operating 

Conditions

Temperature

0°C to 40°C (32°F to 104°F)

Humidity

0% to 90% (non-condensing)

Dimensions

Physical 

(W x H x D)

151 x 126 x 40 mm 

(5.94” x 4.96” x 1.57”)

Weight

Physical

0.7 kg (1.54 lbs)

Power Saving 

Modes

On

45W (Typical)

Off

< 0.5W (Standby)

Содержание M1+ G2

Страница 1: ...gistering your product for future service Warranty information contained in this User Guide will describe your limited coverage from ViewSonic Corporation which is also found on our web site at http w...

Страница 2: ...eding the world s expectations for technological evolution innovation and simplicity At ViewSonic we believe that our products have the potential to make a positive impact in the world and we are conf...

Страница 3: ...s could cause objects to become heated and deformed or even cause a fire The lamp becomes extremely hot during operation Allow the projector to cool for approximately 45 minutes prior to removing the...

Страница 4: ...wer outlet DO NOT remove the grounding prong Please ensure grounding prongs are NEVER REMOVED Protect the power cord from being treaded upon or pinched particularly at the plug and at the point where...

Страница 5: ...Orientation 12 Projection Dimensions 13 Making Connections 14 Connecting to Power 14 DC Power Power Outlet 14 Power on by Power Bank Function 15 Using the Battery 15 Battery Usage Time Information 15...

Страница 6: ...guage 27 Projection Orientation 28 Network Settings 28 Shutting Down the Projector 29 Input Source Selected On Screen Display OSD Tree 30 Operating the Projector 40 Home Screen 40 Home Screen On Scree...

Страница 7: ...Regulatory and Service Information 78 Compliance Information 78 FCC Compliance Statement 78 FCC Radiation Exposure Statement 79 IC Warning Statement 79 Country Code Statement 79 IC Radiation Exposure...

Страница 8: ...8 Introduction Package Contents OK 1 5 6 7 2 3 4 Item Description 1 Projector 2 Power Cord 3 USB Type C Cable 4 Power Adapter 5 Remote Control with Batteries 6 Carrying Bag 7 Quick Start Guide...

Страница 9: ...Ring 14 Return5 5 Micro SD slot 15 Speaker PR 6 DC IN 16 IR Receiver 7 USB C 17 Battery Indicator 8 HDMI 18 Smart Stand 9 Audio Out 19 Lens 10 USB Type A 1 Enacts the selected On Screen Display OSD me...

Страница 10: ...le Bluetooth 5 Up Down Left Right Navigate and select menu items Keystone adjustment 6 OK Confirms the selection 7 Setting Displays the Setting menu 8 Return Returns to the previous screen 9 Home Acce...

Страница 11: ...nstall two AAA batteries observing the battery polarities as indicated in the base of the battery compartment Positive goes to positive and negative goes to negative 3 Replace the battery tray by alig...

Страница 12: ...ocation and distance between the projector and other equipment The projector is designed to be installed in one of the following locations Location Front Table The projector is placed near the floor i...

Страница 13: ...6 49 81 34 86 886 50 127 53 6 1 36 24 5 62 26 43 58 1107 60 152 4 64 32 1 63 29 4 74 72 52 29 1328 70 177 8 75 04 1 91 34 3 87 17 61 01 1550 80 203 2 85 76 2 18 39 2 99 62 69 73 1771 90 228 6 96 48 2...

Страница 14: ...tlet 1 Connect the power cord to the power adapter 2 Connect the power adapter to the DC IN jack at the side of the projector 3 Connect the power cord plug to a power outlet When connected the status...

Страница 15: ...y PD protocol output Additionally at 15V 3A the projector can be powered on and charge simultaneously Using the Battery The battery level icon will show at the top right of the Home Screen As the batt...

Страница 16: ...USB flash drive to the USB Type A port For supported file formats see page 48 USB C Connection Connect one end of a USB Type C cable to the USB C port of your device Then connect the other end of the...

Страница 17: ...reen Mirroring icon 3 Choose ViewSonic PJ XXXX For Android 1 Download and install the Google Home application and open it 2 Pull to refresh the app and wait for 30 seconds 3 ViewSonic PJ XXXX will now...

Страница 18: ...oth that allows the user to connect their device wirelessly for audio playback To connect and pair your device 1 Go to Home Bluetooth 2 Use the Left and Right directional buttons on the remote control...

Страница 19: ...Bluetooth mode 4 A sound effect will be audible upon entering pairing mode 5 Upon successful connection another sound effect will be audible NOTE Once paired if both the projector and your device are...

Страница 20: ...1 Go to Home Bluetooth 2 Use the Left and Right directional buttons on the remote control to select the Bluetooth Out option 3 The projector will search for nearby Bluetooth devices Select your devic...

Страница 21: ...Connection To connect to a Wi Fi network 1 Go to Home Setting Network Settings Wi Fi 2 Press Left or Right on the remote control to select On 3 Available Wi Fi networks will then be displayed Select o...

Страница 22: ...22 22 4 If you connect to a secure Wi Fi network you must enter the password when prompted...

Страница 23: ...me Setting Network Settings Wi Fi 2 Press Left or Right on the remote control to select On 3 From the available Wi Fi networks list select Others and press OK on the remote control 4 Enter the SSID an...

Страница 24: ...24 24 5 Enter the password when prompted NOTE It is recommended to let the system configure the network settings automatically...

Страница 25: ...Up the Projector 1 Ensure the projector is connected to a power source or that the battery has sufficient charge 2 Open the Smart Stand by moving its lens cover down 3 Move the Smart Stand to your de...

Страница 26: ...Carefully adjust the stand to fine tune the projected image s position NOTE If the projector is not placed on a flat surface or the screen and the projector are not perpendicular to each other the pro...

Страница 27: ...Language Projection Orientation and Network Settings Follow the on screen instructions using the OK and Up Down Left Right buttons on the remote control When the Finish screen appears this indicates...

Страница 28: ...ientation Select the preferred projection orientation and press OK to confirm the selection For more information see page 12 Network Settings Select one of the available Wi Fi options For more informa...

Страница 29: ...the remote control will result in the following message 3 Press the Up Down buttons on the remote control to select Turn Off and press OK on the remote control NOTE When not in use please press the P...

Страница 30: ...ust the Image Setting and Advanced menus Main Menu Sub menu Menu Option Image Setting Color Mode Brightest TV Movie Gaming Brightness 0 100 Contrast 0 100 Color Temp 6500K 7500K 9300K Tint 0 100 Satur...

Страница 31: ...tings 3D Sync Auto Off Frame Sequential Frame Packing Top Bottom Side by Side 3D Sync Invert Disable Invert harman kardon Audio Mode Movie Music User Audio Volume 0 20 Mute Off On Light Source Level F...

Страница 32: ...Image Setting Menu After your input source is selected you can adjust the Image Setting menu To access the Image Setting menu 1 Press Setting on the remote control 2 Use the Up Down buttons to select...

Страница 33: ...33 33 33 3 Then use the Left Right buttons to enter the sub menu s and or adjust the settings 4 Press the Return button to go to the previous menu or exit...

Страница 34: ...ips from digital cameras or DVs through the PC input Best for low light environments Gaming Designed for playing video games NOTE Only supports HDMI USB C signal input Brightness The higher the value...

Страница 35: ...settings produce less saturated colors in fact a setting of 0 removes that color from the image entirely If the saturation is too high that color will be overpowering and unrealistic Sharpness A high...

Страница 36: ...vanced Setting Menu After your input source is selected you can adjust the Advanced menu To access the Advanced menu 1 Press Setting on the remote control 2 Press the Right button to access the Advanc...

Страница 37: ...37 37 37 37 3 Use the Up Down buttons to select a menu 4 Then use the Left Right buttons to enter the sub menu s and or adjust the settings 5 Press the Return button to go to the previous menu or exit...

Страница 38: ...screen without altering the image s aspect ratio 4 3 Scales an image so that it is displayed in the center of the screen with a 4 3 aspect ratio This is most suitable for 4 3 images like computer mon...

Страница 39: ...Adjust and choose from Automatic Off Frame Sequential Frame Packing Top Bottom Side by Side 3D Sync Invert Allows for correction if the 3D image depth is inversed harman kardon Adjust the audio setti...

Страница 40: ...on the remote control regardless of what page you are on Menu Description File Management Provides a user interface to manage files and folders Apps Center Access and view all installed applications B...

Страница 41: ...nagement Apps Center Aptoide Bluetooth Bluetooth Speaker Bluetooth Pairing Bluetooth Out Setting Network Settings Wi Fi Off On SSID Configure IP IP Address Subnet Mask Default Gateway DNS Server Other...

Страница 42: ...English French German Italian Spanish Russian Swedish Dutch Turkish Czech Portuguese Thai Polish Finnish Arabic Indonesian Hindi Vietnam Greek Projector Projection Front Table Front Ceiling Rear Tabl...

Страница 43: ...one Off On Smart Energy Auto Power Off Disable 10 minutes 20 minutes 30 minutes Sleep Timer Disable 30 minutes 1 hour 2 hours 3 hours 4 hours 8 hours 12 hours Power Saving Enable Disable harman kardon...

Страница 44: ...el Reset to Factory Default Yes Cancel Firmware Upgrade Software Update Online Software Update by USB OTA Reminder Enable Disable Software Version Information Light Source Hours System Version Memory...

Страница 45: ...2 Select a device on the source list Use the direction buttons to select the desired file Then press OK on the remote control to open the selected file 3 Press the Return button to go to a previous a...

Страница 46: ...files 3 By pressing the Right button Copy Paste Cut Delete Select All and Return boxes will be available for use ement Pictures orage Photo 1 3 png Photo 1 4 png Photo 1 5 png Photo 1 6 png Photo 1 7...

Страница 47: ...Next Repeat All Rotate right Repeat One Play List Information NOTE Tips for Using USB When using USB for reading and or storage please keep in mind the following 1 Some USB storage devices may not be...

Страница 48: ...and read documents in xls xlsx 3 ppt pptx Able to open and read documents in ppt pptx 4 Pdf Able to open and read documents in pdf II Supporting Interface Language 1 Supporting Interface 44 languages...

Страница 49: ...pps 1 To view your Apps select Home Apps Center 2 Use the direction buttons to select the desired App Then press OK on the remote control to launch the App NOTE Press the Home button on the remote con...

Страница 50: ...ons to navigate the menu options When you find your preferred App press the OK button to install it NOTE Users can install third party Apps by apk file in File Management However some third party Apps...

Страница 51: ...2 Use the directional buttons to select the desired App 3 Press and hold OK on the remote control for three 3 seconds The below dialogue box will appear 4 Select OK to uninstall the App NOTE Press th...

Страница 52: ...52 Bluetooth The projector is equipped with Bluetooth that allows the user to connect their device wirelessly for audio playback For more information see Connecting to Bluetooth on page 18page 18...

Страница 53: ...just Network Basic and Advanced Settings Date Time Firmware Update and view Information Network Settings 1 Select Home Setting Network Settings 13 00 Basic Settings Network Settings Date Time Advanced...

Страница 54: ...54 2 View and adjust your Wi Fi and network settings 3 To setup a Wireless connection see Connecting to Networks on page 21page 21...

Страница 55: ...on Firmware Update 2 Use the Up and Down buttons to select the desired option and press OK Then use the Left and Right buttons to make adjustments or selections 3 To return to a previous menu press th...

Страница 56: ...one Provides a rectangular screen image by automatically adjusting the keystone number when there is a trapezoidal screen image caused by the tilting of the projector Enable Automatically adjust the k...

Страница 57: ...er after connecting to the Internet 1 Select Home Setting Date Time 13 00 Basic Settings Network Settings Date Time Advanced Settings Information Firmware Update 2 Use the Up and Down buttons to selec...

Страница 58: ...ze the date and time automatically after connecting to the Internet On Turn on synchronization Off Turn off synchronization Time Zone Select your desired location Time Format Select a different displa...

Страница 59: ...ower cord USB or disconnect from the Internet during the upgrading process 1 Before entering the Firmware Upgrade menu ensure the projector is connected to the Internet 2 To enter the menu select Home...

Страница 60: ...onic website OTA and display the below dialog message if their is new Firmware 4 By selecting Yes a progress bar will appear as the update process begins UPGRADING SOFTWARE PLEASE DO NOT TURN OFF 52 5...

Страница 61: ...ssing OK on the remote control 4 The system will detect the Firmware version and display the above dialog message 5 By selecting Yes a progress bar will appear as the update process begins 6 After rea...

Страница 62: ...ettings Network Settings Date Time Advanced Settings Information Firmware Update 2 Use the Up and Down buttons to select the desired option and press OK Then use the Left and Right buttons to make adj...

Страница 63: ...Turn off automatically after a set period of time Power Saving Lower power consumption if no input source is detected after five 5 minutes NOTE The power consumption of the LED will be changed to 30 a...

Страница 64: ...ojector under other extreme conditions excluding the above it may display auto shut down symptoms which is designed to protect your projector from over heating In cases like this you should switch to...

Страница 65: ...65 65 Menu Description Reset to Factory Default Factory reset NOTE Light Source Hours will remain unchanged...

Страница 66: ...ing Information 13 00 Basic Settings Network Settings Date Time Advanced Settings Information Firmware Update 2 View system status and information NOTE Press the Home button on the remote control to r...

Страница 67: ...en Mirroring Mirror your personal device s screen To setup wireless Screen Mirroring see Wireless Screen Mirroring on page 17page 17 NOTE Ensure your device is connected to the same network as the pro...

Страница 68: ...Adding Apps Add your favorite Apps to the Home Screen 1 From the Home Screen select Add App and then press OK on the remote control 2 Use the directional buttons to select the desired App and press O...

Страница 69: ...Delete Apps From the Home Screen 1 From the Home Screen select the App you want to delete and press and hold OK for three 3 seconds 2 The message Do you want to Delete this application from My Favorit...

Страница 70: ...1920 x 1080 Input HDMI 1 HDMI 1 4 HDCP 1 4 Audio In Bluetooth 4 2 USB Type A 1 USB 2 0 Reader USB Type C 1 Power input 5V 2A Wi Fi 1 5G Ouput Speaker 3W Cube x 2 USB Type A Power 1 USB 2 0 5V 1A share...

Страница 71: ...47 59 94 27 576i 720 1440 x 576 15 63 50 27 576p 720 x 576 31 25 50 27 720 50p 1280 x 720 37 5 50 74 25 720 60p 1280 x 720 45 60 74 25 1080 24P 1920 x 1080 27 24 74 25 1080 25P 1920 x 1080 28 13 25 7...

Страница 72: ...875 49 5 1024 x 768 60 004 48 363 65 70 069 56 476 75 75 029 60 023 78 75 1152 x 864 75 67 5 108 1280 x 768 59 87 47 776 79 5 74 893 60 289 102 25 1280 x 800 59 81 49 702 83 5 74 934 62 795 106 5 128...

Страница 73: ...Bottom 1080p 1920 x 1080 16 9 23 98 24 Yes 720p 1280 x 720 16 9 50 59 94 60 Yes 3D HDMI USB C Manual Setting Signal Resolution dots Aspect Ratio Refresh Rate Hz Support SVGA 800 x 600 4 3 60 120 Yes...

Страница 74: ...74 74 LED Indicators Light Description Green Power On Red Stand by Mode Flashing White Projector Charging Solid White Battery is Fully Charged...

Страница 75: ...off and charge the battery for at least 30 minutes There is no picture Ensure the video source cable is connected properly and that the video source is turned on If the input source is not selected au...

Страница 76: ...76 Problem or Issue Possible Solutions The projector system is frozen and will not respond Please toggle the Power Switch off on to reset the device...

Страница 77: ...t lint free dry cloth to remove dirt or dust If the case is still not clean apply a small amount of non ammonia non alcohol based mild non abrasive detergent onto a clean soft lint free cloth then wip...

Страница 78: ...ith the instructions may cause harmful interference to radio communications However there is no guarantee that interference will not occur in a particular installation If this equipment does cause har...

Страница 79: ...evice complies with Industry Canada license exempt RSS standard s Operation is subject to the following two conditions 1 this device may not cause interference and 2 this device must accept any interf...

Страница 80: ...m de 20cm de distance entre la source de rayonnement et votre corps les dispositifs fonctionnant dans la bande 5150 5825 MHz sont r serv s uniquement pour une utilisation l int rieur afin de r duire l...

Страница 81: ...BP 0 1 0 1 Certain components of products as stated above are exempted under the Annex III of the RoHS2 Directives as noted below Examples of exempted components are Mercury in cold cathode fluorescen...

Страница 82: ...n an explosion or the leakage of flammable liquid or gas Indian Restriction of Hazardous Substances Restriction on Hazardous Substances statement India This product complies with the India E waste Rul...

Страница 83: ...ntal Protection Agency EPA As an ENERGY STAR partner ViewSonic Corporation has determined that this product meets the ENERGY STAR guidelines for energy efficiency Disclaimer ViewSonic Corporation shal...

Страница 84: ...www viewsonic com my Middle East www viewsonic com me Myanmar www viewsonic com mm Nepal www viewsonic com np New Zealand www viewsonic com nz Pakistan www viewsonic com pk Philippines www viewsonic...

Страница 85: ...tion Limited One 1 year Heavy Usage Warranty Under heavy usage settings where a projector s use includes more than fourteen 14 hours average daily usage North and South America One 1 year warranty for...

Страница 86: ...al installation and set up service charges How to get service 1 For information about receiving service under warranty contact ViewSonic Customer Support Please refer to the Customer Support page You...

Страница 87: ...fic legal rights and you may also have other rights which vary from local authority Some local governments do not allow limitations on implied warranties and or do not allow the exclusion of incidenta...

Страница 88: ...hased separately are warranted for 90 days Who the warranty protects This warranty is valid only for the first consumer purchaser What the warranty excludes and does not cover 1 Any product on which t...

Страница 89: ...er packaging to an authorized ViewSonic service center 3 Round trip transportation costs for in warranty products will be paid by ViewSonic Limitation of implied warranties There are no warranties exp...

Страница 90: ...36954 E Mail Cefeo soluglobales com Cuernavaca Compusupport de Cuernavaca SA de CV Francisco Leyva 178 Col Miguel Hidalgo C P 62040 Cuernavaca Morelos Tel 01 777 3180579 01 777 3124014 E Mail aquevedo...

Страница 91: ...C0 M91 Y72 K24 Process Color C0 M0 Y0 K100 Process Color C0 M91 Y72 K24 Process Color Pantone Black C Spot Color Pantone 187 C Spot Color...

Отзывы: