background image

U  S  E  R  ‘  S    M  A  N  U  A  L   

   |   


V  I  B  A  L  A  N  C  E     2 . 0   |    26

I N F O R M A T I O N   R E G A R D I N G   T Y P E S   ( T Y P E )   O F   C Y C L E   ( C Y C L E )

I N   A D V A N C E D   C O N T R O L

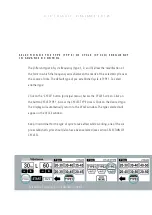
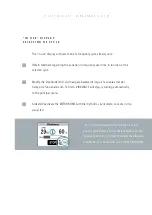
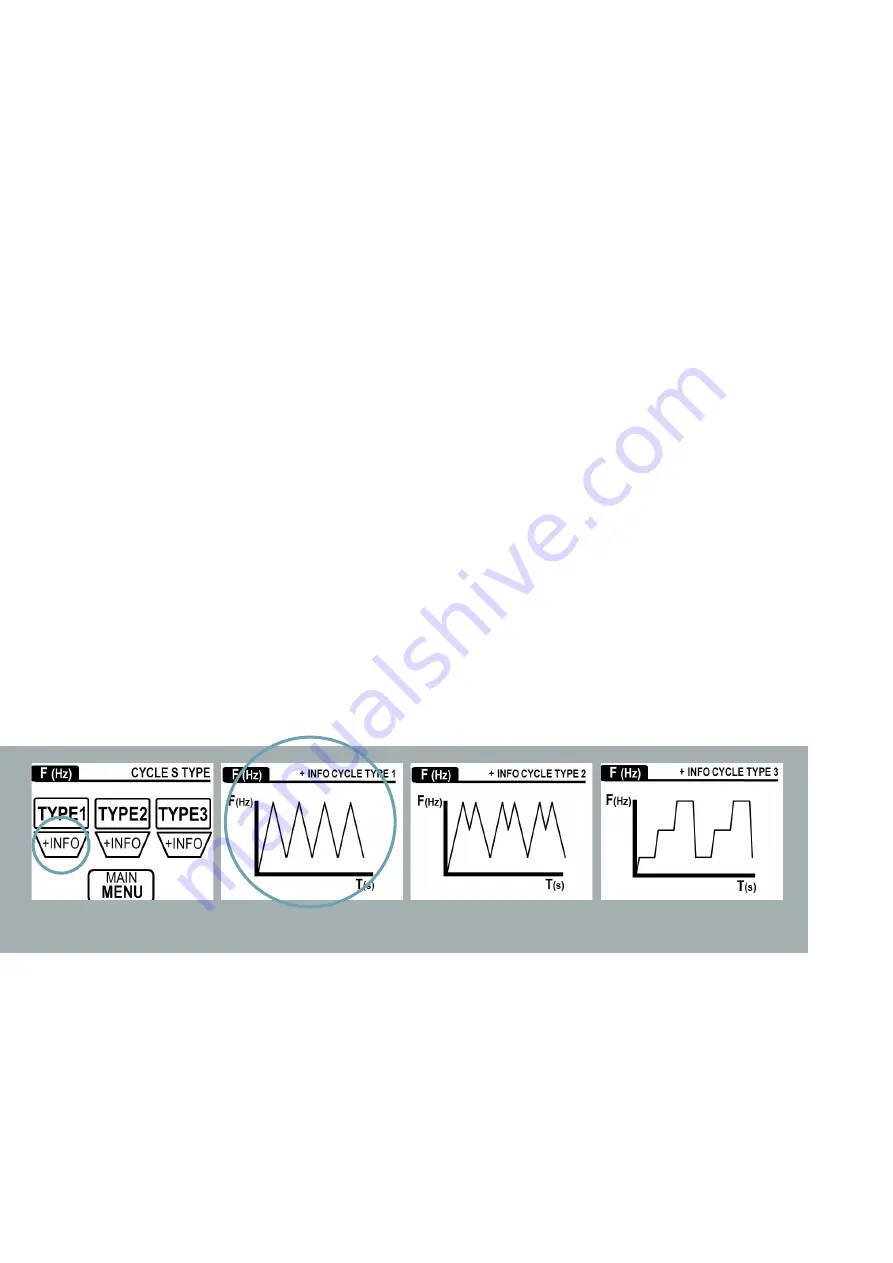
If desired, one can find additional information on each type of cycle (CYCLES TYPE):
Click on the button “+INFO” of the type selected (CYCLES TYPE screen). Access to  
INFO. Click on any part of the screen to go back.

Keep in mind that for the type of cycle to take affect while working, a specific cycle 
will also need to have been selected (see section SELECTION OF CYCLES).

To obtain information regarding types of cycle in advanced control.

Содержание VIBALANCE 2.0

Страница 1: ...U S E R S M A N U A L V I B A L A N C E 2 0 ...

Страница 2: ...her equipment adjustments Mobility of the control tower Maximum weight Description of the functioning of the control tower Principal menu screen Frequency selection in the principal menu Amplitude selection in the principal menu Time interval selection in the principal menu Frequency cycles selection in the advanced control Frequency cycle type selection in the advanced control Information regardi...

Страница 3: ...Selection of a single frequency Selection of cycle START STOP photoelectric sensor Back lighting and return to default values Maintenance Problem solving Scrap and elimination of the equipment Disclaimer Guarantee Customer support 30 31 32 33 34 35 36 37 38 39 ...

Страница 4: ...ainstakingly by the creators to increase the effectiveness and versatility of training The positive re sults obtained in sport and in the field of rehabilitation motivated them to take on new challenges to continue growing and share their findings We thank you for choosing to purchase a Viequipment product Its technology design and quality will bring long lasting total satisfaction Before starting...

Страница 5: ...e needs of physical conditioning and rehabilitation professionals T H E V I B A L A N C E 2 0 Vibalance 2 0 is a vibration platform with different levels of stability that impro ves specific aspects of neuromuscular performance It allows for training with multidirectional and bi directional instability as well as instability on the incline or decline plane It even transforms into a stable platform...

Страница 6: ...ratory structure weight kg Control tower weight kg Number of stabilizers Weight of stabilizers kg Vibratory structure material Control tower material Vibratory structure dimensions An x Pr x Al mm Tower dimensions An xPr x Al mm Vibratory structure surface mm Vibratory plate surface Maximum load kg Resistance limit between both couplings kg Noise dB A Maximum inclination of the platform VIBALANCE ...

Страница 7: ...led E L E M E N T S O F T H E E Q U I P M E N T Figure 1 Details of the components of the Vibalance 2 0 touch screen spiral cable stabilizer START STOP photoelectric sensor power cord connector spring anti impact ring vibratory platform PVC profile control tower lateral anchors principal switch fuse ...

Страница 8: ...tal or sensorial capacity or persons without sufficient experience or knowledge if they have been instructed in the safe use of the vibratory bar and they unders tand the risks involved The Vibalance 2 0 and the control tower should be installed on a flat stable sur face It is recommended that the surface on which the platform is placed be suffi ciently stable so as to prevent it from moving durin...

Страница 9: ...U S E R S M A N U A L V I B A L A N C E 2 0 7 Figure 2 Defining the free space around the Vibalance 2 0 ...

Страница 10: ... M A N E U V E R S C O R R E C T U S E O F T H E E Q U I P M E N T A N D A S S E M B L Y The Vibalance 2 0 should be used as is indicated in this instruction manual paying special attention of keeping unsupervised children away from the equip ment To start and stop the equipment one can use the Start Stop button located at the bottom of the tactile display or the foot sensor located at one of the ...

Страница 11: ...control tower should be connected to the public electricity network as a power source Do not force the original position of the L shaped connector The greater length of the spiral cable which connects the vibratory platform with the control tower must be in contact with the ground It is recommended to not separate the con trol tower more than 0 8 m from the vibratory platform ...

Страница 12: ...es of heat for prolonged periods of time heaters hot are circuits and maintain ventilation displays unobstructed Do not place the Vibalance 2 0 in a humid environment Do not allow liquid to enter the equipment especially the control tower Keep the machine away from heat sources Viequipment takes no responsibility for damages caused by failure or interruption of the grounding cable ie Electrical di...

Страница 13: ...s When attaching external resistance systems to the vibratory platform elastic straps and or pulley machines using its lateral anchors be sure to use adequate snap rings Do not use the platform if the surface of the vibratory plate the anti impact hoop or the stabilizers are worn out Once training is finished stop the device using the principal switch and discon nect the control tower when it is n...

Страница 14: ... packaging place the control tower near the sliding plat form so that the spiral cable is positioned near the connector Connect the spiral cable safety connector to the electronic control tower as shown in Figure 3 Plug the power cable in to the power socket and turn on the principal switch Figure 3 Connection of the sliding platform to the control tower ...

Страница 15: ...Vibalance 2 0 is ready to use E X E R C I S E S A N D R E C O M M E N D A T I O N S ADVISORY BEFORE BEGINNING ANY EXERCISE PROGRAM CONSULT YOUR DOCTOR Read all of the instructions before using the product Improper training or excessi ve exercise can cause health damage Always use under the supervision of a profes sional If you experience pain or vertigo while doing exercise stop immediately and co...

Страница 16: ... G O F F O F T H E E Q U I P M E N T Vibalance 2 0 allows one to adjust various levels of stability Maximum stabili ty is reached when the four stabilizers are placed around the perimeter of the machine s base and minimum stability when all the stabilizers are removed In all conditions in which all stabilizers are not used the user should mount the machine knowing that the vibratory plate will inc...

Страница 17: ...ercising it is recommended to not step down from the machi ne until the vibratory plate has come into contact with some part of the base and become stable At this time one can proceed to dismount from the vibratory platform by first moving the foot which is found in the most elevated part of the vibratory plate ...

Страница 18: ...ion Figure 6 Vibalance 2 0 originally provided multidirectional instability Using the stabi lizing accessories the degree of stability can be modified depending upon the number of accessories used and their placement Bidirectional instability the placement of two stabilizers one on either side of the platform allows one to stabilize it along one of two horizontal axes Depen ding upon the placement...

Страница 19: ...U S E R S M A N U A L V I B A L A N C E 2 0 17 Figure 5a and 5b Placing stabilizers on the base of the vibratory platform ...

Страница 20: ...U S E R S M A N U A L V I B A L A N C E 2 0 18 Figure 6 Correct position of the stabilizers once they are inserted in the Vibalance 2 0 ...

Страница 21: ...O L T O W E R M A X I M U M W E I G H T D E S C R I P T I O N O F T H E F U N C T I O N I N G O F T H E C O N T R O L T O W E R T O U C H D I S P L A Y The maximum load for the vibratory platform should not exceed 200 kg In order to avoid lifting the platform off of the floor or moving about do not submit the vibratory plate anchors to loads exceeding 40 kg The Vibalance 2 0 control tower allows y...

Страница 22: ...U S E R S M A N U A L V I B A L A N C E 2 0 20 Figure 7 Optimal distance between the control tower and the vibratory platform ...

Страница 23: ...on the screen 5 more seconds elapse before the Prin cipal menu appears P R I N C I P A L M E N U S C R E E N The default values for the Vibalance 2 0 are always the same 30 Hz for vibration frequen cy amplitude L low and time 60 s Click on the Start button to start the platform The platform should immediately start If this is not the case ensure that all connections are correct see Connecting the ...

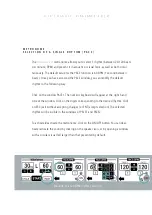
Страница 24: ... the principal menu Control of Vibalance 2 0 using the touch display is designed to allow the user to move around the menu and select any function quickly intuitively and intuitively From the principal menu all control parameters are accessible Two levels can be dis tinguished in the spatial distribution of the control functions of the principal menu the higher level which permits the quick select...

Страница 25: ...latform is functioning without the need to stop see on screen Modification of the vibration amplitude from low to high S E L E C T I O N O F T I M E I N T E R V A L I N T H E P R I N C I P A L M E N U Desired work time 5 180 s can be selected in two different ways 1 Modification second by second click on the and buttons located below the window corresponding to time value 2 Selection of pre establ...

Страница 26: ...YCLE button principal menu Access to CYCLES screen Click on the desired cycle The window of the selected cycle will change the background and text color Click on the return arrow to return to the principal menu Cycle CYCLE and type TYPE selected will appear in the frequency window If one wishes to re select a single frequency ie 45 Hz click on the frequency window and access the pre established fr...

Страница 27: ...The default type of pre established cycle is TYPE 1 To select another type Click on the CYCLE button principal menu Access the CYCLES screen Click on the button CYCLE TYPE 1 Access the CYCLES TYPE screen Click on the desired type The display will automatically return to the CYCLE window The type selected will appear in the CYCLE window Keep in mind that for the type of cycle to take affect while w...

Страница 28: ... information on each type of cycle CYCLES TYPE Click on the button INFO of the type selected CYCLES TYPE screen Access to window INFO Click on any part of the screen to go back Keep in mind that for the type of cycle to take affect while working a specific cycle will also need to have been selected see section SELECTION OF CYCLES To obtain information regarding types of cycle in advanced control ...

Страница 29: ...ou can modify the default rhythm in the following way Click on the window PACE1 The numeric keyboard will appear at the right hand side of the window Click on the digits corresponding to the desired rhythm Click on ESC exit without accepting changes or ENT accept selection The selected rhythm will be visible in the windows of PACE1 and PACE2 To activate deactivate the metronome click on the ON OFF...

Страница 30: ...ill appear on the left side of the window Click on the digits of the desired rhythm Click on ESC exit without accepting changes or ENT accept selection Repeat the same steps in the window of PACE 2 The two rhythms will remain selected in their respective windows 2 Beat to beat Click on the buttons and to increase or decrease the value of PACE1 If you wish to modify PACE 2 as well click on the wind...

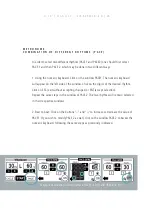
Страница 31: ...es The selected rhythm will be temporarily saved in the memory If so desired one can activate de activate the metronome put it in silent mode or use the zoom increase visual led while the platform is in use from the display in use The COMBINATOIN OF TWO DIFFERENT RHYTHMS function allows you to program the number of times that a rhythm will be repeated PACE PACE before moving on to another Activati...

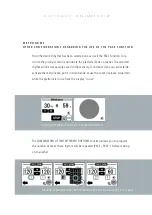
Страница 32: ... the vibration Navigate backwards from the time selected Seguir la cuenta atrás del tiempo se leccionado To finish VIBALANCE will stop returning automatically to the principal menu Activate deactivate the METRONOME with the rhythm s silent mode or zoom in the visual led The in use display with the selection of one single frequency allows you to modify the fre quency from Hz to Hz the vibration amp...

Страница 33: ...ycle Modify the amplitude H L and navigate backwards seguir la cuenta atrás del tiempo de funcionamiento To finish VIBALANCE will stop returning automatically to the principal menu Activate deactivate the METRONOME with the rhythm s silent mode or zoom in the visual led The in use display with the selection of a fre quency cycle allows you to obtain feedback on the frequency variation in time to m...

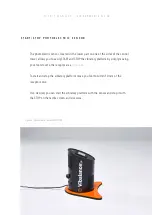
Страница 34: ... tower allows you to easily START and STOP the vibratory platform by simply moving your foot closet o the receptor area Figure 8 To start and stop the vibratory platform move you foot to within 10 mm of the receptor zone If so desired you can start the vibratory platform with the sensor and stop it with the STOP on the tactile screen and viceversa Figure 8 Photoelectric sensor START STOP ...

Страница 35: ... control parameters show certain default values All of the parameters return to their default values after 5 min without modifying any parameters and without starting the Vibalance 2 0 After 4 min without clicking on the tactile screen the display goes into energy saving mode by reducing the backlighting With a single click the display returns to 100 luminosity ...

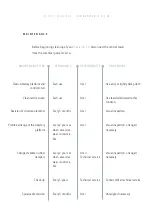
Страница 36: ...tform Change stabilizer rubber dampers Check up Spiral cable revisión User User User User User Technical service Technical service User PERIODICITY PROCEDURE Each use Each use Every 3 months Every 2 years or when excessive wear is noticea ble Every 2 years or when excessive wear is noticea ble Every 5 years Every 3 months Use a dry or lightly damp cloth Use towels dedicated to this function Visual...

Страница 37: ...commencing to pro blem solve If the display does not light up after turning on the principal on switch ensu re that the power cable is properly inserted and that the power outlet Works correctly If all of the power plugs work correctly but the display still does not light up after turning on the principal on switch check the fuse of the electronic control unit Replace the fuse if necessary If the ...

Страница 38: ...lectronic or electric devices which contain undamaged usable components should not be disposed of in common waste bins as they may leak dangerous substances into ground water ending up in the food chain and thus harming the health and well being of living organisms Use the corresponding collection points for the disposal and recycling of unser viceable electronic and electrical devices Consult you...

Страница 39: ...mage rehabi litation after ocular surgery use of eyepieces unhealed fractures recent surgery epilepsy migraines herniated disks spondylolisthesis spondylolysis or spond ylosis recent joint replacements or IUD surgical needles staples or plates or any other concern regarding physical health personal injury resulting from the device or injury to oneself if The device or accessories are used incorrec...

Страница 40: ...nd a period of one year on labor except the consumable parts This guaran tee applies only to the original owner and is non transferable Claims made in virtue of this guarantee must be submitted to the distributor from whom the vibratory platform was acquired Proof of purchase is required Upon expiry of the guarantee period repairs will have a guarantee of three months G U A R A N T E E ADVISORY FO...

Страница 41: ... repairs Units not used in accordance with the Vibalance 2 0 user instructions Damages which exceed the cost of the product The deterioration of the integrated product as a consequence of abnormal storage and or safe keeping conditions in the clients installations and The failure to produce the proof of purchase date for the product Byomedic System SLU Abat Oliba 38 08210 Barberà del Vallès e mail...

Страница 42: ...U S E R S M A N U A L V I B A L A N C E 2 0 40 If you have any questions please visit our web site vi equipment com Follow us 2016 VIEQUIPMENT ALL RIGHTS RESERVED ...

Отзывы: