iLink Series Scan Tool
USER MANUAL
SHENZHEN VIDENT TECHNOLOGY CO., LTD
Copyright ©2017 Vident Tech.
Страница 1: ...iLink Series Scan Tool USER MANUAL SHENZHEN VIDENT TECHNOLOGY CO LTD Copyright 2017 Vident Tech...
Страница 2: ...on wires and spark plugs These components create hazardous voltages when the engine is running Put the transmission in PARK for automatic transmission or NEUTRAL for manual transmission and make sure...
Страница 3: ...ic VIN Acquisition 6 2 1 2 Manual VIN Entry 7 2 1 3 Manual Vehicle Selection 8 2 1 4 Save a Tested Vehicle Info 8 2 2 System Selection 10 2 2 1 Auto Scan 10 2 2 2 Control Unit 11 2 3 Diagnostic Functi...
Страница 4: ...rase Codes 20 4 3 Live Data 20 4 3 1 View Data 20 4 3 1 1 Complete Data Set 20 4 3 1 2 Custom Data List 20 4 3 2 Record Data 21 4 3 3 Playback Data 21 4 4 View Freeze Frame 21 4 5 Read I M Readiness S...
Страница 5: ...used applications 3 Diagnostic Connector to connect to vehicle s DLC 4 OK Key to confirm the current operation 5 Selection Keys to select an option or scroll through a screen of data or text 6 ESC Key...
Страница 6: ...ation Turn the vehicle ignition to ON position Vehicle battery voltage should be 9 14 volts Throttle should be on a closed position 1 4 2 Connecting to Vehicle 1 Locate the data link connector DLC The...
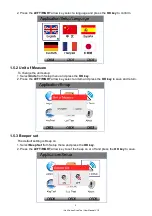
Страница 7: ...hange the unit setup 1 Select Units from Setup menu and press the OK key 2 Press the LEFT RIGHT arrow key select an item and press the OK key to save and return 1 5 3 Beeper set The default setting is...
Страница 8: ...Otherwise the key is not functioning properly 3 Click the F2 function key twice to exit 1 5 5 LCD Test LCD test checks if the LCD is working properly 1 Select LCD Test from Setup menu and press the OK...
Страница 9: ...Diagnostic Operations This section illustrates how to use the scanner to read and clear diagnostic trouble codes and view live data readings and ECU information on controllers installed on the vehicle...
Страница 10: ...he data displays correctly The vehicle identification sequence is menu driven you simply follow the screen prompts and make a series of choices Each selection you make advances you to the next screen...
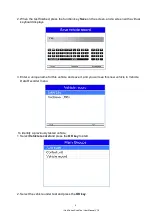
Страница 11: ...if it is incorrect and you are required to enter the correct VIN number manually 2 1 2 Manual VIN Entry Manual VIN Entry identifies a vehicle by manually inputting a 17 digit VIN code 1 Select manual...
Страница 12: ...each screen that appears select the correct option and then press the OK key Follow the on screen prompts until the menu of controller selection displays 2 1 4 Save a Tested Vehicle Info The scan too...
Страница 13: ...and a screen with a virtual keyboard displays 3 Enter a unique name for this vehicle and save it and you will see this new vehicle in Vehicle Data Recorder menu To identify a previously tested vehicl...
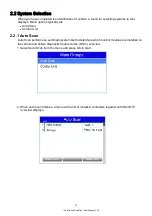
Страница 14: ...typically are Auto Scan Control Unit 2 2 1 Auto Scan Auto Scan performs an automatic system test to determine which control modules are installed on the vehicle and obtain diagnostic trouble codes DTC...
Страница 15: ...the system you would like to test and press the OK key When the scan tool has established connection with the vehicle the Function Menu displays 2 2 2 Control Unit Control Unit screen displays all co...
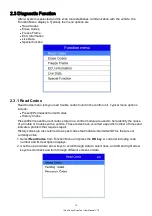
Страница 16: ...History Codes Present Permanent Current codes stored in a control module are used to help identify the cause of a trouble or troubles with a vehicle These codes have occurred a specific number of time...
Страница 17: ...e Data Freeze Frame Data menu displays freeze frame data a snapshot of critical vehicle operating conditions automatically recorded by the on board computer at the time of the DTC set It is a good fun...
Страница 18: ...lets you view all live PID data from a selected system 1 Scroll with the up and down arrow keys to highlight a line if the One Graphic on the bottom is highlighted it indicates graphing is available...
Страница 19: ...imize the number of PIDs on the data list and focus on any suspicious or symptom specific data parameters 1 Select Custom List from the menu and press the OK key The custom data stream selection scree...
Страница 20: ...cting Active Test opens a menu of test options that varies by make and model Selecting a menu option activates the test Follow all screen instructions while performing tests The content and pattern of...
Страница 21: ...s This section gives brief instructions of the most commonly required service and maintenance operations Typical service operation screens are a series of menu driven executive commands Follow on scre...
Страница 22: ...generation DPF Regeneration menu let you perform the DPF cleaning to clear the blockage through continuous burning of the particulates captured in the DPF filter When a DPF regeneration cycle is compl...
Страница 23: ...pension system are replaced or the car level is incorrect perform this function to adjust the car body height sensor for horizontal calibration 3 13 Sunroof Initialization This function is used to set...
Страница 24: ...es again If any codes remain repeat the Erase Codes steps 4 3 Live Data Live Data menu lets you view record and playback real time PID data from the electronic control module Menu options typically in...
Страница 25: ...NOTE Different vehicles communicate at different speeds and support a different number of PIDs Therefore the maximum number of frames that can be recorded varies The code reader keeps recording data...
Страница 26: ...ce the start of the current drive cycle Below is a list of abbreviations and names of OBD II monitors supported by the code reader To retrieve I M Readiness Status data 1 Scroll with UP DOWN key to hi...
Страница 27: ...return 4 7 On Board Monitor Test The On Board Monitor Test function is useful after servicing or after clearing a vehicle ECU s memory It receives test results for emission related powertrain compone...
Страница 28: ...nostic Menu and press the OK key 2 Use the UP DOWN key to highlight a system or component press the OK key to start test and the code reader displays the message Command Sent 3 Press the ESC key to ex...
Страница 29: ...on 2 Use the UP DOWN key to highlight an available option and press the OK key A screen with details of the selected option displays 3 Press the ESC key to exit and return 5 Playback Data The PlayBack...
Страница 30: ...Answer Yes to delete and No to quit 6 Software Update and Printing To apply software updates to the tool you will need a Windows PC Laptop and an TF Card Reader 6 1 Registration part 1 Create an acco...
Страница 31: ...website It s right under the download tab of individual product page 2 The file downloaded will be a compressed zip file Open that file and run the installer inside it 3 Once installed open the iScanz...
Страница 32: ...nt products iLink iAuto series when you insert TF card into computer and run iScanzilla registration is automatically finished For user who already have one scan tool iLink iAuto series registered ple...
Страница 33: ...successful registration Alternatively you can register the product in the member center when logged in on our website 6 3 Updating your tool 1 Now close the iScanzilla software remove the TF card from...
Страница 34: ...iLink Series Scan Tool User Manual V1 0 30 Ensure that the correct serial number is displayed in the drop down list 3 Click the Update button to download and install available updates...
Страница 35: ...your free updates ran out your tool will continue to function it will not time out but you will no longer be able to access the update servers Should you wish to continue updating your tool you will...
Страница 36: ...iLink Series Scan Tool User Manual V1 0 32 3 Tick a piece of data to either review it or print it out...
Страница 37: ...SHENZHEN VIDENT TECHNOLOGY CO LTD Visit our website www videnttech com For Technical Assistance send us email support videnttech com...