Network Interface Unit
October 2000
GFK-1551D
1
Preinstallation Check _____________________________
Carefully inspect all shipping containers for damage. If any equipment
is damaged, notify the delivery service immediately. Save the damaged
shipping container for inspection by the delivery service. After
unpacking the equipment, record all serial numbers. Save the shipping
containers and packing material in case it is necessary to transport or
ship any part of the system.
Quick Start Guide ________________________________
1.
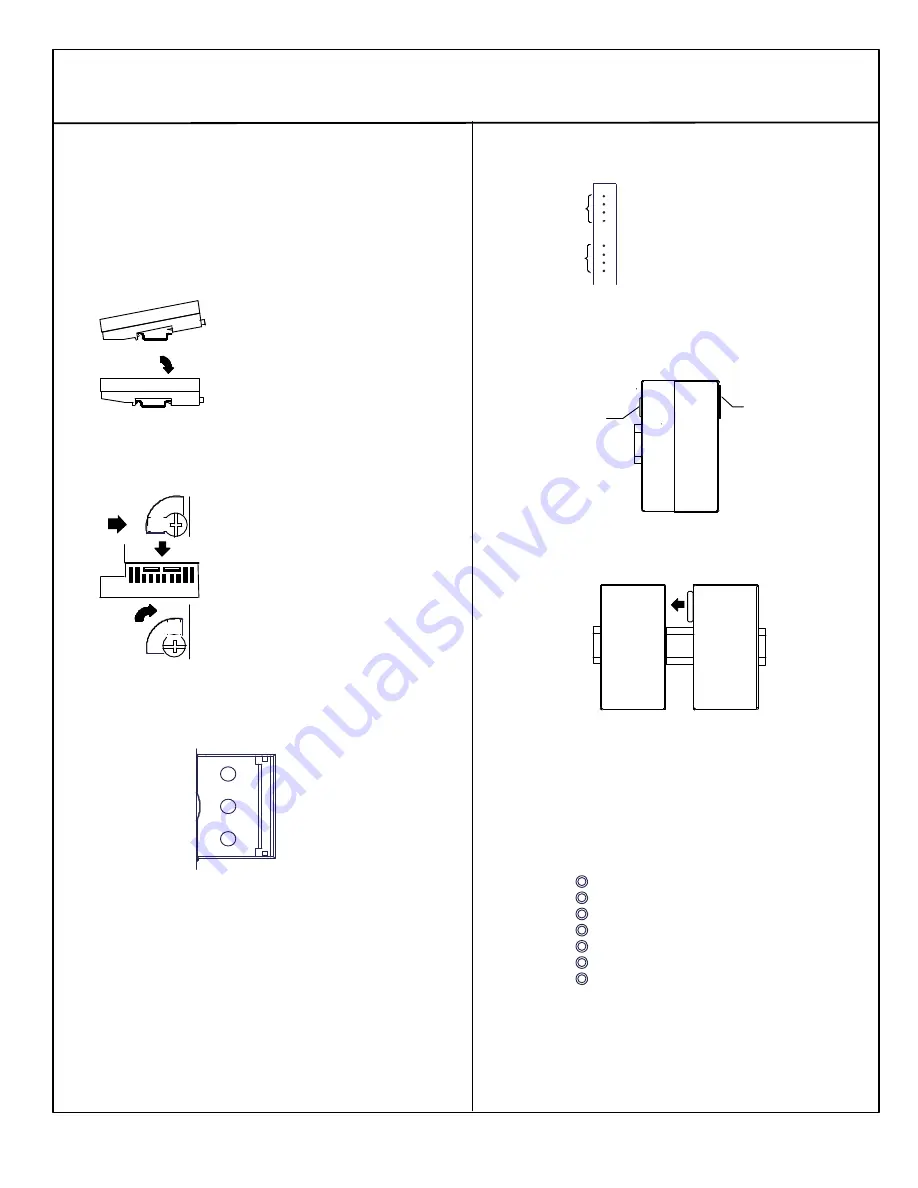
Install the NIU on the DIN Rail
by simply clicking it into place.
Note: The NIU and connecting carriers
must be installed on the same section
of 35mm x 7.5mm DIN rail.
The DIN rail must have a conductive
(unpainted) finish for proper grounding.
(
Refer to the heading
Module Installation
for information about
space requirements or module orientation, or if you are installing
the NIU in an area of excessive vibration).
2.
Install the Power Supply on the NIU
.
The latch on the power supply must be
in the unlocked position.
Align the connectors and the latch post
and press the power supply module
down until the two tabs on the bottom of
the power supply click into place.
Turn the latch to the locked position to
secure the power supply to the top of the
NIU.
Complete the power supply wiring as described in the installation
instructions provided with the Power Supply
.
3.
Adjust the rotary switches
on the front of the NIU using a
2.44mm (3/32in) flat screwdriver.
0
1
0
0
7
6
4
5
8
9
1
1
BAUD
RATE
SBA
X10
3
2
3
2
3
2
SBA
X1
N
N
A
U
§
Select the serial bus address with the two upper rotary
switches, SBA X10 (for the tens digit) and SBA X1(for the
ones digit). Each device on a bus must have a unique serial
bus address in the range 0 - 31.
§
Select the baud rate to match that used by the other devices
on the bus by setting the bottom rotary switch: (3) 153.6
Kbaud extended, (2) 153.6 Kbaud standard, (1) 76.8 Kbaud,
or (0) 38.4 Kbaud.
§
Cycle power to the NIU after changing the switch settings.
4.
Connect the communications bus to the NIU
. (
Refer to the
heading
Bus Installation Guidelines
if the NIU is at the end of the
bus, or for detailed bus installation instructions.)
Main Bus
Connections
SHIELD OUT
SERIAL B2
SHIELD IN
SERIAL A2
SHIELD OUT
SERIAL B1
SHIELD IN
SERIAL A1
Redundant
Connections
The NIU has two sets of bus
terminals. The upper terminals are
for the main bus cable. The lower
bus terminals are for an optional
redundant (dual) bus cable.
5.
Remove the connector cover on the righthand side of the
NIU
. Do not discard this cover; you will need to install it on the last
carrier. It protects the connector pins from damage and ESD during
handling and use. Do not remove the connector cover on the
lefthand side.
Connector Cover
Connector Cover
6.
Install additional modules
by mounting modules on their carriers
and sliding them along the DIN rail to fully engage the connectors in
the sides of the carriers.
7.
Power up the NIU
. The modules in the I/O station will automatically
be configured, starting at slot 1 in each rack including expansion
racks. If an empty slot or faulted module is encountered,
autoconfiguration for that rack stops. Autoconfiguration then skips to
the next rack and continues until all racks are configured.
Note: If the I/O station includes any additional power supplies, those
power supplies should be turned on at the same time.
8.
Observe the NIU LEDs,
which indicate the presence of power and
show the operating mode and status of the NIU.
BUS B
SBA
ERR
I/O ENBL
FORCE
PWR
FAULT
OK
PWR
Indicates that the NIU is receiving
power.
OK
Indicates diagnostics executed
successfully.
FAULT
Is ON if there are one of more
faults.
I
/O ENBL
This bicolor LED is green if the I/O
scan is enabled and data is being
received from the bus. Otherwise,
this LED is amber.
FORCE
Is ON if one of more I/O points is
forced.
SBA ERR
Is ON if a duplicate device SBA or
invalid SBA exists.
BUS B
Is ON if bus B is active.


