Appendix 1: Installing the Front Vise
onto a Workbench without an Apron
Option A:
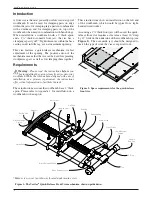
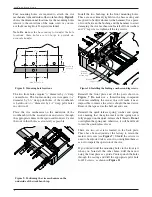
If your workbench does not have an apron, and if your
workbench top is reasonably thick, you can mount the
front vise to the underside of the workbench top and
clamp workpieces against the edge of the workbench.
Assuming a 1
3
/
4
"
thick jaw, this set-up will require a
space of 18
"
× 12
"
under the workbench top.
Figure 15: Mounting the front vise onto a workbench
without an apron.
Option B:
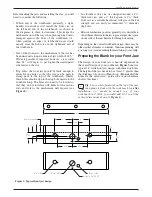
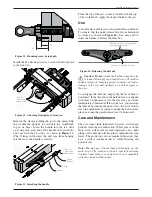
Alternatively, a rear jaw can be added to the underside of
the workbench top to increase the clamping surface area.
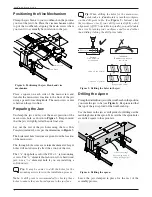
Adding a rear jaw to the underside of the workbench
allows long workpieces to be clamped right up to the
edge of the workbench.
Notches to clear
dog holes.
Holes for mounting
lag screws.
1
1
/
8
"
3
/
4
"
5
"
5
"
1
11
/
16
"
1
25
/
32
"
Figure 16: Typical rear jaw dimensions.
In practice, it will probably be easier to bore the holes for
the vise mechanism into the rear jaw
after
the rear jaw
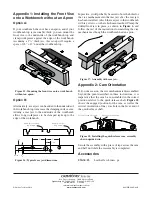
has been installed. Attach the rear jaw to the workbench
with lag screws, or other attachment method. Clamp the
drilled front jaw in place, as shown in
Figure 6
, and
follow the rest of the instructions for installing the vise
mechanism as though the workbench had an apron.
Figure 17: Assembly with rear jaw.
Appendix 2: Cam Orientation
If, for some reason, the vise mechanism is disassembled
beyond the point described in these instructions, it is
imperative that the cam be re-assembled in the correct
position relative to the quick-release shaft.
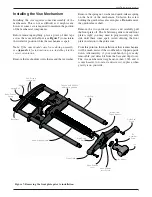
Figure 18
shows the engaged position for the cam, as well as the
critical orientation of the cross hole in the lever end of
the quick-release shaft.
Vertical Cross Hole Axis
Note cam orientation.
Figure 18: Installing the quick-release cam, assembly
shown upside down.
Secure the assembly with a piece of tape across the cam
and half nut while the reassembly is completed.
Accessories
05G34.03
Leather Jaw Liners, pr.
814 Proctor Avenue
Ogdensburg NY 13669-2205
United States
1090 Morrison Drive
Ottawa ON K2H 1C2
Canada
[email protected]
© Veritas Tools Inc. 2013
www.veritastools.com
843 IWE-449 Rev. B


