Operation - 14
Mirror Installation
1. Install the left and right mirror attachment brack-
ets to the sides of the power unit’s front frame.
HT4000:
Remove the 6) bolts that fasten the front
bumper to the power unit. Install the mirror attach-
ment brackets to the power unit using 6) 5/16” x 1”
bolts, 6) 5/16” flat washers, and 4) 5/16” flat wash
-
ers (from original mounting bolts) between the 2)
top holes in the brackets and the power unit to
level the mounting surface. Fasten with the original
nuts and torque to 210 in-lbs (24 Nm).
NOTE: if your HT4000 is equipped with a Kawa-
saki engine, the mirror bracket hole spacing will
require modification.
KT4100, KT4200, & KN4500:
Remove the 4) bolts
that fasten the front bumper to the front frame.
Install the mirror attachment brackets to the
power unit using 4) 5/16” x 1” bolts, 4)5/16” flat
washers. Fasten with the original nuts and torque
to 210 in-lbs (24 Nm).
2. Assemble the 2) mirror arms using 2) 3/8” x 1-1/4”
bolts, 4) 3/8” flat washers, and 4) 3/8” lock nuts.
Leave the hardware loose enough that the arms
can be adjusted later.
3. Install the mirror arms an equal distance into the
mirror attachment brackets and secure them with
the tightener handles.
4. Mount the mirror frame to the outer ends of the
mirror arms. For a trial setting, select a hole near
the center of the adjustment options. Use the iden-
tical hole on the opposite side. Fasten to the mirror
arms with 2) 1/4” x 1-1/2” bolts, 4) 1/4” flat wash
-
ers, and 2) 1/4” lock nuts.
5. Fasten the pivot holes in the ends of the mirror
frame to the mirror arms with 2) 1/4” x 1-1/2” bolts,
4) 1/4” flat washers, and 2) 1/4” lock nuts.
6. Sit on the power unit seat to determine if the set-
tings allow the operator to see the action of the
grinder. Make any necessary adjustments and
tighten the hardware that fastens the mirror frame
to the mirror arms.
Remove the mirror from the power unit when not using
the stump grinder. Loosen the tightener handles and
slide the mirror arms out of the mirror attachment
brackets. Clean the mirror of any dust and debris and
store in a safe place.
Attention
Some attachments may come in contact with the
mirror attachment brackets when fully raised,
causing damage to the attachment and/or the mir-
ror attachment brackets. It is recommended that
the mirror attachment brackets be removed from
the power unit when detaching the stump grinder,
prior to using any other attachment.
SETUP
Содержание KC180
Страница 22: ...Illustrated Parts 22 Use only original Ventrac replacement parts PARTS ILLUSTRATED DRAWING Main Frame Shields ...
Страница 24: ...PARTS Illustrated Parts 24 Use only original Ventrac replacement parts ILLUSTRATED DRAWING Drive Pulleys ...
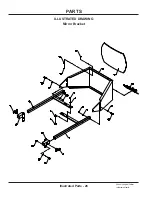
Страница 26: ...PARTS Illustrated Parts 26 Use only original Ventrac replacement parts ILLUSTRATED DRAWING Mirror Bracket ...


