Vemco HR2 Скачать руководство пользователя страница 33

2.6 Establishing Communication

To establish communication with an HR2 receiver from within the Fathom software, perform the
following steps.

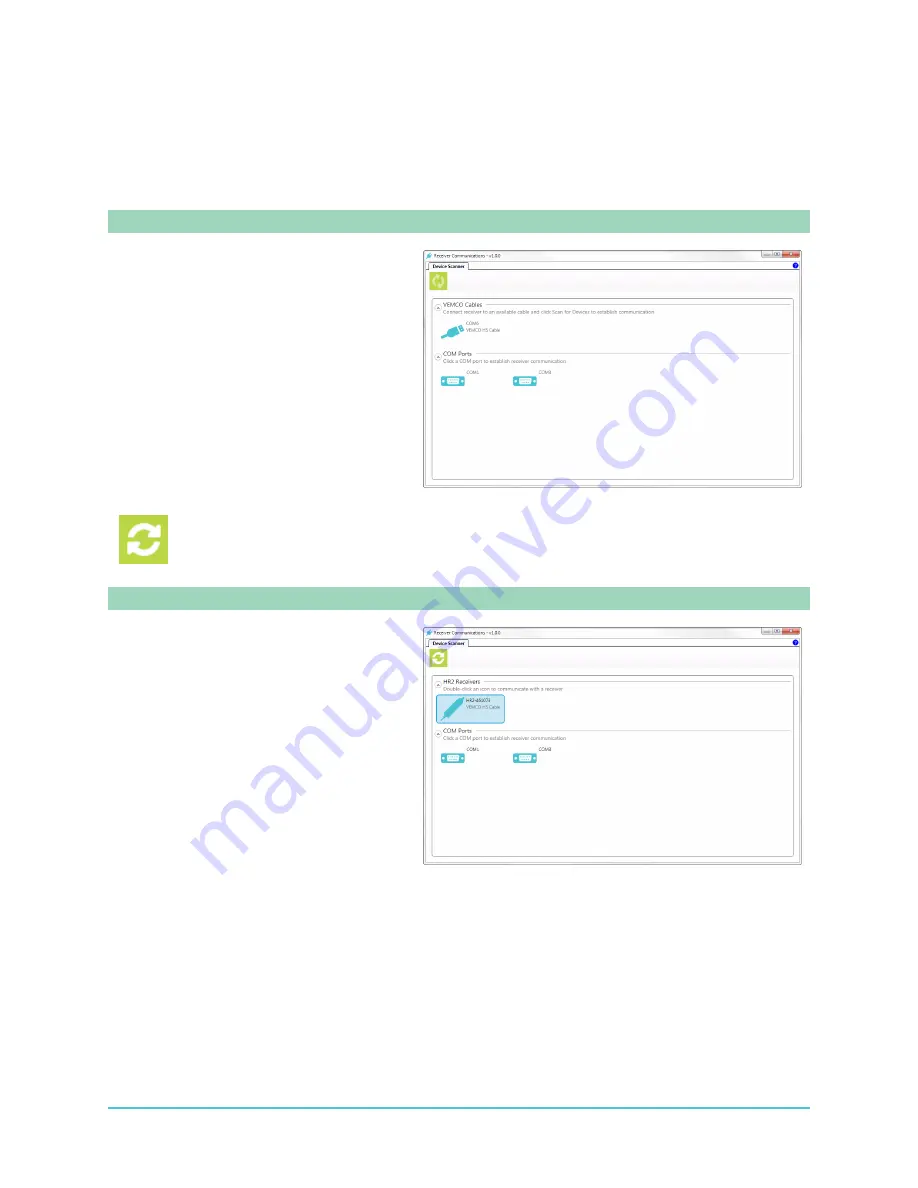
Step 1 - Fathom attempts to detect connected receivers

After launching Fathom, the

Receiver

Communications

window appears.

Available COM ports are automatically
displayed.

When a VEMCO cable is detected, Fathom

displays it as a

COM port

and

automatically initiates a scan for devices
connected to the cable.

While Fathom is scanning for receivers, the

Scan for Devices

button is temporarily

unavailable for use. The device scan may
take up to 6 seconds.

Step 2 - When a receiver is detected

When an

HR2

receiver is detected, it is

displayed as shown here.

24

HR2 Receiver User Guide

Содержание HR2

Страница 1: ......

Страница 2: ...3 1 Communication cable information 7 1 4 Operation Modes 8 1 4 1 Suspend Mode 8 1 4 2 Record Mode 8 1 5 Fathom Software Overview 9 1 5 1 Fathom software requirements 9 1 5 2 What can Fathom do 9 1 6...

Страница 3: ...Tiles Display Settings 40 3 4 HR2 Transmitter Tab 44 3 4 1 Transmitter Settings 44 3 4 2 Transmitter IDs 44 3 4 3 Configure Transmitter 44 3 5 Sensor Logging Tab 49 3 6 Watch Table Tab 51 3 6 1 Addin...

Страница 4: ...91 6 1 6 Noise Samples Tilt and Temperature HR2 VR2Tx VR2AR and VR4 UWM receivers only 93 6 2 Exporting Data 95 6 2 1 Record Types included in each export option 98 6 2 2 Record Types by receiver mod...

Страница 5: ...ormat is my Data Stored in the Receiver 173 9 2 3 Why Do I see a discrepancy between detections in my HR2 Live views and detections in the exported CSV file 173 9 2 4 Where do I find the Fathom softwa...

Страница 6: ...Open Source Licenses 195 G Contact Information 197 H Warranty and Disclaimer 199 Glossary 202 For the latest versions of user guides and software visit our website 2018 AMIRIX Systems Inc All rights r...

Страница 7: ...vi This page intentionally left blank to ensure new chapters start on right odd number pages...

Страница 8: ...ng data using the Export Data application from VR2Tx VR2AR and VR4 UWM receiver log files Note that communication with and configuration of VR2Tx VR2AR and VR4 UWM receivers still requires the VUEsoft...

Страница 9: ...viii This page intentionally left blank to ensure new chapters start on right odd number pages...

Страница 10: ...tagged animals with sub meter accuracy The HR2 receiver detects both PPM1 VEMCO s traditional coding system and HR2 VEMCO s new High Residence coding system transmissions from 180 kHz tags transmitte...

Страница 11: ...possible resolution data high spatial resolution for positioning studies 1m and frequent animal positions of the order of seconds l Autonomously deployed HR receivers can easily be moved to different...

Страница 12: ...Quick Specifications HR2 Quick Specifications Dimensions 40 cm 15 9 x 10 cm 3 9 diameter Weight in air w Lithium metal battery 2 88 kg w Alkaline battery 3 16 kg Receiver Frequency 180 kHz Battery Li...

Страница 13: ...er is NOT ready to record data yet as it is shipped in Suspend Mode Your first task is to connect it to a computer and the Fathom software and place it in Record Mode For more information see Getting...

Страница 14: ...section 8 2 2 Never cover this valve with tape or paint for example 4 Cable Tie grooves These grooves top and bottom of receiver are used to attach the HR2 to a mooring line For more information see...

Страница 15: ...Internal Case Parts Figure 1 3 Opened HR2 Receiver INTERNAL parts without battery pack 6 HR2 Receiver User Guide...

Страница 16: ...C cable l The HSOC is powered by a PC USB port or USB bus that can provide 500 milliamps It can offload data from an HR2 receiver that has an expired internal battery or if the battery has been remove...

Страница 17: ...ot recording on page 73 CAUTION The HR2 is shipped in Suspend mode with the internal battery connected Always put the receiver in Record mode start a study before deployment 1 4 2 Record Mode During t...

Страница 18: ...g the VUE software from VR2W VR2AR VR2Tx and VR4 UWM receivers We advise that HR2 users always update to the latest version of Fathom on your entire suite of PC s and laptops By always using the lates...

Страница 19: ...mation The Receiver Information section provides basic information about your connected receiver serial number and if the receiver is ON Recording or OFF NOT Recording 4 Software Tabs and Panels The S...

Страница 20: ...eceiver is identified a receiver icon is displayed double clicking this icon will open a hardware communication tab for that receiver a Receiver tab l If Fathom is unable to identify the connected rec...

Страница 21: ...rmation see Live Tiles Tab on page 39 l HR2 Transmitter tab The HR2 Transmitter Tab provides transmitter identification information and configuration options For more information see HR2 Transmitter T...

Страница 22: ...the HR2 User Guide PDF format is available in the HR2 folder on the USB Stick that was shipped with your receiver You can also download a printable User Guide in PDF format on the HR2 product page at...

Страница 23: ...14 This page intentionally left blank to ensure new chapters start on right odd number pages...

Страница 24: ...tup Guide checklist NOTE The HR2 receiver was shipped with the battery installed and connected Before the HR2 can begin recording data it must be connected to computer and switched from Suspend Mode t...

Страница 25: ...m When the Fathom Installer Welcome screen appears click Next 2 Read the End User License Agreement EULA check the I accept box and click Next 3 Choose the Destination Folder To install in the default...

Страница 26: ...d to the external connector when a cable is not connected to the receiver Removing installing the Dummy Plug and Locking Collar Follow the instructions below to remove and reverse the steps to re inst...

Страница 27: ...connector connect the supplied cable to the HR2 receiver and to a computer as described below Step 1 Get your receiver communication cable Take out the communication cable provided by VEMCO cable may...

Страница 28: ...2C receiver example shown Step 4 Screw Lock Collar on Slide the Locking Collar located on the external cable over the connector and twist it clock wise until it stops There shouldn t be a gap between...

Страница 29: ...To install the update click An update for Fathom Software is available and follow the instructions To perform the update at another time select an application to launch To check for updates manually s...

Страница 30: ...his topic l Click the Information icon top right to open the About Fathom window see next 2 4 2 The About Fathom Window The About Fathom window displays the Fathom software version and its components...

Страница 31: ...e following window appears To install the update click Install Update and follow the instructions provided by the installation wizard To install the update later click Remind me later For information...

Страница 32: ...n for devices Button to search again for communication ports and connected receivers performs a refresh 2 Identified receiver Receiver and serial number as identified by the software and cable connect...

Страница 33: ...ars Available COM ports are automatically displayed When a VEMCO cable is detected Fathom displays it as a COM port and automatically initiates a scan for devices connected to the cable While Fathom i...

Страница 34: ...d watch which COM port disappears from the COM Ports display Plug the cable back in and attempt to connect to the receiver using the identified COM port l If you are unable to connect to the receiver...

Страница 35: ...ication to be established The HR2 receiver s information and status are shown in a new tab identified by the receiver serial number Fathom will select an appropriate communication speed session baud r...

Страница 36: ...recommend offloading your data before performing the update To update the firmware click Update and follow the instructions To perform the update at another time click Cancel NOTE We recommend instal...

Страница 37: ...operations tabs Status Live Detections etc Operation Buttons Receiver Operation buttons include Button icon Button name and description Set Receiver Clock button Sets the receiver s internal clock bas...

Страница 38: ...ng Tests can and should be done in both air see In Air Test below and water see In Water Test on the next page 2 8 1 In Air Test The HR2 can detect coded tags and communicate with a VR100 200 in air b...

Страница 39: ...lect the Live Detections or Live Tiles tab to see live ping information 10 Offload the data that was collected during the test creating a data file see Offloading Data on page 70 11 Export the offload...

Страница 40: ...ags and receivers to different locations If conducting the test in a small bucket try moving the tags around Place your tags in a mesh bag or hold the tag underwater with your hands If in a large body...

Страница 41: ...32 This page intentionally left blank to ensure new chapters start on right odd number pages...

Страница 42: ...bs allow you to set up how you communicate with and use your HR2 receiver This Section Contains Information On The Following 3 1 Status Tab 34 3 2 Live Detections Tab 36 3 3 Live Tiles Tab 39 3 4 HR2...

Страница 43: ...Remaining l voltage example 10 5V Line Power Displays the voltage provided by the external power source if connected The HR2 s external connector allows for the receiver to be powered from an external...

Страница 44: ...receiver is on its side as it would be if placed on a table top Noise Displays ambient noise in decibels dB Temperature Displays ambient temperature in degrees Celsius C Data Detections Displays Exte...

Страница 45: ...ed detection l The ambient noise level N at the time of the detection l The Quality Score Q of the received detection Quality Score is a measure of the quality of an HR detection where 10 is excellent...

Страница 46: ...the receiver s own built in transmitter The HR2 receiver has two methods of decoding PPM transmissions PPM transmissions may be decoded by one or both decoders in either case a single detection is rep...

Страница 47: ...n The Filter Options box appears and displays the available options The default is Good Quality detects Select the quality level to set the option and return to the Live Tiles tab Live Detections tab...

Страница 48: ...ns and one for PPM detections NOTE You can select which Quality level of detections to display see Live Tiles and Live Detection Filter Options on the previous page Figure 3 5 Sample Tile information...

Страница 49: ...right corner of the tile or the Clear Tiles button is clicked A tile will remain green as long as detections of that ID continue to come in within the time threshold specified under Tile Settings Ora...

Страница 50: ...o a single ID range at a time a subset of tags To set up an ID Range subset of tags NOTE Filters are applied to both PPM and HR detections 1 In the Name field type a name for the set of tags 2 In the...

Страница 51: ...iles will remain displayed before they either disappear or change colour in the absence of new detections of the ID see description of how this works above Thresholds should be set slightly longer tha...

Страница 52: ...be displayed in the Tile Display Thresholds fields Figure 3 10 Showing the Tile Display Thresholds defaults 2 The default settings are 40 seconds for HR and 340 seconds for PPM These settings are app...

Страница 53: ...Transmitter Settings This section displays the current transmitter parameters l Whether the transmitter is ON transmitting or OFF not transmitting l Which transmitter Profile is in use l The Transmit...

Страница 54: ...ended at all times when not conducting range testing Sync Tag HR 25 35s PPM 270 330s This setting transmits with a random delay between 25 and 35 seconds for HR coding and 270 and 330 seconds for PPM...

Страница 55: ...e this setting only when performing range tests using a single transmitter and when there are no tagged animals known to be in the area The fixed delay setting means that transmission collisions are l...

Страница 56: ...ions Applying changes When you change configuration settings the Apply Changes button is accessible Click the button to immediately set the new parameters Figure 3 15 Applying Changes disable Transmit...

Страница 57: ...Clicking the Show Defaults button will change any current settings to the default settings and make the Apply Changes button accessible If you simply view the default settings and then click another...

Страница 58: ...efault settings To view the default hours and minutes settings click Show Defaults The default settings are displayed in the settings boxes Figure 3 18 Showing the default settings To accept the defau...

Страница 59: ...e minimum combined value is 0 hour 1 minute l The maximum combined value is 24 hours 0 minutes If you enter an invalid value a red frame appears around the settings boxes Figure 3 20 Invalid outside a...

Страница 60: ...ng Tag IDs Tag ID and Code Space information was shipped with the tag 1 Select the Code Space from the drop down list 2 IMPORTANT Currently you cannot enter sensor tags into a Watch Table 2 In the ID...

Страница 61: ...clear selected counts from the Watch Table list 1 Select one or more entries by checking the box at the right of the entries Under Manage Entries at the right the Clear Selected Counts button becomes...

Страница 62: ...Figure 3 23 Watch Table created from scratch built by you Example 2 Figure 3 24 Watch Table exported from an HR2 Receiver Exporting a Watch Table file Fathom can export Watch Table information to a cs...

Страница 63: ...dialog box appears 2 Navigate to the location you want to save the file and click Save Fathom will save the file with the default name format HR2 180 461059 Watchtable 2017 04 26 150755 csv Example F...

Страница 64: ...ored permanently in a device such as an HR2 receiver It is not to be confused with Fathom the PC software used to communicate with the receiver Firmware updates are rare and will occur to either compl...

Страница 65: ...atic update after a notification a Continue with firmware update window opens Figure 3 28 Continue with firmware update dialog box Click Update A Firmware Update Warning window opens NOTE In unique ci...

Страница 66: ...e Update Warning dialog box To offload your data first click Offload data first and proceed to save your data To update the firmware without saving your data first click Update firmware and follow the...

Страница 67: ...nication Options Setting the Session Baud Rate The session baud rate is the communication speed in bits per second bps between your HR2 receiver and the Fathom software Fathom will automatically set t...

Страница 68: ...unication link between the receiver and the RS485 host To enable RS485 Termination To enable RS485 Termination check the RS485 Termination box NOTE If there are multiple receivers attached to a single...

Страница 69: ...reset options for the receiver Faults Upon connecting to an HR2 Receiver Fathom performs a check of the receiver s state If any faults are found you will be presented with a fault diagnosis message F...

Страница 70: ...again when contacting Support Figure 3 35 Advanced Settings displaying Faults Conditions To view fault conditions click View Faults The Current receiver faults window appears Figure 3 36 Sample recei...

Страница 71: ...mstances it may be necessary to reboot the HR2 receiver For example VEMCO Support may recommend this action to clear a non critical fault condition Rebooting the receiver temporarily powers it off and...

Страница 72: ...g on page 67 To leave this window without rebooting the receiver click Cancel instead Factory Reset Use the Factory Reset option to return the HR2 receiver to its original settings Only use factory re...

Страница 73: ...settings b Offload Will offload data off of the receiver first then proceed with the reset c Cancel Will cancel the operation and return to the Advanced tab panel NOTE If it hasn t appeared yet in yo...

Страница 74: ...rnal clock Before deploying your HR2 receiver we recommend that you consult the Deploying an HR2 Receiver on page 75 section This Section Contains Information On The Following 4 1 Record Mode 66 4 2 S...

Страница 75: ...pings and detections and transmits its ID even while connected to Fathom software To place the receiver in Record Mode On the HR2 Receiver Tab click the Start a Study button start recording Follow the...

Страница 76: ...the Fathom software see Establishing Communication on page 24 Step 1 Start a Study button On the HR2 Receiver Tab click the Start a Study button start recording NOTE This button is not available befor...

Страница 77: ...under way click Abort at the bottom right of the screen l If you need to offload data that is present click Offload and offload your data first For more information on the offload data procedure see...

Страница 78: ...Step 5 Check the Receiver Status On the Status tab the status of the HR2 receiver should now display as ON Recording Figure 4 1 Receiver Initialized and Recording 69 4 2 Starting a Study...

Страница 79: ...d Data button On the HR2 Receiver Tab click the Offload Data button NOTE This button is not available before communication between the receiver and Fathom is established Step 2 Select Offload folder S...

Страница 80: ...to complete the download depends on the amount of data collected Step 5 Data is Offloading The offload progress is displayed including estimated time remaining Step 6 Successful Data Offload Once the...

Страница 81: ...een the HR2 and Fathom software Figure 4 2 Close receiver communication tab A window will appear to confirm that you want to close the HR2 Receiver tab When the communication is disconnected the HR2 r...

Страница 82: ...the HR2 Receiver Tab click the Suspend Receiver button stop recording Figure 4 3 Suspend Receiver button The Suspend receiver operation warning appears Figure 4 4 Suspend Receiver operation warning l...

Страница 83: ...74 This page intentionally left blank to ensure new chapters start on right odd number pages...

Страница 84: ...Some important points to keep in mind when designing a deployment plan for your HR2 receivers are explained here The common method for attaching a HR2 to a mooring line is also given This Section Con...

Страница 85: ...nsions The HR2 receiver s case dimensions can be useful when designing a mooring plan or mooring equipment The dimensions in inches are shown in the drawings below Figure 5 1 HR2 Case Dimensions 76 HR...

Страница 86: ...at you achieve good detection probability in most or all weather conditions It is not always necessary to have 100 coverage if you have several other locations where you know the animals will be passi...

Страница 87: ...e purchased from VEMCO product number HWE 507450 Follow the instructions listed below to attach the HR2 receiver to the rope used as the mooring line Step 1 Attach locations Identify the location on t...

Страница 88: ...de latch and tighten Wrap a third cable tie around the HR2 receiver and the rope so the cable tie occupies the top half of the lower groove in the HR2 body The bottom half of the groove is already occ...

Страница 89: ...ie so the head of the cable tie is over the rope Step 9 Trim off excess Trim the cable ties so there is no excess cable tie material and no sharp edges Figure 5 2 Sample mooring line attachment VR2Txs...

Страница 90: ...ite Pair 2 Red Black l Overall Copper Braided Shield 80 coverage l Black polyurethane jacket to an overall outer diameter of approximately 0 290 l Two jacketed Kevlar 49 strength members with breaking...

Страница 91: ...82 This page intentionally left blank to ensure new chapters start on right odd number pages...

Страница 92: ...cable time series for HR2 VR2W VR2AR VR2Tx and VR4 UWM receivers It also provides the ability to convert HR2 VDAT files offloaded using Fathom and VR2W VR2AR VR2Tx and VR4 UWM VRL files offloaded usin...

Страница 93: ...Step 1 Launch Fathom Click the Task Bar shortcut for the Fathom Launcher to start the Fathom software see below and then click on the Visualize Data icon see right Step 2 Select file to import To sel...

Страница 94: ...ancel the import process by clicking closing the tab Step 4 Data displayed The data are displayed in the Data Visualizer window Data are presented in two sections l All Data in the top section A l Sel...

Страница 95: ...window is fully resizable using click and drag action or using the Maximize window button Good to Know When you resize the window the graphs adjust to the size you pick and spreads the data according...

Страница 96: ...l C Bin Size Detections per Fathom bins your detection counts into bins of optimal size for display purposes The bin is recalculated each time you resize the Data Visualizer window and appears at the...

Страница 97: ...ion l C Bin Size Detections per Fathom bins your detection counts in the Selection section into bins of optimal size for the selected date range The bin size appears at the top left of the plot To dec...

Страница 98: ...by ID The detection count of each ID for the selected time period is listed to the right of the graph To sort the individual plots by detection count click Count at the top right l C Pinpointing Date...

Страница 99: ...ndary y axis Select which value you would like to display using the Tilt Temperature or None options at the top right of the plot You can access tilt or temperature values at any time along the series...

Страница 100: ...oth sources The default option is both sources To select a filter option At the right of the Data Visualizer window click the current filter option The Filter Options box appears and displays the avai...

Страница 101: ...as described next and watch the updated results on the graphs To use the Range Selector tool There are three ways to set the range A Click INSIDE the range selector and drag the range to a different...

Страница 102: ...he information you requested from your choices for the graph l For the HR2 you can view the Noise Samples by Type just click your choice HR PPM or Combined HR and PPM For the VR4 UWM you can also view...

Страница 103: ...ght side of the graph Example 1 Figure 6 12 HR Noise Samples and Tilt information Example 2 Figure 6 13 PPM Noise Samples and Temperature information Example 3 Figure 6 14 Combined HR and PPM Noise Sa...

Страница 104: ...for the Fathom Launcher to start the Fathom software and click on the Export Data icon Step 2 Select files to export To select the files to export click Select Files The Select Files to Export dialog...

Страница 105: ...r details see Other Records on page 101 For more information you can also view l Record Types by receiver model on page 102 and l Field Descriptions by Record Type on page 107 Step 4 Add Keyword to fi...

Страница 106: ...for records in the receiver log The exported CSV file includes l a field containing the original uncorrected date and time for each data point Device Time UTC and l a field containing the corrected da...

Страница 107: ...or appears to the right of the exported file name Click Close to finish and return to the Fathom screen 6 2 1 Record Types Included In Each Export Option Record Options are listed as they appear in th...

Страница 108: ...gnostic information DIAG_VR2Tx_ INTERIM VR2Tx VR2W regular system diagnostic information DIAG_VR2W VR2W VR2W intermittent system diagnostic information DIAG_VR2W_ INTERIM VR2W VR4 UWM regular system d...

Страница 109: ...R4 UWM Sensor Records Record Types Exported Record Identifier in CSV File Applicable Receiver Models Receiver tilt sensor readings ATTITUDE HR2 VR2Tx VR2AR VR4 UWM Receiver depth sensor readings DEPTH...

Страница 110: ...NSMITTER HR2 VR2Tx VR2AR There are also a few other record types that are exported to the CSV file with any of the checkbox selection you make Other Records Record Types Exported Record Identifier in...

Страница 111: ...iver general event EVENT Receiver fault information EVENT_FAULT Receiver initialization inform ation EVENT_INIT Receiver offload information EVENT_OFFLOAD HR2 memory remaining and other health informa...

Страница 112: ...event EVENT Receiver fault information EVENT_FAULT Receiver initialization inform ation EVENT_INIT Receiver offload information EVENT_OFFLOAD VR2W memory remaining and other health information HEALTH_...

Страница 113: ..._OFFLOAD VR2Tx memory remaining and other health information HEALTH_VR2TX Sensor records Receiver tilt sensor readings ATTITUDE VR2Tx noise sensor stats min max mean NOISE_STATS_VR2TX Receiver tempera...

Страница 114: ...INIT Receiver offload information EVENT_OFFLOAD VR2AR memory remaining and other health information HEALTH_VR2AR Sensor records Receiver tilt sensor readings ATTITUDE Receiver depth sensor readings DE...

Страница 115: ...ation DIAG_VR4 Event records Receiver general event EVENT Receiver fault information EVENT_FAULT Receiver initialization inform ation EVENT_INIT Receiver offload information EVENT_OFFLOAD VR4 UWM memo...

Страница 116: ...g to the receiver s clock the uncorrected time Time Date and time of the data following correction for receiver clock drift the corrected time The time offset of this time from UTC is indicated in the...

Страница 117: ...m software Time Correction s The difference between uncorrected Device Time UTC and cor rected Time times Model Receiver model that generated the data in this record Serial Number Serial number of the...

Страница 118: ...set from UTC time in hours of the value in the Time column The time offset is as selected when the receiver log was exported to Fathom CSV format using the Fathom software Time Correction s The differ...

Страница 119: ...t h column Time Offset h Offset from UTC time in hours of the value in the Time column The time offset is as selected when the receiver log was exported to Fathom CSV format using the Fathom software...

Страница 120: ...dicated in the Time Offset h column Time Offset h Offset from UTC time in hours of the value in the Time column The time offset is as selected when the receiver log was exported to Fathom CSV format u...

Страница 121: ...Time Date and time of the data following correction for receiver clock drift the corrected time The time offset of this time from UTC is indicated in the Time Offset h column Time Offset h Offset fro...

Страница 122: ...m UTC is indicated in the Time Offset h column Time Offset h Offset from UTC time in hours of the value in the Time column The time offset is as selected when the receiver log was exported to Fathom C...

Страница 123: ...UTC time in hours of the value in the Time column The time offset is as selected when the receiver log was exported to Fathom CSV format using the Fathom software Time Correction s The difference betw...

Страница 124: ...ontain information about the receiver log file that was used to generate the CSV output Field Description File Name The name of the receiver log file that was used to create this CSV file UUID A uniqu...

Страница 125: ...thom software Time Correction s The difference between uncorrected Device Time UTC and cor rected Time times Model Receiver model that generated the data in this record Serial Number Serial number of...

Страница 126: ...Serial number of the receiver that generated the data in this record Depth Min m Minimum depth during the stats Accumulation Period Depth Max m Maximum depth during the stats Accumulation Period Depth...

Страница 127: ...ock drift the corrected time1 The time offset of this time from UTC is indic ated in the Time Offset h column Time Offset h Offset from UTC time in hours of the value in the Time column The time offse...

Страница 128: ...t noise level at the time of the detection HR and PPM detections on HR2 receivers only Quality Score A measure of the quality of an HR detection where 10 is excellent and 1 is poor The quality score m...

Страница 129: ...records contain information about filters applied to DET records upon export from a receiver log to CSV format Detection filters are only applied to log files from certain receiver models For more in...

Страница 130: ...record Serial Number Serial number of the receiver that generated the data in this record Tilt degrees HR2 receiver tilt angle degrees from vertical sampled at time of logging HR Noise dB HR 170 kHz c...

Страница 131: ...r s clock the uncorrected time Time Date and time of the data following correction for receiver clock drift the corrected time The time offset of this time from UTC is indicated in the Time Offset h c...

Страница 132: ...indicated in the Time Offset h column Time Offset h Offset from UTC time in hours of the value in the Time column The time offset is as selected when the receiver log was exported to Fathom CSV forma...

Страница 133: ...n the Time Offset h column Time Offset h Offset from UTC time in hours of the value in the Time column The time offset is as selected when the receiver log was exported to Fathom CSV format using the...

Страница 134: ...set of this time from UTC is indicated in the Time Offset h column Time Offset h Offset from UTC time in hours of the value in the Time column The time offset is as selected when the receiver log was...

Страница 135: ...n the Time Offset h column Time Offset h Offset from UTC time in hours of the value in the Time column The time offset is as selected when the receiver log was exported to Fathom CSV format using the...

Страница 136: ...set of this time from UTC is indicated in the Time Offset h column Time Offset h Offset from UTC time in hours of the value in the Time column The time offset is as selected when the receiver log was...

Страница 137: ...receiver log was exported to Fathom CSV format using the Fathom software Time Correction s The difference between uncorrected Device Time UTC and cor rected Time times Model Receiver model that gener...

Страница 138: ...k drift the corrected time The time offset of this time from UTC is indicated in the Time Offset h column Time Offset h Offset from UTC time in hours of the value in the Time column The time offset is...

Страница 139: ...elected when the receiver log was exported to Fathom CSV format using the Fathom software Time Correction s The difference between uncorrected Device Time UTC and cor rected Time times Model Receiver...

Страница 140: ...selected when the receiver log was exported to Fathom CSV format using the Fathom software Time Correction s The difference between uncorrected Device Time UTC and cor rected Time times Model Receive...

Страница 141: ...al number of the receiver that generated the data in this record External Time UTC UTC date and time of the device that was used to offload the receiver calculated from the device s clock time and tim...

Страница 142: ...The time offset is as selected when the receiver log was exported to Fathom CSV format using the Fathom software Time Correction s The difference between uncorrected Device Time UTC and cor rected Tim...

Страница 143: ...he time offset is as selected when the receiver log was exported to Fathom CSV format using the Fathom software Time Correction s The difference between uncorrected Device Time UTC and cor rected Time...

Страница 144: ...time in hours of the value in the Time column The time offset is as selected when the receiver log was exported to Fathom CSV format using the Fathom software Time Correction s The difference between...

Страница 145: ...ime in hours of the value in the Time column The time offset is as selected when the receiver log was exported to Fathom CSV format using the Fathom software Time Correction s The difference between u...

Страница 146: ...mn The time offset is as selected when the receiver log was exported to Fathom CSV format using the Fathom software Time Correction s The difference between uncorrected Device Time UTC and cor rected...

Страница 147: ...Serial Number Serial number of the receiver that generated the data in this record Noise Min m Minimum noise during the stats Accumulation Period Noise Max m Maximum noise during the stats Accumulati...

Страница 148: ...d Serial Number Serial number of the receiver that generated the data in this record Noise Min mV Minimum noise during the stats Accumulation Period Noise Max mV Maximum noise during the stats Accumul...

Страница 149: ...fset of this time from UTC is indicated in the Time Offset h column Time Offset h Offset from UTC time in hours of the value in the Time column The time offset is as selected when the receiver log was...

Страница 150: ...the receiver that generated the data in this record Ambient Min m Minimum ambient temperature during the stats Accumulation Period Ambient Max m Maximum ambient temperature during the stats Accumulat...

Страница 151: ...142 This page intentionally left blank to ensure new chapters start on right odd number pages...

Страница 152: ...l help keep your HR2 receiver in peak operating condition It will also help when preparing it for storage This Section Contains Information On The Following 7 1 Replacing the Main Battery 144 7 2 O Ri...

Страница 153: ...g and Connecting a Battery on page 152 4 Closing the case see Closing the HR2 Case on page 155 IMPORTANT PLEASE be kind to the environment and dispose of the battery according to your local regulation...

Страница 154: ...n place while opening it Step 3 Insert the steel rod Bottom end Hold the body of the HR2 securely in place Insert one steel rod into the hole that runs through the diameter of the case near the bottom...

Страница 155: ...f the receiver acts as a brace while you apply pressure but be careful of it jumping off the flat surface Continue to rotate the rod and therefore the end cap until turning becomes easier but not quit...

Страница 156: ...ents Slide the end cap and outer cylinder apart until the battery compartment has cleared the cylinder Be very careful not to damage the threads on the end cap or the HR2 won t close and seal properly...

Страница 157: ...to the side IMPORTANT Check the inside of the receiver for any signs of moisture water Completely dry the battery tray and parts before re assembling and deployment Also check your O rings for any sig...

Страница 158: ...Step 3 Disconnect Press the release lever clip on the bottom of the battery connector and pull the connector out 149 7 1 Replacing the Main Battery...

Страница 159: ...attery tray Step 5 Lift battery up Grab the battery from both sides and push a bit forward against the top foam cushion in the battery tray Lift battery up from the back end NOTE The battery is held i...

Страница 160: ...Remove the battery Pull the battery out of the battery tray and set it aside PLEASE Be kind to the environment and dispose of the battery according to your local regulation 151 7 1 Replacing the Main...

Страница 161: ...or the receiver will be damaged For this reason VEMCO recommends the HR2 be opened and closed in a controlled environment and not in the field or on the deck of a boat Step 1 Open the case Open the H...

Страница 162: ...e Step 4 Check that battery is secure Ensure that the battery is pressed onto its hook and loop retainer strips and that it fits tightly between its top and bottom foam cushion retainers NOTE The conn...

Страница 163: ...ire connector Position the battery wire connector with the retainer clip on the bottom Step 8 Connect the battery Gently but firmly push the connector in until the clip clicks into its locked position...

Страница 164: ...VEMCO recommends the HR2 be opened and closed in a controlled environment and not in the field or on the deck of a boat Step 1 Use a new desiccant pack Place a new desiccant pack if the existing one...

Страница 165: ...ent and prevent the case from closing For tips on thread care see The Threads Have Been Damaged on page 176 Step 4 Prepare for final tightening Place a hand on the back of the receiver or steel rod to...

Страница 166: ...e you apply pressure but be careful of it jumping off the flat surface Continue to rotate the rod and therefore the end cap until turning becomes tight DO NOT overtighten IMPORTANT Make sure to test y...

Страница 167: ...Removing O Rings The O rings must be removed from their grooves to allow the O rings and the grooves to be inspected and cleaned Do not use a sharp object which may damage the groove surface when rem...

Страница 168: ...is use a magnifying glass and a bright light Scratches in the O ring groove would allow water to bypass the O ring potentially flooding the receiver and destroying the internal electronics If you find...

Страница 169: ...an O ring to pop out of the groove while the case is being closed giving little protection from water entering the HR2 7 2 3 Installing O Rings Now that the O rings and O ring surfaces are clean and p...

Страница 170: ...reduce the occurrence of condensation in the HR2 Be sure to store the HR2 in a safe location where the case will not be damaged Also be sure the temperature of the receiver during storage does not exc...

Страница 171: ...ing Instructions Clean the HR2 Receiver with a damp cloth and mild detergent l Do not use solvents l Do not use a scraper or abrasive cleaner on the LED window or the seal surfaces 162 HR2 Receiver Us...

Страница 172: ...ntains Information On The Following 8 1 Flash Memory 164 8 2 Status Light Flashes 165 8 3 Batteries 166 8 4 Updating the Fathom Software 167 8 5 Automatic Firmware Updates and Notifications 168 8 6 In...

Страница 173: ...transmitters and the date time at which the detection was recorded The HR2 will not continue to record received data once the memory is full A HR2 receiver with 2 GB can store more than 170 million de...

Страница 174: ...Transmitter Tab on page 44 The Status Light LED on an HR2 flashes either red green or blue Generally the red flashes are related to received pings and the green flashes are related to transmitted ping...

Страница 175: ...d switched from Suspend Mode to Record Mode IMPORTANT Always place the receiver in Suspend Mode when the receiver is not being used for an extended period of time WARNING Lithium metal batteries are c...

Страница 176: ...nnected to the Internet you will get notified automatically when new versions of Fathom are available for download see also Checking for Updates on page 22 To download and install the latest update ju...

Страница 177: ...er and sensor logging settings to default values We recommend offloading your data before performing the update NOTE We recommend installing the update immediately to ensure the ongoing best performan...

Страница 178: ...for Windows 2 If your cable is NOT a high speed VEMCO cable a go to www sealevel com b Download the latest SeaCOM asynchronous serial software drivers for Windows 3 Run the executable file to install...

Страница 179: ...170 This page intentionally left blank to ensure new chapters start on right odd number pages...

Страница 180: ...171 9 Common Questions This Section Contains Information On The Following 9 1 HR2 Receiver Related Questions 172 9 2 Fathom Related Questions 173...

Страница 181: ...9 1 2 What Is Considered A Quality Score For Detections A Quality Score is a measure of the quality of an HR detection where 10 is excellent and 1 is poor The quality score may be used to assist with...

Страница 182: ...ted then your data will be correctly timestamped when stored in the receiver 9 2 3 Why Do I See A Discrepancy Between Detections In My HR2 Live Views And Detec tions In The Exported CSV File Fathom us...

Страница 183: ...NOTE You can also find the more basic version number at the bottom center of every topic in the Help system 174 HR2 Receiver User Guide...

Страница 184: ...175 10 Troubleshooting This Section Contains Information On The Following 10 1 HR2 Receiver Related Troubleshooting 176 10 2 Fathom Related Troubleshooting 177...

Страница 185: ...oshing sound when the case is moved The HR2 case will also be very difficult to open if at all possible If you are suspicious there is compressed air in the receiver case then check for air or water l...

Страница 186: ...ng the identified COM port l If you are unable to connect to the receiver disconnect the cable from the computer then the receiver then reconnect to receiver and computer and try again l If you still...

Страница 187: ...178 This page intentionally left blank to ensure new chapters start on right odd number pages...

Страница 188: ...179 Appendices Appendices...

Страница 189: ...180 This page intentionally left blank to ensure new chapters start on right odd number pages...

Страница 190: ...mputer 3 If automatic installation of RS 485 drivers does not succeed see Installing the Communication Cable Drivers on page 169 4 Launch Fathom click Connect from the VEMCO Launcher in the Task Bar 5...

Страница 191: ...182 This page intentionally left blank to ensure new chapters start on right odd number pages...

Страница 192: ...etections Operating Temperature 5 C to 40 C Water must not freeze Maximum Depth 300 meters 440 psi PC Software Fathom Communication Cable RS 485 up to 12 Mbps External power supply optional 10 30 VDC...

Страница 193: ...184 This page intentionally left blank to ensure new chapters start on right odd number pages...

Страница 194: ...tory settings used when the receiver is shipped or a Factory Reset operation is performed HR2 Factory Settings Receiver Mode Suspended not recording Transmitter state Enabled Transmit Profile Sync Tag...

Страница 195: ...186 This page intentionally left blank to ensure new chapters start on right odd number pages...

Страница 196: ...ilter A second filter that is applied to HR Detection data upon conversion from VDAT to CSV is the HR Residency Filter This filter rejects HR detections of a given ID that are not duplicated within on...

Страница 197: ...188 This page intentionally left blank to ensure new chapters start on right odd number pages...

Страница 198: ...Context Sensitive Help CSH by clicking the CSH icon in specific panels take time to figure out how the following tools can assist you in making the most of the Help This Section Contains Information O...

Страница 199: ...art Topics help tabs l Search Tool 2 The top right corner provides your Search Tool where you can type in search criteria and get a list of topics found results see Using the Search Tool on page 193 l...

Страница 200: ...ides an overall outline and organization of the Help system 1 To open or close a book click on the book or the book title The sub topics it contains are then listed displayed below 2 To view a topic c...

Страница 201: ...ars highlighted where it is found throughout the topic To remove the highlighting click this button 4 Back left pointing double arrows After navigating forward two or more topics click this button to...

Страница 202: ...rds in the Search field A search engine looks through every topic When it finds the terms it presents you with a list of topics to choose from and open Search results are ranked not listed alphabetica...

Страница 203: ...194 This page intentionally left blank to ensure new chapters start on right odd number pages...

Страница 204: ...enses2 link in the About Fathom window 2 The Open Source Licenses window appears 1Open source software is software with source code that anyone can inspect modify and enhance 2Open source licenses are...

Страница 205: ...click the Export All button The file will be saved as a markdown1 file md 1Markdown is a lightweight markup language with plain text formatting syntax It is designed so that it can be converted to HT...

Страница 206: ...197 G Contact Information 20 Angus Morton Drive Bedford Nova Scotia Canada B4B 0L9 Phone 1 902 450 1700 Fax 1 902 450 1704 Web Site www vemco com...

Страница 207: ...198 This page intentionally left blank to ensure new chapters start on right odd number pages...

Страница 208: ...ions set forth below NOTICE PERIODS To receive a warranty remedy for a Product Buyer must contact VEMCO s Customer Support Department during the warranty period to receive the Return Material Authoriz...

Страница 209: ...ND THE REMEDIES OF BUYER SET FORTH HEREIN ARE EXCLUSIVE AND IN SUBSTITUTION FOR AND BUYER HEREBY WAIVES AND RENOUNCES ALL OTHER WARRANTIES AND OBLIGATIONS OF VEMCO AND ANY ASSIGNEE OF VEMCO AND ALL RI...

Страница 210: ...e engineer decompile disassemble or create derivative works based on the Embedded Software and or IP This license is assigned to the Product with which you have acquired the Embedded Software and or I...

Страница 211: ...to a text on that field H HR High Residence HR is a VEMCO technology that allows for the reliable detection of hundreds of animals in a particular location at one time Each transmitter carries a uniq...

Страница 212: ...ore A measure of the quality of an HR detection where 10 is excellent and 1 is poor The quality score may be used to assist with filtering false detections out of a dataset Detections with a quality s...

Отзывы: