background image

Ins tallation — S t ep-By-S t ep

2

.

w w w . v e l o d y n e . c o m

SC-IF/IC User’s Manual

Step 1 - 

Determine installation location.  As stated above, the SC-IF/IC can be mounted virtually
anywhere.  The only requirements are that the cabinet fit into the location, and that there be
proper venting for the audio to be passed into the listening environment. 

Step 2 -  

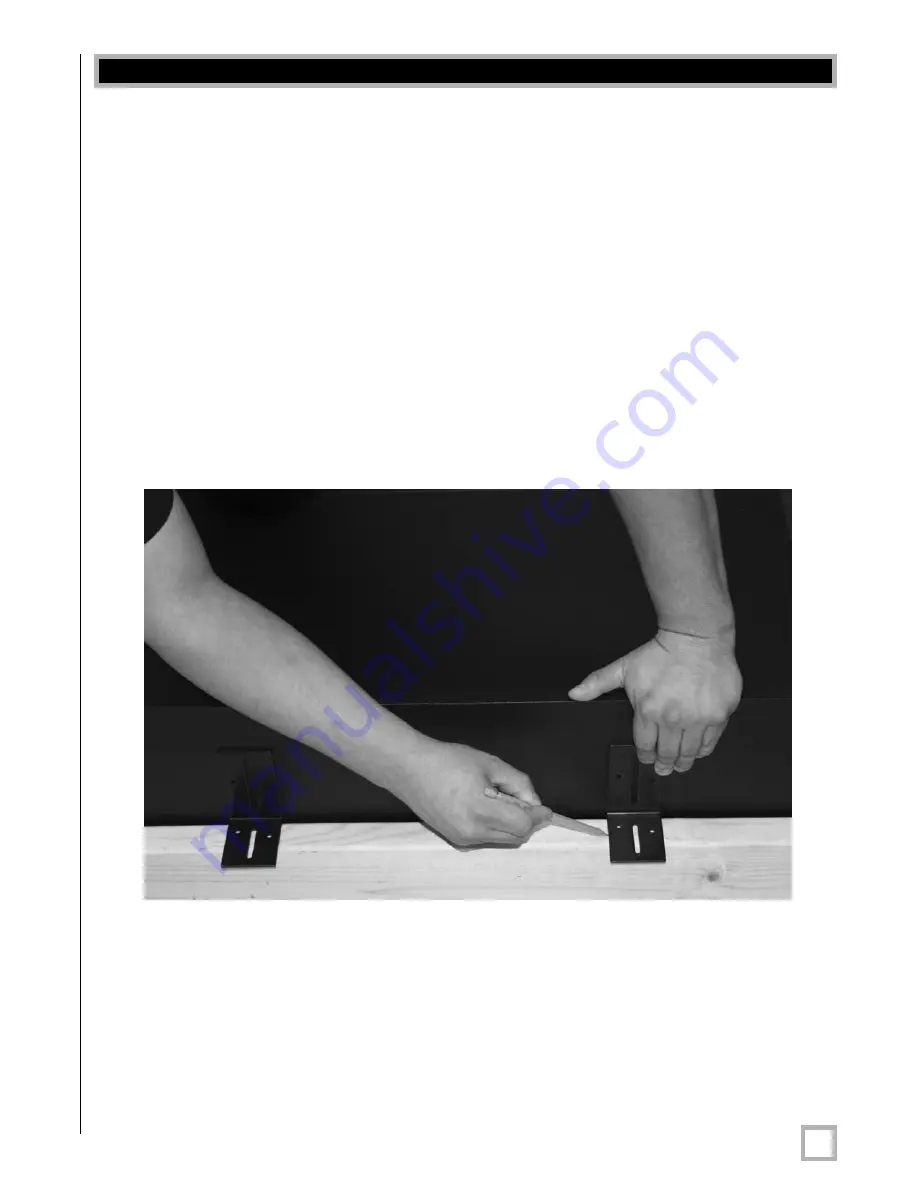
Mark installation location.  It is useful to place the subwoofer cabinet in its proposed position
and mark the locations of the four brackets that will be used to affix the subwoofer to the
framing.  Note that the brackets can be mounted ANYWHERE on the subwoofer cabinet, as
long as the brackets do not interfere with the woofer’s operation.  Always use all four brackets
in the installation.  It is recommended that the cabinet be positioned flush with the face of the
joists for ease of positioning and installation, but this is not required.  Make sure the speaker
terminals are facing the direction you intend to run the speaker wire.

Figure 1:  Mark bracket locations with a pencil.

Note: The brackets can be attached anywhere on the SC-IF/IC cabinet.

Содержание SubContractor SC-IF

Страница 1: ...SC IF IC In Floor In Ceiling Subwoofer SubContractorTM Series I N S T A L L A T I O N M A N U A L ...

Страница 2: ...duct should be connected to a power supply only of the type described in the operating instructions or as marked on the product 11 Braunding r Polarizati n This product may be equipped with apolarized altemating ourent line plug a plug having one blade wider than the other This plug will fit into the power outlot only one way This is a safety feature If you are unable to insert the plug fully into...

Страница 3: ...ii w w w v e l o d y n e c o m SC IF IC User s Manual Table of Contents Product Overview 1 Installation Step By Step 2 Other Velodyne Products 10 o ...

Страница 4: ...applications all that is required is a sturdy stud frame to mount to and a way to mount a decorative grille The woofer cabinet is 14 wide so ideally installs with 16 joist spacing However spacer boards can be used to adapt the SC IF IC to any application This document provides the detailed process for properly installing the SC IF IC The user s manual for the SC 1250 subwoofer amplifier provides t...

Страница 5: ...and mark the locations of the four brackets that will be used to affix the subwoofer to the framing Note that the brackets can be mounted ANYWHERE on the subwoofer cabinet as long as the brackets do not interfere with the woofer s operation Always use all four brackets in the installation It is recommended that the cabinet be positioned flush with the face of the joists for ease of positioning and...

Страница 6: ...e end user installation Step 4 Prepare the installation location Make whatever modifications are required to enable the subwoofer to fit in the installation location Note that the SC IF IC is designed for joists on 16 centers Install spacer studs as required to accommodate this dimension Step 5 Attach the mounting brackets Attach the mounting brackets to the cabinet as indicated in step 2 Figure 2...

Страница 7: ...rips to the subwoofer cabinet MAKE SURE STRIPS ARE USED ANYWHERE THE CABINET WILL COME INTO CONTACT WITH THE STRUCTURE IN ANY WAY The SC IF IC is a powerful subwoofer and will likely buzz or rattle if not isolated from the structure using the provided foam strips Figure 3 Affix foam strips ...

Страница 8: ...loosely CAUTION The SC IF IC is heavy Either use a partner to suspend the subwoofer while you are attaching it or use a mechanical device to hold it in place during installation Figure 4 SC IF In Floor positioned into floor location 5 w w w v e l o d y n e c o m SC IF IC User s Manual ...

Страница 9: ...6 w w w v e l o d y n e c o m SC IF IC User s Manual Step 8 Adjust position and tighten Position the subwoofer into its final location and tighten the brackets Figure 5 Tighten the brackets ...

Страница 10: ...eaker wire to the speaker terminals A 16 AWG or heavier wire is recommended Be sure to secure the speaker wire so it does not rattle or buzz against the cabinet during use BE SURE NOT TO CROSS THE SPEAKER WIRES AS THIS CAN DAMAGE THE AMPLIFIER Figure 6a 6b and 6c Speaker wire connection o ...

Страница 11: ...the decorative grille to prevent buzzing and rattling Figure 7 Finished installation with register Step 11 Check for rattles and buzzes Use aggressive bass material and check the subwoofer for buzzes and rattles These can come from inadequate use of the foam strips or there may be sympathetic vibration in the structure due to the powerful nature of the SC IF IC In the latter case track down the ra...

Страница 12: ...void if any repairs or service covered by the terms of this warranty are made to any component of the system by anyone other than a VELODYNE factory authorized service representative 3 VELODYNE is not responsible for damage caused by accidents abuse misuse natural or personal disaster or unauthorized modification The VELODYNE products are not intended for professional or commercial use and VELODYN...

Страница 13: ...e SMS 1 110V SPL R Series SPL 800R SPL 1000R SPL 1200R SPL 1500R SubContrator Series SC 1250 SC 8 SC 10 SC 12 SC 15 SC IW SC IF SC IC VRP Series VRP 1000 VRP 1200 VX Series VX 10 DD Series DD 10 DD 12 DD 15 DD 18 Digital Drive 1812 Signature Edition CHT R Series CHT 8R CHT 10R CHT 12R CHT 15R 230V SMS 1 SPL 800i SPL R Series SPL 800R SPL 1000R SPL 1200R SPL 1500R SubContrator Series SC 1250 SC 8 S...

Страница 14: ...ne Acoustics Inc 345 Digital Drive Morgan Hill CA 95037 408 465 2800 voice 408 779 9227 fax 408 779 9208 service fax www velodyne com Service E mail service velodyne com Product E mail help velodyne com Technical E mail techhelp velodyne com 63 SCIFC Rev A OCT06 ...

Отзывы: