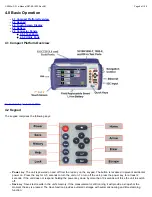
History
key: The history key resets any blinking LED due to a history condition.
Help
key: The help key brings the user to the online help, regardless of the current user interface location of the unit.
Lock
key: Locks the keypad
Home
key: Bring the unit to its home menu regardless of its location on the user interface.
Arrow
key: The arrow key moves the cursor in any of the four supported directions (left, right, up, down). The arrow key
works in conjunction with the Enter and Escape keys.
Enter
key: The enter key provides an enter sequence to the user interface. It is used in non touch screen operation mode
to enter menus and functions.
Escape
key: The escape key provides an escape sequence to the user interface. It is used in non touch-screen operation
mode to escape menus and functions.
4.3 Touch-Screen Display
The LCD supports touch-screen operation. To operate the touch-screen, use the stylus located in the top cover to navigate the
menus and tabs. The unit can also be used in a non touch screen mode i.e. use the arrow, enter, and escape keys to navigate.
The location of the cursor on the screen is indicated by a focus state. The focus state varies depending on the function or
section of the test set. Please observe the following precautions:
Never use excessive pressure on the touch-screen as this may damage its functionality
Never use sharp objects such as a pen, screwdriver etc. as this may damage the surface
Clean the surface of the touch screen using a soft cloth and mild detergent only. Do not use alcohol
4.4 Battery
The VePAL300 chassis is equipped with an intelligent Li-ion rechargeable battery pack which is located in the rear of the unit.
The battery will be partially charged upon delivery, so it is recommended to charge the battery fully before use. Please charge the
battery at room temperature to preserve its life and to obtain maximum charge. The battery is charged during operation provided
the unit is connected to the AC Mains using the supplied AC adapter. Removing the battery, while the unit is powered on is not
recommended - this may result in damage. Remove the rubber cover on the left side to connect the AC Main adapter to the unit.
CX350s-D3.1 e-Manual D07-00-102P RevA01
Page 10 of 109
Содержание VEPAL CX350S-D3.1
Страница 1: ...CX350s D3 1 e Manual D07 00 102P RevA01 Page 1 of 109 ...
Страница 13: ...Go back to top Go back to TOC CX350s D3 1 e Manual D07 00 102P RevA01 Page 13 of 109 ...
Страница 16: ...Go back to top Go back to TOC CX350s D3 1 e Manual D07 00 102P RevA01 Page 16 of 109 ...
Страница 21: ...Go back to top Go back to TOC CX350s D3 1 e Manual D07 00 102P RevA01 Page 21 of 109 ...
Страница 57: ...Go back to top Go back to TOC 7 8 4 Remote Operations ...
Страница 70: ...Trace Route Result Go back to top Go back to TOC CX350s D3 1 e Manual D07 00 102P RevA01 Page 65 of 109 ...
Страница 76: ...Go back to top Go back to TOC CX350s D3 1 e Manual D07 00 102P RevA01 Page 71 of 109 ...


