background image

Introduction

Safety Precautions

4

Safety Precautions

The following safety symbols may be used throughout this manual to alert you to important safety hazards and 
precautions.

EXPLOSIVE

Fuels and their vapors are extremely explosive if 
ignited.

FLAMMABLE

Fuels and their vapors are extremely flammable.

ELECTRICITY

High voltage exists in, and is supplied to, the 
device. A potential shock hazard exists.

TURN POWER OFF

Live power to a device creates a potential shock 
hazard. Turn Off power to the device and associ-
ated accessories when servicing the unit.

NO OPEN FLAMES

Open flames from matches, lighters, welding 
torches, etc. can ignite fuels and their vapors

.

NO SMOKING

Sparks and embers from burning cigarettes or 
pipes can ignite fuels and their vapors

.

NO VEHICLES

Moving vehicles in the area during service can cre-
ate a potential for personal injury to you or others. 
Sparks from starting vehicles can ignite fuels and 
their vapors

.

USE SAFETY BARRICADES

Unauthorized people or vehicles in the work area 
are dangerous. Always use safety cones or barri-
cades, safety tape, and your vehicle to block the 
work area.

CLEAN WORK AREA

Dispose of fuel soaked materials properly and 
not into trash barrels that may be used by cus-
tomers.

INJURY TO EYES AND SKIN

Unauthorized people or vehicles in the work area 
are dangerous. Always use safety cones or barri-
cades, safety tape, and your vehicle to block the 
work area.

WARNING

Heed the adjacent instructions to avoid damage 
to equipment, property, environment or personal 
injury.

READ ALL RELATED MANUALS

Knowledge of all related procedures before you 
begin work is important. Read and understand all 
manuals thoroughly. If you do not understand a 
procedure, ask someone who does

OFF

Содержание VaporTEK

Страница 1: ...Manual No 577014 335 Revision B Installation Setup and Troubleshooting Manual VaporTEK VTEK3 Controller Board ...

Страница 2: ...r Terms and Conditions VEEDER ROOT S PREFERRED CARRIER 1 Contact Veeder Root Customer Service at 800 873 3313 with the specific part numbers and quantities that were missing or received damaged 2 Fax signed Bill of Lading BOL to Veeder Root Customer Service at 800 234 5350 3 Veeder Root will file the claim with the carrier and replace the damaged missing product at no charge to the customer Custom...

Страница 3: ... Characteristics 12 VaporTEK Pump Specifications 13 VaporTEK Controller 14 VaporTEK Controller Pulse Interface Optional 15 VaporTEK Pulse Interface Adapter Board P N 900900 001 Jumpers 15 VaporTEK Valve Adapter Board Optional 16 VaporTEK Pump Configuration 18 Installation VaporTEK Pump 19 VaporTEK 3 Controller and VaporTEK Pulse Interface Installation 21 VaporTEK 3 Controller Board InstallatioN 21...

Страница 4: ...gure 10 VaporTEK Pulse Interface Adapter Board Mounted To Back Of VaporTEK 3 Controller Board Housing 22 Figure 11 VaporTEK 3 Controller Board Mounting Cover Secured With Safety Label Affixed 23 Figure 12 Apply Thermal Transfer Paste To These Component Surfaces 24 Figure 13 Apply Thermal Transfer Paste To These Component Surfaces 24 Figure 14 Old Versus New Style VaporTEK Cable Plugs 25 Figure 15 ...

Страница 5: ...ery system that collects vapor during vehicle fueling and returns vapor to the underground storage tank UST Each VaporTEK system is designed to accommodate two active fueling points simultaneously VaporTEK System Basic Components VaporTEK Pump VaporTEK 3 Controller Board Figure 1 VaporTEK System Basic Components VaporTEK 3 Controller Board VaporTEK Pump ...

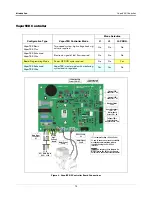
Страница 6: ...fications for contractors who will install and setup the equipment discussed in this manual VEEDER ROOT VTEK3 EPV ADAPTER 900900 001 A B 0V 5Vout X2 X1 F1 F3 SIDE B SIDE A VTEK3 CTRL X3 To VaporTEK 3 Controller Board X8 Pulse Interface Port VaporTEK Valve Adapter Board Pulse Inputs Side A 315mA 315mA 8 24 VDC Power Pulse Inputs Side B PE GND 24V P3A P2A P1A GND GND P4B GND GND P4A P3B P2B P1B EPV ...

Страница 7: ...tem tests troubleshooting service techniques and operations training on the designated system Wireless 2 Tall Tank VR Vapor Products Certification Contractors holding a certification with the following designations are approved to perform installation checkout startup programming system tests troubleshooting service techniques and operations training on the designated system ISD In Station Diagnos...

Страница 8: ...HICLES Moving vehicles in the area during service can cre ate a potential for personal injury to you or others Sparks from starting vehicles can ignite fuels and their vapors USE SAFETY BARRICADES Unauthorized people or vehicles in the work area are dangerous Always use safety cones or barri cades safety tape and your vehicle to block the work area CLEAN WORK AREA Dispose of fuel soaked materials ...

Страница 9: ...y fuel flow electronic signal is required VaporTEK Enhanced Constant Speed System controlled High Voltage Signals M1 M2 MPV A L control VaporTEK Ultra Variable Speed System A L equalized by EPV electronic signal is required WARNING This product is to be installed and operated in the highly combustible environment of a gasoline dispenser where flammable liquids and explosive vapors may be present F...

Страница 10: ...nd pipe lengths are permitted between the filler nozzle and the vacuum pump according to EN13463 1 standard Vapor recovery hose with an inside diameter 10mm in the coaxial hose 6m or Coaxial hose 6m with an outside diameter 38mm and fitted together with a downstream pipeline DN 15 G 1 2 3m In addition the tanks mentioned in Test Reports PTB Ex 05 45017 and PTB Ex 05 45027 may be installed in the D...

Страница 11: ...for use where external surfaces may come into regular exposure to substances which are incompatible with any of the following materials Aluminium and aluminium alloys brass alloys zinc plated steel carbon alloy steel nitrile rubber TUV Certification VaporTEK Kits VaporTEK Pump ATEX IECEX ITRI Kit P N 900612 001 Product Test Standard TUV Certificate Number Hose Nozzle VaporTEK Basic VDI 4205 A L 13...

Страница 12: ...otten VaporTEK Pump PCEC Kit P N 900869 001 China PCEC Version Quantity Description 1 VaporTEK PUMP MOTOR ASM P N 900882 001 1 577014 132 Pump Field Replacement Manual Quantity Description 1 VaporTEK PUMP MOTOR ASM P N 900868 001 1 VaporTEK Pump Install Manual Chinese 577014 090 ...

Страница 13: ... P N 900892 001 1 VaporTEK 3 Controller board MTG Cover P N 900893 001 1 Label VTEK 3 Controller KIT P N 900853 001 4 Snap Lock Standoff P N 579197 001 2 Saddle Clamp T15 8 SPC P N 576010 834 VEEDER ROOT VAPORTEK CONTROLLER 900890 001 Rev C P N 141 031 916 S N 0000586 DATE 49 2016 RoHS Compliant PE F1 PE L N PE M1 M2 AB SB AA SA EPV VALVE MOTOR POWER MOTOR SIGNAL J3 X7 X6 X8 PROGRAM J1 J2 X3 X2 X1...

Страница 14: ...ass 8 Steel Zinc Plated Tooth Washer P N 579201 001 2 Hex Nut M6 X 1 Steel P N 579082 001 2 SHCS M6X1 X 20MM LG Grade 8 8 P N 579281 001 2 Screw PH Phillips M4 0 7 X 12LG Lock washer M4 P N 579198 001 1 18AWG 3 Conductor Power Cable with Connector 3 FT Long P N 900651 001 Item Quantity Description ...

Страница 15: ...ulse Interface Adapter Board P N SK 141 086 464 P N VR 900900 001 4 Support Post Dual Locking M4 0 X 6MM LG Plastic P N 579081 001 1 26 Pin Flat Ribbon cable P N 579292 001 1 18AWG 2 Conductor Power Cable with Connector 4 FT Long P N 900652 001 1 24AWG 8 Conductor Signal Cables 3 FT Long P N 900643 001 Quantity Description 1 High Voltage Relay VTEK3 CTRL X3 ...

Страница 16: ...ough the vapor pump to the UST See Figure 3 for flow direction 5 The following conditions must apply according to EN13463 1 for the maximum pipe and hose lengths between the nozzle and the VaporTEK Pump a An inner diameter 10mm in the coaxial hose of length 6m OR b Coaxial hose of length 6m with an outer diameter 38mm together with a DN15 pipe G length 3m Quantity Description 1 VaporTEK Valve Adap...

Страница 17: ...s Either side of the pump Motor Type Synchronous BLDC Brushless DC Motor Voltage Single Phase 230 VAC 10 Frequency 50 60 Hz Watts 250W Motor Speed 2500 rpm max Maximum flow rate Up to 120 lpm Noise Level 59 dB A Flame Arrester 1 Outlet Port G 1 4 Flame Arresters 2 Inlet Ports G 1 4 2 Mounting Boss 4 Both Sides M6 x 1 Flow Direction to UST W 140 mm H 235 mm L 245 mm Sensor Cable Motor Cable M22 x 1...

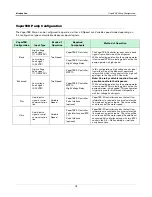
Страница 18: ... RoHS Compliant PE F1 PE L N PE M1 M2 AB SB AA SA EPV VALVE MOTOR POWER MOTOR SIGNAL J3 V6 V3 V8 V1 X7 X6 X8 PROGRAM J1 J2 X3 X2 X1 X4 BR1 IC5 RS422 L1 N L1 N PE High Voltage Inputs AC Main Power 110V 230V Main Power Connector X1 Motor Power Cable Motor Signal Cable To VaporTEK 3 Pulse Interface Adapter Board X8 Board Heartbeat LED V3 Motor Board Error LED V8 Monitor Status LEDs External LED Conne...

Страница 19: ...oHS Compliant PE F1 PE L N PE M1 M2 AB SB AA SA EPV VALVE MOTOR POWER MOTOR SIGNAL J3 V6 V3 V8 V1 X7 X6 X8 PROGRAM J1 J2 X3 X2 X1 X4 BR1 IC5 RS422 UNSAFE AREA UNSAFE AREA SAFE AREA L1 N MAIN 230V L1 N PE M1 M2 VTEK3 CTRL X3 26 Pin Flat Ribbon Cable 579292 001 VaporTEK 3 Pulse Interface Adapter 141 086 646 8 24V DC Pulse Side A PULS Power Supply 100W 140 810 856 24V DC OK L N GND GND P4A P3A P2A P1...

Страница 20: ...nal is used to control the valve power for each side separately An on board integrated current regulator is stabilizing the valve current against temperature drift on the valve solenoid head An equalizer setup function provided by the FB1 Service terminal with software version 6 9 and above allows the service technician to calibrate the valve power in dual transaction mode This setup can also be d...

Страница 21: ... Valve Adapter Board 315mA To The Existing 24VDC Power Supply 315mA EPV B E P V B VEEDER ROOT VAPORTEK CONTROLLER 900890 001 Rev C P N 141 031 916 S N 0000586 DATE 49 2016 RoHS Compliant PE F1 PE L N PE M1 M2 AB SB AA SA EPV VALVE MOTOR POWER MOTOR SIGNAL J3 X7 X6 X8 PROGRAM J1 J2 X3 X2 X1 X4 BR1 IC5 RS422 PE GND 24V Duncansville PA 16 Type EPV10 SIRA 12ATEX6058X 40 Valve II 1 2G c T3 Solenoid II ...

Страница 22: ...e Vapor TEK Controller Note One relay switch is required for each gasoline nozzle in the dispenser With one fueling point active the pump operates in low speed With two fueling points active the pump operates in high speed This configuration is typically used for multi product dispensers with low voltage hook signals Low voltage hook signal 0 24VDC VaporTEK 3 Controller MPV10 High Voltage Relay Pl...

Страница 23: ...ate direction of flow Also ensure the electrical cables of the VaporTEK Pump s location will reach the VaporTEK Controller installed in the electronic cabinet of the dispenser Unclassified Area 4 After identifying the desired pump orientation secure the VaporTEK Pump onto the dispenser support structure Excessive vibration may require additional support and vibration mounts to secure the VaporTEK ...

Страница 24: ... Pump 20 Figure 8 VaporTEK Pump Installation Orientations Preferred Pump Installation Orientation Fins Down Acceptable Pump Installations Orientation Fins Up Motor Facing Incorrect Pump Installation Motor On Top Motor Down ...

Страница 25: ... 579082 001 nuts from the VaporTEK 3 Controller Board Kit P N 900895 001 see item 1 Figure 9 Figure 9 Install The VaporTEK 3 Controller Board Mounting Bracket In The Dispenser s Electronic Compartment 2 Plug in the ribbon cable connector that connects to the VaporTEK Pulse Interface Adapter board into the X8 male connector on the VaporTEK 3 Controller board see item 2 in Figure 9 3 Plug in the Mot...

Страница 26: ...o P1A and GND terminals to the board as shown Item 3 For additional grades utilize additional ports 4 To get 1 grade pulse input for Side B insert cable 900643 001 to P1B and GND terminals to the board as shown Item 4 For additional grades utilize additional ports 5 Plug the 26 Pin Flat Ribbon Cable P N 579292 001 plug Item 5 to the board as shown 6 Get the VaporTEK 3 Controller board MTG Cover P ...

Страница 27: ...rface Installation 23 Figure 11 VaporTEK 3 Controller Board Mounting Cover Secured With Safety Label Affixed WARNING TURN OFF ALL POWER BEFORE SERVICING HIGH VOLTAGE PRESENT WITHIN UNIT ONLY QUALIFIED PERSONNEL SHOULD SERVICE OR ACCESS THIS UNIT P N 900894 001 ...

Страница 28: ... of thermal transfer paste NTE303 or equivalent Figure 12 Apply Thermal Transfer Paste To These Component Surfaces 1 Fasten the VaporTEK 3 Controller board to the mounting surface with three M3 0 5 X12 long screws and three M3 0 5 tooth washer hex nuts see Item 1 Figure 3 Torque each screw to a nominal 0 60 N m min 0 50 N m max 1 00 N m Figure 13 Apply Thermal Transfer Paste To These Component Sur...

Страница 29: ...concerning flammable liquids VbF Technical guidelines for flammable liquids TRbF respectively technical guidelines industrial safety regulations TRBSASdapter Technical rules GAS TRG For combined storage and delivery with gas Regulations concerning plants for the storage bottling and transfer of substances harmful to water VawS Federal emission protection act VDE regulations Explosion protection gu...

Страница 30: ...on page 21 2 Connect the P N 900899 001 adapter cable s screw terminal plug to the pump motor power cable screw terminal plug Connect the 4 pin snap plug end of the motor power adapter cable to the Motor Power connector on the VaporTEK 3 Controller board Item 3 in Figure 9 3 Attach the adapter cable s Motor Power plug ground wire to the PE terminal on the VaporTEK 3 Controller board Item 6 Figure ...

Страница 31: ...ibbon cable To establish communication with the monitoring system Jumpers J1 and J2 need to be in place on the VaporTEK 3 Controller board see Figure 4 on page 14 After power up the VaporTEK 3 Controller board starts to communicate to the connected monitoring system automatically 4 VaporTEK with RS422 Serial Connection All information like fuel flow Monitoring status and re regulation will be exch...

Страница 32: ...IGNAL J3 V6 V3 V8 V1 X7 X6 X8 PROGRAM J1 J2 X3 X2 X1 X4 BR1 IC5 RS422 UNSAFE AREA UNSAFE AREA SAFE AREA O T GND OFF TEMP 120 C Nozzle Switcher Side A Nozzle Switcher Side B Ex Junction Box O T GND ON TEMP 120 C FB1 Service Terminal Motor Power Cable M4 W PWM M2 V PWM M1 U PWM M3 VCC 5V Motor Signal Cable S4 GND S3 H3 S2 H2 S1 H1 S5 O T L1 N MAIN 230V L1 N PE M1 M2 F6 F1 F8 F3 Home 7 END 1 SHIFT SP...

Страница 33: ... GND OFF TEMP 120 C O T GND ON TEMP 120 C FB1 Service Terminal Motor Power Cable M4 W PWM M2 V PWM M1 U PWM M3 VCC 5V Motor Signal Cable S4 GND S3 H3 S2 H2 S1 H1 S5 O T L1 N MAIN 230V L1 N PE M1 M2 F6 F1 F8 F3 Home 7 END 1 SHIFT SPACE ENTER INS 0 2 PgDn 3 4 5 6 PgUp 9 8 F9 F4 F10 F5 F7 F2 START VTEK3 CTRL X3 26 Pin Flat Ribbon Cable 579292 001 VaporTEK 3 Pulse Interface Adapter 141 086 646 8 24V D...

Страница 34: ...X8 PROGRAM J1 J2 X3 X2 X1 X4 BR1 IC5 RS422 UNSAFE AREA UNSAFE AREA SAFE AREA L1 N MAIN 230V L1 N PE FB1 Service Terminal F6 F1 F8 F3 Home 7 END 1 SHIFT SPACE ENTER INS 0 2 PgDn 3 4 5 6 PgUp 9 8 F9 F4 F10 F5 F7 F2 START VTEK3 CTRL X3 26 Pin Flat Ribbon Cable 579292 001 VaporTEK Pulse Interface Adapter 141 086 646 8 24V DC Pulse Side A PULS Power Supply 100W 140 810 856 24V DC OK L N Pulse Side B To...

Страница 35: ... circuits on Side A See Figure 18 for high voltage relay wiring diagrams d Make similar connections on Side B and connect to M2 on the VaporTEK Controller B A Pulse Out B 2 1 Out A 5 V B A B A 1 2 3 4 5 6 7 8 1 2 3 4 5 6 7 8 PE N L RS485 230 V RS485 4 2 1 FAFNIR VAPORIX Control Service VAPORIX Flow SIDE A VEEDER ROOT VAPORTEK CONTROLLER 900890 001 Rev C P N 141 031 916 S N 0000586 DATE 49 2016 RoH...

Страница 36: ...l Grade 1 Voltage Relay Grade 2 Voltage Relay Grade 3 Voltage See Figure 20 for low voltage relay wiring diagrams DISPENSER SIDE B High Voltage Hook Signal 110 230 VAC Note wiring similar to side A PPU1 PPU2 VaporTEK Pump VaporTEK 3 Controller Board VEEDER ROOT VAPORTEK CONTROLLER 900890 001 Rev C P N 141 031 916 S N 0000586 DATE 49 2016 RoHS Compliant PE F1 PE L N PE M1 M2 AB SB AA SA EPV VALVE M...

Страница 37: ...TEK Wiring 33 Figure 21 VaporTEK High Voltage Relay Diagram 110 230 VAC to VaporTEK Controller 110 230 VAC Power Mains Neutral Line 013 27 eps 2 4 6 8 VaporTEK High Voltage Relay 1 3 5 7 High Voltage Nozzle Hook Signal Input ...

Страница 38: ... in Figure 22 All necessary setup such as pulse ratio and K Factor can be done by using a FB1 Service Terminal Figure 22 VaporTEK USB Adapter Service OFF VEEDER ROOT VAPORTEK CONTROLLER 900890 001 Rev C P N 141 031 916 S N 0000586 DATE 49 2016 RoHS Compliant PE F1 PE L N PE M1 M2 AB SB AA SA EPV VALVE MOTOR POWER MOTOR SIGNAL J3 V6 V3 V8 V1 X7 X6 X8 PROGRAM J1 J2 X3 X2 X1 X4 BR1 IC5 RS422 UNSAFE A...

Страница 39: ...elect the appropriate COM port on your laptop COM X in example below To verify COM port go to Control Panel System Device Manager and select ports Check to see which COM port says USB 2 0 Click OK Connection Description OK Cancel X New Connection Name Enter a name and choose an icon for the connection VaporTEK Controller Icon VaporTEK Connect using Detect Carrier Loss Connect To Enter details for ...

Страница 40: ... Port Settings COM X Properties Restore Defaults OK Cancel Flow control Stop bits Parity Data bits Bits per second None 1 None 8 9600 X Apply Apply Function arrow and ctrl keys act as Terminal keys Crtl H Del Crtl H Space Crtl H VaporTEK Properties ASCII Setup Input Translation Terminal Setup Terminal Setup Colors OK Cancel Auto detect X Settings Connect To Emulation Telnet terminal ID Windows key...

Страница 41: ...ay milliseconds 100 Character delay milliseconds 0 Append line feeds to incoming line ends Force incoming data to 7 bit ASCII Wrap lines that exceed terminal width New Connection Hyperterminal File Edit View Call Transfer Help Print echo Capture NUM CAPS SCROLL 9600 8 N 1 Auto detect Connected 0 02 44 VTEK_3 Motor Controller SW 1 02 Chip Version M16C26A Device No 000000621 Prod Date 24 03 2016 No ...

Страница 42: ...on Hyperterminal File Edit View Call Transfer Help Print echo Capture NUM CAPS SCROLL 9600 8 N 1 Auto detect Connected 0 02 44 VTEK_3 Motor Controller SW 1 02 Chip Version M16C26A Device No 000000621 Prod Date 24 03 2016 No Master Mode VTEK Board Revision C MAIN MENU 1 Show Config and Monitor Status 2 Set Config 3 Set Factory Defaults 4 Debug Mode 5 Show Calibration Table 6 A L Ratio 7 Pulse Ratio...

Страница 43: ...d 0 02 44 2 Set Config Pump Motor Type VaporTEK VTEK RS422 Type Slave Device HV Nozzle Speed M1 2500 rpm HV Nozzle Speed M2 2500 rpm Set M1 Input performance 0 250RPM x10 120 Set M2 Input performance 0 250RPM x10 120 Do you want to save it Y N y Config has been stored successfully Pump Motor Type VaporTEK VTEK RS422 Type Slave Device HV Nozzle Speed M1 1200 rpm HV Nozzle Speed M2 1200 rpm New Conn...

Страница 44: ...n to disable this function Press s to show the power consumption data of motor New Connection Hyperterminal File Edit View Call Transfer Help Print echo Capture NUM CAPS SCROLL 9600 8 N 1 Auto detect Connected 0 02 44 4 Debug Mode Press f to toggle to real time fuel Flow Press d to debug Motor Hall Sensor Signals Press s to show the current Motor Speed New Connection Hyperterminal File Edit View C...

Страница 45: ...cho Capture NUM CAPS SCROLL 9600 8 N 1 Auto detect Connected 0 02 44 5 Calibration Table MP Flow A Flow B Speed No l min l min rpm 0 0 0 0 1 4 4 80 2 8 8 160 3 12 12 240 4 16 16 320 5 20 20 400 6 24 24 480 7 28 28 560 8 32 32 640 9 36 36 720 10 40 40 800 11 44 44 880 12 48 48 960 13 52 52 1040 14 56 56 1120 15 60 60 1200 New Connection Hyperterminal File Edit View Call Transfer Help Print echo Cap...

Страница 46: ...tor value of 100 represents 100 New Connection Hyperterminal File Edit View Call Transfer Help Print echo Capture NUM CAPS SCROLL 9600 8 N 1 Auto detect Connected 0 02 44 7 Pulse Ratio Pulse rate Imp l 100 Pulse Prescaler 1 Pulse Prescaler x Pulse rate 100 pulse 1 do you want to change these Y N Y Input Pulse Ratio pulse l 10 250 136 New Pulse Prescaler 1 10 1 Data have been written successfully P...

Страница 47: ...nt and is for factory use only 19 Show Hot Keys Press h This item shows all other available hot keys New Connection Hyperterminal File Edit View Call Transfer Help Print echo Capture NUM CAPS SCROLL 9600 8 N 1 Auto detect Connected 0 02 44 Hot Keys m show the Main Menu h show this Help Menu f toggle ON OFF real time fuel Flow s show Motor Speed and Status ...

Страница 48: ...equired FB1 hand held terminal with 15 pin to RS422 cable Gas meter A L nozzle adapter varies by nozzle manufacturer Hoses Initial Setup 1 Verify power is available at the VaporTEK 3 Controller board both the V1 and V6 red LED s are on and the V3 green LED is flashing slowly New Connection Hyperterminal File Edit View Call Transfer Help Print echo Capture NUM CAPS SCROLL 9600 8 N 1 Auto detect Con...

Страница 49: ...e from the dispenser holder and secure the A L nozzle adapter to the spout of either the ARVN or Elaflex nozzle as appropriate The A L adapter o rings prevent air leakage into the nozzle s vapor collection holes see nozzle close up detail in Figure 23 After ensuring the nozzle shutoff port is not covered by the adapter body tighten the two knurled end rings to secure the adapter to the nozzle 6 Se...

Страница 50: ...RAM J1 J2 X3 X2 X1 X4 BR1 IC5 RS422 UNSAFE AREA UNSAFE AREA SAFE AREA 1 2 3 4 5 6 7 8 9 0 E NT E R S HIF T S TA RT VRC TYP Ga smess ung 1 MVR 2 VRC 3 Flow Direction Nozzle End TM OR Connect vapor flow meter to barbed fitting on adapter Connect vapor flow meter to barbed fitting on adapter AVRN Nozzle Vapor collection holes Nozzle hold open clip Nozzle hold open clip Nozzle shutoff port don t cover...

Страница 51: ...calibration factor 5 When display below appears input the calibration factor shown on the gas meter example 07 is now the New factor and press ENTER Refer to the Burkert Gas meter product manual for the calibration factor It is typically marked K Factor see Figure 24 Figure 24 Locate the Burkert Gas Meter Calibration Factor SERVICE Gas measuring 1 SYS Identify 2 EC2000 3 VAPOR CONTROLLER Gas measu...

Страница 52: ... current petrol flow rate on the FB1 s display by using the FB1 Sub menu item Petrol flow 3 see step 4 below The pulse rate adjustment can be setup either using the service terminal FB1 connected to the VaporTEK Interface or a Laptop connected to the VaporTEK Interface Pulse Rate Setup with FB1 1 Switch on the FB1 Press the Start button until below screen displays then press the keys shown 2 When ...

Страница 53: ...hen the display below appears press the keys shown 3 When the display below appears press the keys shown to start the auto calibration 4 At the display below select the dispenser side 1 or 2 that you want to calibrate 10 Errors 1 Production 2 Fuel Flow 3 Impulse 4 4 VAPOR CONTROLLER Pulse assignment Cur 050 Change with F2 F2 Press number keys to enter desired pulse rate e g 136 ENTER SERVICE SAL p...

Страница 54: ...he Simulation section and verify the A L Ratio which is shown as Rate The Rate as displayed on the FB1 Terminal shall be within the legislated range established by local regulation Simulation with FB1 Terminal 1 Press the START green button on the FB1 Terminal until the below screen appears Press the keys as shown Select Side Side 1 1 Side 2 2 1 2 or Adjustment Rate 100 Offset 001 Change with F2 A...

Страница 55: ... minute The flow rate achieved by the VaporTEK Pump will be displayed in the FB1 Terminal 6 The FB1 Terminal will start the simulation and display the results as in the example below Where Rate is the ratio of current vapor flow Cur divided by the simulated petrol flow Set Set is the simulated petrol flow established in Step 5 above NOTE Set value must be greater than 6 lpm to start the VaporTEK P...

Страница 56: ...LVE MOTOR POWER MOTOR SIGNAL J3 V6 V3 V8 V1 X7 X6 X8 PROGRAM J1 J2 X3 X2 X1 X4 BR1 IC5 RS422 UNSAFE AREA UNSAFE AREA SAFE AREA L1 N PE M1 M2 Gilbarco Inc 24V 135W TB3 P2 TB3 J1 FB1 Service Terminal VaporTEK Pump VaporTEK 3 Controller Board 900890 001 VAPOR VAC CASH A TRIND SMRT CASH B Plug the orange connector into any connector on the M04406A001 cable 230V 230V F6 F1 F8 F3 Home 7 END 1 SHIFT SPAC...

Страница 57: ... CONTROL PUMP CONTROL NODE 140 761 746 LON 1 U14 P 1123 P 1111 1 1 10 26 1 26 1 10 P 1102 P 1103 P 1104 P 1122 DIRECT DEBUG P 1101 P 1105 JP1 2W REV D1 JP2 D2 D3 D4 D5 D6 D7 D8 D9 D10 D11 D12 D13 D14 RX TX A B C D E 2W RX 2W TX ST LON1 LON2 HeartB JP3 ColdStart JP5 JP6 JP7 26 1 JP8 JP9 P 1115 P 1113 P 1112 P 1114 P 1108 IFSF AUX I O MD EN VAPORVAC P 1110 BATT 2 0 3 6 VDC 14 22 VDC 4 75 5 25 VDC 3 ...

Страница 58: ...For technical support sales or other assistance please visit www veeder com ...

Отзывы: