


72
©Vecow ECX-2000 User Manual
GETTING TO KNOW YOUR ECX-2000
2.2 Front Panel I/O Functions
In Vecow ECX-2000 series family, all I/O connectors are located on front panel
and rear panel. Most of the general connections to computer device, such as
USB, LAN Jack, Display, DVI-D, Display Port and any additional storage, are
placed on the front panel.
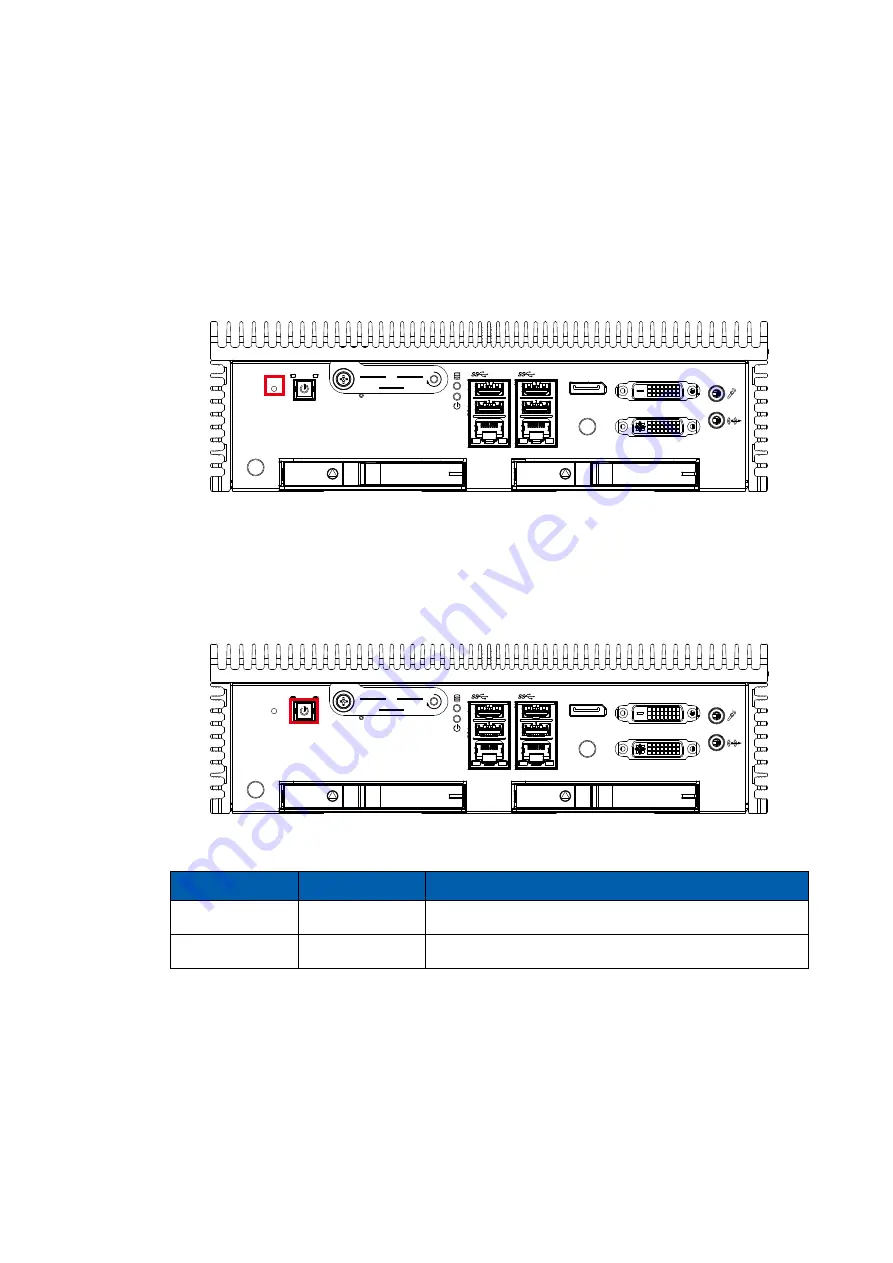
2.2.1 Reset Tact Switch
It is a hardware reset switch. Use this switch to reset the system without power
off the system. Press the Reset Switch for a few seconds, then reset will be
enabled.
DP
DVI-D
DVI-I
RST
1
2
WLAN
LAN 1
LAN 2
SIM 1
SIM 2
Micro SD
2.2.2 Power Button
The Power Button is a non-latched switch with dual color LED indication. It indicates
power status : S0, S3 and S5. More detail LED indications are listed as follows :
LED Color
Power Status
System Status
Solid Blue
S0
System working
Solid Orange
S3, S5
Suspend to RAM, System off with standby power
To power on the system, press the power button and then the blue LED is lightened.
To power off the system, you can either command shutdown by OS operation,
or just simply press the power button.
If system error, you can just press the power button for 4 seconds to shut down
the machine directly. Please do note that a 4-second interval between each 2
power-on/power-off operation is necessary in normal working status. (For example,
once turning off the system, you have to wait for 4 seconds to initiate another
power-on operation).
DP
DVI-D
DVI-I
RST
1
2
WLAN
LAN 1
LAN 2
SIM 1
SIM 2
Micro SD
Содержание ECX-2000 Series
Страница 122: ...111 Vecow ECX 2000 User Manual SYSTEM SETUP Step 2 Remove plug fan...
Страница 123: ...112 Vecow ECX 2000 User Manual SYSTEM SETUP Step 3 Remove six flat head M3x5L screws and take out cooler...
Страница 128: ...117 Vecow ECX 2000 User Manual SYSTEM SETUP Step 2 Open Cover_Bottom...
Страница 130: ...119 Vecow ECX 2000 User Manual SYSTEM SETUP 3 4 Installing Mini PCIe Card Step 1 Remove three flat head M3x5L screws...
Страница 131: ...120 Vecow ECX 2000 User Manual SYSTEM SETUP Step 2 Open cover bottom...
Страница 137: ...126 Vecow ECX 2000 User Manual SYSTEM SETUP 3 7 2 ECS 2000 series Step 1 Remove three flat head M3x5L screws...
Страница 138: ...127 Vecow ECX 2000 User Manual SYSTEM SETUP Step 2 Open cover bottom Step 3 Remove eight Hexagon M3 Nuts...
Страница 140: ...129 Vecow ECX 2000 User Manual SYSTEM SETUP Step 6 Use eight Hexagon M3 Nuts and fasten bracket SSD HDD...
Страница 141: ...130 Vecow ECX 2000 User Manual SYSTEM SETUP 3 8 Installing M 2 Step 1 Remove three flat head M3x5L screws...
Страница 144: ...133 Vecow ECX 2000 User Manual SYSTEM SETUP Step 6 The position of M 2 NGFF connector...
Страница 147: ...136 Vecow ECX 2000 User Manual SYSTEM SETUP Step 3 Remove hole plug Step 4 Install SMA cable and fasten washer and nut...


