NST-203C3-SV
v 1.03
M.2 SATA SSD to USB 3.1 Gen 2 Type C Enclosure
Copyright © 2020 Vantec Thermal Technologies. All Rights Reserved. All Registered Trademarks Belong to Their Respective Compaines.
Preparing the newly installed SSD for use:
All NEW USB storage needs to be initialized, partition and
formatted for the Operating System you are using before it
can store data. For Windows OS, use Disk Management and
for OS X, use Disk Utility.
If the M.2 is not new and have important data already on
the m
emory module, DO NOT initialize, it will erase
all the DATA.
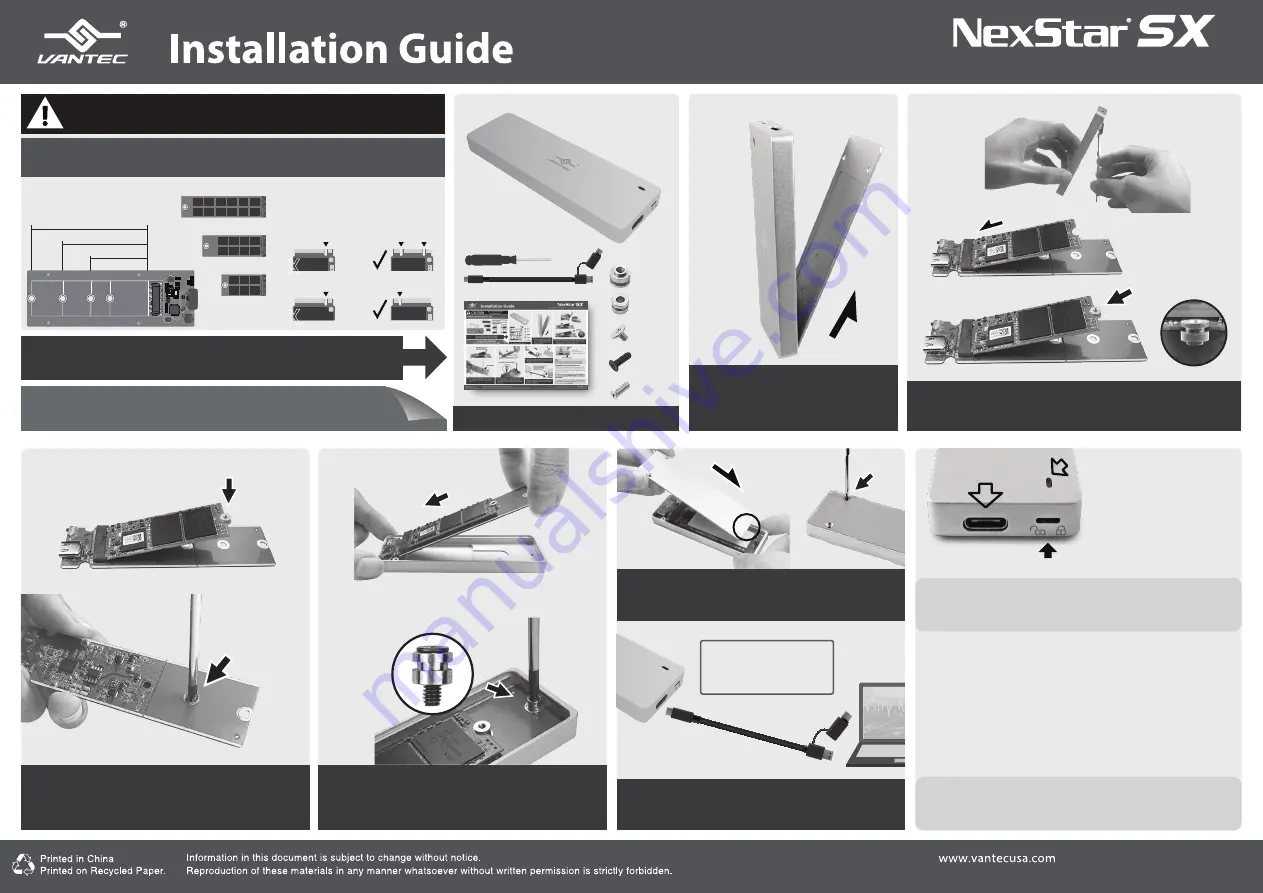
1
. Verify the package contents.
2
.
Hold the enclosure at the angle
shown to remove the cover. Note
the cover latch for locking the
cover on one end.
3
.
Please tilt the enclosure and carefully take the PCB out.
Insert at an angle the M.2 Module into the M.2 interface
with label face up. Insert NUT-A as shown
6
.
Once the M.2 is secured, replace the cover shown.
Note the cover latch. Secure the cover using two
SCREW-E to hold the cover in place.
5
.
Insert the PCB back carefully by putting the
connector side into the enclosure first aligning
the USB-C and Lock Switch port to the opening
correctly.
4
.
Push down the module and secure it with the
screw (SCREW-B) from the back of the PCB on
to NUT-A.
KNOW YOUR M.2 MODULE SIZE
To install your M.2 SSD module correctly, please follow the steps listed:
CAUTION
Static Sensitive Devices
Handle with Care
For your M.2 22x80 size,
Use instruction on the back page
For your M.2 22x60 or 22x42,
Use instruction on this page
NOTE :
For Write-Protect to function correctly, You MUST adjust Read
Only or Read/Write mode before connecting USB to Computer
LED Activity :
RED - Read Only mode
White - Read / Write mode
For detail, instruction refers to the FAQ
"How to preparing a New
storage, Hard Drive, or SSD for use with a system"
on our website
support section at
www.vantecusa.com
7
. Connect single end USB-C to your enclosure and
the other end to your computer USB-C or to USB
Type A port ( NOT both ).
or
USB-C
USB-C
USB-A
Note: The connecting direction
of the cable is fixed and the
enclosure would not work in
the opposite direction.
80 mm
60 mm
42 mm
22x80 mm
M.2 Card
22x60 mm
22x42 mm
X
X
NVMe M-Key
SATA SSD B+M Key
SATA SSD B Key
AHCI M-Key
USB-C
Use NUT-A
Push down to secure
screw from bottom
Use SCREW-B
Use SCREW-C (black) and NUT-D
LED
Write-Protect mode
This enclosure support SATA SSD using
“B” Key or “B+M” Key.
This enclosure DO NOT support NVMe
or PCIe M-Key Module.
SCREW-B
SCREW-C
SCREW-E
NUT-A
NUT-D
USB-C
USB-C
USB-A


