© October 2021 Van Essen Instruments. All rights reserved.
www.vanessen.com
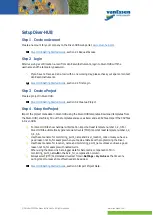
Setup Diver-HUB
Step 1 Create an Account
Create an account for your company on the Diver-HUB web portal:
Diver-HUB Getting Started Guide
, section 2.1 Request Access.
Step 2 Login
After receiving a confirmation e-mail from Van Essen Instruments, login to Diver-HUB with the
username and the temporary password.
If you have not received an e-mail within one working day, please check your spam or contact
Van Essen Instruments.
Diver-HUB Getting Started Guide
, section 2.2 First Login
Step 3 Create a Project
Create a project in Diver-HUB.
Diver-HUB Getting Started Guide
, section 3.2 Create a Project.
Step 4 Setup the Project
Import the project meta data in Diver-HUB using the Diver-HUB templates. Download templates from
the Diver-HUB (.xlsx files). Fill out the templates and save as Excel and as CSV files. Import the CSV files
in Diver-HUB.
For Diver-HUB to show hardware information import at least template number 1, 2, 3. For
Diver-HUB to automatically generate water levels (TOC) import at least template number 1, 2,
3, 4, 5, 6.
Use the same name for
monitoring_point_name
and
diver_location_code
unless you have a
good reason not to, for example when you made a mistake with programming the Diver.
Use the same name for
location_name
and
monitoring_point_name
unless you have a good
reason not to, for example with nested wells.
When using the Diver-Link baro logger data for barometric compensation fill in
monitoring_point_name
-B in the
baro_for_compensation
column.
Always select
(UTC) Coordinated Universal Time
in Settings
>
My Profile
as the time zone
during import unless a time offset needs to be added.
Diver-HUB Getting Started Guide
, section 3.3 Import Project Data.


