-4
Detail G
1
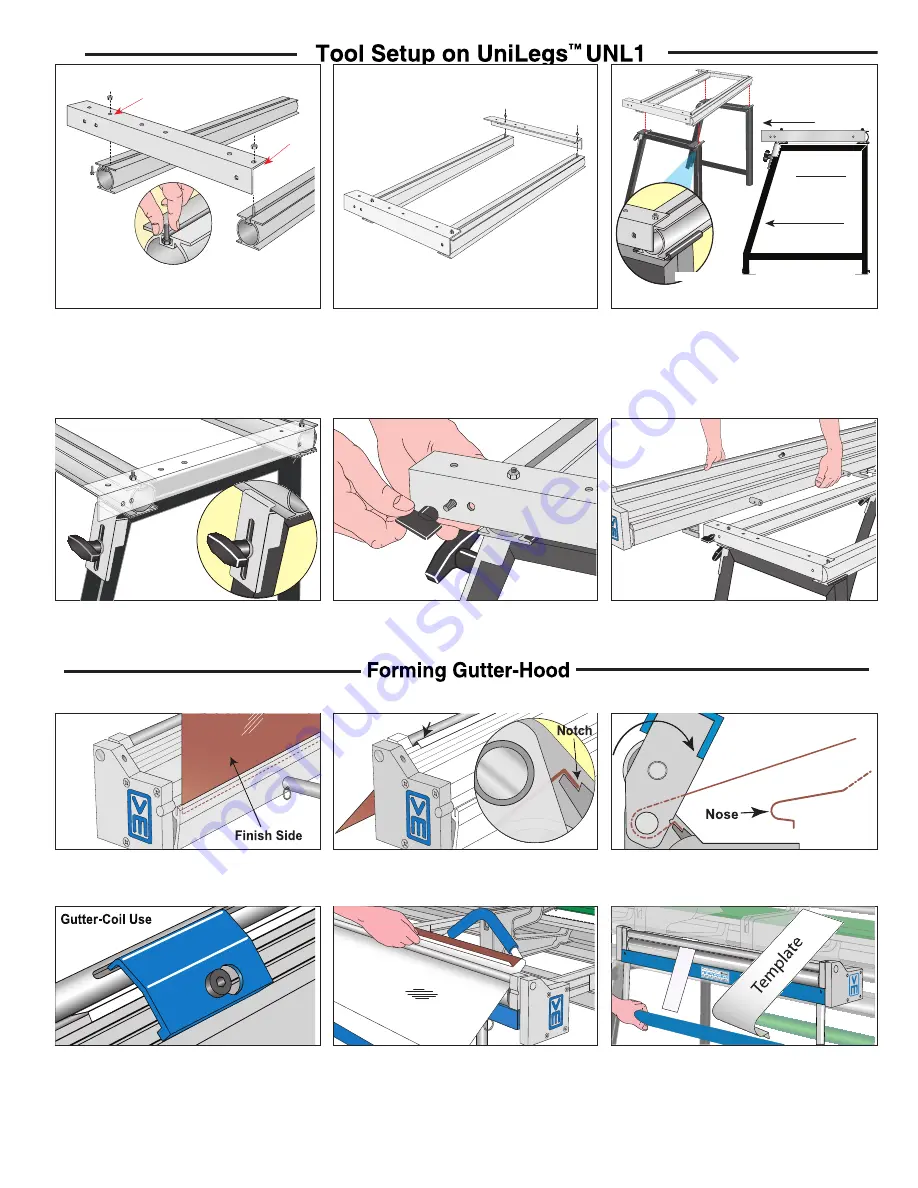
Lay out rails
L
as shown with screw tracks facing up. Insert
the hex head portion of screw
C
into each track (see Detail
G). With bracket
K
facing downward, align holes (indicated by
arrows), with hex head threads and lower into place. Tighten
bracket snugly against rails with locknuts
G
.
2
From opposite end of rails, again insert the hex head portion
of screw
D
into each track. Align holes in bracket
J
with hex
screw threads and lower into place. Install locknuts
H
. Square
up assembly and tighten all fasteners. Ensure all hole locations
match those in drawing before proceeding.
3
Position a UniLeg
™
at each end of rail assembly with the ex-
tended brackets facing the same direction as the leg flares
(see Side View). Align rail flanges with retainer hooks on top of
UniLegs
™
and slide into place (see Detail H). Note: Ask for help
holding UniLegs
™
apart during this step if needed.
Caution: To prevent the tool from tipping during use, always ensure the extended portion of the bracket is facing the same direction as the
leg flare (see step 3 above). Always situate tool on level ground
4
To finish installing the rail assembly, loosen each T knob and
extend latch plates up and over rail flange (see detail). Tight-
en T knobs snugly in place. Check T knobs often and tighten as
needed.
5
Insert a hex screw
C
through the outward hole of the extend-
ed portion of the bracket
K
. Start a knob
E
several threads
onto the hex screw
D
and leave loose for now. Repeat same pro-
cedure on opposite side of rail assembly.
6
Align slotted brackets on underside of tool to outside of ex-
tended brackets
K
and
J
. Align slots with hex screw threads
and slide in place to a complete stop. Tighten knobs
F
snugly.
Install handles referring to Steps 8 & 9 on Page 3.
Note:
General knowledge in the installation of gutters and/or roofing field will be very helpful in using these guidelines. Please take time to read this User Guide before getting
started. In this section, we will show how to form basic gutter-hood from standard trim coil.
1
Cut a blank up to 50 inches long and to the desired width.
Insert edge fully into slot with finish side (the side exposed
to the weather), facing as shown. Bend upward 90˚ to create a
1/2" flange.
2
With finish side of material facing downward, slide flat end
between roller and anvil until the 1/2" flange is fully seated
in notch. Note: The 1/2" flange must be exact to work properly
with brackets.
3
Lift roller handle to a complete stop to form the radius. Note:
When forming standard trim-coil, use of the reinforcement
clip (step 4), is unnecessary.
4
For gutter-coil, insert blank per Step 2 above and slide re-
inforcement clip in place. Lift roller handle to form radius
without allowing blank to touch or hit the clip which can cause
damage to material.
5
Return roller to the starting position and remove reinforce-
ment clip if in use. Rotate blank and slide from tool. Note:
Practice with smaller lengths until satisfied with results.
6
Cut a 3” or 4” strip and perform steps 1, 2 and 3 above. This
will become your template to use throughout the job and will
be further explained in the remaining steps.
Pre-Installation Note:
Most trim/gutter coil comes from the factory with a glossy, or shiny finish which can cause rain to overshoot the gutter opening (similar to water running off
a waxed car). This is a common occurrence in the gutter/leaf protection industry and should be discussed with the property owner. Normally, the gutter-hood loses it’s shiny finish after
a short time of exposure to the elements with the water then wrapping around the gutter-hood and falling into the gutter trough the way it’s supposed to. One solution, for those who
don’t want to wait for Mother Nature to do her thing, is to remove the shiny finish on the gutter-hood surface by lightly wiping it with a Scotch-Brite® type pad so it dulls the surface
slightly. This should allow the water to properly adhere to the gutter-hood until it is deposited into the gutter trough. Note: Scotch-Brite® is a registered trademark of the 3M corporation.
Detail H
Detail
Extended Bracket
Side View
Leg Flare
Rail Assembly


