background image

Section 4 | Datalog X2 


©

 2021 

– Valeport Ltd 

Page | 22 


4.2.2  Configure an Instrument 

The configuration wizard is shared with DataLog X2. 

The configuration wizard is instrument specific and the options given will depend on the instrument 
connected, the example given here is for a MiniSVP.  


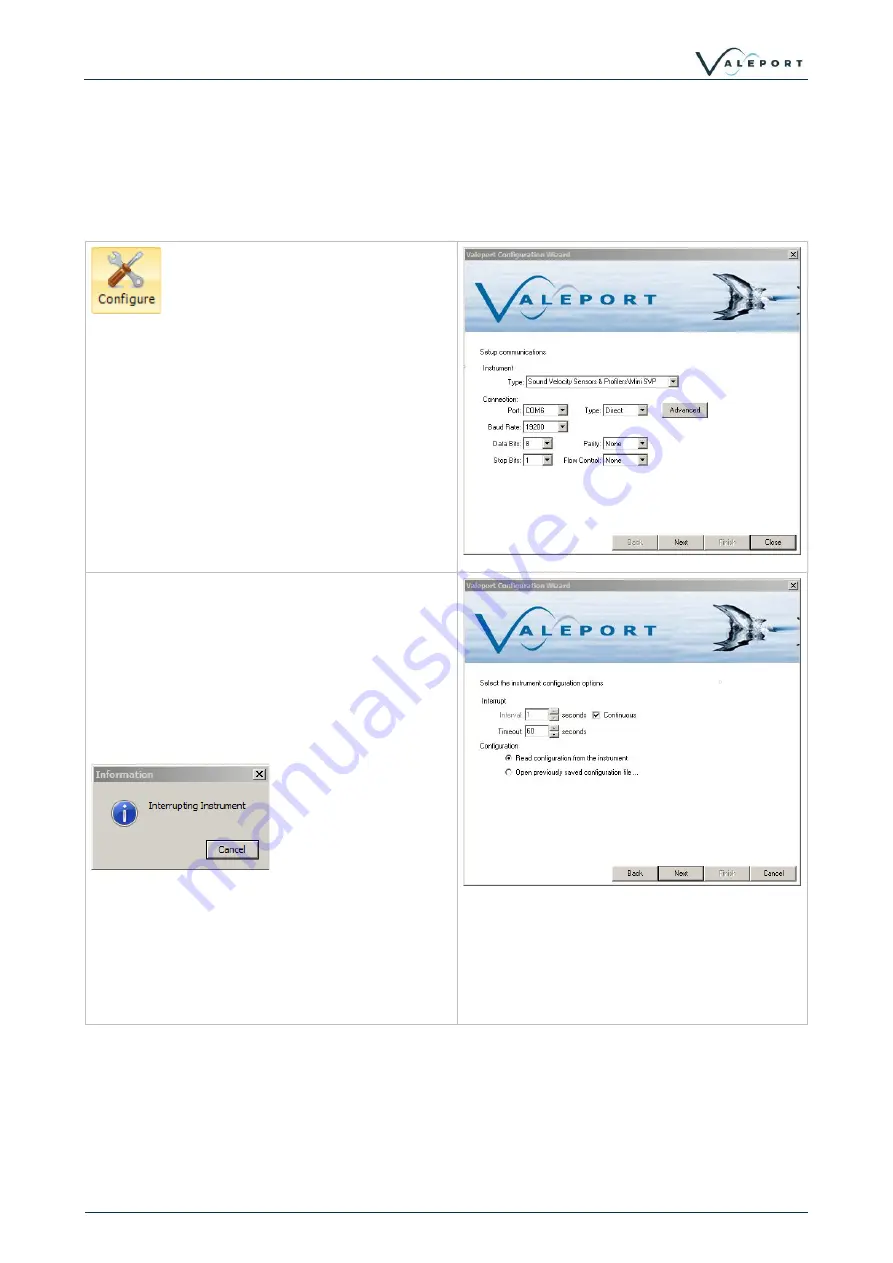
Clicking on the configure tool will bring up the 
configuration wizard.  

 
Select the instrument type and the connection 
settings will be set to the factory default for this 
instrument. They can be altered if required.  

 
Select the comm port the instrument is 
connected to and click next.  


At the next window, set the timeout setting for 
interrupting the instrument.  

If attempting to connect to an instrument 
operating in Burst Mode, the timeout should be 
set to greater than the burst interval.  

When Next is clicked the configuration wizard will 
attempt to interrupt the instrument and read out 
the current configuration. 


If the wizard fails to interrupt the instrument, then 
check the connection settings and retry.  

If the instrument is successfully interrupted, 
commands and responses should be visible in 
the command window behind the configuration 
wizard. 


Содержание DataLog x2

Страница 1: ...nt must not be copied reprinted or reproduced in any material form either wholly or in part and the contents of this document and any method or technique available there from must not be disclosed to...

Страница 2: ...ries Chart 16 4 1 3 Profile Chart 17 4 1 4 Scatter Chart 17 4 1 5 Polar Chart 17 4 1 6 Terminal Window 18 4 1 7 Table View 18 4 2 Instrument ToolBar 19 4 2 1 Establish a connection 20 4 2 2 Configure...

Страница 3: ...graphing and data analysis tools built in Terminal X2 will work with any Valeport Instrument that communicates via serial RS232 Functionality may be limited with some older instruments At present Dat...

Страница 4: ...data IE6 installed Recommended Requirements 1 gigahertz GHz or faster 32 bit x86 or 64 bit x64 processor 2 gigabyte GB RAM 32 bit or 4 GB RAM 64 bit 1280 x 1024 screen resolution Free Disk space 20Mb...

Страница 5: ...Installation and User Guide MANUAL 1899207337 17 Page 3 2021 Valeport Ltd Confirm the installation tasks and click Install to finalise the installation Installation can be terminated at any time by p...

Страница 6: ...ed from the program list and uninstalled 2 3 1 Starting DataLog X2 To start DataLog X2 use the following methods Navigate to the All Programs link under the Windows START menu Navigate to the folder V...

Страница 7: ...es including data logging wizard based instrument configuration file downloads multiple port connections and TCP IP serial connection for use over internet connections 3 1 Terminal Toolbar This allows...

Страница 8: ...l scroll with any received data Data can be highlighted selected copied and pasted Commands can be typed directly into the connection window or entered into the command line window below Command Line...

Страница 9: ...rd The instrument type can be selected from the drop down list The connection settings will default to the factory settings for that instrument If these have been changed by the user it may be necessa...

Страница 10: ...e connection details and any communications will be shown in the window Commands can be issued via typing directly into the command window or via the command toolbar The command toolbar stores a histo...

Страница 11: ...hey can be altered if required Select the comm port the instrument is connected to and click next At the next window set the timeout setting for interrupting the instrument If attempting to connect to...

Страница 12: ...figured Output units can be set and the Tare setting can be configured To set a manual Tare enter the required figure in the box To take a measured Tare press the Set Tare Button The following dialog...

Страница 13: ...the header of every recorded file Sampling modes will depend on the instrument connected The final screen will show a summary of the commands that will be sent to the instrument If settings have not b...

Страница 14: ...t tab of DataLog X2 See image 2 Enter the command 028 in the Terminal window 3 Disconnect then reconnect the Power Comms cable to activate the instrument 3 4 Download a file Clicking on the download i...

Страница 15: ...upport individual file downloads mini and 400 series a file list with check boxes will be displayed For older instruments such as the model 106 108 308 and the model 740 the entire memory has to be do...

Страница 16: ...e instrument is not listed then a Generic Instrument can be selected from the dropdown and suitable comms settings entered The next screen sets the interuppt settings but also adds the ability to filt...

Страница 17: ...a recorded on instruments without a Real Time Clock there is the option to append a timestamp to each record Files will be saved to the selected location Files can be automatically named incremented a...

Страница 18: ...ewed as tables and graphs 4 1 1 File Manager In DataLog X2 a file is either a recorded data file from real time connection or a downloaded file from an instrument Downloaded files and recorded files a...

Страница 19: ...a reversed Y axis 4 1 4 Scatter Chart A scatter chart allows one parameter to be plotted against another A good example of this is T S plot traditionally used in oceanography to identify water masses...

Страница 20: ...aLog X2 It can be used to manually interact with the instrument It gives access to all the functionality of Terminal X2 4 1 7 Table View The Table view shows the data contained in the file currently h...

Страница 21: ...llation and User Guide MANUAL 1899207337 17 Page 19 2021 Valeport Ltd 4 2 Instrument ToolBar The instrument toolbar gives access to a range of functionality for connecting configuring and downloading...

Страница 22: ...The instrument type can be selected from the drop down list The connection settings will default to the factory settings for that instrument If these have been changed by the user it may be necessary...

Страница 23: ...the status bar will show the connection details and any communications will be shown in the window Commands can be issued via typing directly into the command window or via the command toolbar The com...

Страница 24: ...hey can be altered if required Select the comm port the instrument is connected to and click next At the next window set the timeout setting for interrupting the instrument If attempting to connect to...

Страница 25: ...e pressure sensor to be configured Output units can be set and the Tare setting can be configured To set a manual Tare enter the required figure in the box To take a measured Tare press the Set Tare B...

Страница 26: ...d file Sampling modes will depend on the instrument connected The final screen will show a summary of the commands that will be sent to the instrument If settings have not been changed then no command...

Страница 27: ...minal window 3 Disconnect then reconnect the Power Comms cable to activate the instrument 4 2 3 Download a File The download wizard is shared with DataLog X2 it operates in the same way as in Terminal...

Страница 28: ...loads mini and 400 series a file list with check boxes will be displayed For older instruments such as the model 106 108 308 and the model 740 the entire memory has to be downloaded in one A status wi...

Страница 29: ...the Recording wizard As with the other wizards set up the instrument type and communications settings If the instrument is not listed then a Generic Instrument can be selected from the dropdown and s...

Страница 30: ...is recognised the columns of data should automatically populate If Generic format has been selected in the previous screen the delimters columns names and units can be defined For data recorded on in...

Страница 31: ...continue to be recorded until the record button is clicked again 4 2 5 Instrument Tools The instrument tools can be used a shortcut to carry out task on a connected instrument such as interupting a r...

Страница 32: ...o clear the filter click the clear button 4 4 Recording Toolbar The Recording toolbar becomes active when the Record button on the Home Toolbar is clicked Clicking the record button will activate the...

Страница 33: ...the connection settings with the default setting for a Model 106 Select the COM port that the instrument is connected to Click Next This will set the interrupt timeouts for the instrument As default D...

Страница 34: ...urrent setting of the instrument and display on screen Settings that are greyed out are factory set and cannot be changed by the user The instruments internal clock can be manually set or synced to th...

Страница 35: ...imum of 3 seconds Average Period is how many Sample Periods are averaged before a data point is recorded or output I E Sample Period 3s Average Period 1 Data recorded once every 3s Sample Period 3s Av...

Страница 36: ...e been made to the instrument setup then no commands will be shown here Manual commands can be added here for example if you want to put the instrument straight into run mode then add 028 to the list...

Страница 37: ...odel 740 There are three options for the calibration of a Model 740 1 No calibration 2 Site Calibration A site specific calibration is calculated by measured the pressure at known high and low tide he...

Страница 38: ...actor are given Offset is the height of the pressure transducer above or below a known datum point IE Chart Datum or Lowest Astronomical Tide Gain is the factor applied to compensate for the density o...

Страница 39: ...By uploading a data set that contains Sound Velocity Pressure and Temperature DataLog x2 will automatically calculate the Practical Salinity and from that Density at each point in the profile using V...

Страница 40: ...Section 5 Tutorials 2021 Valeport Ltd Page 38...

Отзывы: