background image

Installation and connection

30

20901552_EN-US_PC301x NT V.sel (Ser.Atb_Ha)_V1.1_160822

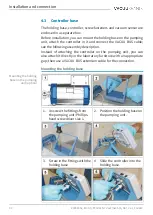
4.3 Controller base

The holding base, controller, screw fasteners and vacuum sensor are
enclosed in a separate box.

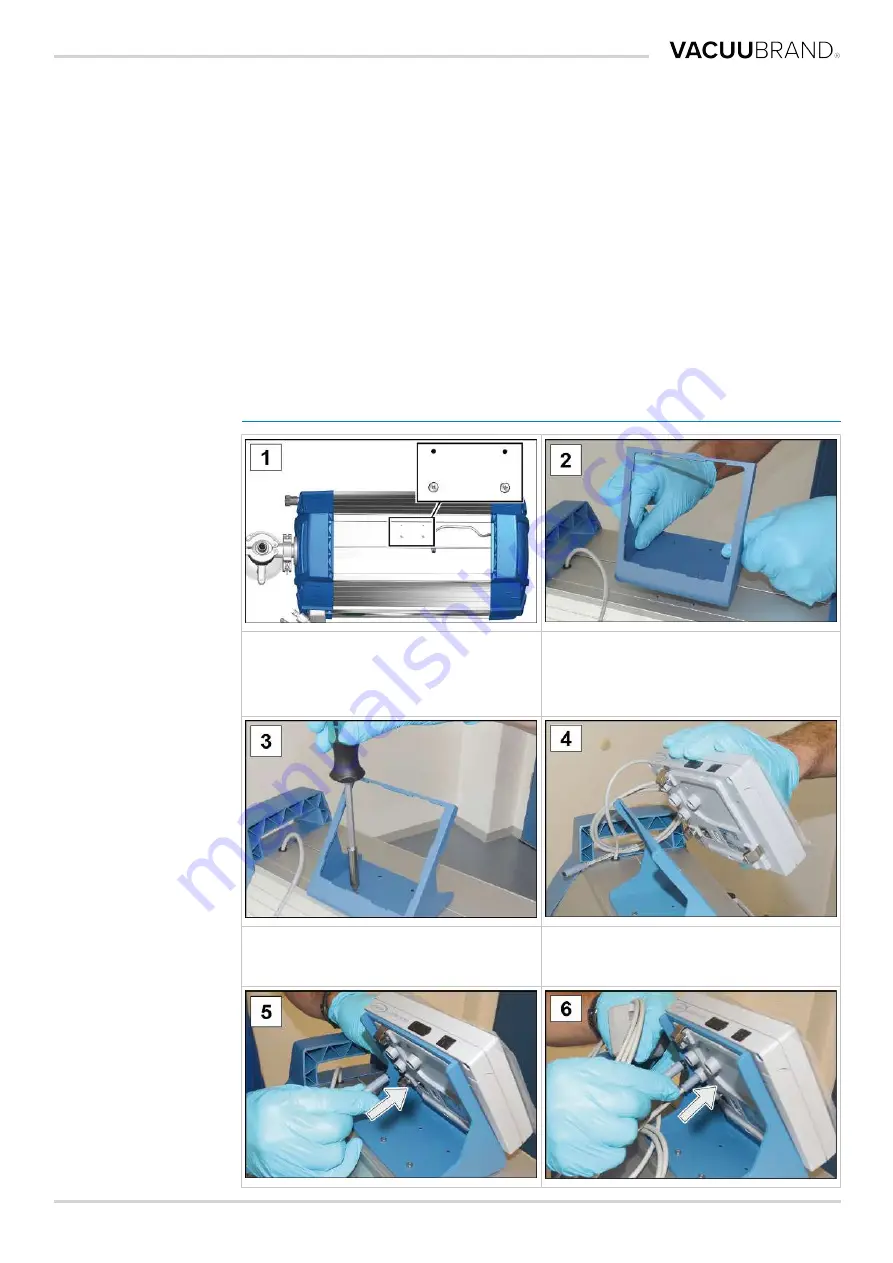
Before installation, you can mount the holding base on the pumping
unit,  attach  the  controller  in  it  and  connect  the  VACUU  BUS  cable;
see the following assembly description.

Instead  of  attaching  the  controller  on  the  pumping  unit,  you  can
also attach it directly in the laboratory furniture with an appropriate
gap; then use a VACUU BUS extension cable for the connection.

Mounting the holding base

Mounting the holding

base on the pumping

unit (option)

1. Unscrew the fittings from

the pumping unit; Phillips-
head screwdriver size 1.

2. Position the holding base on

the pumping unit.

3. Screw in the fittings with the

holding base.

4. Slide the controller into the

holding base.

Содержание PC 3010 NT VARIO o.C.

Страница 1: ...Chemistry pumping unit series PC 3010 NT VARIO select PC 3016 NT VARIO select PC 3012 NT VARIO select PC 3012 NT VARIO select EKP Instructions for use Original instructions EN US 20901552...

Страница 2: ...product Thank you for purchasing this product from VACUUBRAND GMBH CO KG You have chosen a state of the art high quality prod uct Manufacturer VACUUBRAND GMBH CO KG Alfred Zippe Str 4 97877 Wertheim G...

Страница 3: ...arget group description 15 2 4 Protective clothing 16 2 5 Safety measures 16 2 6 Laboratory and work materials 17 2 7 Possible sources of danger 18 2 8 Motor protection 21 2 9 ATEX device category 21...

Страница 4: ...hooting 48 6 1 Technical assistance 48 6 2 Error cause corrective measure 48 7 Cleaning and maintenance 51 7 1 Information on service activities 52 7 2 Cleaning 54 7 2 1 Housing surface 54 7 2 2 Empty...

Страница 5: ...low the safety instructions n In addition to the information in this User manual please also observe the applicable national regulations on accident preven tion and occupational safety General General...

Страница 6: ...roduct n When you contact our service department please have the serial number and product type on hand see the nameplate on the product 1 2 Manual structure Breakdown of in structions The manual has...

Страница 7: ...us situation Failure to observe this warning may result in danger to life or serious injury Please follow the instructions for prevention CAUTION Indicates a potentially dangerous situation Failure to...

Страница 8: ...anger sign Warning of electrical voltage Warning of hot surface Electrostatically sensitive components ESD General mandatory action sign Disconnect power plug from electrical outlet Other symbols and...

Страница 9: ...the action Action instructions multiple steps 1 First action step 2 Next action step R Result of the action Action instructions that require several steps must be followed in the order they are descr...

Страница 10: ...ber Gas type ind Gas type independent GB Gas ballast If necessary If necessary Size Size IK Immissions condenser IN1 Inlet vacuum connection KF Small flange Max Maximum value Min Minimum value NT New...

Страница 11: ...ithout external cooling medium Dry ice condenser 2 Cooling condenser with receiving flask and dry ice as cooling medium installed at the outlet pressure side VACUU BUS VACUUBRAND bus system for the co...

Страница 12: ...nd regulating a rough vacuum in installations designed for this purpose Attached coolers emission condenser immission condenser dry ice cooler Peltronic emission condenser including separator and flas...

Страница 13: ...pumping and condensing solid materials or liquids 2 1 3 Foreseeable misuse Misuse In addition to improper use there are other types of use that are for bidden when handling the device Forbidden types...

Страница 14: ...theg Target group descrip tion on page 15 must have the corresponding qualification for the listed activities Only qualified electricians are permitted to carry out special work on electrical equipme...

Страница 15: ...t The assigned work can be assessed and potential dangers detected Responsible spe cialist Qualified employee with additional field department or division responsibility who is assigned by the operato...

Страница 16: ...ach product is put through an extensive test program before delivery Operator measures Operator measures Use your vacuum only when you have understood the instruc tion manual and the operation Replace...

Страница 17: ...s flow can damage the vacuum pump Hazardous substances can form de posits in the vacuum pump Possible protective measures Protective measures depending on the ap plication Rinse the vacuum pump with i...

Страница 18: ...f the pumps a higher pressure can build up at the outlet than the mechanical stability of the sys tem allows Always ensure that the exhaust line is open and free of pres sure To guarantee an unobstruc...

Страница 19: ...cuum line e g con densate in the vacuum line can distort the measurements of the vacuum sensor Prevent excess pressure in the suction hose 1060 mbar 795 Torr Dangers during ventilation Looking out for...

Страница 20: ...r non compliance with minimum distances When setting up the device observe a minimum distance of 5 cm between the cooling fan and adjacent parts e g housing walls etc Always ensure that there is suffi...

Страница 21: ...ly or acknowledge the fault message on the controller Eliminate the cause of the error Allow the vacuum pump to cool down Restart the pumping unit 2 9 ATEX device category Installation and explosive e...

Страница 22: ...stalled so that they cannot be mechanically damaged from the outside e g installing pumping units with impact protection attaching shatter protection for glass flasks etc n The devices are designed f...

Страница 23: ...er ate 3 1 Basic configuration of pumping unit series View and basic con figuration PC 301x NT VARIO se lect Meaning 1 VACUU SELECT sensor mount on suction line 2 Coolant connections 3 Chemical membra...

Страница 24: ...verview of chem istry pumping units a b d c Meaning Chemistry pumping unit Pump head Steps AK EK EKP a PC 3010 NT VARIO select 8 4 b PC 3016 NT VARIO select 8 1 c PC 3012 NT VARIO select 8 3 d PC 3012...

Страница 25: ...nsers and coolers 3 3 1 Separator condenser at inlet Connection on separator flask Connections on AK Meaning 1 Vacuum inlet connection IN 3 3 2 Condenser at outlet Connection and coolant on emission c...

Страница 26: ...acuum network Example Local area vacuum network Meaning 1 Example of use VACUU LAN network arrangement with three valve mod ules 2 Laboratory furniture 3 Exhaust gas hose diverted into a fume hood 4 V...

Страница 27: ...ging e g for sending in for re pairs Incoming goods Check the delivery immediately after receipt for any transport damage and for completeness Promptly report transport damage to the supplier in writi...

Страница 28: ...n temperature between the storage location and the installation site can lead to the formation of condensate After receipt or storage allow your vacuum to acclimatize for at least 3 4 hours before put...

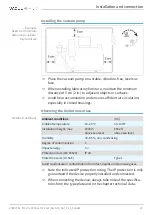
Страница 29: ...gs Observing the limitations of use Ambient conditions Ambient conditions US Ambient temperature 10 40 C 50 104 F Installation height max 2000 m above sea level 6562 ft above sea level Humidity 30 85...

Страница 30: ...see the following assembly description Instead of attaching the controller on the pumping unit you can also attach it directly in the laboratory furniture with an appropriate gap then use a VACUU BUS...

Страница 31: ...r pumping unit as described in the fol lowing examples Also attach the provided screw fasteners and glass flasks to the condensers 4 4 1 Vacuum connection IN CAUTION Flexible vacuum hoses can contract...

Страница 32: ...connection at inlet IN You will achieve the optimal vacuum for your application if you ob serve the following points Connect the shortest possible vacuum line with the maximum possible cross section...

Страница 33: ...of pressure Always lay the exhaust hose so that it is descending or take measures to prevent condensate return flow into the vacuum pump Observe the maximum allowable pressures and pressure different...

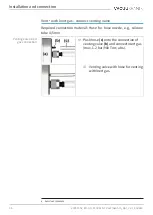
Страница 34: ...suitable for cooling n In a closed internal coolant circuit the pressure should be lim ited to 3 bar 44 psi n A cooling water valve may only be installed in the inflow the coolant outflow must be open...

Страница 35: ...potentially explosive mixture can form When flammable substances are present use only inert gas for ventilation e g nitrogen max 1 2 bar 900 Torr abs VACUU SELECT sen sor with venting valve Venting co...

Страница 36: ...s connect venting valve Required connection material Hose for hose nozzle e g silicone tube 4 5 mm Venting valve inert gas connection Push hose c onto the connection of venting valve b and connect ine...

Страница 37: ...rocess a potentially explosive mixture can form due to oxygen in the air or other dangerous situations can occur In the presence of flammable substances and for pro cesses in which a potentially explo...

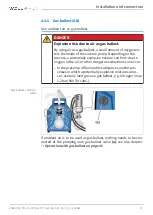
Страница 38: ...tb_Ha _V1 1_160822 Use of inert gas as gas ballast OPTION Prepare the inert gas connection GB Remove the black gas ballast cap and connect a gas ballast adapter in its place On request we can send you...

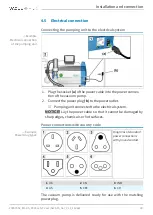
Страница 39: ...the power connec tion of the vacuum pump 2 Connect the power plug b to the power outlet R Pumping unit connected to the electrical system NOTICE Lay the power cable so that it cannot be damaged by sha...

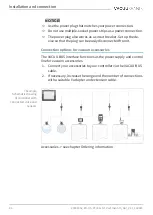
Страница 40: ...at the plug can be easily disconnected from it Connection options for vacuum accessories The VACUU BUS interface functions as the power supply and control line for vacuum accessories 1 Connect your ac...

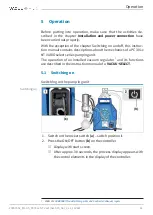
Страница 41: ...chanics of a PC 301x NT VARIO select series pumping unit The operation of an installed vacuum regulator 7 and its functions are described in the instruction manual of a VACUU SELECT 5 1 Switching on S...

Страница 42: ...erator interface VACUU SELECT with process display Process display Pressure display for a process 1 Status bar 2 Analog pressure display pressure curve 3 Digital pressure display pressure value target...

Страница 43: ...lways possible VENT8 Ventilate system Option Button press 2 Sec briefly ventilate regulation continues Button press 2 Sec ventilate to atmospheric pres sure vacuum pump is stopped Button press during...

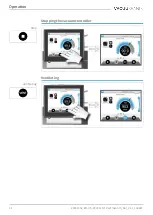
Страница 44: ...Operation 44 20901552_EN US_PC301x NT V sel Ser Atb_Ha _V1 1_160822 Stopping the vacuum controller Stop Ventilating Ventilating...

Страница 45: ...alve Operating the gas ballast valve Turn the black gas ballast cap in any direction to open or close the gas ballast valve If possible only evacuate the condensable vapors e g water vapor solvents et...

Страница 46: ...continue run ning for approx 30 minutes with open gas ballast or open inlet IN R Condensate and residual media are rinsed out of the vac uum pump NOTICE Avoid deposits and rinse the condensate out of...

Страница 47: ...he pumping unit into storage Especially if it has been in operation for more than 15 000 hours 3 Seal off the suction and exhaust line e g with the transport caps 4 Pack up The pumping unit so that it...

Страница 48: ...from the refer ence standard Sensor dirty Humidity in sensor Sensor defective Sensor not measur ing correctly Clean sensor mea suring chamber Allow sensor measur ing chamber to dry e g by draining Ca...

Страница 49: ...Ensure that nothing is blocking the line Operator Vacuum pump stopped Vacuum pump does not start Motor overloaded Motor overheating Thermal protection activated Check coolant con nection Ensure coola...

Страница 50: ...ted properly or pulled out VACUU BUS plug connection or cable defective or not in serted Controller switched off or defective Switch on Pumping unit Check the power connection and ca ble Check the VAC...

Страница 51: ...nal protective equipment e g safety gloves eye protection and if required a respirator Decontaminate the vacuum pump before you open it If required have the vacuum pump decontaminated by an external s...

Страница 52: ...d hose x Replace pressure release valve on EC x Clean pumping unit x Recommended auxiliary equipment Example Recom mended auxiliary equipment for clean ing and maintenance Meaning No Auxiliary equipme...

Страница 53: ...screwdriver Opening hose clamps Size 1 5 Phillips head screwdriver Screw fasteners for controller holding base Size 1 6 Torx screwdriver Screw fasteners for EK counterholder Fastening loosening clampi...

Страница 54: ...ched components such as glass flasks The temperatures that are produced during operation may cause burns Use protection against accidental contact especially when the exhaust temperature is persistent...

Страница 55: ...ner e g a chemical resistant canister 3 Reattach the glass flask separator to the condenser with the joint clamp Depending on the application the collected liquid can either be re cycled or properly d...

Страница 56: ...Example Maintenance of pump heads Meaning Maintenance items and sequence 1 Silicone pressure release valve EC 20638821 2 Suction pressure distributer behind inlet separator 3 Pump head pair right 4 P...

Страница 57: ...inte nance 1 Switch off the pumping unit and disconnect the power plug 2 Remove the glass flask and connected hoses from the inlet IN 3 Remove the glass flask and connected hoses from the emissions co...

Страница 58: ...sing section hexagon socket wrench size 4 8 Take the housing section off and set it aside Example Disassembling the EC 9 Open the union nut from the inflow EC 10 Remove the 2 screws from the EC bracke...

Страница 59: ...th the bracket from the molded hose Here you can check the pressure release valve of the EC and replace it in case of damage 12 Put the cooler down safely so that no liquid can leak out 13 Open the ho...

Страница 60: ...valves Dismantling other housing parts Example Dismantling the housing 1 Remove the 4 screws from the rear housing section hexagon socket wrench size 4 2 Remove the housing section and set it aside 3...

Страница 61: ...uncovering the first pump head pair 1 Remove the 2 outer screws from the retaining plate hexagon socket wrench size 4 2 Carefully set the pump to the side 3 Unscrew the screw fasteners of the side pan...

Страница 62: ...sion view draw ing of pump head pair Meaning Valve maintenance 1 Clamping bracket screw fasteners 2 Cup springs 3 Valve clusters 4 Valves 5 O rings Size 26 x 2 Membrane maintenance 6 Head cover screw...

Страница 63: ...intenance of pump head pair right side 1 Open the hose clamps of the outer hoses Flat head screwdriver size 1 2 Pull the molded hoses off 3 Unscrew the hexagon socket screws from the head covers Hexag...

Страница 64: ...ne support disc and unscrew the assembly with the membrane wrench fixed in place 3 Lift the membrane with all its parts out of the vacuum pump If spacers are stuck to the connecting rod care fully rem...

Страница 65: ...used membrane 5 Place the new membrane onto the square bolt of the membrane spring washer n Make sure that you install the membrane correctly with the coated light side on top n Ensure that it is cor...

Страница 66: ...carefully place all compo nents into the threaded hole of the connecting rod 9 Tighten the assembly by hand at first using the mem brane wrench 10 Then place a torque wrench with a hexagon socket bit...

Страница 67: ...ket from the valve clus ters 4 Remove the valve clusters with the cup springs n The quantity and intercon nection of the molded hoses a depends on the position of the pump head pair Pump head pairs mu...

Страница 68: ...e replacement 5 Carefully remove the used O rings and valves 6 Check the surfaces for soil ing 7 Clean soiled surfaces care fully 8 Insert new sealing rings into the notches 9 Apply the new valves and...

Страница 69: ...ings onto the pump heads 11 Place the clamping brackets onto the valve clusters and tighten the screws by hand at first Then tighten these with a torque wrench to 3 Nm 12 Carefully press the mem brane...

Страница 70: ...xample Maintenance of pump head pair bot tom To change the membranes and valves proceed exactly as de scribed for the pump head pair right side g Pump head pair right on page 63 Pump head pair left si...

Страница 71: ...side panel from the pump a Pump head pair left b Pump head pair top 5 To change the membranes and valves proceed exactly as de scribed for the pump head pair right side g Pump head pair right on page...

Страница 72: ...ide panels onto the pump 2 Tighten the screw fasteners of the side panel hexagon wrench size 5 3 Turn the pumping unit up right and make sure that it is in a secure standing posi tion 4 Attach the sid...

Страница 73: ...2 73 7 Tighten the 2 outer screws from the retaining plate hexagon socket wrench size 4 8 Attach the cable in the rear gap Assembling the rear housing cover 9 Tighten the screws from the side panel re...

Страница 74: ...socket wrench size 4 12 Attach the molded hose for the EC Assembling the EC 13 Close the hose clamp e g with flat nose pliers 14 Push the EC together with the bracket onto the molded hose 15 Fasten th...

Страница 75: ...rom the housing section hexagon socket wrench size 4 Assembling attach ment parts 19 Place the cap onto the gas ballast 20 Fasten the inlet separator to the tension ring 21 Fasten the glass flask to t...

Страница 76: ...1x NT V sel Ser Atb_Ha _V1 1_160822 If the maintenance work is fully completed Connect the hosing for operation Connect the pumping unit to the power supply R Pumping unit ready for restart R Without...

Страница 77: ...the power supply there are 2 de vice fuses type 8 AT 5x20 Replace device fuse Example Check and replace the device fuse 1 First unplug the power con nector and then unlock the fuse drawer 2 Gently pu...

Страница 78: ...P 40 Protection class UL 50E Type 1 Avoid condensate or contamination from dust liquids and corrosive gases Operating conditions US Operating temperature 10 40 C 50 104 F Storage transport temperature...

Страница 79: ...2 m Appliance fuse 2 pcs 8A T 5x20 Vacuum data US Inlet pressure outlet pres sure differential pressure ab solute 1 1 bar 825 Torr Pressure at gas connections absolute max 1 2 bar 900 Torr Sensor inte...

Страница 80: ...VARIO select Pumping speed max 14 3 m3 h 8 42 cfm End vacuum absolute 1 5 mbar 1 1 Torr End vacuum with GB absolute 3 mbar 2 2 Torr Number of cylinders stages 8 3 PC 3012 NT VARIO select EKP Pumping...

Страница 81: ...nection to the outlet Carbon fiber reinforced PPS O ring on separator Fluoroelastomer NBR Pressure relief valve at the vapor con denser Silicone rubber PTFE film Emissions condenser outlet PET Vapor c...

Страница 82: ...m the type plate This way we can provide you with targeted support and consultation for your product Pumping unit type plate general Example Type plate details Ultimate vacuum ATEX specification Manuf...

Страница 83: ...ECT Sensor 20612881 VSK 3000 20640530 DAkkS calibration with first delivery 20900214 DAkkS recalibration 20900215 Order data replace ment parts Replacement parts Order No Hose nozzle 6 curved 20639948...

Страница 84: ...nits Supply sources International agents and dealers Purchase original accessories and original replacement parts from a branch office of VACUUBRAND GMBH CO KG or from your local dealer Information ab...

Страница 85: ...pair process n On site service on request n Calibration DAkkS accreditation n With clearance certificate Returns disposal Additional information can be found on our website www vacuubrand com Service...

Страница 86: ...Annex 86 20901552_EN US_PC301x NT V sel Ser Atb_Ha _V1 1_160822 8 6 EU declaration of conformity...

Страница 87: ...Annex 20901552_EN US_PC301x NT V sel Ser Atb_Ha _V1 1_160822 87 8 7 UKCA conformity declaration...

Страница 88: ...he vacuum pump 29 Instruction modules 6 L Labels and signs 20 Looking out for dangers during venti lation 19 M Maintenance interval 52 Maintenance of pump heads 56 Materials affected by media 81 Measu...

Страница 89: ...se 77 Restart procedure 21 Rough vacuum 11 S Safety instructions 12 Separator flask 24 Separator flask connections 25 Surface temperatures 20 Switching on 41 Switching on the pumping unit 41 T Target...

Страница 90: ...90 20901552_EN US_PC301x NT V sel Ser Atb_Ha _V1 1_160822...

Страница 91: ...20901552_EN US_PC301x NT V sel Ser Atb_Ha _V1 1_160822 91...

Страница 92: ...ANY Head office 49 9342 808 0 Sales 49 9342 808 5550 Service 49 9342 808 5660 Fax 49 9342 808 5555 E mail info vacuubrand com Web www vacuubrand com Version 20901552_EN US_PC301x NT V sel Ser Atb_Ha _...

Отзывы: