

Installation
Product structure diagram
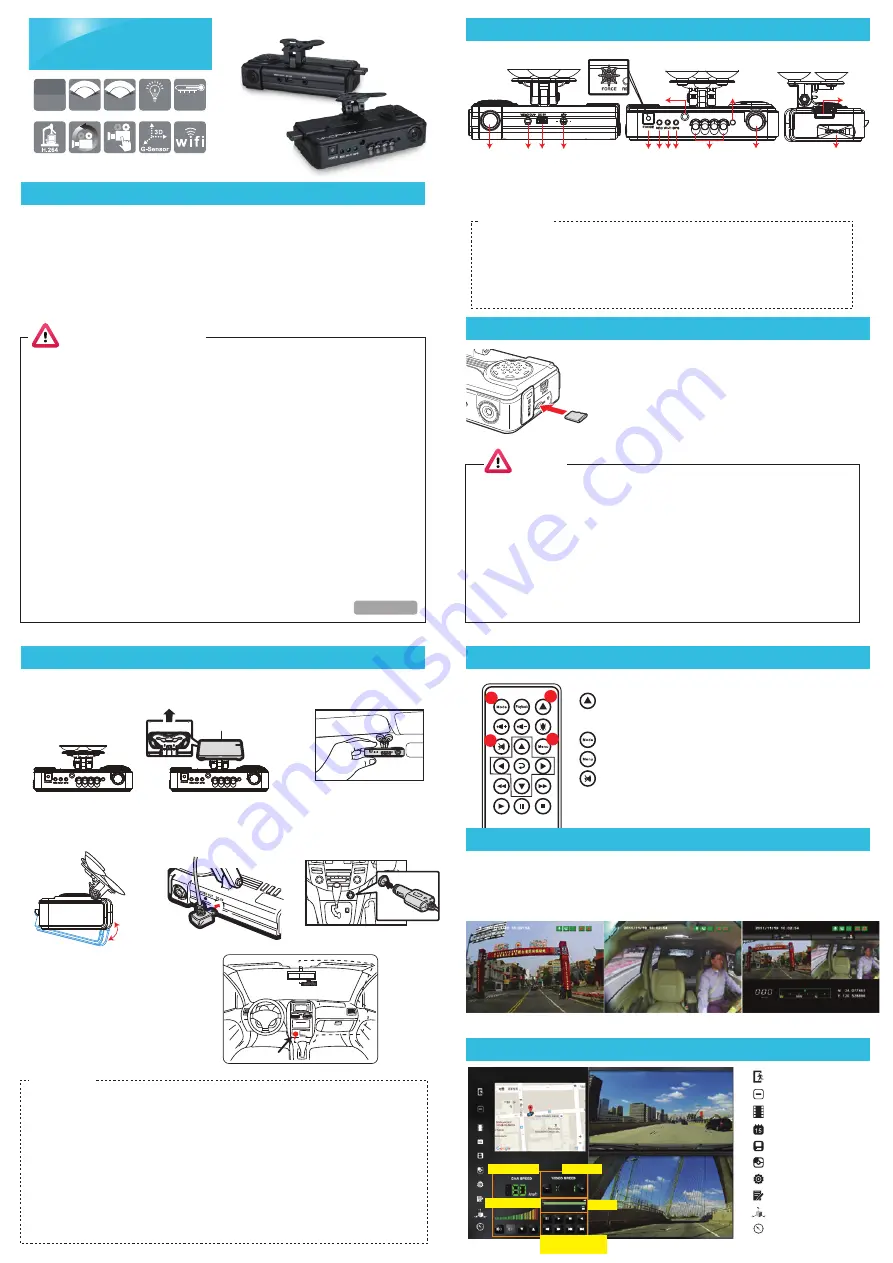
Remote controller
Player
Car Camcorder
2ch FullHD 1080P / HD 720P
1
.
Use「suction cup」or「Double-sided adhesive」install
device on vehicle front windshield.
4
.
Plug the power cable to
DC5Vconnect jack
5
.
Plug in the cigarette adapter.
2
.
Set up the machine in
proper position.
3
.
Adjust the camera view to
proper angle
Installation of Micro SD card
Introduction of OSD Interface
-15
℃
~65
℃
2CH
VVR
1080P
120º
120º
720P
120º
130º
back view
LOW LUX
front view
3G / 4G / G-Mouse (optional)
Accessories
Optional:
Standard: (a) 5V cigarette Power adapter
(b) 4 pings, 3.5 inch headphone jack to RCA output cable
(c) IR remote controller (d) Suction cup for bracket holder
(e) Bracket holder (f) Product CD (g) Quick start guide (h) WiFi Dongle
(a) 8G Class10 Above micro SD Card(8GB/16GB/32BG/64GB/128GB)
(b) External GPS Mouse (4P Phone Jack Connect)
(c) Vertical 90˚ glass vehicle models, such as: tour buses, large trucks,
container trucks, fire engines, can be used with AVM-351 bracket.
1
2
3
4
5 6
7
8
10
12
13
14
11
9
5. Force Recording Button
6. Recording Light /Red
7. WiFi connection light/Blue
8. GPS indicator/Green
9. Remote Control Receiver
10. IR LED light
11. Light Sensor
12. Rear camera
13. USB Jack / WiFi Dongle
14. MICRO SD Card
1. Front camera
2. Video output
3. Power DC5V
4. GPS Mouse External
connector
● FORCE: force recording button.
● REC Red light:
Stable flicker of red light: On recording
Fast flicker of red light: Force recording
● Wi-Fi Blue light:
Blue light stable flicker: Not connect with WIFI, the blue light stable bright: the
WIFI is connecting.
● GPS green light:
the green light flicker means GPS 3D being positioning, the green light stable
bright mean GPS position completed.
Light indicator
Double-sided
adhesive
1
3
4
2
Force recording button: Manually establish a recorded
file which cannot be overwritten
Mode button: Full screen / Half screen spilt shift
Menu button: Firmware version of the device displayed
Mute button: Audio recording On/Off
Safety Precautions
Please Take and review some testing videos initially to make sure the images were recorded
correctly. Please note that manufacturer, its subsidiaries and affiliates, and its distributors are
not liable for consequential damages arising from any malfunction of main device accessory,
including memory device that results in the failure of an image to be recorded or to be recorded
in a way that is machine readable.
Before using the product, please ensure that you read the safety precautions described below.
Always ensure that the product is used correctly.
• Use only recommended power sources.
• Do not attempt to disassemble, alter or apply heat to the product.
• DO not apply multi cigarette lighter adapters-Applying such devices will cause unstable power input to damage
the vehicle video recorder.
• Please always make sure all power connectors are fully secured.
• Avoid dropping or subjecting the product to severe impacts.
• To avoid the risk of injury, do not touch the interior of the product if it has been dropped or otherwise damaged.
• Stop using the product immediately if it emits smoke, a strange smell, or otherwise behaves abnormally.
• Do not use organic solvents such as alcohol, benzene, or thinner to clean the product.
• Do not let the product come into contact with water (e.g. sea water) or other liquids.
• Do not allow liquids or foreign objects to enter the VVR.
• Do not place the VVR near or in direct flame.
• Do not handle the power cord with wet hands.
• Do not use the equipment in a manner that exceeds the rated capacity of the electrical outlet or wiring
accessories.
• Do not use if the power cord or plug are damaged, or not fully plugged into the outlet.
• Do not allow dirt or metal objects (such as pins or keys) to contact the terminals or plug.
• Avoid using, placing or storing the product in the humid or dusty areas.
MICRO SD CARD
Q: Two ways to format the SD card, format and restore. When should you
「format」or「restore」the Micro SD CARD?
Ans:
1.「Format」Micro SD card: When you use the Micro SD card for the
very first time or a brand new card, you should format it in order to
use it correctly.
2.「Restore」Micro SD card: When you have backup the recorded files
into PC and want to use the Micro SD card for other purposes, you
have to restore it first so it can be used correctly.
Caution
(1) To ensure recording quality, please do not use adapter card with Micro SD card. Doing so may lead to
bad connection due to shock and vibration
(2) Memory card has life limit. For ensure it working correctly, please test the memory card on PC Player
regularly.
(3) Use new memory card insert device, it will doing professional files format about 2 minutes, and then
start recording.
(4) After SD card format by device or PC player, 8G, 16G, 32G, 64G or 128G SD card all showing 80.5MB
storage space under Windows system, other storage space as hidden files, user have to play video
records by professional player that offer by manufacturer. The restore SD card also have to use the
manufacturer player refer to format/restore memory card chapter.
(5) The collision and high frequency vibration may cause physical damage to the memory card magnetic
field, resulting in video intermittent or unable playback.it is recommended that regular inspection and
backup important data.
Best installation Location
Adapter
Connection
6
.
Device wire installation diagram.
During the wire installation, avoid
set wire on left side above GPS,
please set wire through device front
hole to vehicle ceiling to get better
GPS signal.
★
Notices
(1) GPS positioning accuracy may be affected by the installation position, sun-screen or weather condition.
(2) For ensure clarity of video, install device in the wiper washable area.
(3) Automotive front insulation paper with metal components may lead to GPS cannot position.
(4) Infrared ray start-up time and off time depends on the light intensity, which impact by the installation
location, first file cellophane ... and other factors.
(5) The day and night mode with a delay of about 30 seconds, into the night mode when activate device.
(6) Before using the memory disk, please format the disk first by the software player. If not, device will
automatically erase all data in the memory disk before recording, then recording as default setting.
(7) If the device power consumes more than the standard USB single-hole output 500mA, the computer power
supply may be insufficient, and it requires buying additional DC 5V / 1A above the power supply wire.
(8) Devices video output normally divided into two systems: NTSC or PAL. Ensure using suitable system
according to different devices and monitors.
*
Video output from connecting TV-OUT line to the device
1. When turns to Live screen, it could click「MODE」via remote
control to switch CH1(Front View) or CH2(Inner View), dual CH
display with GPS information as shown below:
Front View (CH1)
Inner View (CH2)
Dual CH Display With
GPS Information
Speed display
Play speed
Play bar
Operation control
interface
Volume control
: Close
: Minimal
: Playback
: Calendar
: Backup
: Snapshot
: Configuration
: Format
: G-Sensor
: Compass
H11AE07D00


