background image

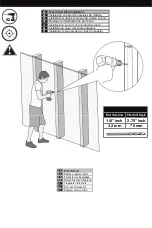
Zoek de drager en markeer de rand- en middenlocaties.

NL

EN

Find stud(s) and mark edge and center locations.

ES

Ubique el panel y marque las ubicaciones de los bordes y el centro.

FR

Repérez l'emplacement d'une poutre, puis marquez l'emplacement des bords et du centre de cette poutre.

DE

Suchen Sie den Balken und markieren Sie Ränder und Mitte.

IT

Individuare il montante e segnare la posizione dei bordi e del centro del montante stesso.

PT

Encontrar a viga e marcar os locais extremos e centrais.

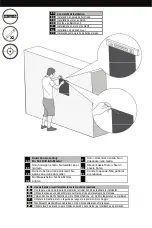
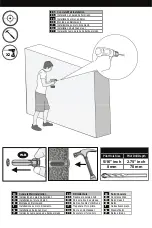
Installatie op muur met houten dragers

NL

Instalação numa parede de vigas de madeira

PT

Installazione su muro con montanti in legno

IT

Montage an Holzbalken an der Wand

DE

Installation murale sur poteau de cloison en bois

FR

Instalación en pared con paneles de madera

ES

Wood Stud Wall Installation

EN

Содержание CL1SA30

Страница 1: ...CL1SA30 OM10033 ULN CL1SA30 L7 OM10033 OEM 042810vA PN A VERSION www V7 world com 30 lbs 13 6 kg 26...

Страница 2: ...do Para realizar una instalaci n segura la pared elegida debe ser capaz de soportar 4 veces el peso de la carga total De lo contrario deber reforzar la superficie para que cumpla con este requisito El...

Страница 3: ...en oder Flachbildfernsehers zu tragen DIE F R DIESES PRODUKT ANGEGEBENE MAXIMALE TRAGKRAFT DARF NIEMALS BERSCHRITTEN WERDEN AVISO PORTUGU S AVISO A INSTALA O OU MONTAGEM INCORRECTA PODER RESULTAR EM G...

Страница 4: ...enza del peso massimo De maximum Capaciteit van het Gewicht Capacidade do peso m ximo 26 N O EXCEDER A CAPACIDADE DE PESO M XIMO PARA ESTE PRODUTO PT NE PAS UTILISER DES PRODUITS QUI SONT PLUS GRANDS...

Страница 5: ...rias ES Outils requis FR Verwijder NL Desmontar Rimuovere Entfernen Sie Retirez Retire Remove PT DE IT EN ES FR Regel NL Ajustar Regolare justieren Sie Ajustez Ajuste Adjust PT DE IT EN ES FR Kabelgot...

Страница 6: ...acers M4 M6 4 M C Philips Screws M4 x 25mm 4 M B Philips Screws M4 x 12mm 4 M A Description Qty Part Screws Hardware for Flat Panel Monitor Kit S V vC Niet inbegrepen NL N o inclu do PT Nicht im Liefe...

Страница 7: ...rews 2 7 OmniMount Badge 1 6 Cover Screws 8 5 Covers 2 4 Cantilever Arm 1 3 Wall plate 1 2 VESA Plate 1 1 N A Description Qty Part Pouch Contents Allen Wrench 5mm 2 P C Allen Wrench 4mm 2 P B Allen Wr...

Страница 8: ...Balken und markieren Sie R nder und Mitte IT Individuare il montante e segnare la posizione dei bordi e del centro del montante stesso PT Encontrar a viga e marcar os locais extremos e centrais Insta...

Страница 9: ...z la plaque ou le gabarit mural pour marquer les emplacements de montage Use la gu a o placa de la pared para marcar el lugar donde se realizar la instalaci n Use wall plate or wall template to mark m...

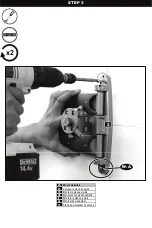
Страница 10: ...con montanti in legno IT Montage an Holzbalken an der Wand DE Installation murale sur poteau de cloison en bois FR Instalaci n en pared con paneles de madera ES Wood Stud Wall Installation EN Boor ee...

Страница 11: ...Verwenden Sie die Wandplatte oder die Wandschablone um die Montagestellen zu markieren Utilisez la plaque ou le gabarit mural pour marquer les emplacements de montage Use la gu a o placa de la pared...

Страница 12: ...betonnen muur NL Instala o numa parede de bet o armado Installazione su muro di cemento Montage an Betonwand Installation sur mur en b ton Instalaci n en pared de hormig n Concrete Wall Installation P...

Страница 13: ...rez l attache FR Verwijder NL Desmontar Rimuovere Entfernen Sie Retirez Retire Remove PT DE IT EN ES FR Leg opzij voor later Colocar de lado at um passo posterior Conservare queste parti per un passag...

Страница 14: ...3 x2 2 W A Monteer de wandplaat NL Placa de montagem na parede PT Montieren Sie die Wandplatte DE Montare la piastra a muro IT Mount wall plate EN Coloque la placa de pared ES Montez la plaque murale...

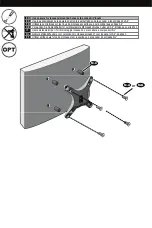
Страница 15: ...di montaggio incassati o per accedere a componenti A V Verwenden Sie Abstandhalter f r zur ckversetzte Montagebohrungen oder um A V Eing nge zu erreichen Utilisez les entretoises sur les trous de mont...

Страница 16: ...plana n o aperte excessivamente os parafusos e assegure se de que os parafusos n o toquem o fundo dos orif cios de montagem NOTA durante l installazione del pannello TV non serrate eccessivamente le v...

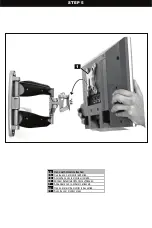
Страница 17: ...itor is bevestigd NL Suporte com monitor preso PT Mit dem befestigten Monitor aufh ngen DE Appendere con lo schermo attaccato IT Hang with monitor attached EN Cuelgue con el monitor adherido ES Accroc...

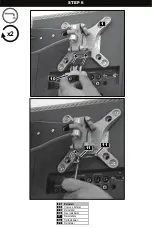
Страница 18: ...STEP 6 x2 Herinstalleren NL Reinstalar Reinstallare Neu installieren R installer Vuelva a instalar Reinstall PT DE IT EN ES FR 1 10 11 11...

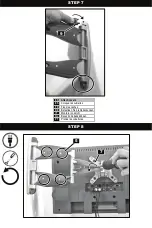
Страница 19: ...STEP 7 Bevestig de bedekkingen NL Prender as coberturas Montare i coperchi Befestigen Sie die Abdeckungen Fixez les caches Coloque las cubiertas Attach covers PT DE IT EN ES FR STEP 8 5 7 9...

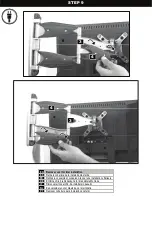
Страница 20: ...o posterior Rimuovere il coperchio da installare in seguito Entfernen Sie die Abdeckung f r die sp tere Montage Retirez le couvercle et conservez le pour une installation ult rieure Retire la cobertur...

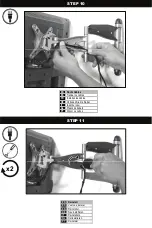
Страница 21: ...cabos PT Verlegen Sie die Kabel DE Inserire i cavi IT Route Cables EN Tienda los cables ES Installez les c bles FR STEP 11 Herinstalleren NL Reinstalar Reinstallare Neu installieren R installer Vuelv...

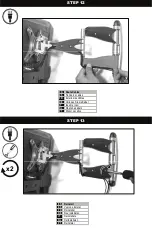
Страница 22: ...nstalar Reinstallare Neu installieren R installer Vuelva a instalar Reinstall PT DE IT EN ES FR Plaats de kabels NL Dispor os cabos PT Verlegen Sie die Kabel DE Inserire i cavi IT Route Cables EN Tien...

Страница 23: ...passen oder neigen Ajustez la position d sir e ou inclinez Ajuste a la inclinaci n o ubicaci n deseada Adjust to Desired Location or Tilt PT IT DE FR ES EN Kantelpositie blokkeren NL Posi o inclinada...

Страница 24: ...a defectos en los materiales o fabricaci n de las piezas y mano de obra a partir de la fecha de compra durante un per odo de cinco 5 a os La responsabilidad bajo esta garant a limitada en ning n caso...

Страница 25: ...ichtlinien bez glich Umtausch der jeweiligen Verkaufsstelle Zu einem sp teren Zeitpunkt w hrend des Garantiezeitraums wenden Sie sich bitte an den autorisierten Vertreter in Ihrer Gerichtshoheit La ga...

Страница 26: ...tributeur van uw rayon te raadplegen GARANZIA LIMITATA DI CINQUE ANNI La garanzia limitata del fabbricante V7 copre il prodotto in caso di difetti di materiale o di lavorazione a decorrere dalla data...

Страница 27: ...o Produto foi adquirido Esta garantia limitada n o se aplica a danos ocorridos durante o processo de desembalagem montagem ou instala o remo o do produto para reparos reinstala o do produto ap s o rep...

Страница 28: ...rized Distributors DA PT IT DE FR ES EN www V7 world com US V7 Ingram Micro Headquarters 1600 E St Andrew Place Santa Ana CA 92705 USA Canada Ingram Micro LP Canada 55 Standish Court Mississauga ON L5...

Отзывы: