manualshive.com logo in svg
background image

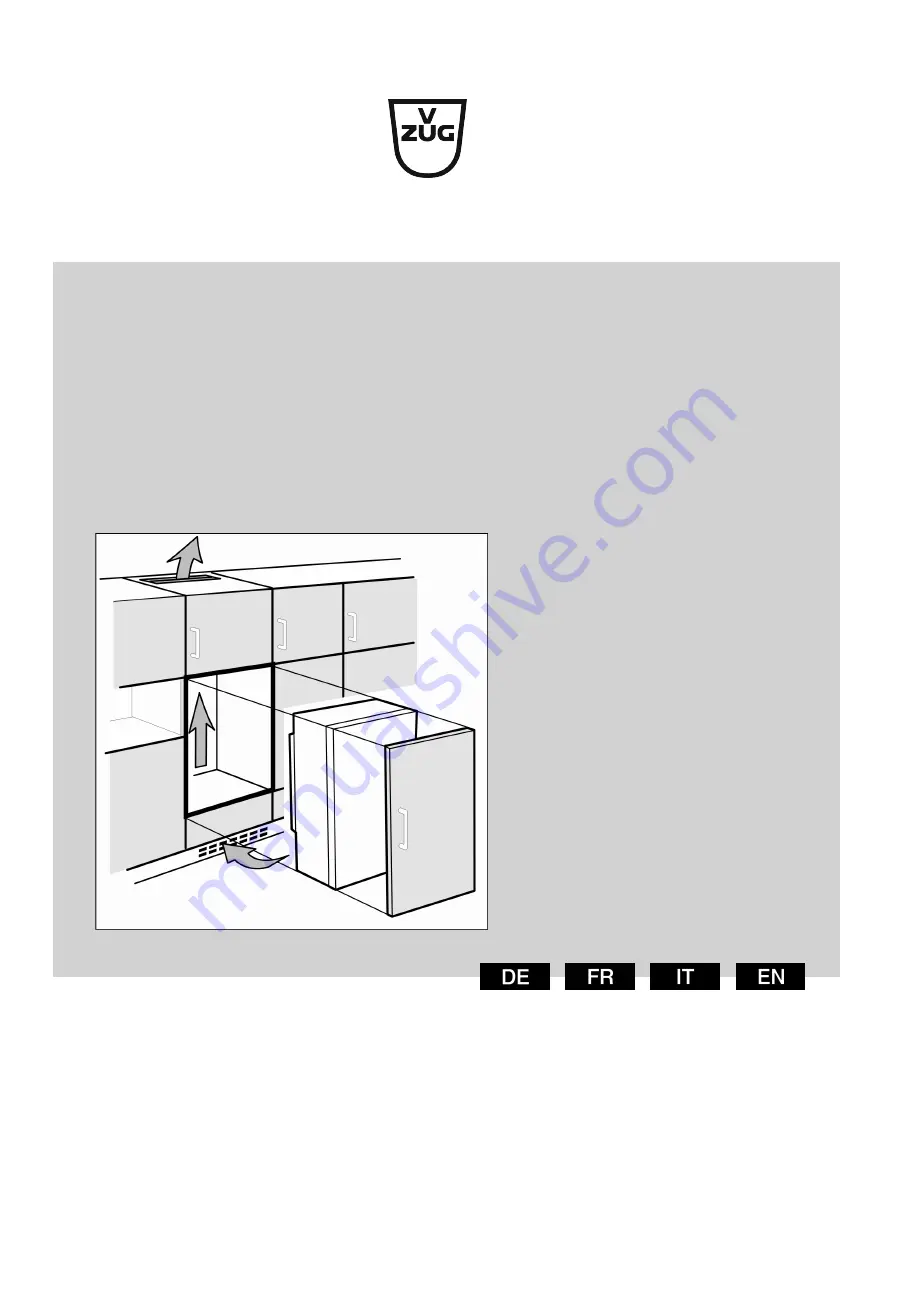
Installationsanleitung | Notice d’installation
Istruzioni d'installazione | Installation instructions
Cooler V200 / V600 / V4000 | Freezer V4000

Kühl- und Gefriergerät | réfrigerateur et congelateur
Frigorifero e congelatore | Refrigerator and freezer

Содержание Cooler V200

Страница 1: ...tung Notice d installation Istruzioni d installazione Installation instructions Cooler V200 V600 V4000 Freezer V4000 K hl und Gefrierger t r frigerateur et congelateur Frigorifero e congelatore Refrig...

Страница 2: ...sanweisungen sind mit einem gekennzeichnet Handlungsergebnisse mit einem 1 Allgemeine Sicherheitshinweise Bewahren Sie diese Montageanweisung sorgf ltig auf damit Sie jederzeit auf sie zur ckgreifen k...

Страница 3: ...90 kann bei Ger ten mit Schlie d mpfung ber den Kunden dienst bezogen werden 2 2 Aufstellen mehrerer Ger te ACHTUNG Besch digungsgefahr durch Kondenswasser u Das Ger t nicht direkt neben einem weiter...

Страница 4: ...el Einbauger t immer freihalten u Ventilatorluftschlitze immer frei halten Die L ftungsquerschnitte unbedingt einhalten Die Tiefe des Entl ftungsschachts an der M belr ckwand muss min 38 mm betragen F...

Страница 5: ...stellen u Alle Transportsicherungsteile entfernen Fig 4 u Transportsicherung an der Ger tet re abziehen u Ger t reinigen siehe Gebrauchsanweisung Ger t reinigen 10 Verpackung entsorgen WARNUNG Erstick...

Страница 6: ...f r die Montage Markier stift abwischbar Beipack Bauteile entnehmen Nicht mehr ben tigte Bauteile fach gerecht entsorgen 12 Gefrierfacht r Sie k nnen die Gefrierfacht r bei einem T ranschlag wechel m...

Страница 7: ...her abmontieren 3 Fig 9 u Abdeckungen abnehmen Fig 10 u Schrauben an allen Scharnieren l sen nicht heraus drehen Fig 11 u T r abnehmen T r nach vorne und dann nach au en schieben aush ngen und beiseit...

Страница 8: ...en 1 Halterung festschrauben 2 und Schlie d mpfer in Kugelzapfen einh ngen u Alle Schrauben kontrollieren und ggf nachziehen Fig 19 u Abdeckung unten und Mitte wieder montieren Die restli chen Abdecku...

Страница 9: ...Fig 20 Montageteile im Beipack Fig 21 Fig 22 Fig 23 Fig 24 Fig 25 Fig 26 Ger t in die Nische einbauen Je nach Modell und Ausstattung 9...

Страница 10: ...eipack entnehmen und auf der R ckseite des Ger tes einstecken Den Netzstecker mit Hilfe einer Schnur zur frei zug nglichen Steckdose verlegen Den Netzstecker erst nach dem korrekten Einbau des Ger tes...

Страница 11: ...rschieben lassen Fig 37 Fig 38 u Das Ger t vollst ndig in die M belnische einschieben Die Stellf e m ssen an beiden Seiten in den Aussparungen der Anschlagwinkel sitzen Fig 39 u Den Anschlag des Monta...

Страница 12: ...ie Stellf e ausrichten Fig 44 u Das Ger t scharnierseitig anschrauben Fig 45 u Den Winkel so verschieben dass er b ndig an der Seitenwand der M belnische sitzt Alle Schrauben fest anziehen Fig 46 u Gr...

Страница 13: ...und mit der zweiten Schiene ebenso verfahren 14 4 M belfront montieren Fig 51 u T r schlie en und Voreinstellung von 8 mm ab Oberkante der Ger tet r bis zur Auflage der Traverse berpr fen Fig 52 u Mon...

Страница 14: ...g ausrichten Fig 60 u Kontermuttern anziehen und Einstellh he kontrollieren Fig 61 u T rabstand zu den umliegenden M belt ren berpr fen Bei M belfronten die dicker sind als 19 mm die Ma e und Hinweise...

Страница 15: ...ie f r eine zweit rige M belt rmontage die Fugenlage Fig 66 Fugenlage zweit rige M belfront Nischenh he Ger teh he A mm Abstand B mm Fugenlage C Festt r mm 178 2 Schubf cher 1770 15 549 15 178 3 Schub...

Страница 16: ...en Spaltma durchf hren Spaltma Beschreibung S Gmax Ist das Spaltma gr er als die beiden Grenzwerte m ssen Sie keine Korrektur vornehmen S Gmin Liegt das Spaltma unter den Grenzwerten m ssen Sie das Sp...

Страница 17: ...raphes concernant uniquement un certain type d appareils sont indiqu s par un ast risque Les instructions sont indiqu es par un les r sultats par un 1 Consignes de s curit g n rales Conservez soigneus...

Страница 18: ...eut tre fourni par le S A V pour les appareils avec amor tisseur de fermeture 2 2 Installation de plusieurs appareils ATTENTION Risque d endommagement d l eau de condensation u Ne pas placer l apparei...

Страница 19: ...ures ou la grille d a ration dans le b ti de l appareil et le meuble de cuisine appareil encastrable u Toujours laisser d gag es les fentes d a ration du venti lateur Les sections de ventilation doive...

Страница 20: ...etc sur l appareil Confier le montage de l appareil dans le meuble de cuisine un sp cialiste Ne pas installer l appareil sans aide 9 1 Apr s installation u Enlever les pi ces de calage pos es pour le...

Страница 21: ...ces vacuer les pi ces inutiles selon les r glementations locales 12 Porte du cong lateur En cas d inversion du sens d ouverture de la porte du cong lateur la porte peut tre invers e par une manipulat...

Страница 22: ...un tour nevis 3 Fig 9 u Retirer les caches Fig 10 u Desserrer les vis de toutes les charni res sans les retirer Fig 11 u Retirer la porte pousser la porte vers l avant puis vers l ext rieur la d croc...

Страница 23: ...ion 2 et suspendre l amortisseur de fermeture dans le pivot sph rique u V rifier toutes les vis et les resserrer si n cessaire Fig 19 u Remonter les caches inf rieur et central Remonter les caches res...

Страница 24: ...Outil Fig 20 Pi ces n cessaires au montage fournies Fig 21 Fig 22 Fig 23 Fig 24 Fig 25 Fig 26 Encastrer l appareil dans la niche 24 selon le mod le et l quipement...

Страница 25: ...ortir le c ble d alimentation des pi ces jointes et le brancher l arri re de l appareil Poser la fiche de secteur l aide d un cordon sur la prise librement accessible Brancher la fiche de secteur uniq...

Страница 26: ...placer encore l g rement l querre Fig 37 Fig 38 u Ins rer enti rement l appareil dans la niche du meuble Les pieds de r glage doivent se trouver des deux c t s dans les encoches de l querre Fig 39 u R...

Страница 27: ...l appareil l aide des pieds de r glage Fig 44 u Visser l appareil c t charni re Fig 45 u R gler l querre de mani re ce qu elle soit ras de la paroi lat rale de la niche du meuble Serrer fond toutes l...

Страница 28: ...ec le deuxi me rail 14 4 Monter la fa ade de meuble Fig 51 u Fermer la porte et v rifier que le pr r glage de 8 mm est respect entre le bord sup rieur de la porte de l appareil et l appui de la traver...

Страница 29: ...ig 60 u Serrer les contre crous et contr ler la hauteur de r glage Fig 61 u V rifier que la distance entre la porte et les portes du meuble qui l entourent est suffisante Pour les fa ades de meuble d...

Страница 30: ...s dimensions hors tout de la niche et de l paisseur du corps du meuble Remarque Respecter les dimensions correspondantes de l appareil et de la niche ainsi que les sch mas de montage Les sch mas de mo...

Страница 31: ...oit avoir une profondeur minimale d environ 2 mm par rapport au corps u Encastrer l appareil dans la niche u Fixer la fa ade du meuble la porte de l appareil u Contr ler l absence de collision en fa a...

Страница 32: ...c ble de raccordement au secteur plus long peut tre command aupr s du S A V S assurer que les conditions suivantes sont r unies Le type de courant et la tension sur le lieu d installation doivent cor...

Страница 33: ...modifiche volte al miglioramento del prodotto I paragrafi che si riferiscono soltanto a determinate appa recchiature sono contrassegnati con un asterisco Le istruzioni operative sono contrassegnate da...

Страница 34: ...enti possibile acquistare un set per limitare l angolo di apertura della porta a 90 per apparecchiature con chiusura ammortizzata 2 2 Installazione di diverse apparec chiature ATTENZIONE Pericolo di d...

Страница 35: ...con una profondit di mobili da cucina di 560 mm Con profondit di mobili da cucina di 550 mm l apparecchiatura funziona perfettamente pur presentando un consumo energetico leggermente superiore u Cont...

Страница 36: ...0 16 122 Cooler V600 19 178 Freezer V4000 Cooler V4000 26 frigoriferi e congelatori a un anta 7 Trasporto dell apparecchiatura u Trasportare l apparecchiatura imballata u Trasportare l apparecchiatura...

Страница 37: ...che per apparecchi a due ante Selezionare una delle alternative apparecchio con incernieratura a destra o apparecchio con incerniera tura a sinistra Fase di montaggio necessaria con IceMaker e o Infin...

Страница 38: ...ta situata in basso sul retro della porta del vano congelatore Fig 6 u Chiudere la porta del vano congelatore 1 u Dal basso accedere alla porta del vano congelatore u Spingere la guida 2 verso destra...

Страница 39: ...are deve essere riposizionato per l avvitamento delle cerniere Fig 14 u Riposizionare le viti per il fissaggio delle cerniere Non serrare le viti dopo il riposizionamento le cerniere devono essere inc...

Страница 40: ...one dell apparecchia tura nella nicchia Per l installazione dell apparecchiatura si devono eseguire le seguenti operazioni principali 1 Predisposizione degli utensili Fig 20 2 Controllo degli elementi...

Страница 41: ...di montaggio dell apparecchiatura Fig 28 u Avvitare le due met dell angolare di montaggio a destra e a sinistra sulla base del mobile a filo con la parete laterale Fig 29 u Prendere il cavo di alimen...

Страница 42: ...parete laterale del mobile di 16 mm o 19 mm Fig 34 u Per mobili con pareti di spessore pari a 16 mm aggan ciare un distanziatore su tutte le cerniere Per mobili con pareti di spessore pari a 19 mm non...

Страница 43: ...are sulla parete laterale del mobile Fig 41 u Nei mobili con pareti laterali di spessore pari a 16 mm i distanziatori si trovano sul lato cerniera del mobile Fig 42 u Nei mobili con pareti laterali di...

Страница 44: ...cessaria usando delle forbici affilate Fig 50 Il dispositivo di regolazione dell altezza in dotazione serve per l ottimizzazione del rumore Entrambi i pezzi del dispositivo di regolazione dell altezza...

Страница 45: ...ciolare montare la traversa di fissaggio con almeno 6 viti in caso di ante a inglesina montare con almeno 4 viti Fig 56 u Estrarre gli ausili di montaggio e inserirli capovolti nell a pertura adiacent...

Страница 46: ...o del montaggio u Verificare i punti seguenti per assicurarsi che l appa recchio sia installato correttamente In caso contrario potrebbero formarsi ghiaccio e condensa e verificarsi malfunzionamenti w...

Страница 47: ...stesso punto di rotazione della cerniera della porta fissa installata sulla propria apparec chiatura Utilizzando una cerniera aggiuntiva Kamat il peso viene alleggerito su diversi punti Per i frontal...

Страница 48: ...NZA Collegamento non corretto Pericolo di incendio u Non utilizzare cavi prolunga u Non utilizzare attacchi multipli ATTENZIONE Collegamento non corretto Danno all elettronica u Non collegare l appare...

Страница 49: ...ake action are marked with a the results of an action are marked with a 1 General safety instructions Please keep this assembly manual in a safe place so you can refer back to it at any time If you pa...

Страница 50: ...zer NOTICE Risk of damage due to condensation u Do not install the appliance directly above another refrig erator or freezer These appliances are designed for a variety of installation options Combine...

Страница 51: ...e ventilation cross sections below the unit at its base and above the unit in the surrounding cabinet As a rule the larger the ventilation cross section the more efficiently the appliance will run Suf...

Страница 52: ...to packing material and plastic film u Do not allow children to play with packing material The packaging is made of recyclable materials corrugated board cardboard expanded polystyrene parts polythene...

Страница 53: ...swapped If the main door of the appliance can be opened to more than 115 1 you can open the freezer compartment without reposi tioning the hinge If the opening angle 2 of the appliance door is less th...

Страница 54: ...rews on all the hinges but do not remove them Fig 11 u Removing the door Push the door forward and then out unhook it and put it to one side Fig 12 u Unscrew all hinges and set aside together with the...

Страница 55: ...he soft stop mechanism to the ball studs u Check all screws and retighten them if necessary Fig 19 u Refit the cover at the bottom and centre Only fit the other lids after installing the appliance in...

Страница 56: ...Fig 20 Assembly parts in the accessory kit Fig 21 Fig 22 Fig 23 Fig 24 Fig 25 Fig 26 Installing the appliance in the recess 56 Depending on model and options...

Страница 57: ...the power cable from the package and plug it into the back of the appliance Use a string to route the power plug cord to the accessible socket Do not plug in the power plug until the appliance is corr...

Страница 58: ...tly Fig 37 Fig 38 u Insert the appliance all the way into the unit recess The adjustable feet must rest in the recesses in the brackets on both sides Fig 39 u Remove the floor mounting bracket stopper...

Страница 59: ...the tilt of the appliance Fig 44 u Screw on the appliance on the hinge side Fig 45 u Move the bracket so it sits flush on the side wall of the cabinet recess Tighten all the screws securely Fig 46 u...

Страница 60: ...do the same with the second rail 14 4 Mounting the front of the cabinet Fig 51 u Close the door and check the preset of 8 mm from the upper edge of the appliance door to the crosspiece support Fig 52...

Страница 61: ...0 u Screw on the lock nuts and check the height Fig 61 u Check the gap between the door and the surrounding custom door panels For unit fronts thicker than 19 mm take account of the dimensions and adv...

Страница 62: ...ickness should be at least 16 mm and no bigger than 19 mm When mounting a 2 door cabinet door observe the recommended clearances Fig 66 Clearances for a 2 door cabinet door Recess height Appliance hei...

Страница 63: ...of the following depending on the measured clearance size Clearance Description S Gmax If the clearance size is greater than the two limits you do not need to make any adjust ments S Gmin If the clea...

Страница 64: ...20221028 7088375 00 1213605 01 V ZUG AG Industriestrasse 66 CH 6302 Zug info vzug com www vzug com...

Отзывы: