background image


11


Setup 


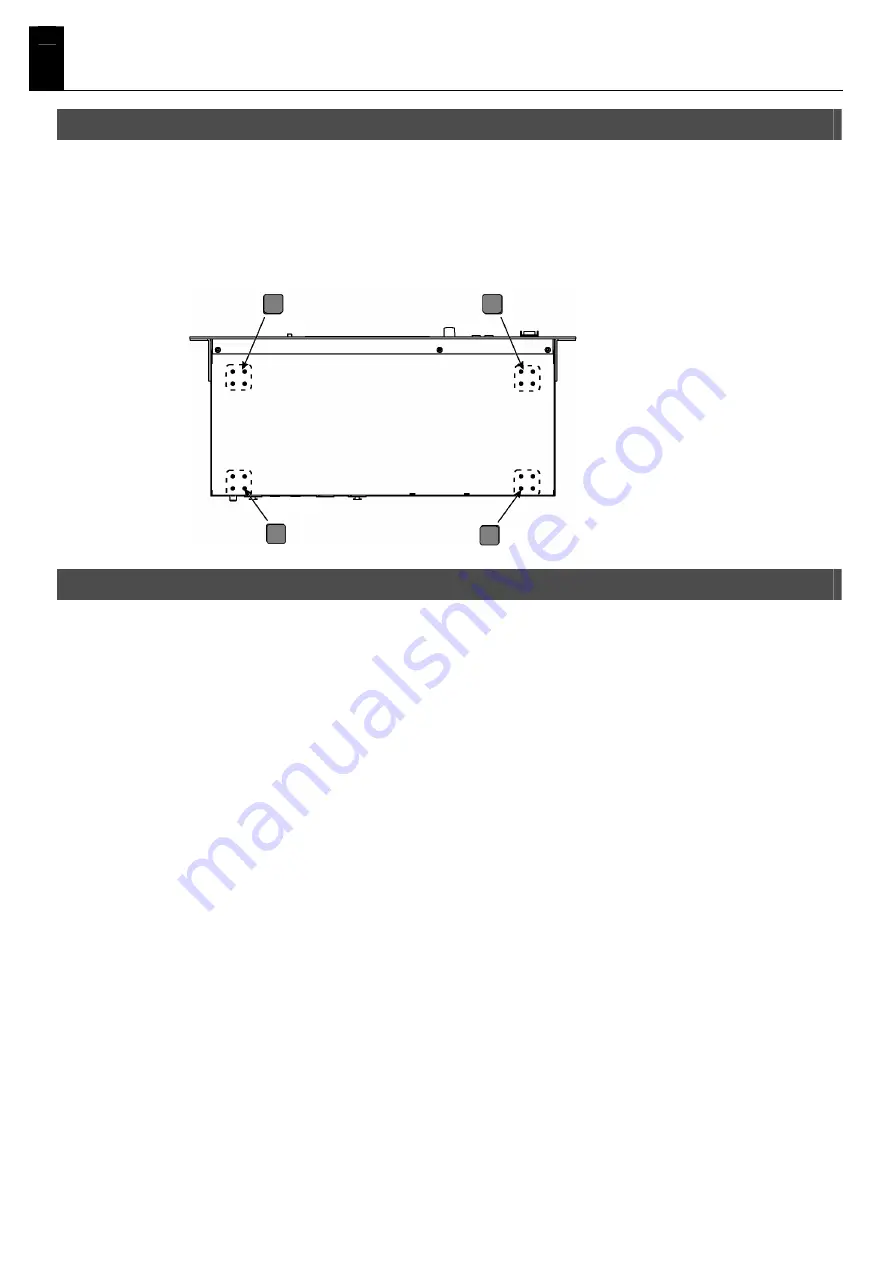
Attaching the adhesive rubber pads (accessory) 


If you would prefer to use the UDMR on a shelf or desk instead of mounting it in a rack, please 
attach the provided adhesive rubber pads to prevent slippage or damage to the unit. 

Remove the protective seals from both sides of the pads and attach them to the positions shown 
in the diagram below. 


(Undersurface of the UDMR) 


Rack installation (heat precaution) 


When mounting the UDMR in a rack, take the following precautions to ensure effective cooling. 

  Install and operate the UDMR in a well-ventilated area. 

  Do not mount the UDMR in a sealed rack. Warm air trapped inside the rack may cause the 

UDMR may heat up. 

  Particularly in the case of multi-tier rack mounting, make sure that the rack is designed to allow 

adequate ventilation and prevent recirculation of exhaust air. If the rear surface of the rack 
cannot be opened, install an exhaust fan or an exhaust outlet at the top of this surface where 
warm air accumulates. 

  When storing and using the UDRM in a portable case (portable rack), remove the case's front 

and rear surfaces and make sure that the UDMR's front and rear panels are not covered. 

*  Take care when installing the rack to prevent injury to hands and fingers. 

*  Also read the 'Setup' section of the OPERATING INSTRUCTIONS (p.4) before installing the 

rack. 


Содержание UDMR

Страница 1: ...is strictly prohibited To ensure correct usage of this product carefully read the SAFETY INSTUCTIONS on page 2 and the OPERATING INSTRUCTIONS on page 4 prior to use Please also familiarize yourself w...

Страница 2: ...ates actions which are prohibited The specific details of the prohibited action are indicated by the graphical illustration appearing within the symbol The symbol on the left is used to indicate that...

Страница 3: ...its smoke or an unusual smell When a foreign object enters the UDMR or a liquid is spilled on it When the UDMR is wet by rain etc When an anomaly or malfunction occurs Never attempt to plug in unplug...

Страница 4: ...emperature etc the UDMR s adhesive rubber pads may cause the surface on which the UDMR is setup to become discolored or deteriorate This can be prevented by placing a material such as felt under the a...

Страница 5: ...nufactured using precision electronic components so observe the following precautions when handling them To prevent damage from static electricity it is necessary to discharge the static electricity f...

Страница 6: ...song phrases 42 Phrase operations 44 Deleting phrases 44 Copying phrases 45 Memory card settings editing 47 Preparing memory cards use with the UDMR card formatting 47 Deleting all memory card phrase...

Страница 7: ...rnal devices 81 UDMR settings 81 Settings for using sync signals 83 DMX input output settings 85 DMX output settings 85 Phrase playback fade setting 86 Phrase switchover fadesetting 86 Channel fade se...

Страница 8: ...mixing of phrases Combine recorded phrases at will to create new choreography patterns and a range of playback modes to suit the application Auto BPM function detects tempo from external audio Automat...

Страница 9: ...indicator Displays the selected card 9 Phrase no BPM display Displays the phrase number of the selected phrase Displays the tempo BPM during playback of pattern phrases see p 38 for which the phrase s...

Страница 10: ...phrases Upon changing this setting to MIDI THRU MIDI messages input to the MIDI IN terminal are output without modification 7 MIDI IN terminal By connecting a MIDI player sequencer via this terminal y...

Страница 11: ...ea Do not mount the UDMR in a sealed rack Warm air trapped inside the rack may cause the UDMR may heat up Particularly in the case of multi tier rack mounting make sure that the rack is designed to al...

Страница 12: ...revent the inadvertent removal of the memory card After checking that the memory card is properly inserted in the memory card slot affix the card protector using the provided screws as shown below Onl...

Страница 13: ...two terminal slots Attach the 2P 3P converter to the plug and insert into the outlet after first inserting the ground connection Always insert the ground connection before inserting the power plug in...

Страница 14: ...the POWER switch located on the front panel to turn the unit on Due to the UDMR s circuit protection mechanism the unit will remain inoperable for several seconds after turning on the power 2 Check th...

Страница 15: ...35 Automatic Random Playback function Enables random sequential playback of up to 100 phrases p 38 Maintenance free The UDMR is designed without any moving mechanical components giving it exceptional...

Страница 16: ...quipment such as audio recorders and video equipment such as video presenters using the MIDI protocol This functionality allows you to create a total system incorporating lighting audio and video LED...

Страница 17: ...circuit you can also play back phrases from a selection of up to 500 types Direct playback Perform playback from a selection of up to 10 phrases by attaching switches to each of the 10 individual cont...

Страница 18: ...e a total recording time of up to 27 hours 500 phrases This feature allows you to store all of your phrases for various performance patterns on a single CF card Total system integrating lighting audio...

Страница 19: ...ternal devices The UDMR can play back phrases in sync with synchronized signals transmitted from video devices sequencers and industrial lighting consoles etc It also performs playback stop and locate...

Страница 20: ...h this function you can create pattern phrases combining up to 100 phrases then play them back sequentially at the tempo automatically detected by the UDMR p 38 Playback can be performed either accord...

Страница 21: ...h the main lighting controller during time code synchronization with the UDMR the unit instantly switches to Backup Mode so that you can continue the show or stage performance without any interruption...

Страница 22: ...aximum number of phrases Handling of recorded data Upon inserting the memory card in the slot the UDMR reads the card s settings information Please be aware of the following points when inserting and...

Страница 23: ...re fully inserting it into the card slot Do not force the card into the slot Removing the memory card Press the eject button then remove the memory card from the card slot Do not attempt to remove the...

Страница 24: ...56 mins 33 secs 13 hrs 53 mins 07 secs 64 13 hrs 53 mins 07 secs 27 hrs 46 mins 14 secs Recording channels 32 27 hrs 46 mins 14 secs 55 hrs 32 mins 28 secs 512 MB CompactFlash Frame rate at recording...

Страница 25: ...s storage capacity and the DMX frame rate Refer to DMX phrase recording capacity on page 24 for further details on the supported memory card sizes and their maximum recording times Do not attempt to...

Страница 26: ...rn the SELECT dial to choose alphanumeric characters Press the SELECT dial to confirm your selected character Available characters Alphabet letters capitals numerals katakana characters sonant marks i...

Страница 27: ...ation screen is then displayed so press the ENTER button if you wish to confirm the card name Once you press the ENTER button the display returns to the settings selection screen If you do not want to...

Страница 28: ...f P 68 Transmit MMC MSC Off P 68 External type MTC P 73 Sync out Off P 74 MTC LTC type 30 P 73 TC error level 5 P 74 Tap Tempo setting Tap tempo Off P 77 Audio tempo Off P 77 DMX settings DMX output M...

Страница 29: ...the SELECT dial to the phrase number you wish to record To switch the memory card slot A B press the SELECT dial The phrase number cannot be changed after phrase recording Please therefore select the...

Страница 30: ...e RECORD DMX option you can then designate the DMX signal type Item Setting Summary Frames 40 20 Designates the number of DMX signal frames sampled per second frame rate The standard frame rate is 40...

Страница 31: ...io source s setup information such as the tonal volume effect data for each part when a song is selected When using this type of MIDI sequencer start the sequencer song selection and playback after in...

Страница 32: ...The phrase recording stops when the trigger channel value changes to 50 or below It is also possible to start recording when there is a change to the data of one among all of the channels In this cas...

Страница 33: ...STOP button to end the phrase playback By turning the SELECT dial during playback you can select the next phrase to play back without stopping the current phrase playback Pausing the phrase playback...

Страница 34: ...time setting is complete the display returns to the settings selection screen 6 Press the MODE button The setting is completed and the display returns to the default screen Pressing the MODE button i...

Страница 35: ...less and repeat interval 1 Turn the SELECT dial to select the phrase for which you wish to change the setting 2 Press the MODE button The MODE indicator light comes on 3 Turn the SELECT dial to 1 3 RE...

Страница 36: ...ted and the display returns to the default screen Setting the MIDI phrase playback tempo This section describes how to configure the MIDI phrase playback This setting can only be applied to MIDI phras...

Страница 37: ...play returns to the default screen Setting the sync source Configures the phrase sync source When using the UDMR either on its own or as the MMC MSC or MTC master the sync source is set to Internal Pl...

Страница 38: ...a single phrase Combining with phrase units pattern phrases Pattern phrases the method for combining phrases which have already been recorded They can be also used to designate the playback sequence a...

Страница 39: ...nce pattern phrase mode can be randomized The time interval until the next phrase playback can be set A single phrase can be used within the pattern phrase as many times as desired A separate pattern...

Страница 40: ...en and cancels all settings made up to that point 1 Press the MODE button The MODE indicator light comes on 2 Turn the SELECT dial to 2 1 PATTERN PHRASE then press the SELECT dial 3 Select the memory...

Страница 41: ...you must also designate the fade time time until total switchover Turn the SELECT dial to designate the fade time Once you have designated the fade time press the SELECT dial 10 Next you must registe...

Страница 42: ...hrases cannot be registered within a song phrase In case of settings which cause the phrases to overlap playback of the current phrase is suspended and playback of the subsequent phrase begins Phrase...

Страница 43: ...designated the fade time press the SELECT dial 7 Next you must register the phrase Turn the SELECT dial to designate the desired registration number No 001 100 then press the SELECT dial 8 Select the...

Страница 44: ...whether or not to cancel the phrase delete Please note that selecting YES and pressing the ENTER button returns you to the default screen and cancels all settings made up to that point 1 Press the MO...

Страница 45: ...choose the phrase number of the leading phrase you wish to copy Once you have designated the phrase number press the SELECT dial 5 Select the phrase number of the last phrase you wish to copy using th...

Страница 46: ...ich comprise them are not copied Copying pattern song phrases onto the same memory card The constituent actual phrases are recorded on the same memory card so the phrases can be played back correctly...

Страница 47: ...rds 1 Press the MODE button The MODE indicator light comes on 2 Turn the SELECT dial to 4 2 DELETE CARD then press the SELECT dial 3 Turn the SELECT dial to designate the memory card to be deleted A o...

Страница 48: ...ssing the ENTER button returns you to the default screen and cancels all settings made up to that point Protecting memory cards Card Protect This function protects the information recorded on memory c...

Страница 49: ...Moves the cursor position forward one space Press the SELECT dial to execute BACK Moves the cursor position back one space Press the SELECT dial to execute INSERT Inserts a single space Press the SELE...

Страница 50: ...nit to each other The accessory Euroblock connectors may pose a choking hazard if swallowed so be sure to keep them out of reach of children Control input playback modes The UDMR features two control...

Страница 51: ...TP STOP terminal used to terminate phrase playback The STP terminal is turned ON by creating a short circuit with the above terminals and with the COM common terminals Direct playback submodes Basic o...

Страница 52: ...is voided Playback is repeated as long as the control signal input continues Pre priority playback Playback priority is given to the phrase currently being played Even if a START signal is newly inpu...

Страница 53: ...tch the terminal connection method 1 Press the MODE button The MODE indicator light comes on 2 Turn the SELECT dial to 5 1 CONTROL INPUT then press the SELECT dial 3 Turn the SELECT dial to DIRECT PLA...

Страница 54: ...allocated to the control terminal Once you have selected the card press the SELECT dial Select this option when you do not wish to allocate phrases to the control input terminals 6 Turn the SELECT di...

Страница 55: ...signals 9 used to select memory cards A or B using 0 off 1 on signals 10START start used to start phrase playback STP stop used to terminate the phrase playback The STP terminal is turned ON by creat...

Страница 56: ...Playback submode 2 Level on edge off Binary designated phrases are played back repeatedly Playback is repeated as long as the START signal input continues Phrase playback can be initiated using the bi...

Страница 57: ...ntrol terminals Instead it is necessary to configure the control input mode to match the terminal connection method 1 Press the MODE button The MODE indicator light comes on 2 Using the SELECT dial ch...

Страница 58: ...mid setting Pressing the MODE button mid setting displays a confirmation screen asking you whether or not to cancel the setting Please note that selecting YES and pressing the ENTER button returns you...

Страница 59: ...1 1 1 0 1 1 0 119 0 1 1 1 0 1 1 1 120 0 1 1 1 1 0 0 0 121 0 1 1 1 1 0 0 1 122 0 1 1 1 1 0 1 0 123 0 1 1 1 1 0 1 1 124 0 1 1 1 1 1 0 0 125 0 1 1 1 1 1 0 1 126 0 1 1 1 1 1 1 0 127 0 1 1 1 1 1 1 1 128 1...

Страница 60: ...ignals p 66 Synchronizing phrase playback with video devices using a combination of MMC and MTC signals p 69 Please also refer to MIDI Implementation on page 99 for the specifications of the MIDI mess...

Страница 61: ...It is not possible to play back DMX and MIDI phrases simultaneously You can however use exclusive messages for starting recording playback stop control record settings and phrase designation Refer to...

Страница 62: ...tting Please note that selecting YES and pressing the ENTER button returns you to the default screen and cancels all settings made up to that point Allocating phrases to note numbers MIDI note mapping...

Страница 63: ...The MIDI protocol enables different data to be sent to multiple MIDI devices using a single MIDI cable For example when the MIDI channel on the transmitting side is set to 1 the MIDI channel on the re...

Страница 64: ...default screen Pressing the MODE button mid setting displays a confirmation screen asking you whether or not to cancel the setting Please note that selecting YES and pressing the ENTER button returns...

Страница 65: ...multiple UDMR units set the Note Trigger for the controlled devices p 64 to TRIGGER The note number on off signals are not output during MIDI phrase playback Configuring the MIDI Note Out 1 Press the...

Страница 66: ...rformance equipment such as stage and visual devices MSC can be used for operations such as playback and stop from the master device In order to use this standard the other devices must be MSC compati...

Страница 67: ...ODE button mid setting displays a confirmation screen asking you whether or not to cancel the setting Please note that selecting YES and pressing the ENTER button returns you to the default screen and...

Страница 68: ...the ENTER button returns you to the default screen and cancels all settings made up to that point MMC MSC receive settings using UDMR as slave This section describes how to configure the UDMR to opera...

Страница 69: ...To synchronize operation using MTC LTC it is necessary to match the frame rates of both devices Check the specifications of the external MIDI device to be connected before configuring the time code F...

Страница 70: ...SELECT dial 3 Using the SELECT dial set the sync source to EXTERNAL Press the SELECT dial once you have finished setting the sync source 4 The BLACKOUT setting screen is displayed Turn the SELECT dial...

Страница 71: ...king you whether or not to cancel the setting Please note that selecting YES and pressing the ENTER button returns you to the default screen and cancels all settings made up to that point Configuring...

Страница 72: ...returns you to the default screen and cancels all settings made up to that point MMC MSC receive settings using UDMR as slave This section describes how to configure the UDMR to operate according to r...

Страница 73: ...e note that selecting YES and pressing the ENTER button returns you to the default screen and cancels all settings made up to that point Selecting the frame rate 30 29N 29D 25 24 This section explains...

Страница 74: ...nizing the UDMR as a slave the unit constantly checks whether MTC LTC signals are being sent correctly and continuously If MTC LTC signals are not sent continuously the UDMR determines that a problem...

Страница 75: ...is equivalent to 24h 00m 00s 00f Setting procedure 1 Turn the SELECT dial to select the phrase for which you wish to change the setting 2 Press the MODE button The MODE indicator light comes on 3 Tur...

Страница 76: ...in MIDI phrase playback methods on page 64 V LINK function chart V LINK function MIDI message Remarks Playback phrase designation Bank Select MSB 00H 03H Designates phrases in combination with Program...

Страница 77: ...val between each on is measured Once detected on three times the BPM is then calculated based on the average time interval Once detected four times the BPM is detected from the average time interval u...

Страница 78: ...g Please note that selecting YES and pressing the ENTER button returns you to the default screen and cancels all settings made up to that point Playback method 1 Start the playback of a pattern phrase...

Страница 79: ...as drums For this reason the tempo cannot be detected from human voices such as vocals or solo musical instrument performances The detectable BPM range is 90 180 BPM Furthermore the rated input level...

Страница 80: ...k method 1 Input the audio signal to the AUDIO IN terminal 2 Start the playback of a pattern phrase which has the switchover timing set to BPM The BPM indicator light comes on and the BPM is shown on...

Страница 81: ...en DMX signals from an external lighting controller are output with modification the UDMR s DMX indicator light comes on Once Backup Mode starts operating the DMX indicator light flashes UDMR settings...

Страница 82: ...int Setting the error level automatic Backup Mode only This section describes how to configure the interval 0 10 for checking for received DMX signals When Backup Mode is set to automatic the unit con...

Страница 83: ...ng YES and pressing the ENTER button returns you to the default screen and cancels all settings made up to that point Selecting the frame rate 30 29N 29D 25 24 This section explains how to select the...

Страница 84: ...ayed Turn the SELECT dial to set the blackout function to ON or OFF When the blackout function is set to ON all DMX channels are transmitted at 0 if the external sync signal is interrupted The phrase...

Страница 85: ...ed output from the DMX OUT terminal of signals input to the DMX IN terminal or output of phrase signals played back on the UDMR Refer to Lighting console backup on page 21 for further details The UDMR...

Страница 86: ...e the display returns to the settings selection screen 6 Press the MODE button The setting is completed and the display returns to the default screen Pressing the MODE button mid setting displays a co...

Страница 87: ...o ON OFF CUT then press the SELECT dial 5 Once you have finished the settings for each channel turn the SELECT dial to END then press the SELECT dial The confirmation screen is displayed Press the ENT...

Страница 88: ...ary signals as follows Phrase number 001 binary signal 00000000 Phrase number 002 binary signal 00000001 Phrase number 003 binary signal 00000010 Phrase number 250 binary signal 11111001 When converti...

Страница 89: ...mum contact capacity of no voltage NO contacts used in conjunction with the Busy Out terminal must not exceed DC30V 5A Both pattern phrases p 38 and song phrases p 42 are treated as a single phrase so...

Страница 90: ...rmation screen is displayed Press the ENTER button to execute the operation To cancel the operation turn the SELECT dial to NO then press the ENTER button Once the setting is complete the display retu...

Страница 91: ...tion 5 Turn the SELECT dial to designate the number of the phrase for automatic playback then press the SELECT dial Only available phrase numbers are displayed 6 Repeat steps 4 5 above to register eac...

Страница 92: ...e when the settings selection screen or any of the settings screens are displayed Configuring Sleep Mode 1 Press the MODE button The MODE indicator will light up 2 Turn the SELECT dial to 10 3 DISPLAY...

Страница 93: ...Press the MODE button The setting is completed and the display returns to the default screen Pressing the MODE button mid setting displays a confirmation screen asking you whether or not to cancel the...

Страница 94: ...When attempting to play back phrases using external device control the start of the phrase playback is delayed Has the Delay Time setting been configured for the phrase Try playing the phrase manuall...

Страница 95: ...set to OFF See Configuring MIDI receive channels on page 63 MIDI controlled playback Phrases do not play as expected in MIDI controlled playback Allocation of phrases to note numbers for Program Chang...

Страница 96: ...the connector cables are not disconnected The UDMR makes a ticking sound The UDMR s internal relays may make a clicking sound in the case of continuous control input etc However this is normal and do...

Страница 97: ...ransmission method NO ACTIVE SENSE RECORDING STOPPED The MIDI Active Sense message has been discontinued Check the transmission and MIDI cable INCORRECT FORMAT PLEASE REFORMAT The card format is not s...

Страница 98: ...er that slight deviations may occur depending on the type of memory For binary playback please ensure that the binary signal designated input is completed within 50msec All of the common COM terminals...

Страница 99: ...or to receipt of Program Change are not affected Not received when MIDI receive channel s are off For channels 1 16 message is only received by designated channels When ALL is selected message is rece...

Страница 100: ...s Status F0H 7FH dev 06H 06H F7H Byte Description F0H Exclusive status 7FH Universal System Exclusive Message Real Time Header dev Device ID 7FH 06H MMC Command Message 06H RECORD STROBE MCS F7H EOX E...

Страница 101: ...ats Numbers after the Q_list decimal point are ignored Q_number is ignored Q_list and Q_number are expressed as ASCII numbers For example Q_list 250 is expressed as 32H 35H 30H TIMED_GO Status Data By...

Страница 102: ...which are not turned off when the MIDI phrase performance is stopped Channel Mode Message All Notes Off Controller Number 123 Status Second Byte Third Byte BnH 7BH 00H n MIDI channel number 0H FH ch...

Страница 103: ...scription F0H Exclusive status 7FH Universal System Exclusive Message Real Time Header dev Device ID 7FH 02H MSC Command Message com Command Format 7FH 01H GO num Q_number 0 00H Delimiter List Q_list...

Страница 104: ...rd Byte BnH 79H 00H n MIDI channel number 0H FH ch 1 ch 16 Local On Off Status Second Byte Third Byte BnH 7AH vvH n MIDI channel number 0H FH ch 1 ch 16 vv Value 00H 7FH OFF ON MONO Status Second Byte...

Страница 105: ...s for detecting MIDI connection anomalies System Real Time Messages Active Sensing Status FEH When Active Sensing message is received all subsequent message intervals are monitored In the monitoring m...

Страница 106: ...d 1 0 119 Control Change Program Change True Change 1 2 1 21 23 71 73 128 System Exclusive 1 Common QuarterFrame SongPosition SongSelect Tune 3 4 Real Time Clock Command 1 All Sound Off 1 Reset All Co...

Страница 107: ...Velocity Note On Note Off After Touch Key s Channel Pitch Bend 0 119 Control Change Program Change True Change 0 127 Exclusive Common Quarter Frame Song Position Song Select Tune Real Time Clock Comm...

Страница 108: ...LCD screen Control Card eject button PLAY button STOP button MODE button ENTER button SELECT dial button POWER switch Indicators A indicator B indicator DMX indicator BPM indicator LTC MTC indicator A...

Страница 109: ...9 Outline Dimensional Drawing Dimensions shown without adhesive rubber pads attached Dimensions shown do not include power cord UDMR dimensions and specifications may be subject to change without noti...

Страница 110: ...93 sleep 92 DMX indicator 9 Earth 13 Edge 50 Eject button 9 Endless 35 ENTER button 9 Error level backup 81 time code 73 Fade 41 43 86 formatting 25 Formatting card 25 Frame rate DMX 30 LTC MTC 69 Ga...

Страница 111: ...ayback 52 Power cord 13 POWER switch 9 Pre priority playback 52 Program Change 64 Protect 48 Protector 9 Rack 11 Receive channel 63 Record standby mode 29 Recording format 30 Repeat 35 search 33 Seque...

Отзывы: