11
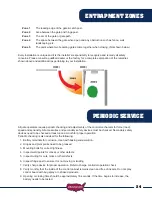
Attach Universal Actuator Bracket to hinge post or post being used
Mounting hardware needed:
• two 3/8” x 16 x 8” carriage bolts
• two 3/8” USS flat washers
• two 3/8” nylon lock nuts
The universal actuator bracket can be installed in many different ways
to accommodate your gate opener installation. The pictures here are for
reference and your installation might differ.
Universal actuator bracket must be securely installed. Drilling through the
post is the strongest method.
NOTE: In all cases, the universal actuator bracket should be aligned
level with a horizontal gate section.
1. Attach Universal Actuator Bracket with associated bracket (round or
square post mount) as previously determined to work best with your
opening method. It is recommended that the square post flush mount
bracket or the round post flush mount bracket be installed for strength
on opposite side of post from the universal bracket.
2. Install with carriage bolts, lock nuts and washers.
3. Tighten nuts securely.
Welding is the recommended method of securing the linear actuator mounts to the gate and hinge
post. Bolt on brackets are provided and are acceptable but may require frequent service to keep
tight. They must be very securely attached (i.e. carriage bolts with lock nuts and washers). Lag
type bolts are not recommended. Loose or unstable linear actuator mounts will result in improper
operation.
3
IMPORTANT CAUTIONS:
1. Do not perform any welding with the actuator cable plugged into the control board or the battery
connected. Serious damage to the control board and/or battery may occur if attempted.
2. Use control box as a template to determine mounting screw locations and then attach screws
and slide on control box. Do not attempt to hold control box and drill mounting holes. This could
damage the preinstalled components.
3. Always disconnect the battery power from the control board using the Plug N Go harness prior to
wiring any devices to the control board.


