DS4093-002B
LBT7864
Mod.
4093
TELEFONO BCA DOMO PLUS
SINGLE LINE DOMO PLUS TELEPHONE
Sch./Ref. 4093/15
LIBRETTO ISTRUZIONI
INSTRUCTIONS FOR USE
Страница 1: ...DS4093 002B LBT7864 Mod 4093 TELEFONO BCA DOMO PLUS SINGLE LINE DOMO PLUS TELEPHONE Sch Ref 4093 15 LIBRETTO ISTRUZIONI INSTRUCTIONS FOR USE ...
Страница 2: ...LEFONO È preferibile utilizzare il telefono in ambienti protetti con un campo di temperatura compreso tra 5 e 40 C ed una umidità relativa compresa tra 20 e 75 Evitare di esporre il telefono direttamente ai raggi solari o a fonti di calore È sconsigliato collocare il telefono in ambienti particolarmente soggetti a polvere in quanto l accumularsi di depositi può compromettere il regolare funzioname...
Страница 3: ... di linea 7 2 4 Regolazione del volume della soneria 7 2 5 Regolazione del volume del VivaVoce 8 2 6 Programmazione data ora 8 2 7 Installazione a parete 9 2 7 1 Appoggio temporaneo del microtelefono 9 3 USO DEL TELEFONO 9 3 1 Display 10 3 2 Funzione VivaVoce Mani libere 11 3 3 Effettuare una chiamata 11 3 4 Rispondere ad una chiamata 11 3 5 Funzione REDIAL tasto 11 3 6 Funzione NOTES tasto 12 3 7...
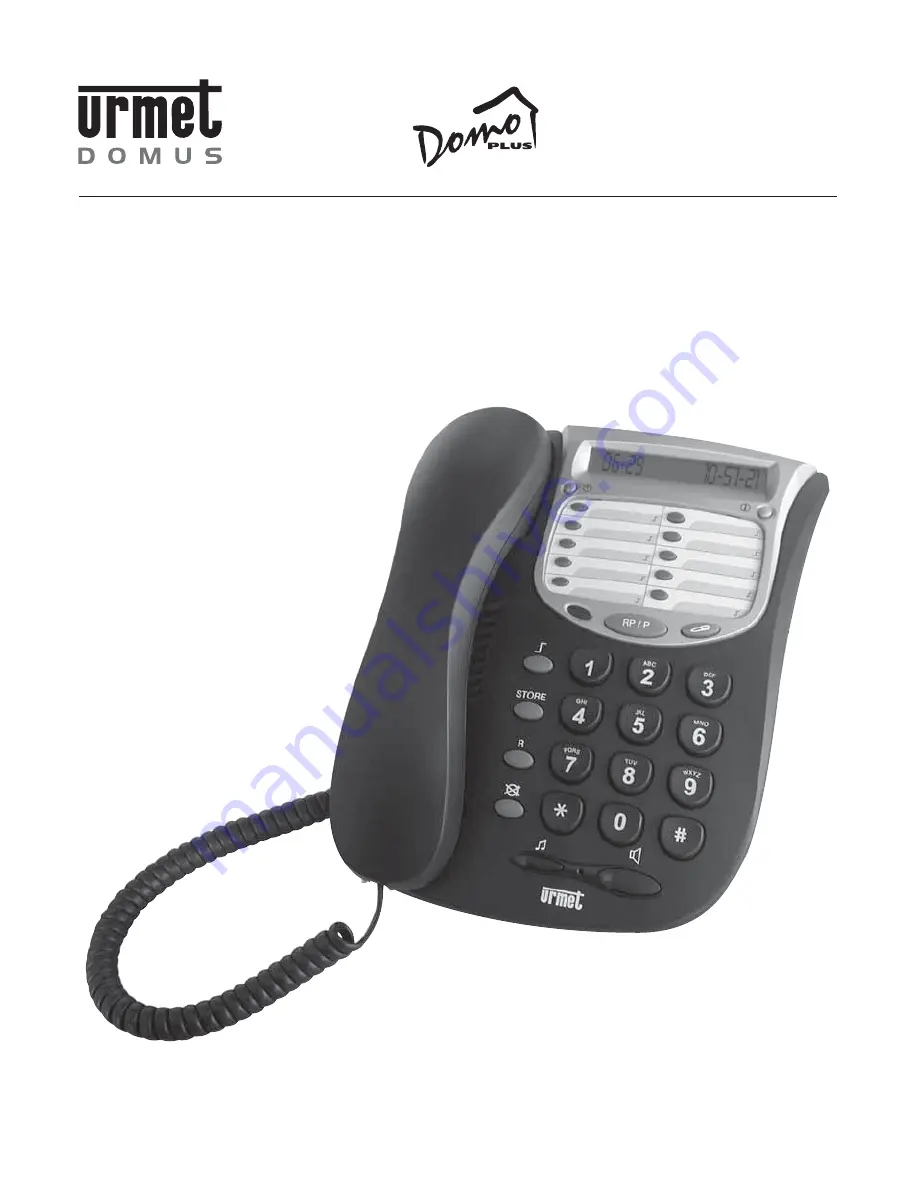
Страница 4: ...IONE ORA E DATA 6 TASTI MEMORIE A RICHIAMO DIRETTO 7 DISPLAY LCD 8 TASTO INFORMAZIONI 9 CARTELLINO PORTANUMERI 10 INDICATORE LUMINOSO DI CHIAMATA 11 TASTO NOTES 12 TASTO RP P 13 TASTIERA DI SELEZIONE 14 TASTO VIVA VOCE CON INDICATORE LUMINOSO 15 TASTO DI ATTESA MUSICALE CON INDICATORE LUMINOSO 16 TASTO MUTE 17 TASTO R 18 TASTO STORE 19 TASTO MEMORIE A RICHIAMO INDIRETTO 20 CAVO SPIRALATO CORDONE M...
Страница 5: ...TE 4 REGOLAZIONE LIVELLO VOLUME DEL VIVA VOCE 5 REGOLAZIONE LIVELLO VOLUME DELLA SONERIA 6 CONNETTORE CAVO LINEA TELEFONICA 7 CONNETTORE CAVO MICROTELEFONO 8 SUPPORTO APPOGGIO TAVOLO PARETE 172 mm 81 mm 100 mm 215 mm Solo telefono Telefono Supporto 1 2 DIMENSIONI 7 6 2 3 4 8 5 1 1 ...
Страница 6: ...tallare sotto il telefono il supporto fornito in dotazione Montare il supporto in riferimento alla tipologia di installazione che si vuole utilizzare 2 1 1 INSTALLAZIONE DEL SUPPORTO IN CONFIGURAZIONE DA TAVOLO 2 1 2 INSTALLAZIONE DEL SUPPORTO IN CONFIGURAZIONE DA PARETE Configurazione da tavolo Configurazione da parete ...
Страница 7: ... il simbolo e la rimanente direttamente nella presa telefonica Presa telefonica tripolare Inserire una delle due estremità del cavo di linea alla presa posta sul retro del telefono contrassegnata sul fondo del telefono con il simbolo e la rimanente nell innesto per plug dell adattatore inserire l adattatore nella presa telefonica 2 4 REGOLAZIONE DELLA SONERIA Tramite il commutatore posto sul retro...
Страница 8: ...se Premere il tasto per confermare e proseguire Le successive due cifre del datario indicanti il giorno lampeggeranno Premere più volte il tasto per impostare il giorno Premere il tasto per confermare e proseguire Le prime due cifre dell orologio indicanti l ora lampeggeranno Premere più volte il tasto per impostare l ora Premere il tasto per confermare e proseguire Le successive due cifre dell or...
Страница 9: ...arete di circa 5mm Far aderire l apparecchio alla parete in modo che le teste delle viti si inseriscano nel foro largo delle asole e bloccare il telefono con un movimento verticale verso il basso Rimuovere l aggancio del microtelefono e reinserirlo dalla parte opposta ruotarlo di 180 in maniera tale che funzioni da fermo Effettuare i collegamenti le regolazioni e la programmazione come descritto n...
Страница 10: ...imane disponibile per 8 secondi circa dal riaggancio del microtelefono oppure dalla ripressione del tasto Durante la selezione il display visualizza le cifre digitate e trascorsi 10 secondi circa dalla fine della selezione ripropone le informazioni data timer TASTO FUNZIONI DISPLAY CIFRE DI SELEZIONE STORE OPERAZIONE STATO VISUALIZZAZIONE SUL DISPLAY Per conoscere l ultimo numero selezionato sganc...
Страница 11: ...gganciate il microtelefono PROCEDURA CON CENTRALINO Sollevate il microtelefono Attendete il tono di libero del centralino PABX Digitate il codice di accesso alla linea telefonica Premete il tasto per inserire una PAUSA Il display visualizza dopo il codice di accesso la lettera P Attendete il tono di libero dalla centrale Digitate il numero telefonico da chiamare A fine conversazione riagganciate i...
Страница 12: ... di linea Digitate il numero telefonico da chiamare Al tono di occupato oppure a fine conversazione premete il tasto Riagganciate il microtelefono PROCEDURA DI RICHIAMO Sollevate il microtelefono ed attendete il tono di linea Premete il tasto A fine conversazione riagganciate il microtelefono Ogni qualvolta si effettua una procedura di memorizzazione questa sovrascrive sostituisce il numero telefo...
Страница 13: ...richiamo diretto pressione di un tasto e 10 a richiamo indiretto pressione in sequenza di due tasti Il limite di ogni memoria sia a richiamo diretto che indiretto è di 24 digit pause comprese Ogni qualvolta si effettua una procedura di memorizzazione questa sostituisce il numero telefonico precedentemente memorizzato 4 1 PROGRAMMAZIONE DELLE MEMORIE A RICHIAMO DIRETTO PROCEDURA DI PROGRAMMAZIONE C...
Страница 14: ...y dopo lo scorrimento verso sinistra del numero telefonico viene visualizzato Enn dove nn rappresenta il numero della memoria utilizzata Riagganciate il microtelefono PROCEDURA DI PROGRAMMAZIONE CON CENTRALINO Sollevate il microtelefono Premete il tasto Sul display E Digitate il codice di accesso alla linea telefonica Premete il tasto per inserire una PAUSA Digitate il numero telefonico da memoriz...
Страница 15: ...IONE Sollevate il microtelefono Premete il tasto Premete il tasto Digitate il codice corrispondente alla funzione citofonica da memorizzare per esempio 35 Premete il tasto Premete il tasto associato alla funzione citofonica nell esempio M1 Riagganciate il microtelefono Per la programmazione dei tasti M2 ed M3 ripetere la procedura dal primo punto associando il codice 34 al tasto M2 ed il codice 37...
Страница 16: ...2 1 e 2 2 Se l inconveniente persiste provare a collegare alla stessa borchia un telefono sicuramente funzionante Se anche quest ultimo risulterà non funzionante l inconveniente sarà da attribuire alla linea telefonica ANOMALIA PROBABILE CAUSA RIMEDIO Non si sente il segnale di suoneria Suoneria esclusa Verificare predisposizione suoneria vedi 2 3 Con il telefono collegato a centralino PABX non è ...
Страница 17: ... It is preferable to use the telephone in protected environments with a temperature range of between 5 and 40 C and a relative humidity of between 20 and 75 Avoid exposing the phone directly to sunlight or sources of heat It is unadvisable to put the phone in places particularly subject to dust as the gathering of deposits may compromise the due operating features of parts subject to movement ADVI...
Страница 18: ... 22 2 3 Line cord connection 22 2 4 Ringer adjustment 22 2 5 Free hands speaker volume adjustment 23 2 6 Date and time programming procedure 23 2 7 Wall mounting 24 2 7 1 Temporary handset resting 24 3 USING THE TELEPHONE 25 3 1 Display 25 3 2 Free hands speaker function 26 3 3 Making a call 26 3 4 Answering a call 26 3 5 REDIAL function button 26 3 6 NOTES function button 27 3 7 FLASH function bu...
Страница 19: ... 4 HANDSET SUPPORT SYSTEM 5 TIME AND DATE BUTTON 6 ONE TOUCHE DIAL BUTTON 7 DISPLAY LCD 8 INFO BUTTON 9 MEMORY CARD 10 CALL INDICATOR LED 11 NOTE BOOK BUTTON 12 RP P BUTTON 13 DIALLING KEYPAD 14 FREE HANDS SPEAKER BUTTON WITH LED 15 ON HOLD MUSIC BUTTON WITH LED 16 MUTE BUTTON 17 R BUTTON 18 STORE BUTTON 19 TWO TOUCHE DIAL BUTTON 20 SPIRAL CORD FOR HANDSET ...
Страница 20: ... mm Telephone only Telephone mount 7 6 2 3 4 8 5 1 1 1 2 DIMENSIONS 1 RUBBER FEET 2 RINGER 3 SUPPORTS FOR WALL MOUNTING 4 FREE HANDS SPEAKER VOLUME 5 RINGER VOLUME 6 TELEPHONE LINE LEAD CONNECTOR 7 HANDSET LEAD CONNECTOR 8 TABLE TOP WALL MOUNT ...
Страница 21: ...ovided under the telephone to change the reading angle of the display if needed Fit the mount in reference to the type of installation required 2 1 1 TABLE TOP CONFIGURATION MOUNT INSTALLATION 2 1 2 WALL CONFIGURATION MOUNT INSTALLATION Table top configuration Wall configuration ...
Страница 22: ...bottom of the telephone and the other directly in the telephone socket Three pole telephone socket Connect one end of the line cord to the socket on the back of the phone symbol on the bottom of the telephone and the other directly in the plug adapter socket insert the adapter in the telephone socket 2 4 RINGER ADJUSTMENT Using the switch on the back of the phone you can cut off the ringer volume ...
Страница 23: ...ng the month will blink Press repeatedly to set the month Press to confirm and continue The next two digits of the date indicating the day will blink Press repeatedly to set the day Press to confirm and continue The first two digits of the clock indicating the hour will blink Press repeatedly to set the hour Press to confirm and continue The next two digits of the clock indicating the minutes will...
Страница 24: ...ll of approx 5mm Put the device against the wall so that the heads of the screws fit inside the large hole of the slots and lock it in place with a vertical movement downwards Remove the handset hook and re insert it from the opposite side turn it by 180 so that it acts as stopper Make the connections and adjustments as described in the previous paragraphs 2 7 1 TEMPORARY HANDSET RESTING With the ...
Страница 25: ...to reset the timer if required The date timer will appear for 8 more seconds after the handset is hang up or is pressed again The dialled numbers will appear while dialling The date timer information will reappear after approximately 10 seconds BUTTON FUNCTIONS DISPLAY DIALLED NUMBERS STORE OPERATION STATE INFORMATION ON DISPLAY Hang up and press INFO to display the last dialled number The number ...
Страница 26: ...n hang up the handset PROCEDURE WITH SWITCHBOARD Pick up the handset Wait for the free tone of the PABX switchboard Dial the line access code Press the button to insert a PAUSE Letter P will appear on the display after the access code Wait for the line free tone Enter the telephone number to be called At the end of the conversation hang up the handset for access to the REDIAL and NOTES functions w...
Страница 27: ... the line access code Press the button to enter a PAUSE Wait for the line tone Enter the telephone number to be called On receiving the busy tone or at the end of the conversation press the button Hang up RECALLING PROCEDURE Pick up the handset and wait for the line free tone Press the button At the end of the conversation hang up the handset Every time a storage procedure is carried out this over...
Страница 28: ...pre set numbers 10 speed dial numbers and 10 numbers that you can dial by pressing two buttons in sequence The storage limit associated with each function both one and two touch is 24 digits inclusive of pauses Whenever you perform a storage procedure this will replace the previously stored telephone number 4 1 PROGRAMMING ONE TOUCH DIAL NUMBERS PROGRAMMING PROCEDURE WITH IMMEDIATE CALL FORWARDING...
Страница 29: ... buttons M1 M0 Enn where nn is the pre set memory position will appear on the display by scrolling the telephone number to the left Hang up PROGRAMMING PROCEDURE WITH SWITCHBOARD Pick up the handset Press the button On display E Dial the line access code Press the button to enter a PAUSE Enter the telephone number to be stored Press the button Press the button Press one of the pre set number butto...
Страница 30: ...bols printed on it PROGRAMMING PROCEDURE Pick up the handset Press the button Press the button Enter the code corresponding with the door phone function to be stored 35 in the example Press the button press the button associated with the door phone function in the example Hang up For programming the and buttons repeat the procedure from point one associating code 34 with button M2 and code 37 with...
Страница 31: ...nd of the handset see 2 1 and 2 2 If the fault persists try connecting a phone you are sure is working to the same socket If this too fails to work the fault can be attributed to the telephone line FAULT PROBABLE CAUSE REMEDY The ringer cannot be heard Ringer cut off Check the ringer setting see 2 3 With the telephone connected to the PABX switchboard it is not possible to use the REDIAL NOTES and...
Страница 32: ... 97 80013 CASALNUOVO NA V Nazionale delle Puglie 3 Tel 081 193 661 20 Fax 081 193 661 04 30030 VIGONOVO VE V del Lavoro 71 Tel 049 738 63 00 r a Fax 049 738 63 11 66020 S GIOVANNI TEATINO CH V Nenni 17 Loc Sambuceto Tel 085 44 64 851 Tel 085 44 64 033 Fax 085 44 61 862 STABILIMENTO URMET DOMUS S p A 10154 TORINO ITALY VIA BOLOGNA 188 C Telef 011 24 00 000 RIC AUT Fax 011 24 00 300 323 Call Center ...