background image

18

Copyright 2008 Unitech Electronics Co., Ltd. All rights reserved. Unitech is a registered trademark of Unitech Electronics Co., Ltd.

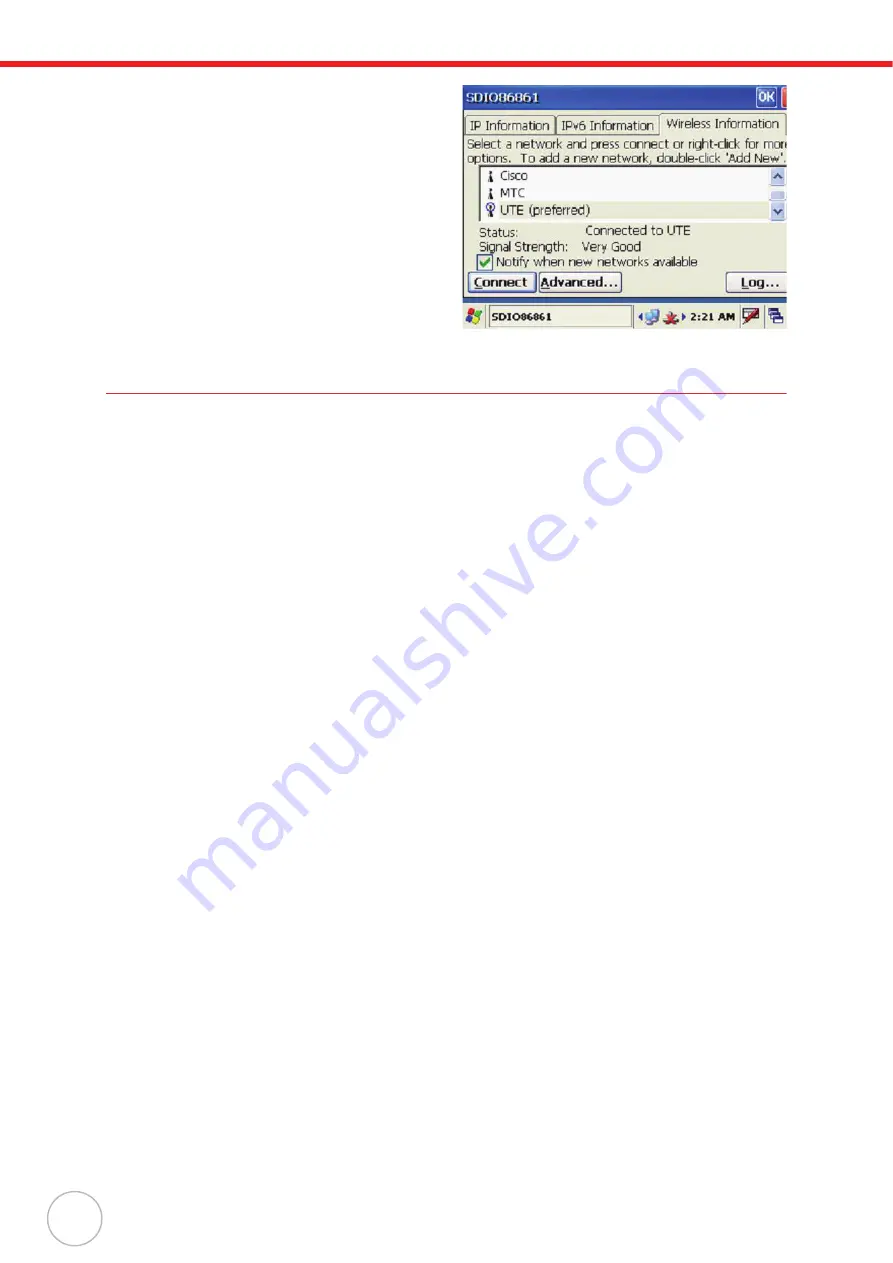
3.

The new network is automatically con-
nected.

If not, tap 

Connect

 to connect the new 

network (UTE for example).

Using ActiveSync

Using Microsoft ActiveSync, you can synchronize and transfer information between your desktop com-
puter and terminal.

Additional Capabilities

With ActiveSync, you can also:

Back up and restore your device data.

Copy (rather than synchronize) files between your device and desktop computer.

Control when synchronization occurs by selecting a synchronization mode. For example, you 
can synchronize continually while connected to your desktop computer or only when you 
choose the synchronize command.

Select which information types are synchronized and control how much data is synchronized. 
For example, you can choose how many weeks of past appointments you want to synchronize.

Requirements

To synchronize, ActiveSync program must be installed on both your desktop computer and the terminal. 
MT380 terminal ships with ActiveSync already installed. You can download and install the most current 
version of ActiveSync from 

www.microsoft.com

.

Installing Microsoft ActiveSync

In order to exchange data between your computer and MT380, Microsoft ActiveSync must be installed 
on your computer. 

NOTE:

If you have a previous version of the Microsoft ActiveSync installed in your computer, 
uninstall it first before installing the latest version of Microsoft ActiveSync. MT380 IP-
based Access Control Terminal requires ActiveSync version 4.5 or higher.

To install Microsoft ActiveSync on your computer:

1.

Close any open programs, including those that run at startup, and disable any virus-scanning 
software.

2.

Download the ActiveSync software from the Microsoft ActiveSync Download page at
 http://www.microsoft.com/windowsmobile/activesync/activesync45.mspx.

3.

Browse to the location of the downloaded file, and double-click it.
The installation wizard begins. 

4.

Follow the instructions on the screen to install Microsoft ActiveSync.

Содержание Tashi MT380 Proximity

Страница 1: ...A Versatile Multi Function Terminal User Manual 400628G Version 1 0...

Страница 2: ......

Страница 3: ...ct names mentioned in this manual may be trademarks or registered trademarks of their respective companies and are hereby acknowledged Regulatory Compliance Statements FCC Statement This is a FCC Part...

Страница 4: ...ghtly cooler environment It is essential that batteries are charged within the stated range of 0 C to 50 C Charging batteries outside of the specified range could damage the batteries and shorten thei...

Страница 5: ...ating MT380 Screen 3 Setting the Date and Time 3 Chapter 2 Using the Hardware 4 Using the Keypad 4 Using Windows CE Keyboard 4 Entering Characters 5 Entering Numerics 5 Moving the Keyboard 5 Closing t...

Страница 6: ...ying an IP Address 22 Chapter 4 Power System 24 Charging the Backup Battery for the First Time 24 Checking the Battery Status 24 Extending Battery Life 25 Changing the Automatic Power Settings 25 Redu...

Страница 7: ...operating system Intel PXA270 processor with speeds up to 520mHz System memory 128 MB SDRAM 64 MB Flash ROM Display 3 5 inch QVGA TFT LCD touch sensitive screen 240 x 320 resolution Multimedia 2 0 meg...

Страница 8: ...there is no main power The battery also functions as a data backup battery Therefore data you enter may not be properly stored until the built in backup battery has been adequately recharged 1 Plug th...

Страница 9: ...the F5 ENTER key to confirm calibration or press the F4 ESC key to cancel it After confirming calibration the Date Time Proper ties screen appears prompting you to set the date and time Setting the D...

Страница 10: ...t The Windows based keyboard replicates the layout of a standard PC keyboard Open the Windows CE keyboard by tapping the keyboard icon on the task bar and tapping Keyboard Key Main Function Menu F1 Fu...

Страница 11: ...ch from the standard keyboard to perform the desired special characters Entering Numerics Open the Windows CE numeric keyboard by tapping the keyboard icon on the task bar and tapping Numeric Keyboard...

Страница 12: ...om a menu lightly tap the tip of the stylus on that choice 3 Double tap to open programs 4 To write data into a field on a form use the stylus to print the letters or numbers Using Proximity Reader MT...

Страница 13: ...Chapter 2 Using the Hardware 7 2 Double tap the Flash Storage 3 Double tap MT380 Test AP 4 Double tap the RFID test folder 5 Double tap the PDA_10 to open the demo program...

Страница 14: ...ered trademark of Unitech Electronics Co Ltd 6 Set the COM Port 2 Tap Connect 7 Tap a card type to activate the demo pro gram you want to test 8 Tap Auto and bring the proximity card close to the sens...

Страница 15: ...rprint in 0 4 seconds per template The Finger Print Reader can store up to 100 templates Testing Finger Print Verification MT380 has a built in BIO ID Manager programs that enable users to test finger...

Страница 16: ...reserved Unitech is a registered trademark of Unitech Electronics Co Ltd 3 Double tap MT380 Test AP folder 4 Double tap the Fingerprint folder to open the demo program 5 Double tap the BioIDMgr to op...

Страница 17: ...8 Put finger on the sensor three times according to the message shown on screen 9 The finger print is enrolled into the pro gram and displayed in the Slot Id field 10 Select a finger print id and tap...

Страница 18: ...to find finger print id info Put finger on the sensor according to the message shown on screen A pop up window appears with verification results Match found slot 0 id 123 or No match Tap OK 13 Under...

Страница 19: ...tion as an audio video intercom Additionally facial recognition can be incorporated using third party software MT380 has a demo program that enables users to capture a still picture with a card number...

Страница 20: ...Ltd 4 Double tap CameraDemo to open the demo program 5 Tap Preview Start A continuous image is displayed enabling users to capture image audio vedio 6 Tap Capture Audio Demo Program The audio demo pro...

Страница 21: ...g the Hardware 15 2 Double tap the Windows folder 3 Double tap wavtest to open the demo program 4 Do one of the following Tap Rec to record the voice Tap Stop to finish recording Tap Play to listen to...

Страница 22: ...stablishing Device PC Connection The following connection methods are provided Serial Cable 1 Plug the provided RS232 communication cable into the PC s 9 pin COM port 2 Connect the other end to MT380...

Страница 23: ...r on the device the pop on window with wireless information will appear If not tap the network icon on the task bar 1 Under the Wireless Information tab dou ble tap Add New to add a new network 2 Ente...

Страница 24: ...irements To synchronize ActiveSync program must be installed on both your desktop computer and the terminal MT380 terminal ships with ActiveSync already installed You can download and install the most...

Страница 25: ...e I O panel on MT380 s rear cover and remove the I O panel by twisting a Philips screwdriver on the cross mark shown as the illustration 2 Connect the provided full RS232 converter cable to the termin...

Страница 26: ...a message appears indicat ing that it is unable to detect a connection click the Cancel button and manually configure the communication settings 5 Follow the onscreen instructions 6 When the configur...

Страница 27: ...80 automatically detects RF cards during the first time installation Note that you can use one of the following two ways to set the IP address Obtaining an IP Address via DHCP Server Specifying an IP...

Страница 28: ...Tap DM9ISA1 3 Tap the radio button next to Obtain an IP address via DHCP and then tap the OK Specifying an IP Address If there is no DHCP server available if you want to specify an IP address assign...

Страница 29: ...Input the proper IP address Subnet Mask and Default Gateway 4 Tap the Name Servers tab and then input the proper Primary DNS Secondary DNS Primary WINS and Secondary WINS To avoid conflict with your...

Страница 30: ...the backlight When you tap the touch panel the backlight is set to minimum brightness to saving battery power Checking the Battery Status If the main battery level becomes low in the course of normal...

Страница 31: ...tomatic shutdown To change the automatic power settings 1 Open the Power Properties by tapping Settings Control Panel Power 2 Tap the Schemes tab 3 Tap the automatic shut off time arrow to select from...

Страница 32: ...display is user defined There are two tabs one for Battery Power and the other for External Power 1 Tap Settings Control Panel Backlight to adjust the screen brightness 2 Set the backlight behavior a...

Страница 33: ...sing data stored in RAM You would per form a warm start in any of the following situations The terminal fails to respond After installing some software applications After making changes to certain sys...

Страница 34: ...synchronized to your computer or you can restore data that you backed up to a storage card You can perform a cold start using the BootMode utility in the operating system or by pressing the Cold Boot...

Страница 35: ...ower over Ethernet Multimedia Camera 2 0 megapixel CMOS camera Audio output 0 8 2 Watt speaker Microphone input Expansion Slot SD slot for memory expansion Power Source Main External power Backup Lith...

Страница 36: ...have six regional services center Choose your region to get our quick support and their contact information can be found in our websites provided as below Region Website Global Operation Center www un...

Отзывы: