background image

APPENDIX E.  COMMUNICATIONS 


HF25D LINEAR DC RESISTANCE WELDING CONTROL 

990-333 

E-9


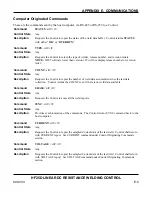
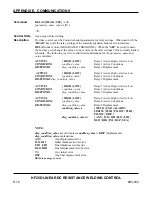
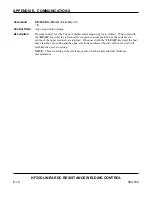
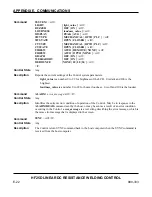
Command 

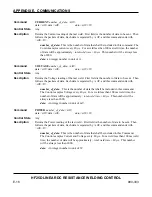
MONITOR {READ | SET}

<crlf> 

[

parameter_name  value

<crlf>] 

 
<lf> 

Control State 

Any except while welding 

Description 

Provides control over the basic weld monitor settings of the Control schedule.  When used 
with the "READ" keyword, the basic weld monitor settings of the currently loaded schedule 
are returned (see MONITOR under Control ORIGINATED COMMANDS).  When the "SET" 
keyword is used, the host may set (change) the value of one or more of the parameters of the 
basic weld monitor settings pertaining to the currently loaded schedule.  The following is a list 
of valid literal substitutions for the parameter_name and value variables: 

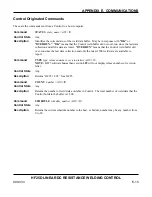
MONTYPE1 

{ KA | V | KW } 

Monitor Type for pulse 1 

UPPER1 { 

limit_value

 }


Upper Limit for pulse 1 

LOWER1 { 

limit_value

 }


Lower Limit for pulse 1 

ACTION1 

{ none | STOP | INHIBIT | APC } 

Out of Limit Action for 


pulse 1 

MONTYPE2 

{ KA | V | KW } 

Monitor Type for pulse 2 

UPPER2 { 

limit_value

 }


Upper Limit for pulse 2 

LOWER2 { 

limit_value

 }


Lower Limit for pulse 2 

ACTION2 

{ none | STOP }


Out of Limit Action for pulse 2 

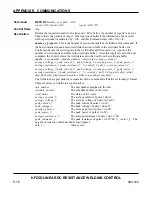
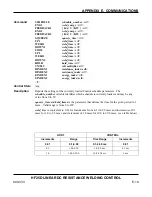
P1LDLY1


{delay_value} 

Pulse 1 Lower Delay Start Time Fo 


Lower 

Limit 

P1LDLY2


{delay_value} 

Pulse 1 Lower Delay End Time For 


Lower 

Limit 

P1UDLY1


{delay_value} 

Pulse 1 Upper Delay Start Time For 


Upper 

Limit 

P1UDLY2


{delay_value} 

Pulse 1 Upper Delay End Time For 


Upper 

Limit 

P2LDLY1


{delay_value} 

Pulse 2 Lower Delay Start Time For 


 Lower Limit 

P2LDLY2


{delay_value} 

Pulse 2 Lower Delay End Time For  


Lower 

Limit 

P2UDLY1


{delay_value} 

Pulse 2 Upper Delay Start Time For 


Upper 

Limit 

P2UDLY2


{delay_value} 

Pulse 2 Upper Delay End Time For 


Upper 

Limit


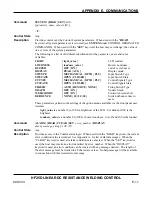
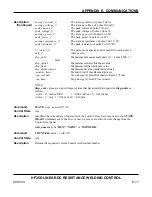
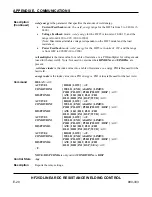
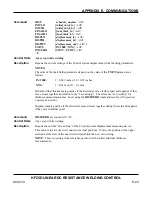
limit_value

 is the parameter that specifies the range of the valid readings.  If the reading was 

within the range of the 

limit_value

, no alarm will occur.  If the reading was out of the valid 

range, an alarm will occur.  If the monitor type is KA, the 

limit_value 

 is in unit of 1A.  If the 

monitor type is V, the 

limit_

value is in unit of 1mV.  If the monitor type is kW, the 

limit_

value 

is in unit of 1W.  The valid number for 

limit_value

  is 1 through 9999 and 0 is for none. 

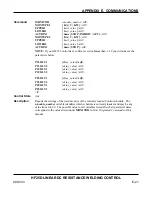
The 

delay_value

 is the parameter that defines the time for the given period in 0.1ms.  Valid 

range is from 0 to 99.  Lower delay value is only valid during WELD time.  Upper delay value 
is valid during UP time, WELD time, and DOWN time. 


Содержание HF25A

Страница 1: ...ber 2003 HF25A HF25D 25kHz HIGH FREQUENCY DC RESISTANCE WELDING SYSTEM MODEL NUMBER STOCK NUMBER HF25A10 240 1 280 02 03 HF25A10 400 1 280 02 04 HF25A10 480 1 280 02 05 HF25DA10 240 1 285 02 HF25DA10 400 1 285 02 01 HF25DA10 480 1 285 02 02 ...

Страница 2: ... are the proprietary work of UNITEK MIYACHI CORPORATION and may not be reproduced copied exhibited or otherwise used without the written authorization of UNITEK MIYACHI CORPORATION Printed in the United States of America Revision Record Revision EO Date Basis of Revision A 19826 9 03 None Original edition B 19895 12 03 Updated LVDT Option information ...

Страница 3: ...Panel Data Entry and Mode Controls 1 7 Key Pad 1 7 Numeric Keys 1 7 Up Down Keys 1 7 Mode Key 1 7 RUN Key 1 7 MENU Key 1 7 Control Keys 1 7 Energy Units Selection Keys 1 7 KA 1 7 V 1 7 KW 1 8 Monitor Keys 1 8 KA 1 7 V 1 8 KW 1 8 Resistance Ω 1 8 Peak Average 1 8 LVDT Keys 1 9 Distance 1 9 New Electrode 1 9 Quick Cal 1 9 WELD NO WELD Switch 1 9 Emergency Stop Switch Operation 1 9 Chapter 2 Getting ...

Страница 4: ...le Lock 3 3 2 System Lock 3 3 3 Calibration Lock 3 3 5 Communication 3 4 1 Communication Role 3 4 2 I D Number 3 5 3 Baud Rate 3 5 6 Relay 3 6 7 Calibration 3 6 8 Reset To Defaults 3 7 1 Reset System Parameters 3 7 2 Reset All Schedules 3 7 9 Chain Schedules 3 8 Setup 1 3 10 1 Footswitch Weld Abort 3 10 2 Switch Debounce Time 3 10 3 Firing Switch 3 11 1 Auto 3 11 2 None 3 11 3 Remote 3 11 4 Input ...

Страница 5: ...3 Single Pulse Weld Profile 3 23 Upslope Downslope Weld Profile 3 24 Dual Pulse Weld Profile 3 24 Section V Programmable Feedback Modes 3 26 Introduction 3 26 Current Mode 3 26 Voltage Mode 3 26 Power Mode 3 26 Section VI Weld Monitor 3 27 Introduction 3 27 Active Part Conditioner APC 3 27 How It Works 3 28 Energy Limits 3 29 Pre Weld Check 3 30 Chapter 4 Operating Instructions Section I Before Yo...

Страница 6: ...s 5 1 Section II Troubleshooting 5 2 Troubleshooting 5 2 Alarm Messages 5 3 Section III Maintenance 5 9 Electrode Maintenance 5 9 Parts Replacement 5 9 Section IV Maintenance 5 10 Chapter 6 Calibration Calibration 6 1 Calibration Equipment Required 6 1 Calibration Procedure 6 2 Calibrating the LVDT 6 4 Appendix A Technical Specifications A 1 Appendix B Electrical and Data Connections B 1 Appendix ...

Страница 7: ...A 91017 7133 Telephone 626 303 5676 FAX 626 358 8048 e mail info unitekmiyachi com The purpose of this manual is to supply operating and maintenance personnel with the information needed to properly and safely operate and maintain the Unitek Peco HF25 Resistance Welding System Control We have made every effort to ensure that the information in this manual is accurate and adequate Should questions ...

Страница 8: ...e advantage of the full capabilities of the Weld Head and Power Supply please read these instruction manuals before attempting to use them Procedures other than those described in these manuals or not performed as prescribed in them may expose personnel to electrical burn or crushing hazards After reading these manuals retain them for future reference when any questions arise regarding the proper ...

Страница 9: ...HF25D DC RESISTANCE WELDING SYSTEM 990 333 ix ...

Страница 10: ......

Страница 11: ...eed 50 microsecond digital feedback automatically controls weld current voltage or power providing more welding consistency compared to traditional direct energy AC or capacitive discharge CD technologies Microprocessor technology automatically compensates for changes in work piece resistance load inductance weld transformer saturation and changes in line voltage Special power device technology pr...

Страница 12: ...mits for both weld pulses Monitor Screen Rear mounted RS 232 and RS 485 connectors allow for remote programming weld schedule selection and data logging for SPC purposes The Control has communication and data options that allows you to connect a single Control or multiple Controls to a printer or a computer in order to Compile store view and print weld history data for detailed analysis Remotely p...

Страница 13: ...rovided with this option For details see Appendix D LVDT option The design of the Control is directed toward compactness lightweight operational simplicity and ease of repair Metric hardware is used throughout the chassis to facilitate international servicing and repair The 25 kHz operating frequency ensures that the integral welding transformer is light and compact The input output connector box ...

Страница 14: ...the operator s controls and indicators and the rear panel which contains fuses circuit breakers and power and signal connectors The rear panel connections are discussed in Chapter 2 Front Panel Display and Display Controls The front panel of the Control below shows controls and indicators The function of each item is described on the following pages Front Panel Controls ...

Страница 15: ... active mode of the Control In the run mode the display permits you to View the entire weld schedule profile individual weld periods and weld energy parameters View individual weld parameter program changes as you enter them via the weld period selector keys View completed weld feedback data and use the data to modify the weld schedule In the menu mode the display presents system setup options for...

Страница 16: ...en press the RUN key Weld Period Selector Keys Select individual weld periods and weld energy fields in the weld schedule profile for programming See Front Panel Data Entry and Mode Controls Time Energy Selector Keys These two switches one for each of the PULSE 1 and PULSE 2 weld periods select either the bottom line of data or the second to bottom line of data on the screen to be programmed The b...

Страница 17: ... scroll the schedule number up and down while in the run mode Mode Keys The mode keys consist of the RUN key and the MENU key RUN Key Sets the Control to the operating mode MENU Key You access the menu screen with this key Menu items control system parameters such as setup and weld counter operation Refer to Menus in Chapter 3 Section II for details of the functions accessible through that screen ...

Страница 18: ... operator to set limits that automatically interrupt the weld when they are reached You can also program the current monitor to output an alarm when the limits are exceeded Pressing the V key displays the voltage monitor This screen shows the results of the most recent weld This screen also allows the operator to set limits that automatically interrupt the weld when they are reached You can also p...

Страница 19: ... CAL enters the displacement calibration routine This routine sets a new zero point for the distance measurement and calibrates the measurement WELD NO WELD Switch When the switch is in the WELD position the programmed weld sequence can initiate weld energy When you set this switch to the NO WELD position no weld current can flow However the Control can execute a complete weld sequence This functi...

Страница 20: ......

Страница 21: ...r telephone or FAX number shown in the Foreword of this manual Space Requirements We recommend that the Control be installed in a well ventilated area that is free from excessive dust acids corrosive gases salt and moisture Other installation considerations are Allow sufficient clearance around both sides and back of the Control for power and signal cabling runs Allow ample workspace around the Co...

Страница 22: ...ections Input power requirements for the Control are as listed below Power Input Specifications Fuses F1 F2 HF25 Model Input Voltage 50 60 Hz 3 phase Vrms Ckt Brkr Current A rms Copper Wire Gauge 7 strands AWG Wire Dia mm Amps Volts Unitek Peco P N HF25A10 240 240 25 10 2 5 6 3 330 096 HF25A10 400 400 20 10 2 5 3 15 330 095 HF25A10 480 480 13 10 2 5 3 15 330 097 Compressed Air and Cooling Water If...

Страница 23: ...Setup Connections to External Equipment All connections other than the weld cable connections between the Control and external equipment are made through the rear panel Rear Panel Components The weld cable connections from the weld head are made at the weld cable terminals on the front panel ...

Страница 24: ...2 Connect one end of the second weld cable to the positive welding transformer terminal on the Control 3 Connect the other end of the weld cables to the weld head 4 Attach the voltage sensing cable connector to the VOLTAGE SENSE INPUT connector 5 Install electrodes in the weld head electrode holders NOTE If you need additional information about the weld heads please refer to their user s manuals ...

Страница 25: ...Use either the or 1 8 diameter clip as appropriate to the electrode diameter 7 Attach a clip directly to each electrode as shown on the right 8 Put a strain relieve on each voltage sensing lead to its corresponding electrode holder so that the lead clips will not break away under heavy operating conditions NOTE Do not attach the firing switch foot switch or EMERGENCY STOP cables at this time ...

Страница 26: ...onnector to the Control firing switch cable connector 5 Adjust the weld head force adjustment knob to produce 5 units of force as displayed on the force indicator index 6 Connect the weld head firing switch cable connector to the Control firing switch cable connector 7 Connect a normally closed approved emergency stop switch across the two leads of the operator emergency stop switch cable This swi...

Страница 27: ...ust the weld head force adjustment knob to produce 5 units of force as displayed on the force indicator index 2 Connect the weld head firing switch cable connector to the Control firing switch cable connector 3 Connect a normally closed approved emergency stop switch across the two leads of the operator emergency stop switch cable This switch when operated open will immediately stop the weld cycle...

Страница 28: ... and Chapter 4 Operating Instructions 10 Turn the air regulator clockwise to produce 10 psi on the air regulator pressure gauge 11 Press the foot switch all the way down to close both levels and hold the foot switch down When the weld head upper electrode rises to the UP position release the foot switch Proceed to Step 13 If it does not rise to the UP position proceed to Step 12 12 Increase air pr...

Страница 29: ...d to select one of the functions on the menu Press the down keys to go to the next or previous menu Each additional menu gives you choices for additional functions Press the MENU key to return to the main menu Main Menu 1 SETUP From the MAIN MENU screen press 1 to go to the SETUP 1 screen The SETUP 1 screen is shown on the right with typical settings SETUP 1 1 FOOTSWITCH WELD ABORT ON 2 SWITCH DEB...

Страница 30: ...accidentally reset the wrong counter press the period key The original count will reappear Press the MENU key to return to the MAIN MENU screen WELD COUNTER 1 TOTAL WELDS 0017429 NUMBER Change Restore MENU Menu 3 COPY A SCHEDULE The Control can store 99 numbered 1 through 99 individual weld energy profiles This function allows you to copy any weld schedule from one numbered weld schedule to anothe...

Страница 31: ...ect different schedules from the front panel 3 Calibration Lock This function prevents unauthorized users from modifying any of the calibration settings NOTE All security options use the same procedure to enter a security code and to turn the security code OFF 1 Press the 1 key to select SCHEDULE LOCK This will bring up the CHANGE STATUS screen as shown at the right 2 Enter a 7 digit number from 0...

Страница 32: ...ds sent to the Control so it will respond properly The Control contains internal software that gives you a great deal of flexibility in the setup and use of your welding system The Control software displays various menu screens on the LCD each containing prompts telling you which of the Control s front panel controls to use in order to customize operating parameters set the Control for use in an a...

Страница 33: ... MENU press the 5 key to go to the COMMUNICATIONS MENU 2 From the COMMUNICATIONS MENU screen press the 2 key to get the I D NUMBER entry screen I D NUMBER I D NUMBER 01 NUMBER Change MENU Previous menu 3 Enter a two digit number from 01 to 30 in the I D NUMBER field 4 Press the MENU key to get the COMMUNICATION menu screen This time the I D NUMBER line will display your I D number entry 5 Press ME...

Страница 34: ...key to select the WHEN menu shown at the right 5 Press the 4 key to select OUT OF LIMITS as the condition for initiating the Relay 1 output signal This will bring up the RELAY 1 menu screen where the WHEN line will now reflect OUT OF LIMITS WHEN 1 WELD 6 P1 LOW LIMIT 2 END OF WELD 7 P2 HIGH LIMIT 3 ALARM 8 P2 LOW LIMIT 4 OUT OF LIMITS 5 P1 HIGH LIMIT NUMBER Select MENU Previous menu 6 Press the ME...

Страница 35: ...N End of Cycle Buzzer OFF Switch Debounce Time 10 ms Display Contrast 050 Relays 1 and 2 On When Alarm Buzzer Loudness 050 1 Reset System Parameters 1 With the reset to defaults screen displayed press the 1 key This will bring up the RESET SYSTEM PARAMETERS query menu as shown at the right 1 NO 2 YES NUMBER Select MENU Previous menu 2 Press the 2 key to select YES This will automatically reset the...

Страница 36: ... Schedule 02 can be programmed with a higher current The chain would look like this Schedule 01 100 times Schedule 02 1 time Schedule 02 1 time In this chain Schedule 02 will just keep repeating after the 100 welds made using Schedule 01 When the electrodes are replaced or resurfaced you can manually switch back to Schedule 01 to restart the sequence You can program any of the Control s 99 stored ...

Страница 37: ...he next schedule in the chain 8 Use the SCHEDULE key to move the highlight horizontally back to the WELD COUNT column Repeat Steps 4 through 8 to program the rest of the chain CHAIN SCHEDULE SETUP SCHEDULE NUMBER WELD COUNT NEXT Ø4 ØØØ1 Ø4 Ø5 ØØØ2 Ø5 Ø6 ØØØ1 Ø6 Ø7 ØØØ1 Ø7 VW scroll SCHEDULE select MENU menu 9 When you finish programming the chain press the MENU key to return to the CHAIN SCHEDULES...

Страница 38: ...ter or PLC controlled welding stations since a single start pulse can be used to initiate the welding process To select the ON OFF states press the 1 key The FOOTSWITCH WELD ABORT line will now reflect your selection 2 Switch Debounce Time The contacts of single pole mechanical firing switches bounce when they close The switch de bounce time function allows you to specify that the initiation switc...

Страница 39: ...lication or when using PLC control The BCD input lines via the CONTROL SIGNALS connector see Appendix B Electrical and Data Connections select weld energy schedules and initiate the weld energy sequence 4 Input Switch Select This function selects the type of external switch to be used by the firing switch foot switch emergency stop and process inhibit inputs and how these switches are activated NO...

Страница 40: ...2 key Pressing the numeric keys automatically returns the display to the SETUP 1 screen INPUT SWITCH SELECT 1 OPTO COLLECTOR NORMAL OPEN 2 OPTO COLLECTOR NORMAL CLOSED NUMBER Select MENU Previous menu OPTO COLLECTOR NORMAL OPEN Turn the open collector output transistor of the opto isolator to ON to initiate the Control OPTO COLLECTOR NORMAL CLOSED Turn the open collector output transistor of the o...

Страница 41: ...ment 0 10 20 30 40 50 60 70 80 90 Adjust Page Graph or Data 3 Press the MENU key to return to the SETUP 1 screen 2 Buzzer Loudness BUZZER LOUDNESS DISPLAY CONTRAST 50 1 From the SETUP 1 screen press the 2 key to go to the BUZZER LOUDNESS adjustment screen 2 Use the V and W keys to adjust the buzzer tone so that it can be heard against shop background noise 0 10 20 30 40 50 60 70 80 90 Adjust Page ...

Страница 42: ... OFF function The UPDATE GRAPH AFTER WELD line will now reflect your state selection ON means that the actual weld energy profile will overlay the programmed weld profile after each weld is made The weld graph is useful for detecting weld splash which is indicated by vertical gaps in the overlap You can reduce weld splash and eliminate it in some cases by using the upslope weld energy profile ...

Страница 43: ... weld schedule Use the no weld state when adjusting the air regulators on air actuated weld heads Menu State Pressing the MENU key puts the Control in the menu state It brings up menu screens that enable you to select various options common to all weld schedules such as how the Control interfaces with the force firing switch foot switch and weld head MAIN MENU 1 SETUP 5 RELAY 2 WELD COUNTER 6 CALI...

Страница 44: ...period is 1 014 volts and the total weld count since the weld counter was last reset is 5 237 The weld profile trace is an analog display of the electrical parameters programmed with the weld period selector keys When the weld is initiated a profile of the actual weld energy delivered during the weld cycle or both weld cycles will be overlaid on the trace The large type number 02 is the selected w...

Страница 45: ...In this state when the Control detects an out of limits condition it will take one of four actions depending on the selection made with the MONITOR display as shown at the right Also an alarm message will be displayed and any relay set for ALARM or OUT OF LIMITS will be energized The selections are NONE The weld cycle will continue STOP DURING PULSE 1 The weld cycle will stop immediately Pulse 2 i...

Страница 46: ...YSTEM 3 18 990 333 Alarm State The Control automatically recognizes many alarm conditions The example WELD SWITCH IN NO WELD POSITION alarm screen shown at the right is displayed when you attempt to initiate a weld with the WELD NO WELD switch in the NO WELD position ...

Страница 47: ...ns Typical applications and recommended weld schedule profiles are defined in the table below For more information about resistance welding see Appendix D The Basics Of Resistance Welding and Appendix E Quality Resistance Welding Solutions Defining The Optimum Process Welding Applications Weld Function Typical Application Basic Weld Make single spot welds on simple flat parts without plating or on...

Страница 48: ... both levels of a two level foot switch are closed and the force firing switch in the air actuated weld head closes When the weld functions are used with a non force fired air actuated weld head the squeeze period must be used to allow sufficient time for the electrodes to close and apply the required weld force to the parts before the weld period begins Weld current begins when the squeeze period...

Страница 49: ...ct the pulse to compensate for any variation in part resistance The Control also has several monitor functions that give you remarkable control over the welding and production process Together these features ensure precise consistent welds higher productivity a lower rejection rate and longer electrode life Before operating the Control it is important to know how to match the Control s capabilitie...

Страница 50: ...es may be programmed for single pulse upslope downslope or dual pulse operation Weld schedules may also use special monitoring features of the Control such as Energy Limit Active Part Conditioner and Pre Weld Check These features are described later in this chapter Weld Sequence Timing A weld schedule is a unique heat profile programmed in constant current voltage or power that is applied over a f...

Страница 51: ...e not flat spring steel parts or heavily plated or oxidized parts Dual Pulse Use for spot welding parts with plating First pulse can be used to displace plating or oxides and the second pulse to achieve the weld For a detailed coverage of resistance welding theory please refer to Appendix D The Basics of Resistance Welding Single Pulse Weld Profile Applications Flat parts that do not have any plat...

Страница 52: ...e used to displace plating and or oxides reduce flashing and spitting or reduce thermal shock when welding parts containing glass to metal seals Downslope annealing assists in the grain refinement of certain heat treatable steels and prevents cracking in aluminum and other materials by reducing the cooling rate Annealing is not typically used for welding small parts Upslope Downslope Weld Profile ...

Страница 53: ...e 2 weld current is typically greater than the Pulse 1 weld current by a factor of 3 as the first pulse significantly reduces the resistance of the interface between the parts The only use for the downslope period following the Pulse 1 or Pulse weld period is to control grain refinement in brittle parts by slowly reducing the weld current to zero during the downslope period The dual pulse weld pro...

Страница 54: ...non flat parts Description This mode controls the voltage across the work piece during welding It helps to compensate for part misplacement and force problems and automatically reduces weld splash which is often associated with non flat parts and wire welds Set monitoring limits on current Power Mode Application Breaking through surface oxides and plating Automated applications where part or elect...

Страница 55: ...st be displaced to allow proper current flow through the parts Levels of oxide and contamination vary from part to part over time which can have an adverse effect on the consistency of the welding process If production parts are plated there can also be a plating process variation over time resulting in inconsistent welds These minor material variations are a major cause of process instability and...

Страница 56: ...lows to the weld and the voltage and resistance drop It will achieve this in a controlled fashion to maintain constant power to the weld Constant Power Waveform With Corresponding Voltage And Current Waveforms Active Part Conditioning uses a dual pulse output The first pulse is programmed for constant power and the second for either constant current constant voltage or constant power Constant volt...

Страница 57: ... be used to trigger alarms to signal operators of weld faults or signal automation equipment to perform pre programmed actions such as stopping the production line so the faulty weld piece can be removed The monitor measures the weld energy parameters during the weld period and compares the measurements against the programmed limits If any of the programmed limits are exceeded the energy limits mo...

Страница 58: ...is similar to Energy Limits however in this case Pulse 1 should be very short 1 2 milliseconds and the current should be low about 10 of the Pulse 2 current Pulse 1 should be used as a measurement pulse and should not perform a weld Pre Weld Check Waveform Example To detect misaligned parts use constant current and set upper and lower voltage limits for Pulse 1 If parts are misaligned the work pie...

Страница 59: ...and function of Controls and Indicators For more information see Chapter 1 of this manual How to select and use the Control functions for your specific welding applications For more information see Chapter III Using Programming Functions The principles of resistance welding and the use of programmed weld schedules For more information see Appendix F The Basics of Resistance Welding For additional ...

Страница 60: ...ected as described in the appropriate sections of your weld head manual Turn the compressed air ON and adjust it according to the instructions in your weld head manual Initial Setup Instructions 1 Adjust the weld head force adjustment knob for a force appropriate for your welding application A good starting point is the mid point in the range of the weld head force 2 Set the WELD NO WELD switch on...

Страница 61: ... the Control 2 Press the SCHEDULE key on the right of the Control 3 Use either of the methods below to select a schedule Use the VW Up Down keys to scroll through the list OR Use the numeric keypad to enter the two digit number of the schedule you want Enter New Values Some welding applications require no more than a simple weld schedule programmed for Single Pulse Upslope Downslope or Dual Pulse ...

Страница 62: ... the LCD to enter weld energy Use the numeric keypad to enter the energy level or use the VW arrows The Control output ranges are Current from 0 01 2 4 kA Voltage 0 05 9 999 V Power 0 01 9 999 kW 6 Perform one of the following From the CONTROL keys section on the front panel press the kA key to program current as the feedback mode From the CONTROL keys section on the front panel press the V key to...

Страница 63: ...umeric keypad to enter the energy level or use the VW arrows The Control output ranges are Current from 0 01 2 4 kA Voltage 0 05 9 999 V Power 0 01 9 999 kW 6 Perform one of the following From the CONTROL keys section on the front panel press the kA key to program current as the feedback mode From the CONTROL keys section on the front panel press the V key to program voltage as the feedback mode F...

Страница 64: ... or use the VW arrows The Control output ranges are Current from 0 01 2 4 kA Voltage 0 05 9 999 V Power 0 01 9 999 kW 6 Perform one of the following to program the Pulse 1 feedback mode From the CONTROL keys section on the front panel press the kA key to program current as the feedback mode From the CONTROL keys section on the front panel press the V key to program voltage as the feedback mode Fro...

Страница 65: ...tor key to select the lower limit field for the weld period Enter the lower limit value for the Pulse 1 weld period NOTE In order for a Pulse 1 lower limit to be programmed you must first program a Pulse 1 upslope in the weld schedule The lower limit mode current voltage or power will automatically be the same as the upper limit mode programmed in Step 5 6 Press the COOL weld period key This will ...

Страница 66: ...s the HOLD period key This will bring up the PULSE 2 OUT OF LIMITS ACTION screen This screen allows you to select the action that the Control will take if the Pulse 2 upper or lower limits are exceeded You PULSE 2 OUT OF LIMITS ACTION 1 none 2 STOP DURING PULSE 2 NUMBER Select MENU Previous menu have two choices NONE takes no action if upper or lower energy limits are exceeded STOP DURING PULSE 2 ...

Страница 67: ...igh then start to drop as a tack weld is made and oxides are removed 5 From the MONITOR keys section on the front panel press the kA current key and observe the current waveform starting to rise as the oxidization breaks down If the current waveform starts to flatten this is an indication that the resistance has stabilized and the parts have come into closer contact 6 Push RUN and optimize the ene...

Страница 68: ...oxidized parts 11 Try welds with varying oxide clean and dirty The power supply terminates the first pulse when your programmed current is reached A clean part will reach the current limit sooner and the pulse will terminate early A dirty part will require more time before the oxide is broken down and current can flow 12 Program your second welding pulse as normal to achieve a strong weld Constant...

Страница 69: ...LOPE portions of the actual weld waveform The LOWER LIMIT line is shorter because it only includes the WELD portion of the waveform If the line of either limit crosses the weld energy waveform the Control can trigger an alarm inhibit the second pulse or stop the weld energy See Section III for more details As you can see by the LCD screens above you can shorten the length of the time of the LOWER ...

Страница 70: ...NITOR LIMITS 1 LOWER LIMIT IGNORE 1ST 0 0ms 2 LOWER LIMIT IGNORE LAST 2 5ms 3 UPPER LIMIT IGNORE 1ST 0 0ms 4 UPPER LIMIT IGNORE LAST 0 0ms NUMBER Select ENERGY Monitor screen horizontally across the screen This allows you to fit the LOWER LIMIT precisely into the waveform graph 6 Use the numerical keypad to select the number of the limit you want to change 7 When the value is highlighted Example 2...

Страница 71: ...ad Correct weld energy and time is set at the Control The equipment is set up properly All electrical connections are tight Electrode alignment allows flush contact with the weld pieces Electrodes are properly dressed Hard The problem is embedded in the system and some form of repair will be needed For example repair might include replacing a broken weld head flexure Alarm Messages Built in automa...

Страница 72: ...e set at HF25 2 Contaminated electrode surface 3 Slow weld head follow up Weld Piece Warping 1 Excessive weld time set at HF25 1 Excessive weld head force 1 Incompatible weld piece projection design 2 Incompatible weld piece materials 2 Wrong electrode tip shape 3 Excessive current energy set at HF25 Insufficient Weld Nugget 1 Insufficient current energy set at HF25 1 Wrong electrode material tip ...

Страница 73: ...HEDULE LOCK ON Operator tried to change a weld schedule or individual weld parameters Press MENU select System Security then enter your access code to turn off System Security NOTE Entering a security code of 280 will always unlock the system CALIBRATION RESET TO DEFAULT User entered calibration values reset to factory default values Execute the built in calibration procedure to get the correct se...

Страница 74: ...EMERGENCY STOP OPERATOR ACTIVATED The Operator Emergency Stop switch has been activated All power to the HF25 26 is immediately terminated Remove any unsafe operating conditions at the welding electrodes Reset the Operator Emergency Stop switch Turn off power to the HF25 26 then turn it on again CHECK VOLTAGE CABLE No electrode voltage measurement was made Verity that the Voltage Sense Cable is pr...

Страница 75: ...the user INPUT TOO LARGE The user has attempted to program a weld energy or time that exceeds the capability of the HF25 26 Re program welding parameters to be within the capability of the HF25 26 INPUT TOO SMALL The user has attempted to program a weld energy or time that is below the capability of the HF25 26 Re program welding parameters to be within the capability of the HF25 26 LOAD RESISTANC...

Страница 76: ...ash can cause the actual weld power to drop below the user set Lower Limit for Weld1 Add upslope to reduce weld splash Reset the Lower Limit for Weld1 to a smaller value POWER 2 LOWER THAN LOWER LIMIT Actual weld power is less than the user set Lower Limit value for Weld2 Weld splash can cause the actual weld power to drop below the user set Lower Limit for Weld2 Add upslope to reduce weld splash ...

Страница 77: ... GREATER THAN UPPER LIMIT Actual weld voltage is greater than the user set Upper Limit value for Weld1 Weld splash can cause the actual weld voltage to exceed the user set Upper Limit for Weld1 Add upslope to reduce weld splash Reset the Upper Limit for Weld1 to a larger value VOLTAGE 2 GREATER THAN UPPER LIMIT Actual weld voltage is greater than the user set Upper Limit value for Weld2 Weld splas...

Страница 78: ...pper Limit values for Weld1 and Weld2 If the terminated weld energy is not adequate for the weld re set the Upper Limit values for Weld1 and Weld2 WELD SWITCH IN NO WELD POSITION User has tried to activate the HF25 26 with the Weld No Weld Switch in the No Weld Position No weld current will flow Set the Weld No Weld switch to the Weld position WELD TIME TOO SMALL The user has attempted to program ...

Страница 79: ... to using a 400 600 grit electrode polishing disk If you must clean a badly damaged tip with a file you must use a polishing disk after filing to ensure the electrode faces are smooth The best method of preventing electrode problems is to regularly re grind electrode tip surfaces and shapes in a certified machine shop Parts Replacement Below is a list of the replacement parts for the Control All i...

Страница 80: ... WELDING SYSTEM 5 10 990 333 Section III Repair Service If you have problems with your Control that you cannot resolve please contact our service department at the address phone number or e mail address indicated in the Foreword of this manual ...

Страница 81: ...ent Required The required equipment for the setup is as follows 2 weld cables No 2 0 1 ft 30 cm long PN 2 0 BB11 1000µΩ coaxial shunt resistor accurate to 0 2 Source for shunt resistor Model R7500 8 T M Research Products Inc 139 Rhode Island Street NE Albuquerque NM 87108 Telephone 505 268 0316 Shielded voltage sense cable PN 4 32998 01 Digital oscilloscope Tektronix 724C or equivalent Male BNC to...

Страница 82: ... 4 Press the 7 key to select the calibration function This will bring up the calibration caution screen CALIBRATION CAUTION CALIBRATION SHOULD BE PERFORMED BY A QUALIFIED TECHNICIAN ONLY REFER TO MANUAL FOR CALIBRATION SETUP Next Menu menu 5 From the calibration caution screen press to continue This will bring up the pre calibration screen 6 From the pre calibration screen press the 2 key to start...

Страница 83: ... the shunt value which is stamped on the copper conductor connected to the transformer Press to continue 8 The next two screens are 1 CALIBRATE D A HIGH and 2 CALIBRATE D A LOW Following the screen instructions adjust the energy output using the measuring parameter feature of the oscilloscope NOTE Do not use a visual assessment Press the period key to advance to the next step Calibration Signal 9 ...

Страница 84: ...CHAPTER 6 CALIBRATION HF25D DC RESISTANCE WELDING SYSTEM 990 333 6 4 Final Calibration Setup ...

Страница 85: ...33 6 5 10 The last calibration screen is 5 END OF CALIBRATION Press the MENU key The calibration is now complete Calibrating the LVDT If you are using the LVDT option follow the calibration procedures described in Appendix D LVDT Option Section 3 LVDT Calibration ...

Страница 86: ...VA max at 3 duty cycle Output Power at 12 Duty Cycle and a Combined PULSE 1 and PULSE 2 Pulse Width of 50 ms 6 0 kW max Maximum Output Current 2400A Max Peak Output Voltage at Max Peak Output Current 5 2V Duty Cycle at Max Peak Output Current 3 Max Load Resistance for Max Output Current 2 1mΩ Output Adjustment Range Resolution and Accuracy NOTE Actual maximum and minimum current voltage or power a...

Страница 87: ...am Actuated Force Fired EZ Air Kit Weld Energy Limits Monitoring Energy Limit Mode Terminate weld energy upon reaching the programmed current voltage power or resistance alarm level Weld Pre Check Mode Inhibit second weld pulse when first test pulse exceeds programmed limits Measurement Parameters Current voltage and power Measurement Selection Peak or average Measurement Range and Accuracy Parame...

Страница 88: ...from other HF25 controls and host computer Voltage Weld voltage signal for voltage feedback operation 0 to 10 volt peak Output Signals Monitor Internal analog voltage signals representing secondary current feedback 0 5 VDC primary current 0 4 VDC or weld voltage 0 5VDC Air Valve Driver 24 VAC 1 amp timing controlled by the HF25 No weld over force protection EZ Air Valve Driver 24 VDC 1 5 amps timi...

Страница 89: ...er 5 16 for weld cable 755 044 4 Spring Lock Washer 755 228 2 Voltage Pick Up Clip Assembly 1 4 in 4 32999 01 2 Voltage Pick Up Clip Assembly 1 8 in 4 32999 02 2 Connector 15 Pin D Type 250 199 1 Accessory 15 pin 250 200 1 Optional Accessories Accessory Part Number 2 Level Foot Switch FS2L DC25 UB25 HF25 Datacom Kit 10 600 06 DATACOM Kit Contents Part Description Part No Qty 9 Pin to 9 Pin Data Co...

Страница 90: ...te The other jumper plug P22 plugs into welding transformer cable connector J22 The jumper plug set determines the power wiring configuration between the power board and the welding transformer Input Power Wiring Diagram CAUTIONS Be sure that the shop source power is appropriate for your Control model If the blue phase wire is not connected no alarm will occur and the weld control will produce mor...

Страница 91: ...additional connectors as shown attached to a detachable connector box The interface can be used in either of two ways In the standard form the Control is shipped with the connector box in place Signals are transferred through the interface via the connectors on the connector box which are pre wired to the terminal block plugs Thus you have an easy way to attach a weld head foot switch firing switc...

Страница 92: ... 31 40 TB5 Pins 41 50 TB6 Pins 51 60 Operator Emergency Stop Switch Input Function The Control is delivered with the operator emergency stop cable leads connected to power interlock contacts J3 1 and J3 2 on the control board via TB5 You must connect a normally closed single pole switch across the cable leads otherwise the Control cannot be turned on Use the switch during Control operation as an e...

Страница 93: ...from the weld head signals that the selected pressure has been applied to the weld pieces Note that a mechanical firing switch is subject to contact bounce which can cause false weld starts The effects of switch bounce can be avoided at low weld speeds by using the switch debounce function on the Control main menu If welding speeds are to exceed 1 5 welds per second use an optical firing switch Co...

Страница 94: ...TRICAL AND DATA CONNECTIONS HF25D DC RESISTANCE WELDING SYSTEM 990 333 B 5 Force Firing Switch Input Schematic Diagram Standard Configuration Force Firing Switch Input Schematic Diagram Alternate Configuration for PLC ...

Страница 95: ...tch before pressing it to the second level the Control will automatically return the upper electrode to its UP position so that you may re position the weld pieces If you do not release the foot switch at the first level and proceed to the second level the force firing switch in the weld head will close Weld current will flow and the Control will automatically return the upper electrode to its UP ...

Страница 96: ...ICAL AND DATA CONNECTIONS HF25D DC RESISTANCE WELDING SYSTEM 990 333 B 7 Two Level Foot Switch Input Schematic Diagram Standard Configuration Two Level Foot Switch Input Schematic Diagram Alternate Configuration for PLC ...

Страница 97: ...le selection inputs Schedule Selection Function Schedule Initiation Function Schedule Selection Function All weld schedules must be entered and saved to the Control memory locally through the Control control panel Once they are saved they can be recalled prior to initiating the weld process by placing a BCD value on the remote schedule selection lines This may be done with either an external progr...

Страница 98: ... Timing Diagram BCD Welding Schedule Selection Scheme Weld Schedule No Bit 20 Pin 1 Bit 21 Pin 2 Bit 22 Pin 3 Bit 23 Pin 4 Bit 24 Pin 12 Bit 25 Pin 5 Bit 26 Pin 14 0 0 0 0 0 0 0 0 1 1 0 0 0 0 0 0 2 0 1 0 0 0 0 0 3 1 1 0 0 0 0 0 4 0 0 1 0 0 0 0 5 98 BCD progression from 5 to 98 99 1 1 0 0 0 1 1 ...

Страница 99: ...initiating the welding process Or it can be programmed to begin initiation when opened Similarly a PLC can input 5 to 24 VDC to trigger the welding process Conversely you can program the Control to start the welding process when the input signal from the PLC drops from 5 or 24 VDC to 0 volts CONTROL SIGNALS Connector Pin Assignments Remote Schedule Select Signals Only Signal Destinations Pin No Na...

Страница 100: ...APPENDIX B ELECTRICAL AND DATA CONNECTIONS HF25D DC RESISTANCE WELDING SYSTEM 990 333 B 11 Mechanical Switch or Opto Coupler Input Schematic Diagram ...

Страница 101: ...APPENDIX B ELECTRICAL AND DATA CONNECTIONS HF25D DC RESISTANCE WELDING SYSTEM B 12 990 333 PLC Voltage Input Schematic Diagram ...

Страница 102: ...olenoid cable to the four pin AIR VALVE DRIVER connector on the connector box The mating connector is an AMP type 206429 1 using cable clamp AMP type 206358 2 The two male pins used are Amp type 66361 2 Standard Air Valve Driver Output Schematic Diagram Standard AIR VALVE DRIVER Connector Pin Assignment Summary Signal Destinations Pin No Name Type TB Control Board Max Voltage Max Current I O Comme...

Страница 103: ...ve Driver Input Output Function The Control supplies a switched 24 VDC output to the EZ Air air valve driver solenoids This valve driver system incorporates multiple solenoids that prevent weld over force caused by excessive air pressure EZ Air Valve Driver I O Schematic Diagram Standard Configuration ...

Страница 104: ...APPENDIX B ELECTRICAL AND DATA CONNECTIONS HF25D DC RESISTANCE WELDING SYSTEM 990 333 B 15 EZ Air Valve Driver I O Schematic Diagram Alternate Configuration for PLC ...

Страница 105: ...ER Connector Pin Assignments Signal Destinations Pin No Name Type TB Control Board Max Voltage Max Current I O Comments 1 HEADCG 2 19 J1 19 24V or ground depending on jumper 2 HEADGND 1 2 J1 2 24VGND EZ air valve common 3 HEAD1 DC 1 3 J1 3 24VDC 3A O EZ air valve 4 HEAD2 DC 1 4 J1 4 24VDC 3A O EZ air valve 5 HEAD3 DC 1 5 J1 5 24VDC 3A O EZ air valve 6 HEADDT1 Digital 1 6 J1 6 24V 10mA I Head detec...

Страница 106: ...ram for each relay and their timing diagrams are as follows Relay contacts closed or open in the energized state Relays are energized when 1 Weld cycle starts 2 Weld cycle ends 3 Alarm state is detected 4 Weld is out of programmed limits Relay Connections The Relay 1 and Relay 2 outputs are available at the 15 pin CONTROL SIGNALS connector on the rear panel of the Control Contact Unitek Miyachi if...

Страница 107: ...mments J2 13 RELAY1 AC DC 4 33 8 24VDC AC 1A O Relay output 1pos J2 14 RELAY1 AC DC 4 34 15 24VDC AC 1A O Relay output 1neg J2 15 RELAY2 AC DC 4 35 6 24VDC AC 1A O Relay output 2 pos J2 16 RELAY2 AC DC 4 36 13 24VDC AC 1A O Relay output 2 neg J2 17 RELAY3 AC DC 4 37 24VDC AC 1A O Relay output 3 pos J2 18 RELAY3 AC DC 4 38 24VDC AC 1A O Relay output 3 neg J2 19 RELAY4 AC DC 4 39 24VDC AC 1A O Relay...

Страница 108: ...APPENDIX B ELECTRICAL AND DATA CONNECTIONS HF25D DC RESISTANCE WELDING SYSTEM 990 333 B 19 Monitor Output Monitor I O Schematic Diagram ...

Страница 109: ...te Voltage Current I O Comments 1 Not used 2 SECCUR Analog 3 0 5VDC O Secondary current 3 PRICUR Analog 5 0 5VDC O Primary current 4 ADPOS Analog 7 0 5VDC O Position 5 DOUT Digital 9 O 6 Not used 7 Not used 8 Not used 9 MONGND 2 1 GND Signal ground 10 VOLTG Analog 4 0 5VDC O Voltage 11 FORCE Analog 6 0 5VDC O Force 12 WELD Digital 8 O Weld 13 COM 10 Common Ground 14 Not used 15 Not used ...

Страница 110: ...ring Switch closure Maximum D1 time is 10 seconds If the firing switch does not close within 10 seconds the message FIRING SWITCH DIDN T CLOSE IN 10 SECONDS will be displayed D2 Delay time from Firing Switch closure and Foot Switch Level 2 closure to squeeze time SQZ Maximum D2 time is 2 ms plus switch debounce time SQZ Squeeze time Selectable range is 0 to 999 ms UP Up slope time Selectable range...

Страница 111: ...Z Maximum DELAY time is 2 ms plus switch debounce time SQZ Squeeze time Selectable range is 0 to 999 ms DELAY Delay time from Firing Switch closure and Foot Switch Level 2 closure to squeeze time SQZ Maximum D2 time is 2 ms plus switch debounce time WELD Weld time Selectable range is 0 0 to 99 0 ms DOWN Down slope time Selectable range is 0 0 to 99 0 ms COOL Cool time Selectable range is 0 0 to 99...

Страница 112: ...e from Remote Schedule Select Signal ON to the start of the weld sequence that is start of SQZ DELAY time is 23 ms SQZ Squeeze time Selectable range is 0 to 999 ms UP Up slope time Selectable range is 0 0 to 99 0 ms WELD Weld time Selectable range is 0 0 to 99 0 ms DOWN Down slope time Selectable range is 0 0 to 99 0 ms COOL Cool time Selectable range is 0 0 to 99 0 ms HOLD Hold time Selectable ra...

Страница 113: ......

Страница 114: ... a cold weld Too thin maybe an over welded or blown weld Weld to a preset displacement The weld energy will stop when the parts reach a user programmed displacement value Actuate a relay when specific LVDT conditions are reached Example If a weld has too much displacement a relay could trigger an alarm for the operator or automation 1 Zero The point where the two electrodes touch zero distance bet...

Страница 115: ...1 0 25 4mm maximum Absolute Accuracy See Following Graph Weld Displacement Accuracy 0 003 0 076mm Displayed Resolution 0 001 0 01mm Measurement Resolution 0 00025 0 006mm Repeatability 1 Maximum Weld Rate 2 weld per second NOTE The suggested minimum weld force to use with the LVDT is 2 lbs 0 9 kgf ...

Страница 116: ...nd move the LVDT up or down so that when the electrodes are closed the LVDT is extended approximately 3 4 inch This will place it in the middle of its stroke When the position is correct tighten the Adjusting Screws If Total Electrode Stroke Is GREATER than 0 5 inch Loosen the adjusting screws and move the LVDT up or down so that when the electrodes are open the LVDT is at its minimum stroke fully...

Страница 117: ...rform several welds before you program high or low limits for Initial Thickness Final Thickness or Displacement Look to see what your results are in the LAST Last Weld column You need to know what your typcial initial thickeness typical final thickness is typical displacement is so you have a reference point Run through this processs development as you would any other process so you can reasonably...

Страница 118: ... 0 63mm 0 100 2 54mm 0 025 0 63mm 0 025 0 100 0 63 2 54mm 0 100 2 54mm Similar to part Over 0 100 Similar to part Similar to part Before LVDT calibration you must tell the unit the thickness of the calibration gauge you will be using 1 Go to the MAIN MENU screen MAIN MENU 1 SETUP 5 COMMUNICATION 2 WELD COUNTER 6 RELAY 3 COPY A SCHEDULE 7 CALIBRATION 4 SYSTEM SECURITY 8 RESET TO DEFAULTS 9 CHAIN SC...

Страница 119: ...libration gauge thickness is entered there are two ways to calibrate the LVDT Quick Calibration Full Calibration The quick calibration procedure is designed to expedite the calibration of air operated Unitek Peco heads Otherwise use the full calibration Both processes are detailed below Quick Calibration Quick Cal The procedure sets a new zero position and recalibrates the LVDT For best accuracy t...

Страница 120: ...on procedure The screen on the right appears briefly then returns to the LVDT main run screen LVDT QUICK CAL QUICK CAL DONE PLEASE WAIT V ABORT CAL Full Calibration This procedure does not set a new zero point It merely establishes the calibration for the LVDT See Section IV Operating Instructions Set New Electrodes to Zero Use this procedure on automated machinery or in cases where the Unitek Pec...

Страница 121: ... value requested between the electrodes 9 Manually adjust the weld head so the electrodes are touching the part 10 Press down on the weldhead force tube until you hear the microswitch click LVDT CALIBRATION PUT THE GAUGE OF 0 100 in BETWEEN ELECTRODES CLOSE THE ELECTRODES AROUND THE PIECE THEN PRESS W MENU Previous menu then press the W button on the front panel as shown on the screen on the right...

Страница 122: ... DISTANCE edit RUN Run POSITION in the top row indicates the position of the top electrode relative to the bottom electrode This screen shows 092 which means that the top electrode is 0 092 away up from the bottom electrode The 7 digit number on the right side of the screen 3600277 in this example indicates the number of welds made The xx number shows the displacement as a percentage of the initia...

Страница 123: ...ure detailed above or perform the new zero procedure detailed below The preferred method is to set a new zero and recalibrate as detailed above To set a new zero without recalibration 1 From the LVDT keys section on the front panel press the NEW ELECTRODE key and the screen on the right appears 2 During the next weld the initial position will be set to 0 LVDT POSITION 092 0000000 LO LIM HI LIM LAS...

Страница 124: ...ial thickness of the parts is measured in 1 1000 of an inch or 1 100 of a mm As the electrode goes down the numbers decrease towards zero Initial thickness is measured at the end of squeeze time before the weld energy flows LVDT POSITION 092 0000000 LO LIM HI LIM LAST INITIAL 037 041 000 CONT FINAL 000 000 000 DISPLC 000 000 000 XX STOP ENERGY AT 000 XXXX IN 1000 NEW ELECTRODE IS SET VW Scroll SCH...

Страница 125: ...IAL 037 041 000 CONT FINAL 000 000 000 DISPLC 000 000 000 XX STOP ENERGY AT 000 XXXX IN 1000 NEW ELECTRODE IS SET VW Scroll SCHEDULE Select RUN Run 4 Use the numerical keypad on the front of the Control to enter a numerical value NOTE FINAL thickness is measured at the end of hold time after the weld You can put high and low limits around final thickness The Control will give you an alarm on the s...

Страница 126: ...GY AT displacement was programmed for 003 The STOP ENERGY AT number will always be less than the actual displacement The actual displacement was 010 as shown in the LAST WELD STOP DISPLC REACHED 8MS 0000283 LO LIM HI LIM LAST INITIAL 000 000 056 CONT FINAL 000 000 046 DISPLC 000 000 010 18 STOP ENERGY AT 003 008 IN 1000 NEW ELECTRODE IS SET SCHEDULE or DISTANCE Edit RUN Run column Last Weld The ti...

Страница 127: ...AULTS 9 CHAIN SCHEDULES NUMBER Select an item 3 Using the keypad on the front of the Control press a number corresponding to the relay you want to program NOTE When it first displays the RELAY 1 screen only displays two options RELAY 1 RELAY 1 ON WHEN ALARM 2 RELAY 2 ON WHEN ALARM 3 RELAY 3 ON WHEN ALARM 4 RELAY 4 ON WHEN ALARM NUMBER Select MENU Previous menu 1 SET RELAY TO ON 2 WHEN ALARM 4 Usin...

Страница 128: ...ange SET RELAY TO ON to SET RELAY TO OFF simply press the number 1 on the keypad on the front of the Control to toggle between ON and OFF 10 Using the keypad on the front of the Control press a number for the selection you want Example Press the number 2 for INITIAL LO RELAY 1 1 ANY 6 DISPLACEMENT LO 2 INITIAL LO 7 DISPLACEMENT HI 3 INITIAL HI 8 INITIAL NG 4 FINAL LO 9 DISPLACEMENT NG 5 FINAL HI 0...

Страница 129: ......

Страница 130: ...Remotely program weld schedules on the Control s Remotely program menu items on the Control s Remote Programming Most users will find the Weldstat software functions sufficient for collecting and using weld history information and remote schedule programming However advanced users may wish to perform additional programming for custom welding applications The codes needed to perform remote programm...

Страница 131: ...t be set to the same baud rate as the unit The computer hardware and operating system needed to support communication depends upon the RS 485 adapter or converter box used For a microprocessor based conversion such as the Edgeport USB converter from Inside Outside Networks the host computer should be at least a Pentium II 233 running Windows 98 Windows ME Windows 2000 Windows XP or Windows NT 4 0 ...

Страница 132: ...the baud rate selected on the unit This capacity is not an issue on RS 232 channels A good guideline is that on a line free of electrical noise the number calculated above must remain less that 70 of the theoretical maximum capacity Electrical noise on the communications lines will further reduce this capacity Shielded cables are recommended Several commands require the unit to be in HOST mode for...

Страница 133: ... by vertical bar indicates one OR another of choices presented REQUIRED OPTIONAL PARAMETERS enclosed in brackets one or more allowed used in the SET parameter zero allowed in the READ parameter RANGE OF PARAMETERS low_end high_end separated by hyphen END OF PARAMETER TERMINATOR crlf carriage return followed by linefeed TERMINATION OF COMMAND lf linefeed must be preceded by the end of line terminat...

Страница 134: ...rol to report the number of weld data accumulated since the last data collection Control returns the COUNT even if there is no weld data available Command ERASE crlf lf Control State Any Description Requests the Control to erase all the weld reports Command SYNC crlf lf Control State Any Description Provides synchronization of the commands The Control returns SYNC command back to the host computer...

Страница 135: ...nd the weld report OLD requests to send the number of oldest weld reports since the last data collection The reported weld data will be erased NEW requests to send the number of newest weld reports All the weld data will be erased after reported number the number of weld data to be sent If the number is greater than the number of weld data in the buffer less than the number of weld data will be se...

Страница 136: ...trol schedule parameters When used with the READ keyword all parameters pertaining to the currently loaded schedule are returned see SCHEDULE under Control ORIGINATED COMMANDS When the SET keyword is used the host may set change the value of one or more of the parameters pertaining to the currently loaded schedule The following is a list of valid literal substitutions for the parameter_name and va...

Страница 137: ...rements of 1 0 msec for 10 0 to 99 0 msec see table below HOST CONTROL Increments Range Time Range Increments 0 01 0 1 0 99 0 1 0 99 ms 0 01 0 1 1 00 9 90 1 0 9 9 ms 0 1 ms 1 0 10 00 99 0 10 0 99 0 ms 1 ms weld_energy is the parameter that specifies the amount of weld energy In the current feedback mode weld_energy is in unit of 0 001KA In the voltage feedback mode weld_energy is in units of 0 001...

Страница 138: ...f Limit Action for pulse 2 P1LDLY1 delay_value Pulse 1 Lower Delay Start Time Fo Lower Limit P1LDLY2 delay_value Pulse 1 Lower Delay End Time For Lower Limit P1UDLY1 delay_value Pulse 1 Upper Delay Start Time For Upper Limit P1UDLY2 delay_value Pulse 1 Upper Delay End Time For Upper Limit P2LDLY1 delay_value Pulse 2 Lower Delay Start Time For Lower Limit P2LDLY2 delay_value Pulse 2 Lower Delay End...

Страница 139: ...n_value Relay 1 Displacement ACTIVE2 HIGH LOW Relay 2 Active High or Active Low CONDITION2 condition_value Relay 2 Active Conditions DISPCOND2 disp_condition_value Relay 2 Displacement ACTIVE3 HIGH LOW Relay 3 Active High or Active Low CONDITION3 condition_value Relay 3 Active Conditions DISPCOND3 disp_condition_value Relay 3 Displacement ACTIVE4 HIGH LOW Relay 4 Active High or Active Low CONDITIO...

Страница 140: ...witch Type GRAPH OFF ON Update Graph WELDABORT OFF ON Footswitch weld abort DEBOUNCE NONE 10 20 30 Switch debounce time in msec These parameters pertain to the settings of the option menus available via the front panel user interface light_value is a number 0 to 100 for brightness of the LCD 0 is dark and 100 is the brightest loudness_value is a number 0 to 100 for buzzer loudness 0 is off and 100...

Страница 141: ...e calibration lock to ON Command KEY key_code crlf lf Control State Some key codes only function in certain states Description Process the key_code as if it was pressed from the front panel The followings are the key_code KEY DEC HEX KEY DEC HEX SQUEEZE 58 3A 5 53 35 UP 1 59 3B 6 54 36 WELD 1 60 3C 7 55 37 DOWN 1 61 3D 8 56 38 COOL 62 3E 9 57 39 UP 2 63 3F PERIOD 46 2E WELD 2 64 40 KA 4 04 DOWN 2 ...

Страница 142: ...ckness final_thick_hi high limit for final thickness displacement_lo low limit for final displacement displacement_hi high limit for final displacement displacement_wtd limit for weld to displacement IN 1000 MM displacement limit units CONT STOP initial thickness error action NOTES The units of the limit fields parameters depend on the value of the UNITS parameter as follows IN 1000 1 0 001 inches...

Страница 143: ...ring zero setting When used with the READ keyword the a d converter counts not actual position for the current zero setting of the upper electrode are returned When used with the CLEAR keyword the host may clear the zero setting and the upper electrode position at the start of the next weld will establish the new zero setting NOTE This zero setting is the reference position for the initial and fin...

Страница 144: ...d buffer did over run since the last data collection and only the latest 1500 weld data are available to report Command TYPE type release numbers revision letters crlf lf NOTE HF25 software lower than version 1 29 will not display release number or revision letter Control State Any Description Returns HF25 1 29L for a HF25 Command COUNT number crlf lf Control State Any Description Returns the numb...

Страница 145: ...average_voltage_1 peak_current_1 peak_voltage_1 average_power_1 peak_power_1 average_resistance_1 peak_resistance_1 _control_1 null_1 average_current_2 average_voltage_2 peak_current_2 peak_voltage_2 average_power_2 peak_power_2 average_resistance_2 peak_resistance_2 _control_2 null_2 disp_units disp_initial disp_final disp_displacement monitor_limit sea_reached sea_time The fields in the report p...

Страница 146: ...al Displacement initial thickness value disp_final Displacement final thickness value disp_displacement Displacement value initial minus final monitor_limit Monitor Limit Time Reached in msec sea_reached Stop Energy At Limit Reached 0 False 1 True sea_time Stop Energy At Limit Time in msec NOTE disp_xxxx values are signed integer values that have units that depend on disp_units as follows units 0 ...

Страница 147: ...is the number of data to be sent Then follows the packets of data Each data is separated by crlf and this command ends with crlf lf number_of_data This is the number of data that shall be included in this command The Control samples Voltage every 40 µs For a weld less than 100 ms weld time the number of data will be approximately total weld time 40 µs This number will be always less than 2000 data...

Страница 148: ...dex crlf EINDEX2 energy_index crlf lf Control State Any Reports the settings of the currently loaded Control schedule parameters The schedule_number variable identifies which schedule is currently loaded and may be any value from 0 to 99 squeeze_time and hold_time are the parameter that defines the time for the given period in 1 msec Valid range is from 0 to 999 weld_time is equivalent to 0 01 for...

Страница 149: ...INDEXx and EINDEXx are present resistance index is the index value into a table of resistance vs energy PID tables used for the last weld energy index is the index value into a PID energy vs PID values table used for the last weld Command RELAY crlf ACTIVE1 HIGH LOW crlf CONDITION1 WELD END ALARM LIMITS P1HI PILOW P2HI P2LOW DISP crlf DISPCOND1 ANY ILO IHI FLO FHI DLO DHI INI DSP WTD crlf ACTIVE2 ...

Страница 150: ...e parameters below P1LDLY1 delay_value crlf P1LDLY2 delay_value crlf P1UDLY1 delay_value crlf P1UDLY2 delay_value crlf P2LDLY1 delay_value crlf P2LDLY2 delay_value crlf P2UDLY1 delay_value crlf P2UDLY2 delay_value crlf lf Control State Any Description Reports the settings of the weld monitor of the currently loaded Control schedule The schedule_number variable identifies which schedule is currentl...

Страница 151: ...t_value is a number 0 to 99 for brightness of the LCD 0 is dark and 100 is the brightest loudness_value is a number 0 to 99 for buzzer loudness 0 is off and 100 is the loudest Command ALARM error_message crlf lf Control State Any Description Identifies the current error condition of operation of the Control May be in response to the ALARM READ command sent by the host or may be sent as a result of...

Страница 152: ... mm 10 0 1 mm Initial and final thickness are positive if the electrodes move farther apart and negative if they move closer together in relation to the zero setting The reference zero setting for thickness measurements may be set using the DISPZERO command see Host Originated Commands section Displacement is positive if the electrodes moved closer together during the weld and negative if they mov...

Страница 153: ......

Страница 154: ...nal weld current voltage or power to produce the heat required to form a weld The higher the weld force the greater the weld current voltage power or time required to produce a given weld The formula for amount of heat generated is I2 RT the square of the weld current I times the workpiece resistance R times the weld time T Welding Parameter Interaction Interaction of Welding Parameters HEAT Exces...

Страница 155: ...rass 2 14 Tinned Brass 14 Alumel 2 Chromel 2 Brass 2 14 Consil 2 Alumel 2 Dumet 2 Brass 2 14 Constantan 2 Aluminum 1 Aluminum 1 Brass 2 14 Copper 14 Aluminum 1 Aluminum Alloys 1 Brass 2 14 Tinned Copper 14 Aluminum 1 Cadmium Plating 1 Brass 2 14 Dumet 2 Aluminum 1 Tinned Brass 14 Brass 2 14 Nichrome 2 Aluminum 1 Tinned Copper 14 Brass 2 14 Nickel 2 Aluminum 1 Gold Plated Dumet 2 Brass 2 14 NiSpan ...

Страница 156: ...onstantan 2 Nichrome 2 Kovar Gold Plate 2 Stainless Steel 2 Constantan 2 Nickel 2 Magnesium 1 Magnesium 1 Copper 14 Copper 14 Molybdenum 2 Molybdenum 2 Copper 14 Dumet 2 Molybdenum 2 Nickel 2 Copper 14 Invar 2 Molybdenum 2 Tungsten 2 Copper 14 Karme 2 Nichrome 2 Nichrome 2 Copper 14 Manganin 2 Nichrome 2 Nickel 2 Copper 14 Nichrome 2 Nichrome 2 Cold Rolled Steel 2 Copper 14 Nickel 2 Nichrome 2 Sta...

Страница 157: ...ngsten 2 henium 2 Cold Rolled Steel 2 Cold Rolled Steel 2 Zinc 14 Zinc 14 Electrode Maintenance Depending on use periodic tip resurfacing is required to remove oxides and welding debris from electrodes Cleaning of electrodes on production line should be limited to use of 400 600 grit electrode polishing disks For less critical applications a file can be used to clean a badly damaged tip However af...

Страница 158: ...e weld is weak Increase the weld time in 1 msec increments Increase weld current voltage or power if a satisfactory weld achieved using 10 msec of weld time NOTE Actual weld strength is a user defined specification 7 Polarity as determined by the direction of weld current flow can have a marked effect on the weld characteristics of some material combinations This effect occurs when welding materia...

Страница 159: ...rates a typical weld strength profile The 14 lb electrode force curve shows the highest pull strengths but the lowest tolerance to changes in weld current voltage or power The 12 lb electrode force curve shows a small reduction in pull strength but considerably more tolerance to changes in weld energy Weld heat will vary as a result of material variations and electrode wear The 12 lb electrode for...

Страница 160: ...ties Basic resistance welding principles Weld profiles Approach to development Common problems Use of screening DOE S Use of factorial DOE S Resistance Welding A Material World The first stage in designing a quality welding solution is to consider the properties of the materials to be joined and also the quality requirements of the desired welded joint When considering these properties it is worth...

Страница 161: ...ed during the process or present as a plating or coating Soldered joints are typically achieved at temperatures less than 400 C and brazed joints such as Sil Phos materials melt at temperatures above 400 C A Solid State Joint A solid state joint can be formed when the materials are heated to between 70 80 of their melting point A Fusion Joint A fusion joint can be formed when both metals are heate...

Страница 162: ...r some of the more common materials used today in micro resistance welding The materials can be grouped into three common catagories The types of joints achievable within each of the main groups are as follows Group I Conductive Metals Conductive metals dissipate heat and it can also be difficult to focus heat at the interface A solid state joint is therefore preferred Typically resistive electrod...

Страница 163: ...state joint is therefore preferred The chart below gives some guidance on the type of joint that can be expected and design considerations required when joining materials from the different groups Group I Group II Group III Group I Copper Solid State W Mo electrodes Solid State Projection on Group I Solid State Fine projections on Group III Group II Steel Solid State or Fusion Solid state or braze...

Страница 164: ...to part and part to part resistances to cause multiple welding problems when welding resistive materials see below Conductive materials can be welded by using high contact resistance and fast heating as their bulk resistance is not high and cannot be relied upon for heat generation Part marking and surface heating Weld splash or expulsion Electrode sticking Weak welds If a weld is initiated when b...

Страница 165: ... in the weld Resistive materials benefit from slower heating rates that allow the contact resistances to reduce significantly thus bulk resistances become the major source for heat generation Weld Profiles The basic welding profile or schedule consists of a controlled application of energy and force over time Precision power supplies control the energy time and therefore heating rate of the parts ...

Страница 166: ...n is based on both the requirements of the application and process In general closed loop power supply technologies are the best choice for their consistent controlled output and fast response to changes in resistance during the weld for further details comparison see Unitek Equipment slide rule Approach to Weld Development The first stage in developing a quality welding process is to fix as many ...

Страница 167: ...g parameters The user should adjust the key welding variables energy force time in order to identify the likely good weld window The mini experiments should also be used to understand the weld characteristics from both application and process perspective Key factors in this understanding are listed on the next page Application Perspective Materials Resistivity melting point thermal mass Shape hard...

Страница 168: ...ld be used to fix further variables from an application and process perspective and also to establish a weld window for energy time and force This part of weld development is critical in order to proceed to a statistical Design of Experiments method of evaluation Random explosions or unexpected variables will skew statistical data and waste valuable time The figure above shows common welding probl...

Страница 169: ...tood multiple Screening DOE S may be required Unitek Equipment provides a simple Screening DOE tool that is run in excel and is sufficient for the majority of applications contact us for details Bespoke sophisticated software is also available from other vendors designed specifically for this purpose Criteria for Success Before running the series of experiments the user must establish an acceptabl...

Страница 170: ...ies of experiments a validation study can be run which looks at the consistency of results over time It is good practice to build in variables such as electrode changes and cleaning as well as equipment set up by different personnel to ensure that the solution is one that can run in a real production environment Welded assemblies should be tested over time an under real use conditions to ensure th...

Страница 171: ......
Страница 172: ...E 4 Common Problems D 9 Communication 3 4 Communication Role 3 4 Communications E 1 Command Format E 4 Computer Originated Commands E 5 Control Originated Commands E 15 Communications Protocol and Commands E 4 Host settings E 2 Overview E 1 Remote Programming E 1 RS 232 Serial Connector Information E 2 RS 485 Connectors E 1 Communications Protocol and Commands E 4 Compressed Air 4 2 Compressed Air...

Страница 173: ...meric Keys 1 7 Up Down Keys 1 7 LVDT Keys 1 9 Distance 1 9 New Electrode 1 9 Quick Cal 1 9 Mode Key 1 7 MENU Key 1 7 RUN Key 1 7 Monitor Keys 1 8 KA 1 7 KW 1 8 Peak Average 1 8 Resistance Ω 1 8 V 1 8 WELD NO WELD Switch 1 9 Final Thickness D 12 Firing Switch 3 11 Foot Pedal Actuated Weld Head Connection 2 6 Footswitch Weld Abort 3 10 Force Firing Switch Input B 4 Front Panel Data Entry and Mode Co...

Страница 174: ...air Service 5 10 Troubleshooting 5 2 Alarm Messages 5 3 Troubleshooting 5 2 Major Components 1 4 Material Properties D 3 Material Variables D 7 Mechanical 3 12 Mechanical Selection 3 3 Mechanical Switch Normal Closed 3 3 Mechanical Switch Normal Open 3 3 Melting Point D 3 Menu Key 1 7 Menu State 3 15 Menus 3 1 Mode Key 1 7 Monitor Keys 1 8 Monitor Output B 19 Monitor State 3 17 N New Electrode 1 9...

Страница 175: ...7 Power Supply Variables D 7 Process Variables D 7 Quality Requirements D 7 Weld Head Mechanical Variables D 7 Basic Principles D 4 Common Problems D 9 Criteria for Success D 10 D 11 Factorial DOE s D 11 Initial Welding Trials D 8 Application Perspective D 8 Process Perspective D 8 Introduction D 1 Material Properties D 3 Conductive Metals D 3 Electrical Thermal Conductivity D 3 Hardness D 3 Melti...

Страница 176: ...Shipping Kit Contents A 4 Weld Energy Limits Monitoring A 2 Weld Head System Compatibility A 2 Test State 3 15 Time Energy Selector Keys 1 6 Troubleshooting 5 2 Two Level Foot Switch Input B 6 U Update Graph After Weld 3 14 Upslope Downslope Weld Profile 3 24 Upslope Downslope Weld Schedule 4 5 Using HF25 Welding and Monitoring Functions 3 19 Using Programming Functions 3 1 Menus 3 1 Main Menu 3 1...

Страница 177: ...g Applications 3 19 Weld Head Applicability 3 20 Weld Head and Mechanical Variables D 7 Weld Head Applicability 3 20 Weld Head Connections 2 4 Weld Head System Compatibility A 2 Weld Monitor 3 27 Active Part Conditioner APC 3 27 How It Works 3 28 Energy Limits 3 29 Introduction 3 27 Pre Weld Check 3 30 Weld Period Selector Keys 1 6 Weld Profiles D 6 Weld Schedule Definition 3 22 Weld Schedule Deve...

Отзывы: