background image


17 


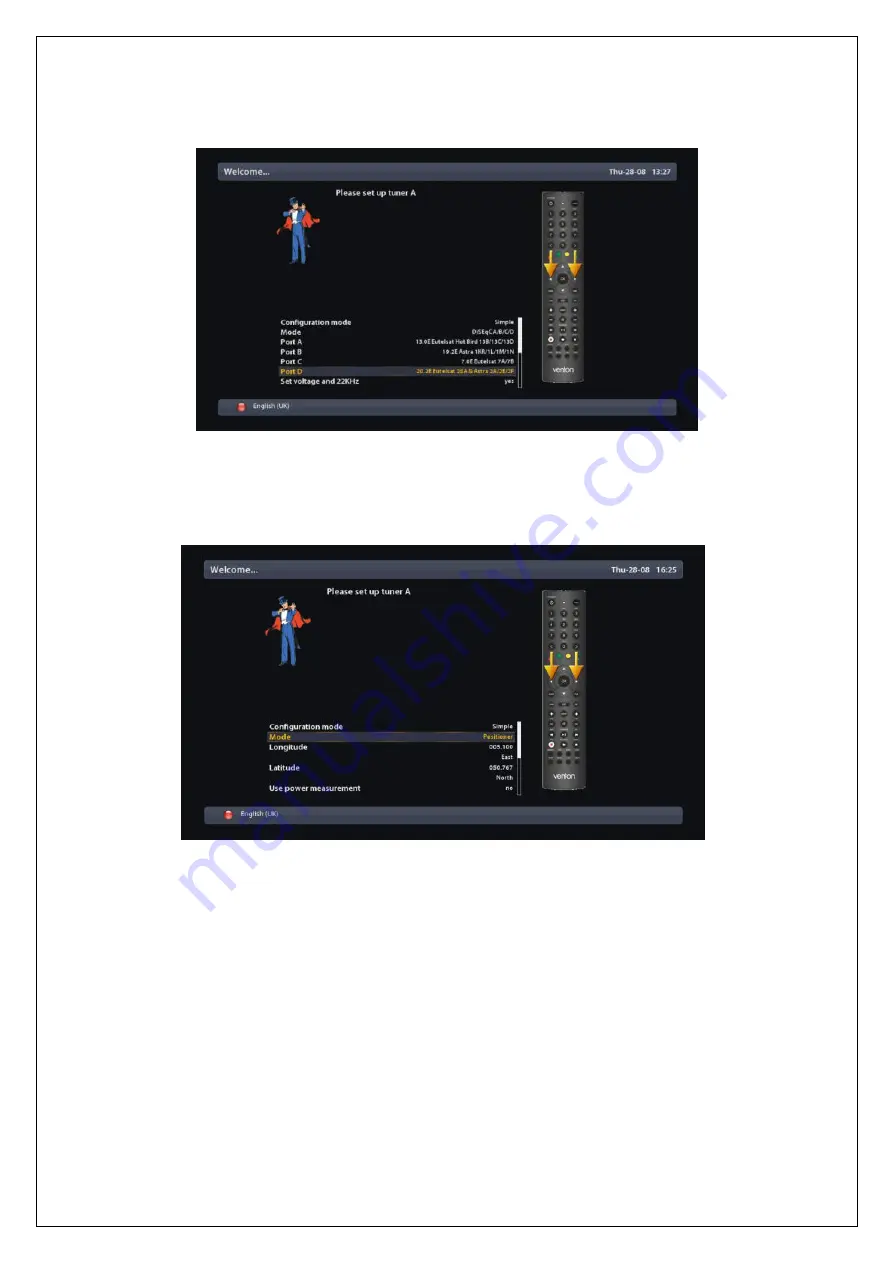
DiSEqC A/B/C/D 

 
This option allows you to configure four satellites in Port A, Port B, Port C, and Port D. 


Positioner 

 
This option is used when you have a motorized satellite antenna. 


Step 7. Configuring Tuner B 

 
This step is for the configuration of TUNER B Input and the process is same as that of Tuner 
 

A. For further information please refer to the above “Step 7. Configuring Tuner A” section.


Step 8. Network Setup 

 
Here you can configure Your network connection automatically. You need to press OK to enter Network Setup 


Содержание HD ECO+

Страница 1: ...Personal Video Recorder Digital Satellite Receiver The UNIBOX HD ECO digital receiver is fully compliant with the international Digital Video Broad casting DVB standard and thus is able to receive di...

Страница 2: ...let and contact authorized service personnel he power cord or supply is damaged Liquids of any kind have been exposed to the product The product has been dropped or the casing has been damaged The pro...

Страница 3: ...roduct or hold the power cord with wet hands as the risk of getting electronic shock is very high Unplug the product and disconnect the LNB cable during a thunderstorm or when left unattended and unus...

Страница 4: ...nnecting Satellite Cables 11 A Two Separate Satellite Cables 11 B Connecting TV via HDMI Cable 11 C Connecting TV via Component Cable 11 D Connecting TV via RCA Video Cable 11 E Connecting TV and VCR...

Страница 5: ...figuration 35 5 1 Main Menu 35 5 2 System Configuration 36 5 3 System Setup 36 5 3 1 System Configuration 37 A V Settings 37 Auto language selection 38 Buttons Setup 39 Customization 39 Channel select...

Страница 6: ...andard For its operation you need an antenna which must be installed appropriately 2 1 Main Features 400 MHz MIPS Processor Linux Operating System Media Player Downloadable Plug ins supported 2 x Smar...

Страница 7: ...ed to other satellite tuner 6 AUDIO L Connects to TV using RCA cable 7 S PDIF Optical Connects to a digital audio system using S PDIF cable 8 TV SCART A SCART connector is provided for TV using SCART...

Страница 8: ...k of the menu PIP Used to open Picture in Picture VOL Adjust the audio volume CH Navigates through the scanned channel list AUDIO Displays the audio track option to choose e g AC3 Stereo MUTE Mutes th...

Страница 9: ...ports To be able to watch channels that are encrypted in such CAS as Nagravision NDS Irdeto Viaccess etc users need to purchase a CAM that is corresponding to each CAS as well as Smartcard to decrypt...

Страница 10: ...ion CCIR601 720 x 576 lines 576p 720p 1080i 1080p 30 Video decoding MPEG 2 MPEG 4 compatible Input data rate 2 45 MSymb s S N 53 dB Audio Decoding AC3 MPEG 4 AAC HE MPEG 1 Layer1 2 and 3 Sampling rate...

Страница 11: ...to ensure the highest picture quality In the rear panel of UNIBOX HD ECO one HDMI connector is available for this purpose Connect your TV to UNIBOX HD ECO using a HDMI cable C Connecting TV via Compon...

Страница 12: ...HD ECO ON or OFF Complete Power Shutdown There is a Power Switch in the rear panel and once it is ON you do not need to turn it on or off each time It takes a longer time to boot the system if you tu...

Страница 13: ...he previous page Step 1 Video Input Selection UNIBOX HD ECO will automatically probe the video input port Press OK if you can see this page on your TV Or you can select a different input port HDMI SCA...

Страница 14: ...lection UNIBOX HD ECO provides various languages and here you can choose the main language for your UNIBOX HD ECO Use UP DOWN key to scroll up and down to find the language you want Step 5 Configuring...

Страница 15: ...ation Modes Not configured Simple Loop through to mode to make the TUNER 1 be internally connected to the TUNER 2 Equal to mode to use the same configuration as that of Tuner B Advanced for an advance...

Страница 16: ...e with a single LNB The cable from LNB is directly connected to UNIBOX HD ECO ToneBurst A B This option is used if you want to receive two satellites using a ToneBurst switch DiSEqC A B This option al...

Страница 17: ...rized satellite antenna Step 7 Configuring Tuner B This step is for the configuration of TUNER B Input and the process is same as that of Tuner A For further information please refer to the above Step...

Страница 18: ...should be automatic or manual 4 0 First use 4 1 Channel List How to use Press UP DOWN If press Navigation UP DOWN key this will activate Channel Selection Menu Four types of the channel lists are ava...

Страница 19: ...plays the list of all scanned channels GREEN It displays the list of all satellites scanned Per each satellite channels are arranged according to Services Provider and New YELLOW It displays the list...

Страница 20: ...by Pressing UP or DOWN key Go to All lists by pressing RED key Select the channel that you want to add to the Favorites list Press MENU key on the selected channel and the following menu appears Choos...

Страница 21: ...t channel of the current channel is tuned in CHANNEL key If you press CHANNEL key the previous or subsequent channel of the current channel is tuned in Channel Number Enter a channel number and it wil...

Страница 22: ...ecording is in progress CAS Encrypted program Dolby Digital Highlighted when the program provides digital audio 1280x720 Screen resolution RED to activate recording GREEN to call up Subservices if ava...

Страница 23: ...o sound NOTE Available options on this menu will differ depending on the service 4 6 Subtitle How to use Press SUBTITLE You can view the subtitle of the current program if the program provides the sub...

Страница 24: ...nts stored on the internal HDD and or a USB memory stick plugged into UNIBOX HD ECO If you play Media Player the following player will appear Go into any directory of the HDD or plugged USB Select a f...

Страница 25: ...This option is used to EXIT from menu GREEN This option is used to save settings 4 9 Teletext How to use Press TXT You can call up Teletext information by pressing TEXT key It will take some time to l...

Страница 26: ...VOLUME key If you want to enlarge the page press VOLUME key VOLUME Key If you want to reduce the page size press VOLUME key 4 10 Electronic Program Guide How to use Press INFO key The Electronic Progr...

Страница 27: ...rvation Select Record for recording reservation Repeat Type Select Once for one time of zapping or recording reservation Select Repeated for repeated zapping or recording reservation Repeats This opti...

Страница 28: ...PG Press BLUE to activate EPG Selection Multi EPG window You can move the previous or next program within the same channel by using YELLOW Previous BLUE Next NOTE Not all channels provide EPG informat...

Страница 29: ...n will appear on the top side of the screen In this state Timeshifted recording is running until you press either PLAY or PAUSE again You can restart viewing of the program If you want to stop Timeshi...

Страница 30: ...Recording How to use Press REC button Press REC key to start the recording of the current program Five recording options are given Add recording stop after current event This option is used when you w...

Страница 31: ...ing running without a specific end time Recording will continue unless you stop it Don t record This option is used to exit from this menu without recording Recording by Timer How to use Press Timers...

Страница 32: ...d a timer YELLOW Disable This option is used to disable the timer and X mark will appear NOTE if you want to enable the disabled timer press YELLOW again BLUE Cleanup This option is used to remove tho...

Страница 33: ...cient recording might stop before the defined end time Stop Recording How to use Press RED Stop Recording If you want to stop recording press RED again while recording is running Select Stop Recording...

Страница 34: ...fobar gives you the following information of the recording Title of the recording Total duration of recording Remaining time Progressive bar Elapsed time 4 14 Managing Recording Files How to use Press...

Страница 35: ...tem Configuration UNIBOX HD ECO is a very sophisticated device designed to allow users a variety of system setting options as detailed as possible You can fine tune your UNIBOX HD ECO to be your OWN s...

Страница 36: ...Channel About menu provides the detailed information of the H W and S W system of your UNIBOX HD ECO Devices menu provides the detailed informations about connected tuners and connected devices Memor...

Страница 37: ...uration How to use Press MENU Setup System Here you can find most of the necessary settings that you might need to optimize your UNIBOX HD ECO in the way you like it Please read the followings careful...

Страница 38: ...NO is used when you do not want to set Dolby Digital audio as the default audio If the program you are watching has AC3 and Stereo audio Stereo audio is used AC3 Downmix YES is used when you want to...

Страница 39: ...nge actions after press OK button Customization In this menu you will find various customization options and this menu can be displayed in three different formats Simple Intermediate and Expert NOTE R...

Страница 40: ...tp streams Send ECM while streaming Descramble http streams Descramble streaming After PowerLost You can setup action what happens after power cut Boot up action You can setup action what box should d...

Страница 41: ...argin before record minutes If you enter a number here for example 5 the recording will begin 5 minutes before the defined time If it is 0 it means that the recording starts exactly at the defined tim...

Страница 42: ...n How to use Press MENU Setup System Language A variety of languages are available for the OSD of UNIBOX HD ECO Selecting Time Zone How to use Press MENU Setup System Timezone Using LEFT RIGHT key you...

Страница 43: ...ation of time after which HDD is to be put into standby mode Here you can choose from No standby 10 or 30 seconds 1 2 5 10 20 30 minutes 1 2 4 hours Once you set this option press GREEN key to confirm...

Страница 44: ...Network Configuration menu you will see five sub menus as follows Adapter settings Through this menu you can set the basic Ethernet configuration User Interface YES is used to activate the Ethernet I...

Страница 45: ...his option is required if you selected not to use DHCP You need to enter the address of the Nameserver Network test When you are not sure whether the network configuration has been done correctly or n...

Страница 46: ...quires a complete system shutdown Please wait patiently until the system reboots with a newly selected Skin 5 3 2 Service Searching How to use Press MENU Setup Service Searching Here you setup the tun...

Страница 47: ...ration menu Tuner Configuration DVB T2 How to use Press MENU Setup Service Searching Tuner Configuration Use UP DOWN to select the DVB T Tuner and press the OK button The Reception settings menu will...

Страница 48: ...s used to scan the transponder TP based on the data that your UNIBOX HD ECO currently has YES is used to scan the TP not just based on the existing TP data but also using new TP data if there is TP da...

Страница 49: ...o using this menu You need to enter a new PIN code twice Protect services You need to set this option at YES if you want to lock certain channels with PIN code Parental control type This option will b...

Страница 50: ...d service list as well as all configurations run the Factory Reset process Select YES in the below menu to run the factory reset Upon the completion of factory reset process your UNIBOX HD ECO will re...

Страница 51: ...arranged in four sections as below Service info PIDs Transponder Tuner Status System Information How to use Press MENU Information About This menu is for you to check the current system of your UNIBO...

Страница 52: ...etup N A Video enhancement settings Video Enhancement Setup N A Customize Setup N A Record Setup N A Subtitle settings Setup N A Display Setup Setup N A Auto language selection Setup N A Harddisk Hard...

Страница 53: ...finder N A Common Interface Slot1 N A N A Parental control Parental control setup N A N A Factory reset N A N A N A Cross EPG Configure N A N A XMLTV providers N A N A OpenTV providers N A N A XEPGDB...

Страница 54: ...Wizard N A Backup system settings Command Execution N A Restore system settings N A N A Install local extension N A N A Advanced Options Advanced restore Restore Choose backup location N A Choose back...

Страница 55: ...channel is currently on air Check if the selected channel is encrypted and if you have a corresponding access smartcard 2 Problem with audio quality Check if your audio cable is connected correctly Ch...

Страница 56: ...e pieces of it in new free programs and that you know you can do these things To protect your rights we need to make restrictions that forbid anyone to deny you these rights or to ask you to surrender...

Страница 57: ...n you must cause it when started running for such interactive use in the most ordinary way to print or display an announcement including an appropriate copyright notice and a notice that there is no w...

Страница 58: ...d to patent issues conditions are imposed on you whether by court order agreement or otherwise that contradict the conditions of this License they do not excuse you from the conditions of this License...

Страница 59: ...ny kind either expressed or implied Including but not limited to the implied warranties of merchantability and fitness for a particular purpose The entire risk as to the quality and performance of the...

Отзывы: