APPENDIX B
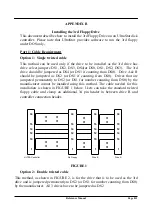
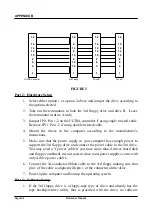
FIGURE 2
Part 2: Hardware Setup
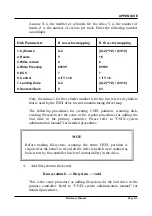
1. Select either option 1 or option 2 above and jumper the drive according to
the option selected.
2. Take out the terminators in both the 3rd floppy drive and drive B. Leave
the terminator in drive A only.
3. Jumper JP11 Pin 1-2 on the ULTRA controller if using single twisted cable.
Remove JP11 Pin 1-2 if using double twisted cable.
4. Mount the drives in the computer according to the manufacturer’s
instructions.
5. Make sure that the power supply in your computer has enough power to
support the 3rd floppy drive and connect the power cable to the 3rd drive.
You may need a Y power cable if you have more than 4 drives (hard disk
and floppy combined) in your system since most power supplies come with
only 4 drive power cables.
6. Connect the 34-conductor ribbon cable to the 3rd floppy making sure that
pin 1 of the cable is aligned with pin 1 of the connector on the drive.
7. Power up the computer and boot up the operating system.
Part 3: Software Setup
1. If the 3rd floppy drive is a floppy-tape type of drive and already has the
tape backup/retrieve utility that is provided with the drive, no software
Page B-2
Reference Manual
34
16
14
12
10
8
6
4
1
34
4
14
6
10
8
12
16
1
34
16
14
12
10
8
6
4
1
34
10
12
14
16
8
6
4
1
ULTRA Controller
3rd Floppy
Drive B
Drive A
Содержание ULTRA 12F24
Страница 1: ...ULTRASTOR CORPORATION ULTRA 12F24 ESDI CONTROLLER INSTALLATION MANUAL REVISION A 4 1 92...
Страница 2: ......
Страница 22: ...This Page Left Intentionally Blank...
Страница 28: ...This Page Left Intentionally Blank...
Страница 38: ...This Page Left Intentionally Blank...
Страница 44: ...This Page Left Intentionally Blank...
Страница 46: ...This Page Left Intentionally Blank...
Страница 48: ...This Page Left Intentionally Blank...
Страница 49: ...NOTES...
Страница 52: ...ULTRASTOR CORPORATION...


