background image

www.ultraoptics.com 


 page 9 

and be separated from the tray.  If the bar code is facing the wrong direction, the system will not 
be able to properly process the work. 


The conveyor on the front of the 44R will pull trays into the machine as space permits.  The 
system controller will monitor the presence of trays and allow them to move forward by 
actuating stop pins located on the bottom of the conveyor. 

Loading Re-Work 

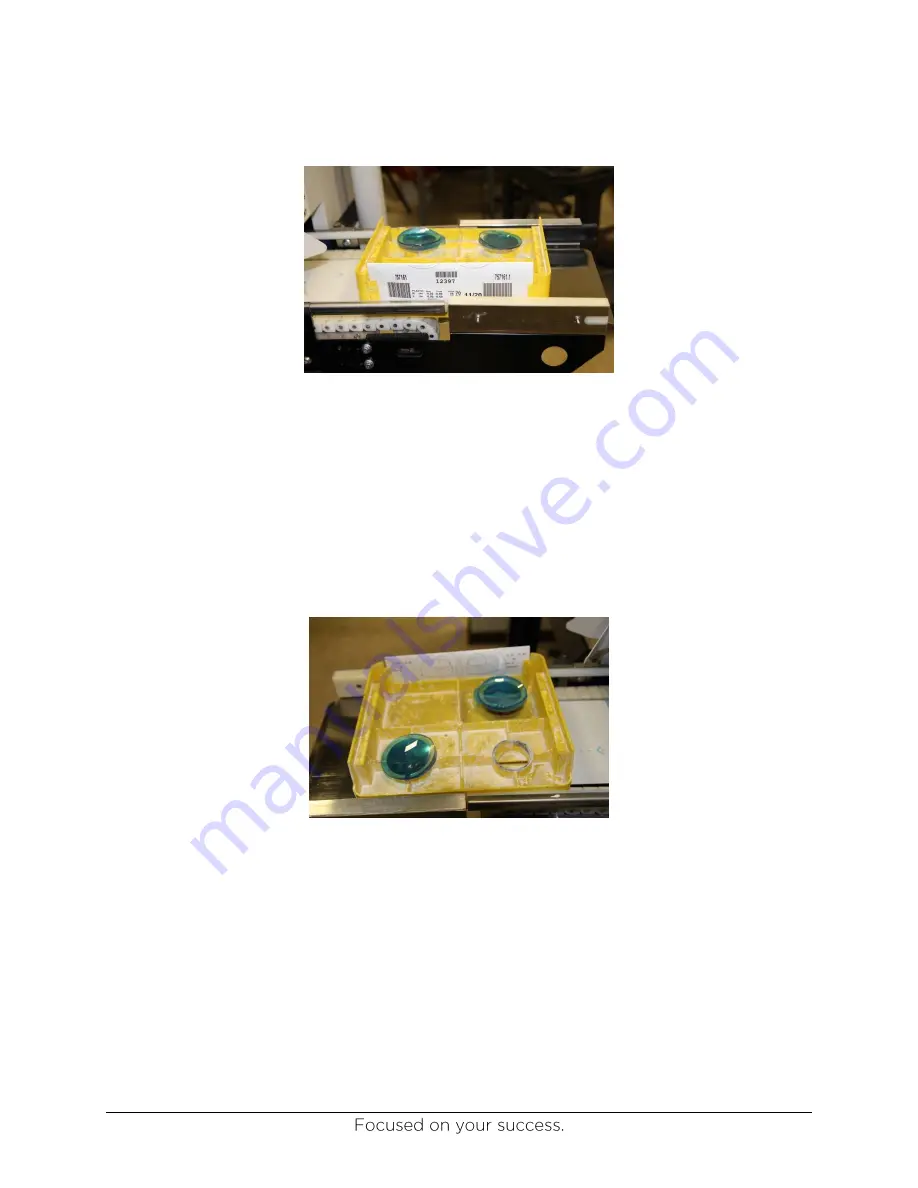
If the need arises to coat just one lens out of a pair on a particular job, simply place the lens that 
does not need to be coated onto the opposite side of the tray and keep the lens that does need 
to be coated in one of the standard locations on the tray as shown in the following picture.  This 
allows the processing of a single lens from a pair, without the two lenses being physically 
separated and risk of misplacement. 


Содержание 44R

Страница 1: ...www ultraoptics com...

Страница 2: ...R and the Ultra Care Program is Ultra Optics latest innovation in a rich history of designing and manufacturing the most accurate and robust lens coating machines available If after reading this manua...

Страница 3: ...he manual supplied by the component manufacturer for the most accurate and current information regarding that item and its particular use Any information in the component manufacturer s manual shall t...

Страница 4: ...s manual appropriate personal protective equipment PPE should be worn The PPE may include but is not limited to safety glasses protective gloves lab coat or smock WARNING This machine uses high voltag...

Страница 5: ...rocess 3 Dry process 3 Coating application 4 Cure process 4 System Operation 6 Start up Procedure 6 Communication With Lab Management System 7 Work Feed into the Machine 8 Loading Re Work 9 Recovery f...

Страница 6: ...r 36 Coating sensor 36 UV sensor 37 Conveyor blocked sensor 37 Water sensor 37 Lift cylinder up and down sensor 37 Vacuum Sensor 37 Replacing the Spindle Motor Assembly 38 Replacement Adjustment of th...

Страница 7: ...automation This innovative system utilizes an industrial standard robotic arm to automatically load unload lenses from the trays into the coating machine The lenses while still on the block are brough...

Страница 8: ...cally by the system PLC Lens Load Unload Lenses are loaded and unloaded into the machine by making use of a robotic arm The motion of the arm is controlled by the robot s controller utilizing input co...

Страница 9: ...downstream of the pump is emptied through the dump valve The system PLC actively monitors input from the water quality sensor and all system sequencing to control the water pump and solenoid valves Th...

Страница 10: ...the pump will stop and the spin speed of the lens changes to a new value which will generate the proper film thickness of coating based upon the specific coating being used The timing and spin speeds...

Страница 11: ...is lamp is used to effectively cure the coating to the lens with the proper characteristics of adhesion hardness etc The PLC monitors the intensity of the lamp and the timing of the curing process bas...

Страница 12: ...is to be run after it was previously shut down by turning off the air supply and pressing the Power button near the touchscreen 1 Perform all of the daily activities listed in the Scheduled Maintenanc...

Страница 13: ...ce the bar code is scanned the 44R controller will communicate with the LMS software to determine how the job should be processed After passing the job identification number to the LMS a code which re...

Страница 14: ...lens do not apply coating 3 Wash dry and coat the lens Work Feed into the Machine Work will be fed into the machine in the standard lens trays The blocked lenses need to rest in the tray with the bac...

Страница 15: ...hem to move forward by actuating stop pins located on the bottom of the conveyor Loading Re Work If the need arises to coat just one lens out of a pair on a particular job simply place the lens that d...

Страница 16: ...o stop processing lenses 1 Press Reset Alarm 2 If lens is still on the robot open door and grab the lens 3 Press the Robot Vacuum button and this will release the lens on the robot suction cup 4 Retur...

Страница 17: ...www ultraoptics com page 11 6 Return the lens to its correct tray position as shown on the recovery screen 7 If there is a lens over the Cure position close the door and press the Spindle Down button...

Страница 18: ...is down press the Lamp Cycle button This will cure the coating on this lens 9 When the lamp cycle button turns from green to red the cycle is complete 10 Press the Spindle Down button again and this w...

Страница 19: ...ad unload position then press Release Lens button 13 Return the lens to its correct tray positon as shown on the recovery screen 14 Unload any remaining lenses that are in the machine using the procee...

Страница 20: ...www ultraoptics com page 14 16 Press Diagnostics tab 17 Press Manual Controls on off button to turn on manual controls...

Страница 21: ...www ultraoptics com page 15 18 Press Manual Controls screen button 19 Turn Conv Sol 1 2 3 and 4 buttons on...

Страница 22: ...utton to turn on conveyer This will clear all trays from the machine 21 Press Conveyer button again to turn off conveyer once all trays are out 22 Reload trays that have uncoated lenses to the infeed...

Страница 23: ...www ultraoptics com page 17 24 Press Manual Controls on off button to turn off manual controls 25 Press Auto Mode tab...

Страница 24: ...www ultraoptics com page 18 26 Press Auto Cycle button to start production...

Страница 25: ...acetone or IPA to wipe out the inside of the coating bowl and clean the screen Empty drain tee and clean screen On bottom of wash bowl is a tee trap Remove the bottom plug and clean out any debris fr...

Страница 26: ...ir flow Hold tissues over openings and confirm the tissue blows out away from the machine Hepa fans should be on high setting at all times Replace suction cups Robot blue P N VC 32W 1 8MPT Spindle yel...

Страница 27: ...s to ensure secure handling of the lenses through the system This procedure may also be required if the system gets inadvertently adjusted and no longer properly picks or places lenses into the machin...

Страница 28: ...www ultraoptics com page 22 3 Select the Control Panel tab on the Robot Manager window 4 Select the Motor On option 5 Click Yes to confirm...

Страница 29: ...ptics com page 23 6 Select the tab for Jog Teach 7 Select the Execute Motion Tab 8 Select Point 01 if machine operates left to right or Point 23 if machine operates right to left from the Destination...

Страница 30: ...www ultraoptics com page 24 9 Select Execute 10 Select Yes to confirm 11 Move Z Axis Until aligning pin is just above calibration tool...

Страница 31: ...Control Panel tab and turn Motor Off 13 With Motor Off selected depress the white button next to Motor Indicator light 14 Move aligning pin into the hole in the calibration tool until it is at the mar...

Страница 32: ...raoptics com page 26 16 Select Jog Teach tab then select the Teach Points tab 17 Select the Teach option 18 Select Yes to Re Teach Point 01 if machine is left to right or Point 23 if machine is right...

Страница 33: ...Point 00 if machine is left to right or Point 22 if machine is right to left from the Point drop down menu 20 Select the Teach option 21 Select Yes to Re Teach Point 00 if machine is left to right or...

Страница 34: ...www ultraoptics com page 28 22 Select the Points tab 23 Change the Z axis for AboveLens1A to 42 525 24 Select Save to save new value...

Страница 35: ...ltraoptics com page 29 25 Select the tab for Jog Teach 26 Select the Execute Motion Tab 27 Select Point 01 if machine is left to right or Point 23 if machine is right to left from the Destination drop...

Страница 36: ...www ultraoptics com page 30 28 Select Execute 29 Select Yes to confirm 30 Select AboveLens1B from the Destination drop down menu...

Страница 37: ...Tray Position 1 and place in Tray Position 2 and repeat calibration steps Calibrating the Cognex barcode scanner From time to time it may be necessary to re calibrate the barcode scanner This may resu...

Страница 38: ...www ultraoptics com page 32 2 Double click on the DM60 device 3 Click OK if this warning pops up 4 Under File select Restore Device...

Страница 39: ...www ultraoptics com page 33 5 Click on Quick Setup 6 Click on Live Display 7 With a barcode in front of the reader click on Tune...

Страница 40: ...www ultraoptics com page 34 8 Click on Optimize Brightness 9 Under File Select Save Configuration 10 Select Yes to save to non volatile memory 11 Close Software...

Страница 41: ...t module 4 Pull out old light module by the handle 5 Insert new light module 6 Insert mounting screws into new light module 7 Close cure station door 8 Attach light side panel to machine Spindle Sucti...

Страница 42: ...way from flagging mechanism 6 Tighten jam nut 7 Reconnect signal cable Conveyor position proximity sensor 1 Two people need remove front cover of machine 2 Remove the 12 screws holding the conveyor pl...

Страница 43: ...racket 3 Attach new sensor 4 Do not adjust dials on this sensor Water sensor 1 Turn off water 2 Disconnect power and signal cables to the sensor 3 Unscrew nut at base of sensor DO NOT REMOVE coupler f...

Страница 44: ...nd unplug both orange air lines 5 Remove both flow control elbows 6 Remove the four bolts on the top of the actuator mounting bracket 7 Loosen the four bolts on the suction cup tool to separate the to...

Страница 45: ...1 coating 12 If adjustment needs to be made use adjustment knob in right panel labeled Coat Spin Off 13 Turn the Coat Spin Off option off 14 With the Spindle Coat option still on turn on Wash Speed 1...

Страница 46: ...80 PSI 5 Push adjustment cap back up to lock in place Replacement Adjustment of the Conveyor Drive Belt 1 Remove the drive belt housing cover 2 To replace belt a Loosen the tension pulley using the to...

Страница 47: ...e in correct tray position R0187 Failed To Load Lens Spindle 4 Robot was unsuccessful in loading a lens into spindle 4 Two attempts were made Check robot pick points for calibration servo motor indexi...

Страница 48: ...bot status for any alarms e stop or that enable I O remote was not activated on Epson software when a laptop was connected to controller R0007 Robot Not Starting The robot running signal to the PLC is...

Страница 49: ...gauge or bad wiring connection at vacuum gauge R019E Spindle 3 No Spin The lens orientation sensor did not read anything Check that motor is turning orientation sensor is properly adjusted and that se...

Страница 50: ...is working tray 2 sensor is not stuck on R018A Tray 3 Failed To Move Check that tray 3 is not blocked from moving Tray stop 3 actuator is working tray 3 sensor is not stuck on R0189 Tray 4 Failed To...

Отзывы: