background image


EVK-R2 - User Guide 

UBX-16016088 - R10 

Appendix  

Page 17 of 27 


Appendix  

A


Setting up AT terminal applications for 
communication with EVK-R2 

The u-blox m-center cellular module evaluation tool is a powerful platform for evaluating, configuring 
and testing u-blox cellular products. m-center includes an AT commands terminal for communication 
with the device and can be downloaded free-of-charge from our website (http://www.u-blox.com). 
 

1.


Follow the board setup instructions in section 

1.8

 to provide all the required connections and 

switching on the cellular module. 

2.


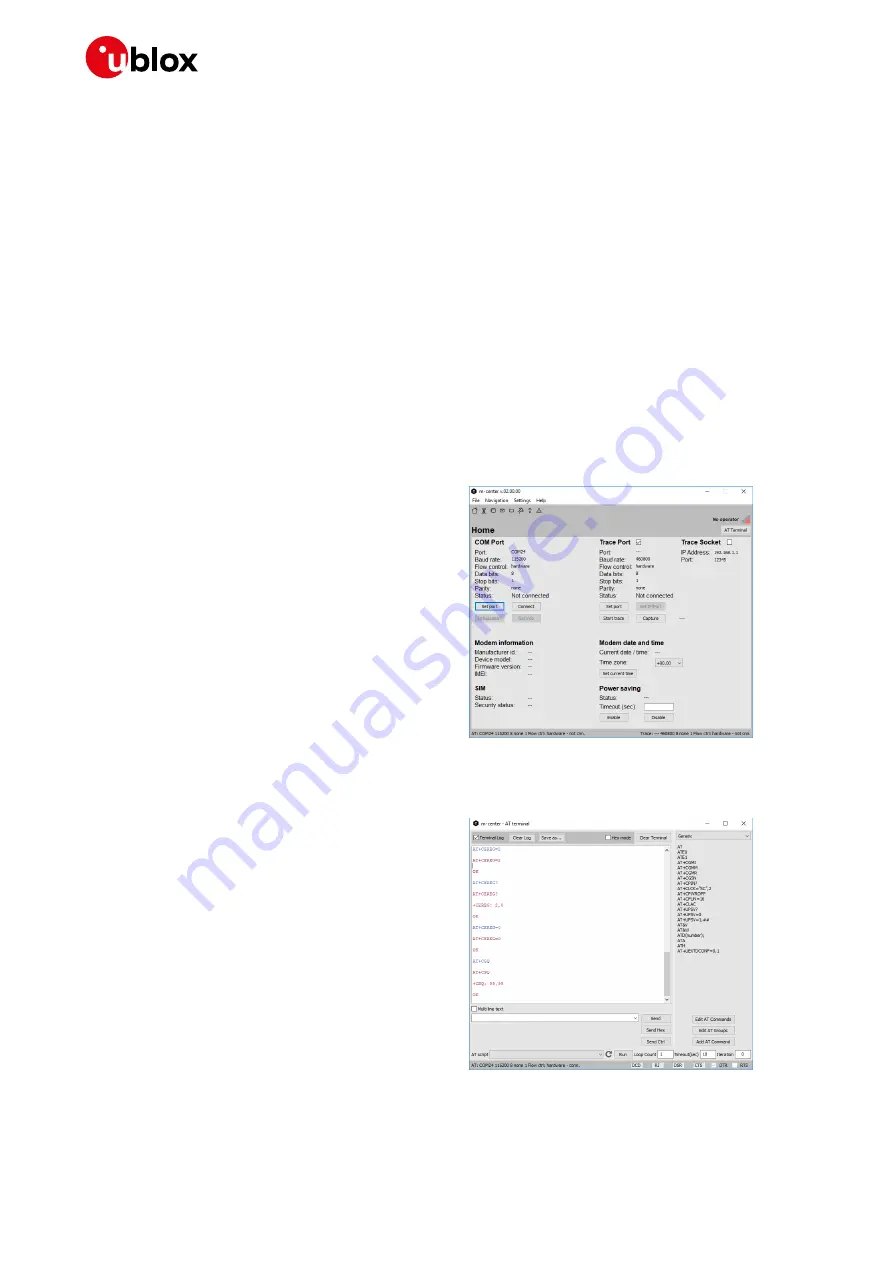
Run the m-center tool: after the m-center start-up, the Home page appears. 

 
3.


On the Home page, set up the AT COM port; 
for the setting values see sectio

1.8

. 

Check with the Windows Device Manager to 
find out which COM port is being used by the 
EVK-R2. 


Figure 4: “Home” page 

 
4.


Enable  the  connection  to  u-blox  cellular 
module by clicking on the Connect button. 

 
5.


Retrieve the module and network information 
by clicking on the Get Info button. 

 
6.


The  module  information  is  retrieved  and 
displayed on the Home page. 

 
7.


Click on the AT Terminal button, found at the 
upper right of the Home page. A new window 
opens and the AT-command terminal is now 
ready for communication with the EVK-R2. 


Figure 5: AT Terminal window 

8.


The AT terminal is ready to use. 
For the complete list of AT commands 
supported by the modules and their syntax, 
see the u-blox AT Commands Manual


[1]

. 

For more information on using the u-blox m-center cellular module evaluation tool, press the F1 key 
on the keyboard to open the m-center help window on the computer. 

Содержание EVK-R2

Страница 1: ...on Kits User Guide Abstract This guide explains how to set up the EVK R2 Evaluation Kits to begin evaluating the u blox TOBY R2 and or LARA R2 series cellular modules supporting LTE Cat 1 3G 2G radio...

Страница 2: ...Product status EVK R200 EVK R200 00B 00 30 31 A01 01 UBX 17006265 Mass Production EVK R202 EVK R202 00B 00 30 31 A01 01 UBX 17006265 Mass Production EVK R203 EVK R203 00B 00 30 39 A01 00 UBX 17048311...

Страница 3: ...15 1 11 Registration on a cellular network 16 1 12 Enable audio codec configuration to provide voice capability 16 1 13 Switching off the EVK R2 16 Appendix 17 A Setting up AT terminal applications f...

Страница 4: ...available with u blox LARA R2 cellular modules see Figure 2 EVK R203 evaluation kit is for evaluation of LARA R203 EVK R204 evaluation kit is for evaluation of LARA R204 EVK R211 evaluation kit is for...

Страница 5: ...connector J200 DIL B2B connector J201 GND GNSS antenna connector J103 GNSS module GNSS adapter board Cellular VCC supply jumper J404 Cellular USB UART J501 Cellular RS232 UART J500 DL501 DL403 DL405 G...

Страница 6: ...connector J300 DIL B2B connector J301 GND GNSS antenna connector J103 GNSS module GNSS adapter board Cellular VCC supply jumper J404 Cellular USB UART J501 Cellular RS232 UART J500 DL501 DL403 DL405 G...

Страница 7: ...hree boards The lower one called EVB WL3 contains the power supply and other peripherals for the TOBY R2 series or the LARA R2 series cellular module SIM card holder Reset button and Power on button T...

Страница 8: ...in the 9 18 V Power Input DL401 EVB Cellular VCC Cellular module supplied Main Power Switch must be switched on DL400 EVB Cellular native USB USB cable plugged in the Cellular native USB connector DS...

Страница 9: ...r cellular module interfaces J200 J2011 J300 J3012 ADP R2 Cellular headset Audio headset jack connector for the cellular module audio interface J303 EVB GNSS antenna SMA connector for the GNSS module...

Страница 10: ...Pins 7 10 77 RSVD Not present 16 TXD J201 Pin 15 47 RSVD Not present 78 GND J201 Pins 7 10 17 RXD J201 Pin 16 48 RSVD Not present 79 GND J201 Pins 7 10 18 RSVD Not present 49 RSVD Not present 80 GND...

Страница 11: ...O4 RESET_N 26 25 Not connected Not connected 28 27 Not connected MIC_BIAS 28 27 MIC_GND Not connected 30 29 PWR_ON Not connected 30 29 Not connected GPIO3 32 31 GPIO2 Not connected 32 31 Not connected...

Страница 12: ...ins 7 10 12 TXD J301 Pin 15 35 I2S_TXD Not present4 58 GND J301 Pins 7 10 13 RXD J301 Pin 16 36 I2S_CLK Not present4 59 ANT_DET Not present 14 GND J301 Pins 7 10 37 I2S_RXD Not present4 60 GND J301 Pi...

Страница 13: ...D3 Not connected 40 39 Not connected GND 42 41 GND GND 42 41 Not connected Table 7 Pin out of the 42 pin Dual In Line Board to Board connectors J301 J300 available on the adapter board ADP R2 of the E...

Страница 14: ...ss the Cellular Power On button SW302 on EVB or the Cellular Reset button SW303 on EVB to switch on the module again 8 For communication via the cellular module s USB interface connect a USB cable to...

Страница 15: ...ART detached from USB UART J501 and RS232 UART J500 connectors B2B Do not care DL404 Table 9 Serial interface configuration Run an AT terminal application e g the u blox m center tool selecting an AT...

Страница 16: ...s the factory programmed value to provide voice capability at the headset jack connector using the external audio codec mounted on the EVK R2 AT USPM USPM 1 1 0 0 2 OK Check the audio path mode settin...

Страница 17: ...ng values see section 1 8 Check with the Windows Device Manager to find out which COM port is being used by the EVK R2 Figure 4 Home page 4 Enable the connection to u blox cellular module by clicking...

Страница 18: ...native USB interface of the cellular module connected to the Windows PC by the Cellular Native USB connector on the ADP B 1 How to install and configure a low data rate modem connection This example...

Страница 19: ...roperties 7 Select Change Settings Advanced 8 Add APN settings command APN shown is just an example Make sure to have the correct APN defined by the network operator 9 Click on Change Default Preferen...

Страница 20: ...connection o The module telephone number 99 1 o The specific GPRS account information for the network operator o A name for the new connection e g u blox GPRS Connection 14 The packet data connection...

Страница 21: ...ng the TCP IP stack of the PC over the native USB interface of the cellular module connected to the Windows PC by the Cellular Native USB connector on the ADP 1 Follow the board setup instructions in...

Страница 22: ...m USB1 AT and Data X X 7 in the picture 5 Enter the modem telephone number 99 1 select Allow other people to use this connection and click Connect to finalize the procedure Consult the cellular networ...

Страница 23: ...settings for the initial default EPS bearer established during LTE attach edit the cid 1 PDN by means of the AT CGDCONT AT command Command sent by DTE user DCE response module Description AT COPS COPS...

Страница 24: ...d for current consumption measurements in this case the 3 8 V supply circuit on the EVB will supply the TOBY R2 or LARA R2 module mounted on the adapter board with the digital multi meter placed in se...

Страница 25: ...M Non Volatile Memory PIN Personal Identification Number PS Packet Switch RAT Radio Access Technology RF Radio Frequency RI Ring Indicator SIM Subscriber Identity Module TCP Transfer Control Protocol...

Страница 26: ...e R02 23 Sep 2016 sses Updated status to Advance Information Corrected external audio codec configuration example R03 23 Dec 2016 sses Disclosure restriction replaces Document status on page 2 and doc...

Страница 27: ...fice China Beijing Phone 86 10 68 133 545 E mail info_cn u blox com Support support_cn u blox com Regional Office China Chongqing Phone 86 23 6815 1588 E mail info_cn u blox com Support support_cn u b...

Отзывы: