background image

6

u-line.com

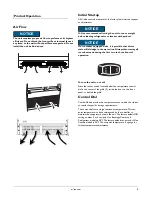
Leveling

NOTICE

Unit must be level, for proper door and ice maker (if 
equipped) operation. 

For Models with adjustable leveling feet:

1. Use a level to check the levelness of the unit from front to back 

and from side to side. Place the level along top edge and side 
edge as shown (1).

2. If the unit is not level, rotate the adjustable leveling legs to raise 

or lower each corner of the unit as necessary.

3. Check levelness after each adjustment and repeat the previous 

steps until the unit is level.

For Models without adjustable leveling feet:

NOTICE

The unit must be located on a level surface, for proper 
door and ice maker (if equipped) operation. 

Use a level to check the levelness of the unit from front to back 
and from side to side. Place the level along top edge and side 
edge as shown (1).

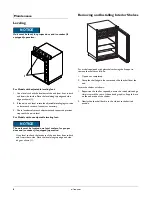
Removing and Installing Interior Shelves

For models equipped with glass shelves having shelf supports, 
remove the shelves as follows:

1. Open door completely.

2. Grasp the shelf edge in the center and slide the shelf from the 

unit.

Insert the shelves as follows:

1. Reposition the shelf as required, ensure the raised white edge 

strip is toward the rear of the unit and graphics, if applied, are 
on the underside of the shelves.

2. Gently slide the shelf back in to the cabinet at the desired 

position.

Maintenance

1

Содержание U-CO29B-00

Страница 1: ...CO1175S 00 U CO1175S 01 U CO1175S 20 U CO1175S 22 U BI2115B 00 U BI2115B 20 U BI2115S 00 U BI2115S 01 U BI2115S 20 U BI2115S 22 U BI2115SOD 00 U BI2115SOD 01 U BI2115SOD 20 U BI2115SOD 22 U BI2115W 00...

Страница 2: ...es while the 2000 Series offers upscale features advanced technology and specialized product families U Line s approach to its breadth of products multiple price points and features allows a choice an...

Страница 3: ...nce Leveling 6 Removing and Installing Interior Shelves 6 Removing and Installing Grille 7 Removing and Installing Door Shelves 7 Standard Doors Door Alignment and Adjustment 8 Door Reversability 8 Re...

Страница 4: ...and leave shelves in place so children may not easily climb inside WARNING SHOCK HAZARD Electrical Grounding Required Never attempt to repair or perform maintenance on the unit until the electricity h...

Страница 5: ...rounding cabinetry Defrost Type Manual Defrost For indoor use only ADA15IM Model Features Factory installed door locks Provides security and safety Stainless steel models Offers a bold stainless steel...

Страница 6: ...de during the first two to three hours of operation To turn the unit on or off Press the rocker switch located below the temperature control dial in the center of the grille 2 inside the door on the f...

Страница 7: ...s Checking Product Temperature To check the actual product temperature in the unit 1 Partially fill a plastic nonbreakable bottle with water 2 Insert an accurate thermometer 3 Tighten the bottle cap s...

Страница 8: ...tly shake the bucket to break apart cubes If not using the ice maker regularly empty the ice bucket periodically to ensure fresh cubes It is normal for cubes to appear cloudy The cause is air trapped...

Страница 9: ...ICE The unit must be located on a level surface for proper door and ice maker if equipped operation Use a level to check the levelness of the unit from front to back and from side to side Place the le...

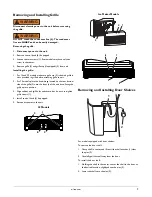
Страница 10: ...rille to unit 2 For 75 models place the hook hinge located on the rear bottom side of the grille 2 onto the front lip of the unit base Swing the grille up into position 3 Align cabinet and grill holes...

Страница 11: ...lass doors without locks are field reversible Stainless steel models without glass doors must be ordered right or left hand hinged Reversing the Door The hinge hardware will be removed and reinstalled...

Страница 12: ...emove the two screws holding the actuator to the door Reinstall the actuator 4 on the opposite end of the door where the nameplate was removed 6 Install new nameplate where the actuator assembly was r...

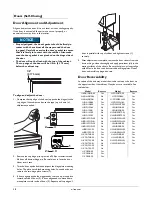
Страница 13: ...edge needs to move down move plate toward inside of door 3 Repeat until top edge of door is parallel with top of cabinet and tighten screws 1 securely 5 After adjustment is complete remove the door cl...

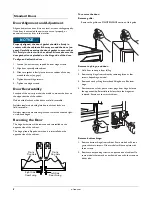
Страница 14: ...r 3 Remove door by tilting forward and lifting door off bottom hinge closer inserts 4 Reinstall hinge screw pin 1 into top hinge using a Phillips screwdriver Remove hole plugs Remove plastic screw plu...

Страница 15: ...into position 4 Hold door to keep it from falling 5 Reinstall hinge screw pin 1 into top hinge using a Phillips screwdriver Align and adjust the door Align and adjust the door see DOOR ALIGNMENT AND A...

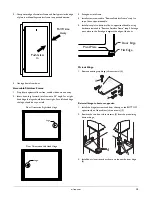
Страница 16: ...p 1 to top of door opposite handle 5 Install pivot plat to bottom of door opposite of handle using hardware removed in Remove Stainless Frame step 2 Arrange pivot plate so the flat edge is against the...

Страница 17: ...lugs 1 Install plastic screw plugs three each top and bottom 3 into holes where hinge hardware was removed Install Door 1 Hold door upright and tilted forward 2 Lift door on to bottom hinge closer ins...

Страница 18: ...the interior and all removed components using a mild nonabrasive detergent and warm water solution applied with a soft sponge or non abrasive cloth Rinse the interior using a soft sponge and clean wa...

Страница 19: ...e ambient temperature is expected to drop below 50 F turn off and unplug unit and drain all water from the unit to prevent freezing damage not covered by the warranty 1 Remove all consumable contents...

Страница 20: ...t may be heard when it operates Evaporator Refrigerant flowing through an evaporator may sound like boiling liquid Condenser Fan Air moving through a condenser may be heard Automatic Defrost Drain Pan...

Страница 21: ...ne Captain Models Combo Models Refrigerator Freezers Refrigerators Drawer Models and Beverage Centers The U Line brand offers products in the 1000 Series 2000 Series and the Modular 3000 Series The 10...

Отзывы: