background image

PAGE 1 OF 9 

0721 IH-1595

1-800-295-5510

uline.com

H-1595

USING THE KEY

1.  To open dispenser while keeping it locked, insert key 

at position A. (See Figure 1)

2.  Turn and hold key clockwise to open dispenser.  

(See Figure 2)

NOTE: Release key back to position A after 

closing to lock dispenser.

USING PUSH BUTTON MODE

1.  Insert key at position A. (See Figure 1)

2.  Turn counterclockwise to position B. (See Figure 3)

3.  Remove key and push in lock to open dispenser. 

(See Figure 4)

TORK

®

 XPRESS

®

 WALL-MOUNT 

MINI TOWEL DISPENSER

Figure 1

Figure 2

Figure 3

Figure 4

Para Español, vea páginas 4-5.

Pour le français, consulter les pages 7-9.

USING THE KEY AND OPTIONAL PUSH BUTTON MODE

PARTS

TOOLS NEEDED

Drill

6 mm Drill Bit

Phillips Screwdriver

Level

Tape Measure

Dispenser x 1

Wall Anchor x 4

Screw x 4

Dispenser Key x 1

Содержание TORK XPRESS H-1595

Страница 1: ...BUTTON MODE 1 Insert key at position A See Figure 1 2 Turn counterclockwise to position B See Figure 3 3 Remove key and push in lock to open dispenser See Figure 4 TORK XPRESS WALL MOUNT MINI TOWEL DISPENSER Figure 1 Figure 2 Figure 3 Figure 4 Para Español vea páginas 4 5 Pour le français consulter les pages 7 9 USING THE KEY AND OPTIONAL PUSH BUTTON MODE PARTS TOOLS NEEDED Drill 6 mm Drill Bit Ph...

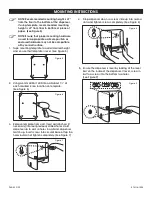
Страница 2: ...igure 5 2 Using a 6mm drill bit drill into wall about 1 at each marked screw location on template See Figure 6 3 Remove template from wall Insert wall anchors if necessary into four previously drilled holes Hold dispenser up to wall so holes in wall and dispenser match up Insert screws into circular base of top two holes but do not tighten completely See Figure 7 4 Drop dispenser down so screws sl...

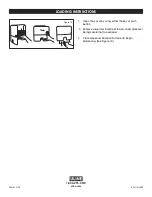
Страница 3: ...S 1 Open the cover by using either the key or push button 2 Remove wrap from bundle of towels Load dispenser being careful not to overload 3 Close dispenser and pull first towel to begin dispensing See Figure 10 Figure 10 1 800 295 5510 uline com ...

Страница 4: ...n A después de cerrar para trabar el despachador USAR EL MODO DE BOTÓN PULSADOR 1 Inserte la llave en la posición A Vea Diagrama 1 2 Gírela en el sentido contrario de las manecillas del reloj hasta la posición B Vea Diagrama 3 3 Quite la llave y presione el cerrojo hacia dentro para abrir el despachador Vea Diagrama 4 Diagrama 1 Diagrama 2 Diagrama 3 Diagrama 4 USAR LA LLAVE Y EL MODO DE BOTÓN PUL...

Страница 5: ...en la pared en las ubicaciones marcadas para los tornillos en la plantilla Vea Diagrama 6 3 Quite la plantilla de la pared Inserte los taquetes si son necesarios en los cuatro orificios previamente taladrados Sostenga el despachador contra la pared de forma que los orificios de la pared coincidan con los orificios del despachador Inserte tornillos en la base circular de los dos orificios superiore...

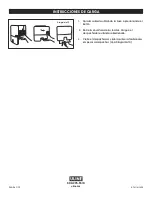
Страница 6: ... cubierta utilizando la llave o presionando el botón 2 Retire la envoltura de las toallas Cargue el despachador evitando sobrellenarlo 3 Cierre el despachador y jale la primera toalla para empezar a despachar Vea Diagrama 10 Diagrama 10 800 295 5510 uline mx ...

Страница 7: ...é en position A après avoir fermé le distributeur pour le verrouiller UTILISATION DU MODE BOUTON POUSSOIR 1 Insérez la clé en position A Voir Figure 1 2 Tournez la clé dans le sens antihoraire en position B Voir Figure 3 3 Retirez la clé et poussez le verrou pour ouvrir le distributeur Voir Figure 4 Figure 1 Figure 2 Figure 3 Figure 4 UTILISATION DE LA CLÉ ET DU MODE BOUTON POUSSOIR EN OPTION PIÈC...

Страница 8: ...mèche de perceuse de 6 mm percez des trous dans le mur à environ 3 8 cm 1 po de profondeur à chaque emplacement de vis sur le gabarit Voir Figure 6 3 Retirez le gabarit du mur Insérez les ancrages muraux au besoin dans les quatre trous prépercés Maintenez le distributeur au mur afin de faire correspondre les trous du distributeur avec les trous prépercés dans le mur Insérez les vis dans la base ci...

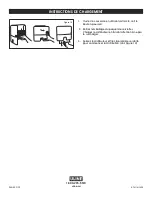
Страница 9: ...t soit la clé soit le bouton poussoir 2 Retirez l emballage du paquet de serviettes Chargez le distributeur en faisant attention à ne pas le surcharger 3 Fermez le distributeur et tirez la première serviette pour commencer la distribution Voir Figure 10 Figure 10 1 800 295 5510 uline ca ...

Отзывы: