background image

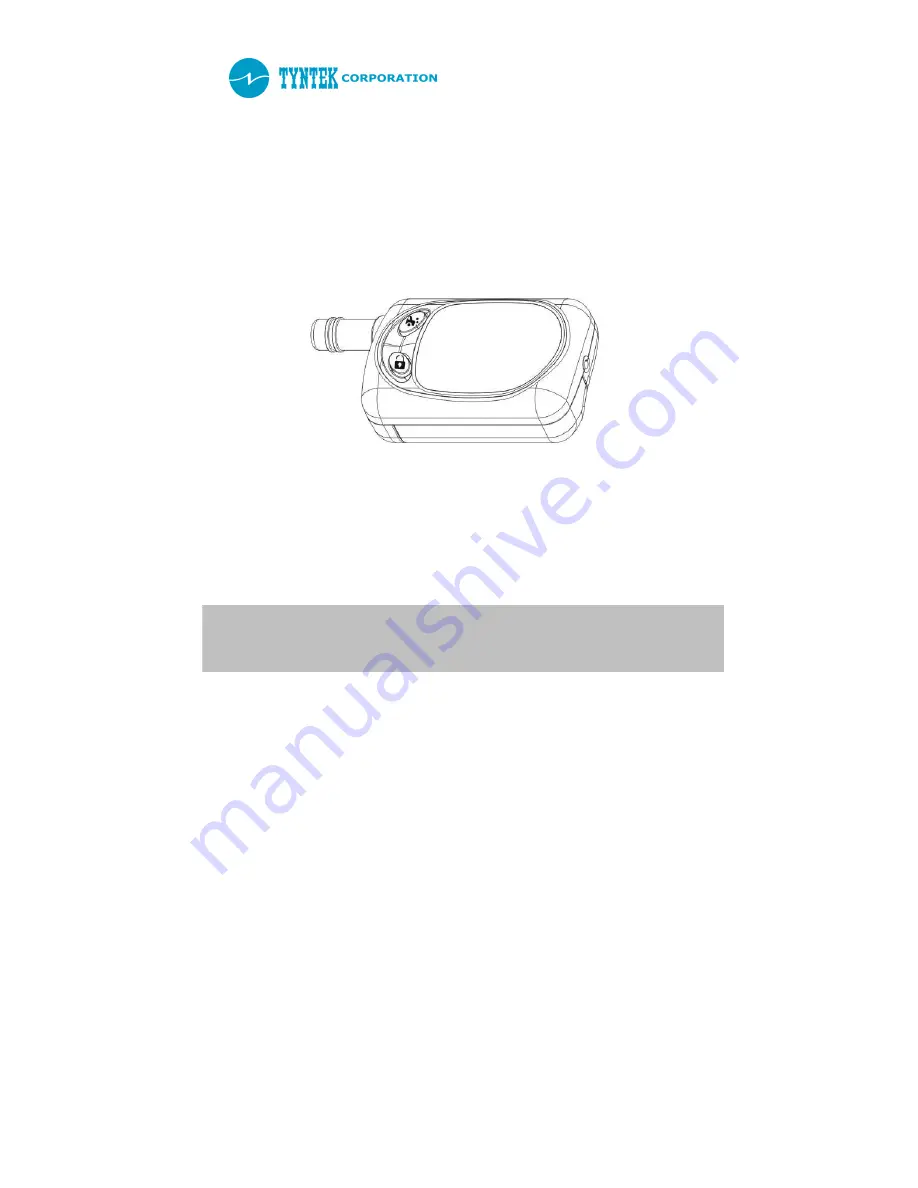
Two Way Car Alarm System

User Manual

Always read carefully and must be fully understood the product notices and

user indirections before you attempt to use your two way car alarm system,

to assure its safe use. Always store this User’s Manual for convenient future

reference

© TYNTEK Corporation

Tyntek is an ISO 9001 and QS 9000 certified manufacturer and this product is

carrying the DGT

FCC

CE

E-Mark.

Содержание 9500RC1

Страница 1: ...notices and user indirections before you attempt to use your two way car alarm system to assure its safe use Always store this User s Manual for convenient future reference TYNTEK Corporation Tyntek i...

Страница 2: ...larm system Check all devices and buttons can proper work Must to be fully understood the User s Manual before using this system in order to use the system properly This user s manual has been validat...

Страница 3: ...mote controller The icon s features on LCD Before using the remote controller Replacing the battery Setting the time The two way remote controller s melodies The two way remote controller s features A...

Страница 4: ...uto hour temperature engine start Valet mode Power save mode Programmable engine running time Adjusting levels of shock sensor s sensitivity setting moving car notice feature Auto alarm and other feat...

Страница 5: ...TYNTEK Corporation V1 4 4 Trouble shooting Product specification Installation diagram Certificates approvals Limited warranty...

Страница 6: ...it is raining or snowing it may cause a short circuit WARNING 1 Avoid the short circuit do not attempt to disassemble or repair the product by your self Always contact an authorized service provider...

Страница 7: ...the main board is temporarily have a short circuit by intruder in arm mode The system will still record the previously setting and auto re arm to prevent intruding Portable in size and attractive in...

Страница 8: ...4 7 Package contents 1 2 way LCD remote controller x 1 2 AAA battery x1 3 1 way remote controller x 1 4 3V CR2032 battery x1 5 Transceiver x1 6 Main board x1 7 Function switch 2 pin harness wire x1 8...

Страница 9: ...ration V1 4 8 9 18pin harness wire x1 10 10pin harness wire x1 11 6pin harness wire x1 12 User s manual x1 Quick operation guide 1 Inserting the battery Make sure the battery s direction of poles are...

Страница 10: ...n checking vehicle s latest status Press button for 1 5 seconds car locator Page28 5 Press button Audible arming Mute arming mode Press button for 1 5 seconds open truck depend on models Page29 6 Pres...

Страница 11: ...Front with LCD Antenna Buzzer Page25 LCD Page16 1 Arm Disarm button Page 26 2 Remote engine start Page 27 3 Checking vehicle s latest status Car locator Page 28 4 Audible arming mode Mute arming Trunk...

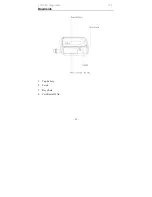
Страница 12: ...TYNTEK Corporation V1 4 11 Downside 1 Cap battery 2 Latch 3 Key chain 4 Certificate ID No...

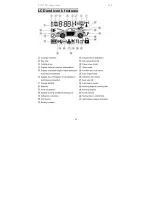
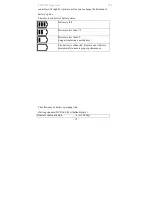
Страница 13: ...TYNTEK Corporation V1 4 12 LCD and icon s features...

Страница 14: ...latch to the direction of left 1 Slide the cap battery to take apart it from body rear 2 Before inserting the new battery check battery s poles and remote controller are in the same direction After in...

Страница 15: ...n to the direction of right and until hearing a clicking sound After inserting new the new battery LCD will display all icons and the remote controller will vibrate twice and then LCD will return to o...

Страница 16: ...roller s battery status Battery is full Battery is less than 1 3 Battery is less than2 3 Suggest replacing a new battery The battery is exhausted Replace a new battery immediately to ensure proper per...

Страница 17: ...bove mentioned data is according to Tyntek testing standard The data may changed in accordance with different environments and personal usage Turn On AUTO KEY the remote controller will consume more b...

Страница 18: ...icon will move from one icon to next icon until to adjust hour 3 Press button and to adjust hours 12 Hours 4 Press button again and press button and to adjust minutes 5 Press button to complete selec...

Страница 19: ...Successful Engine Start Melody 3 Failed Engine Start Stop Engine Start Melody 4 Checking Mode Melody 5 Intrusion Melody 6 Calling Driver Telephone Ring 7 Audible Arming Melody 8 Mute Arming Melody Fo...

Страница 20: ...is blocked Press button or LCD backlight will be illuminated ARM MODE Press button LCD display For vehicle equipped with center control door locks doors lock automatically The alarm will chirp once a...

Страница 21: ...alarm will chirp twice flash vehicle s indicators twice and illuminate dome light for 15 seconds The remote controller will beep twice flashing indicators and display door unlocks The remote controll...

Страница 22: ...0 8s 1s 2s 3s and stop starting once successfully started When engine is running the remote controller will sound successful engine start melody and LCD will display running and Before driving the ve...

Страница 23: ...ISSION CAR REMOTE ENGINE START STOP Go to Programming Mode to choose manual transmission system Notice Must follow the safety operation process for manual transmission car STEP1 When engine is running...

Страница 24: ...tors 3 times sound checking melody and displays vehicle s status and interior temperature Backlight will be illuminated for 3 seconds CAR LOCATOR Press button for 1 5seconds LCD display The vehicle sl...

Страница 25: ...DE In mute arming mode press button LCD display Change to audible arming mode the vehicle will chirp one log beep and flash indicators once The remote controller sound audible alert melody flash the i...

Страница 26: ...NG MODE In audible arming mode press button to switch mute arming mode LCD Change to mute arming mode the vehicle flash indicators once The remote controller flash the indicators once sound mute alert...

Страница 27: ...r closes the vehicle s trunk The remote controller display trunk release and sound one long beep to Confirm When user closes the vehicle s trunk the alarm chirp once and flashes indicators once The al...

Страница 28: ...ration V1 4 27 REMOTE ANTI CAR JACKING ON Press button on for 3 seconds LCD display The vehicle will flash indicators and sound warning siren for 30 Seconds The remote controller will display and flas...

Страница 29: ...OFF Press any button on remote controller to disable this feature The vehicle stop flashing indicators and warning siren will disappear on LCD FUNCTIONAL SELECTION MODE Press button for 1 5 seconds c...

Страница 30: ...en speed is over 20km h user can press button to set the warning speed and the alarm will beep once When speed is faster than warning speed the alarm will continue beeping until the speed is slower th...

Страница 31: ...TYNTEK Corporation V1 4 30...

Страница 32: ...TYNTEK Corporation V1 4 31 FUNCTIONAL SELECTION MODE Operation 1 Press button over 1 5 seconds 2 Press button again the flashing icon will move from one icon to next icon...

Страница 33: ...select ON OFF temperature time the sensitivity adjustment of shock sensor and Auto key 4 Press button to complete selection or press button to continue selecting next feature 5 Press button to leave...

Страница 34: ...EATURES ON LCD KEY LOCK Lock all buttons to avoid pressing wrong button 1 Press button to choose t 2 Press button or to select ON OFF 3 Press button to complete selection 4 Only button can be performe...

Страница 35: ...or press again to adjust the sensitivity of Auto Key 4 Press button and to adjust the sensitivity level of Auto Key 5 Seven adjustable levels for user to adjust the sensitivity of AUTO KEY 3 2 1 0 1...

Страница 36: ...stem will auto re arm 10 When user turn on car locator feature Auto Key will be disabled 11 As AUTO KEY ON it will consume more battery 12 The sensitivity of Auto Key will be affected by different sur...

Страница 37: ...TYNTEK Corporation V1 4 36...

Страница 38: ...matically depend on models 1 Press button to choose to choose 2 Press or buttons to select ON OFF 3 If turn ON press button to set interval hours to warm up engine automatically 4 Press and to select...

Страница 39: ...TYNTEK Corporation V1 4 38 VALET MODE Only arm disarm car locator function button can work 1 Press button to choose to choose 2 Press or buttons to select ON OFF 3 Press button to complete selection...

Страница 40: ...mote controller wills not response to main board until disabling power save mode 1 Press button to choose to choose 2 Press or buttons to select ON OFF 3 Press button to complete selection 4 In power...

Страница 41: ...te engine start or auto engine start 1 Press button to choose to choose 2 Press button or to adjust programmable engine running time on for 5 10 15 minutes 3 Press button to complete selection 4 indic...

Страница 42: ...OCK SENOR To adjust or disable the sensitivity level of shock sensor 1 Press button to choose to choose 2 Press or buttons to adjust eight sensitivity levels on 3 2 1 0 1 2 3 OFF the larger number mea...

Страница 43: ...1 Press button to choose 2 Press buttons or to select ON OFF 3 Press button to complete the selection If turn off the moving car notice feature the remote controller will not response to sensor car b...

Страница 44: ...l appear on LCD monitor again DOOR TRUNK HOOD ANTI INTRUSION The doors trunk or hood are triggered during arming period the vehicle will sound warning siren and flash the indicators for 30 seconds Pre...

Страница 45: ...emote controller will display vehicle s intrusion record and occurrence time Press button to delete the remote controller s intrusion record When user open vehicle s doors the vehicle will flash indic...

Страница 46: ...ed auto re arm feature automatically SHOCK SENSOR Light impact Vehicle will flash indicators 3 times and sound warning siren for 3 times The remote controller will display to indicate light impact and...

Страница 47: ...r key the system will unlock the doors automatically AUTO LOCK DOORS WHEN DRIVING THE CAR When speed arrive at 20km h the system will lock the doors automatically REMOTE CONTROLLERLER S BATTERY STATUS...

Страница 48: ...us it also will display vehicle s interior temperature Display Celsius Fahrenheit depend on models FLASHING INDICATORS WHILE OPENING THE DOORS When you open the door the vehicle will flash indicators...

Страница 49: ...TYNTEK Corporation V1 4 48 Getting to know your one way remote controller The one way remote controller only work about 10 meters Front Backside...

Страница 50: ...ith center control door locks the buckles will release and the alarm will turn to OFF mode The alarm will chirp twice flash vehicle s indicators twice and illuminate dome light for 15 seconds In disar...

Страница 51: ...to stop engine Replacing the battery 1 Use small screw driver to take out screw 2 Take off the PCB to replace the battery 3 Make sure the PCB poles and inserting a new battery 3 V CR2032 Lithium batte...

Страница 52: ...NTEK Corporation V1 4 51 If one way remote controller can t proper work Check the battery status and replace a new battery If the light of LED indication is too weak replacing a new battery immediatel...

Страница 53: ...sceiver and moving car notice features CALLING DRIVER Press the button on the transceiver to call the remote controller The remote controller will display and sound telephone ring Press any key on rem...

Страница 54: ...als to remote controller The remote controller will display icon which is flashing fast and sounding telephone ring The LED indication on moving car card will be illuminated to indicate transmitting s...

Страница 55: ...er your remote controller Registrate your remote controller Step1 Press function switch over 5 seconds the car s indicator will flash once and then until the RF transceiver s LED indicator will fast f...

Страница 56: ...n The antenna of the remote controller and car s door need to be parallel to register Step3 Keep the remote controller at the same position keep parallel and leave the rear mirror for 60 cm around 15...

Страница 57: ...er operation Perform step1 and step3 please don t touch the antenna of the remote controller it may cause the remote controller cant proper work If you still cant use remote controller to command the...

Страница 58: ...es Original parameters Arm Disarm Battery s status Depends on battery Audible arm Mute arm Audible arm Time indication AM 12 00 Key Lock OFF AUTO KEY OFF The vibration mode of remote controller OFF Pr...

Страница 59: ...TYNTEK Corporation V1 4 58 Engine running time 5 minutes Adjustment of shock sensor Sensitivity level is 0...

Страница 60: ...er can proper work LCD cant display any information The battery is exhausted Replacing a new battery Auto key cant proper work to unlock the doors The remote controller need to be out of communication...

Страница 61: ...n V1 4 60 on vehicle s original design The remote controller shorten the remote distance Touching the antenna will cause the noise to shorten the distance Avoiding touching the antenna when using the...

Страница 62: ...ery 5 LCD display 6 Mute Vibration mode 7 5 buttons 8 Working temperature 10 60 9 Storage temperature 20 80 10 Dimension 55 35 21mm Dimension 73x55x21mm including the antenna 1 Way Remote controller 1...

Страница 63: ...king temperature 30 110 6 Storage temperature 40 120 7 Dimension 93 40 14 5mm Main Board 1 Working voltage 12V 8 14 5V 2 Input Output port I O PORT 01 GND 02 DOOR_SW INPUT 03 ULK OPT INPUT 04 TRUNK_SW...

Страница 64: ...0A 12V Positive Output 17 LAMP_L 10A 12V Positive Output 18 GND POWER PORT 01 IGN2 Relay 40A 12V Positive Output 02 ACC Relay 40A 12V Positive Output 03 START MOTOR Relay 40A 12V Positive Output 04 IG...

Страница 65: ...TYNTEK Corporation V1 4 64 Installation Diagram...

Страница 66: ...nd 2 this device must accept any interference received including interference that may cause undesired operation NOTE The changes or modifications not expressly approved by the party responsible for c...

Страница 67: ...art only and excludes any incidental damage and natural disaster and improper operation 3 After the first 12 months of the warranty period there will be a charge for repairing and replacing any defect...

Страница 68: ...YNTEK Corporation V1 4 67 Tyntek two way car alarm system warranty Model ID code Customer s name TEL Mailing address Purchase date Distributor s stamp http www tyntek wireless com tw TYNTEK Corporatio...

Страница 69: ...TYNTEK Corporation V1 4 68 http www tyntek wireless com tw TYNTEK Corporation Printed in Taiwan...

Отзывы: