background image

Sauna i1115 Corner

2017-04-13

Art.nr 2900 2665

Содержание Sauna i1115 Corner

Страница 1: ...Sauna i1115 Corner 2017 04 13 Art nr 2900 2665 ...

Страница 2: ...material G Glas W Holzvertäfelung D Glastür Voici deux exemples de montage de la cabine C est la configuration 1 qui est illustrée par les instructions de montage Les chiffres indiquent l ordre de montage des cloisons Sur l illustration les cloisons portent également une lettre désignant le matériau G verre W panneau de bois D porte vitrée Два примера монтажа комнаты Это монтажная схема 1 показанн...

Страница 3: ...ing Packing Dichtung Joint Прокладка Uszczelka Insida Inside Innenseite Intérieur Внутр Wewnątrz Utsida Outside Außenseite Extérieur Наруж Na zewnątrz D Upp Up Oben Haut Верх Do góry Ner Down Unten Bas Низ Na dół Packning Packing Dichtung Joint Прокладка Uszczelka Insida Inside Innenseite Intérieur Внутр Wewnątrz Utsida Outside Außenseite Extérieur Наруж Na zewnątrz Upp Up Oben Haut Верх Do góry N...

Страница 4: ...ning tissue x1 2700 1002 1200 5040 x6 26x29x12 5mm 1700 1144 x1 22x46 5x210mm 4600 2164 4506 0039 2500 2045 4mm x1 2400 0257 60x21x5mm x1 25x18x7mm x1 x2 M6x60mm 1200 0246 230x43x25mm LOGO 230x43x25mm x1 x1 28x7mm x1 x4 18x10x4mm x2 x2 0300 2226 4606 0940 2800 0450 2800 0455 1800 2230 0500 0252 1800 2236 2800 0468 x1 4 5 0 6 0 4 0 0 1200 1168 1200 1122 1200 1146 1400 0167 1200 1230 1200 1154 4800 ...

Страница 5: ...506 0055 3x1968mm 4506 0050 1x368mm 4506 0137 2x768mm 4506 0141 4506 0143 1x935mm 4506 0147 1x1335mm P6 P7 P8 1x1396mm 4506 0262 1x935mm 4502 1343 P9 1x382 5mm Vent 4506 0071 1x782 5mm 4506 0072 4506 0074 1x788 5mm 1x944mm 4506 0075 1x1344mm 4506 0077 3x1930mm 4506 0060 P1 P2 P5 1x368 4506 0192 4506 0232 4506 0185 2x768mm 4506 0191 4506 0235 4506 0190 P3 2x2048mm 4506 0181 4506 0179 4506 0180 P4 2...

Страница 6: ...ASSISTANT 17mm Grejer bra att ha Useful tools etc Praktische Hilfsmittel Matériel utile Что может пригодиться Przydatne narzędzia itp ...

Страница 7: ... ramy podłogowej Skjut in hörnknutarna I golvramsprofilerna Push the corner joints into place in the profiles for the floor frame Eck und T Verbindungen in die Bodenrahmenprofile einstecken Engager les éléments d angle dans les profilés du cadre de sol Задвиньте внутрь угловые связки в рейки рамы пола Wcisnąć złącza narożne na miejsce w profilach ramy podłogowej ...

Страница 8: ...justable feet in as far as they will go Bodenrahmen wenden Eck und T Verbindungen bis zum Anschlag in die Bodenrahmenprofile einschlagen Verbindungen festschrauben und Einstellfüße anbringen Einstellfüße bis zum Anschlag einschrauben Retourner à l envers le cadre de sol Frapper sur les éléments d angle pour les faire entrer entièrement dans les profilés du cadre de sol Visser les éléments d angle ...

Страница 9: ...rfect end result it is essential that the floor frame is absolutely level Use the hex key to adjust the adjustable feet It is important that the top of the thread on the adjustable feet is below the level of the bottom edge of the walls See the drawings Bodenrahmen an der gewünschten Stelle positionieren Auf ebene Lage des Rahmens achten Wasserwaage verwenden ACHTUNG Damit ein perfektes Endergebni...

Страница 10: ...en Haut Верх Do góry Upp Up Oben Haut Верх Do góry Kant i kant Flush fit Kantenbündig Bord à bord Край к краю Wyrównać OBS Det är viktigt att hörnprofilen ligger dikt an mot väggen Tryck profilen mot väggen när den skruvas I IMPORTANT Make sure the corner profile fits perfectly flush against the wall Press the profile against the wall while screwing it into place ACHTUNG Die Eck und T Verbindungen...

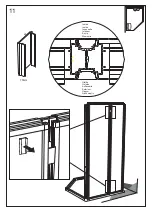
Страница 11: ...ide Außenseite Extérieur Наруж Na zewnątrz Insida Inside Innenseite Intérieur Внутр Wewnątrz OBS Det är viktigt att väggarna är i jämnhöjd I hörnen IMPORTANT The walls must be perfectly level where they meet at the corners ACHTUNG Die Wände müssen an den Ecken auf gleicher Höhe liegen ATTENTION Il est important que les cloisons soient au même niveau dans les angles Внимание Важно чтобы стенки были...

Страница 12: ...Innenseite Intérieur Внутр Wewnątrz OBS NOTE ACHTUNG ATTENTION Внимание UWAGA Kant I kant Flush fit Kantenbündig Bord à bord Край к краю Wyrównać Insida Inside Innenseite Intérieur Внутр Wewnątrz Utsida Outside Außenseite Extérieur Наруж Na zewnątrz Ner Down Unten Bas Низ Na dół Upp insida Up inside Oben innen Haut intérieur Верх внутренняя сторона Do góry Wewnątrz ...

Страница 13: ...21x3mm 10 W 3 Utsida Outside Außenseite Extérieur Наруж Na zewnątrz Insida Inside Innenseite Intérieur Внутр Wewnątrz Styrning Locking plate Sicherungsscheibe Rondelle de blocage Направление Płytka blokująca ...

Страница 14: ...x4 70mm 11 W 3 Insida Inside Innenseite Intérieur Внутр Wewnątrz Utsida Outside Außenseite Extérieur Наруж Na zewnątrz ...

Страница 15: ...nie na tym samym poziomie Tryck ihop väggarna när de skruvas samman Push the walls together while they are being screwed together Wände beim Zusammenschrauben zusammendrücken Pour visser les cloisons les maintenir fermement assemblées Прижимайте стенки одну к другой когда будете соединять их винтами Podczas skręcania ścianek należy je ze sobą trzymać dokładnie połączone Utsida Outside Außenseite E...

Страница 16: ...ocage Направление Płytka blokująca Utsida Outside Außenseite Extérieur Наруж Na zewnątrz Insida Inside Innenseite Intérieur Внутр Wewnątrz Glas Glass Glas Verre Стекло Szkło Packning Packing Dichtung Joint Прокладка Uszczelka Packning Packing Dichtung Joint Прокладка Uszczelka ...

Страница 17: ...x4 70mm 14 5 G Insida Inside Innenseite Intérieur Внутр Wewnątrz Utsida Outside Außenseite Extérieur Наруж Na zewnątrz ...

Страница 18: ...schlag gewünscht weiter mit Abb 17 1 A 4 2 C C 3 C Ø 2 8 5 La porte est livrée suspendue à droite Pour modifier la porte et la rendre suspendue à gauche procéder comme indiqué sur les images des deux pages suivantes Si la porte doit être suspendue à droite passer directement à l image 17 Дверь поставляется с петлями с правой стороны Чтобы дверь открывалась на петлях с левой стороны выполните дейст...

Страница 19: ...16 9 10 B C 7 8 B B A 25x18x7mm C 6 11 Glas Glass Glas Verre Стекло Szkło Insida Inside Innenseite Intérieur Внутр Wewnątrz ...

Страница 20: ...mocować pozostałe wkręty Tryck ihop väggarna vid borrningen Push the walls together while drilling Wände beim Bohren zusammendrücken Pendant le perçage des cloisons les maintenir fermement assemblées Прижимайте стенки одну к другой когда будете сверлить Podczas wiercenie ścisnąć ścianki razem 17 D 6 OBS Det är viktigt att väggarna är i jämnhöjd I hörnen IMPORTANT The walls must be perfectly level ...

Страница 21: ...Glass Glas Verre Стекло Szkło Upp Up Oben Haut Верх Do góry Upp insida Up inside Oben innen Haut intérieur Верх внутренняя сторона Do góry Wewnątrz Packning Packing Dichtung Joint Прокладка Uszczelka Utsida Outside Außenseite Extérieur Наруж Na zewnątrz Glas Glass Glas Verre Стекло Szkło Insida Inside Innenseite Intérieur Внутр Wewnątrz Ner Down Unten Bas Низ Na dół Packning Packing Dichtung Joint...

Страница 22: ...а одинаковой высоте в углу WAŻNE Ścianki w narożniku musza być dokładnie na tym samym poziomie Börja med att borra första hålet och skruva i skruven Borra sedan de tre resterande hålen och sätt I skruvarna Start by drilling the first hole and fixing the screw Then drill the remaining three holes and fix the remaining screws Zunächst das erste Loch bohren und Schraube einschrauben Anschließend die ...

Страница 23: ...e ze sobą trzymać dokładnie połączone OBS Det är viktigt att väggarna är i jämnhöjd I hörnen IMPORTANT The walls must be perfectly level where they meet at the corners ACHTUNG Die Wände müssen an den Ecken auf gleicher Höhe liegen ATTENTION Il est important que les cloisons soient au même niveau dans les angles Внимание Важно чтобы стенки были на одинаковой высоте в углу WAŻNE Ścianki w narożniku ...

Страница 24: ...x2 33x21x3mm 21 W 9 400x2000 Styrning Locking plate Sicherungsscheibe Rondelle de blocage Направление Płytka blokująca ...

Страница 25: ...x8 70mm 22 W 9 Insida Inside Innenseite Intérieur Внутр Wewnątrz Utsida Outside Außenseite Extérieur Наруж Na zewnątrz ...

Страница 26: ...mm 1x1335mm 368mm 1335mm 935mm 768mm 768mm Självhäftande Self adhesive Selbstklebend Autocollant Самоприклеивающиеся Samoprzylepne Insida Inside Innenseite Intérieur Внутр Wewnątrz Utsida Outside Außenseite Extérieur Наруж Na zewnątrz ...

Страница 27: ...14 33x21x3mm Styrning Locking plate Sicherungsscheibe Rondelle de blocage Направление Płytka blokująca Insida Inside Innenseite Intérieur Внутр Wewnątrz Utsida Outside Außenseite Extérieur Наруж Na zewnątrz ...

Страница 28: ...1396mm 25 Tak Ceiling Decke Plafond Потолок Sufit Kant I kant Flush fit Kantenbündig Bord à bord Край к краю Wyrównać Upp Up Oben Haut Верх Do góry Ner Down Unten Bas Низ Na dół Tak Ceiling Decke Plafond Потолок Sufit ...

Страница 29: ...26 x11 70mm Tak Ceiling Decke Plafond Потолок Sufit Vägg Wall Wand Cloison Стенка Ścianka ...

Страница 30: ... av rummet Back of the room Rückseite der Kabine Face arrière de la cabine Задняя часть комнаты Tył kabiny Baksidan av rummet Back of the room Rückseite der Kabine Face arrière de la cabine Задняя часть комнаты Tył kabiny ...

Страница 31: ...n av rummet Back of the room Rückseite der Kabine Face arrière de la cabine Задняя часть комнаты Tył kabiny Baksidan av rummet Back of the room Rückseite der Kabine Face arrière de la cabine Задняя часть комнаты Tył kabiny ...

Страница 32: ...1968mm P6 29 Baksidan av rummet Back of the room Rückseite der Kabine Face arrière de la cabine Задняя часть комнаты Tył kabiny ...

Страница 33: ...1968mm P6 30 Baksidan av rummet Back of the room Rückseite der Kabine Face arrière de la cabine Задняя часть комнаты Tył kabiny ...

Страница 34: ...kseite der Kabine Face arrière de la cabine Задняя часть комнаты Tył kabiny Baksidan av rummet Back of the room Rückseite der Kabine Face arrière de la cabine Задняя часть комнаты Tył kabiny Kant i kant Flush fit Kantenbündig Bord à bord Край к краю Wyrównać ...

Страница 35: ...1968mm P6 32 ...

Страница 36: ... in place Eckprofile durch Schlagen mit der Handfläche auf die Profilecke befestigen Frapper de la main dans l angle des profilés d angle pour les mettre en place Прибейте угловые рейки в углу рукой чтобы они были зафиксированы Uderzając dłonią w róg profilu zamontować dekoracyjny profil narożny zgodnie z rysunkiem Upp Up Oben Haut Верх Do góry ...

Страница 37: ... in place Eckprofile durch Schlagen mit der Handfläche auf die Profilecke befestigen Frapper de la main dans l angle des profilés d angle pour les mettre en place Прибейте угловые рейки в углу рукой чтобы они были зафиксированы Uderzając dłonią w róg profilu zamontować dekoracyjny profil narożny zgodnie z rysunkiem Upp Up Oben Haut Верх Do góry ...

Страница 38: ...35 368mm P5 ...

Страница 39: ...36 768mm P5 ...

Страница 40: ...nis die Frontprofile mit Autowachs polieren CONSEIL Pour obtenir le meilleur résultat polir les profilés frontaux avec du polish pour automobile Совет Для достижения оптимального результата отшлифуйте передние рейки автомобильным воском UWAGA W celu uzyskania najlepszego efektu wizualnego profile dekoracyjne można wypolerować woskiem do polerowania samochodów ...

Страница 41: ...38 28x7mm x1 Insida Inside Innenseite Intérieur Внутр Wewnątrz Utsida Outside Außenseite Extérieur Наруж Na zewnątrz ...

Страница 42: ...2x1918mm P11 39 Rengörings servett Cleaning tissue ...

Страница 43: ...2x787mm P10 40 Kant I kant Flush fit Kantenbündig Bord à bord Край к краю Wyrównać Rengörings servett Cleaning tissue ...

Страница 44: ...P12 1x787mm 41 ...

Страница 45: ...1x935mm x8 B8x16mm Ø 3 3 P9 42 Kant I kant Flush fit Kantenbündig Bord à bord Край к краю Wyrównać Kant I kant Flush fit Kantenbündig Bord à bord Край к краю Wyrównać ...

Страница 46: ... Nehmen Sie die Einstellung der Schraubfüße erst dann vor wenn die Kabine am endgültigen Platz steht Pour visser les pieds attendre que la cabine soit en place Не ввинчивайте лапки пока комната не будет стоять на месте Nie wkręcać stopek do momentu przesunięcia kabiny na miejsce docelowego montażu Kant I kant Flush fit Kantenbündig Bord à bord Край к краю Wyrównać ...

Страница 47: ...P15 2x881mm x2 B6x16mm 44 ...

Страница 48: ...45 3x1128mm P12 1 2 26mm x3 3 29mm Upp Up Oben Haut Верх Do góry ...

Страница 49: ...2x1128mm P10 46 Rengörings servett Cleaning tissue ...

Страница 50: ...1x1984mm P10 47 Kant I kant Flush fit Kantenbündig Bord à bord Край к краю Wyrównać Rengörings servett Cleaning tissue ...

Страница 51: ...P14 4x1984mm 48 Kant I kant Flush fit Kantenbündig Bord à bord Край к краю Wyrównać Rengörings servett Cleaning tissue ...

Страница 52: ...Ø 8 118 mm 1 2 3 4 49 P16 1x1745mm Upp Up Oben Haut Верх Do góry Tryck Press Drücken Presser Прижмите Docisnąć ...

Страница 53: ...50 12V DC 220 240V ...

Страница 54: ...51 26mm 29mm 52 P17 ...

Страница 55: ...12V DC 220 240V 53 Ø 8 x4 B6x6 5mm ...

Страница 56: ... 150mm 54 55 x2 35mm x4 x4 22x10 5x2 M10x65 ...

Страница 57: ...x2 B6x32mm 56 57 Förborrade hål Predrilled holes Vorgebohrte Löcher Trous prépercés Предварительно просверленные отверстия Nawiercone otwory Glas Glass Glas Verre Стекло Szkło ...

Страница 58: ...tun 3B utanför bastun Combi Compact h1 Control panel 3A inside the sauna 3B outside the sauna Combi Compact h1 Bedientafel 3A in der Sauna 3B außerhalb der Sauna Combi Compact h1 Tableau de commande 3A à l intérieur du sauna 3B à l extérieur du sauna Combi Compact h1 Combi Compact h1 Панель управления 3A внутри сауны 3B снаружи сауны Combi Compact h1 Panel sterujący 3A wewnątrz sauny 3B na zewnątr...

Страница 59: ......

Отзывы: