background image

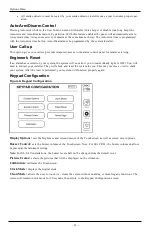
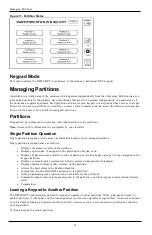
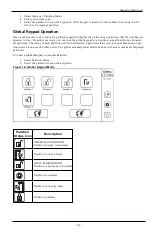
Options Menu

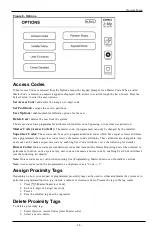
Figure 8- Options

Access Codes

When Access Codes is selected from the Options menu, the keypad prompts for a Master Code. When a valid
Master Code is entered, a numeric keypad is displayed with arrows to scroll through the list of users. Press the
Select button to enter the user options.

Set Access Code:

adds/edits the 4-digit or 6-digit code

Set Partitions:

assigns the user to partitions

User Options:

enables/disables different options for the user

Delete User:

deletes the user from the system

The access codes have programmable attributes which allow zone bypassing, or one-time use activation.

Master Code (Access Code 01):

The master code, if programmed, can only be changed by the installer.

Supervisor Codes:

These codes can be used to program additional codes which have equal or lesser attributes.

Once programmed, the supervisor codes receive the master code’s attributes. These attributes are changeable. Any
user code can be made a supervisor code by enabling User Code Attribute 1 (see the following for details).

Duress Codes:

Duress codes are standard user codes that transmit the Duress Reporting Code when entered to

perform any function on the system. Any user code can be made a duress code by enabling User Code Attribute 2
(see the following for details).

Note:

Duress codes are not valid when entering User Programming, Master Functions or Installer’s sections.

Note:

Access codes cannot be programmed as a duplicate or as a “Code +/- 1”.

Assign Proximity Tags

Depending on how your keypad is programmed, proximity tags can be used to either arm/disarm the system or to
perform a programmed function (e.g. unlock a cabinet or storeroom door). Present the tag to the tag reader.

1.

Press [*][5]Master/Supervisor Code].

2.

Enter a 4-digit or 6-digit user code.

3.

Press 2.

4.

Pass the enrolled tag near the tag reader.

Delete Proximity Tags

To delete a proximity tag:

1.

Select Options, Access Codes [enter Master code].

2.

Select a user to delete.

- 18 -

Содержание HS2TCHP E

Страница 1: ...urer The entire manual should be carefully read UPOZORNĚNÍ Tato příručka obsahuje informace o omezení ve využívání výrobku a jeho funkci a také informace o omezení odpovědnosti výrobce Celou příručku si pečlivě přečtěte WARNUNG Dieses Handbuch enthält Informationen hinsichtlich der Einschränkungen bei der Verwendung des Produkts und der Funktionen und Informationen zu den Einschränkungen bezüglich...

Страница 2: ... 7 Important Notice 7 Specifications and Features 8 Welcome Screen 8 Emergency Keys 9 Arming and Disarming the System 10 Stay Arm Arming the Perimeter 10 Silent Exit Delay 10 Disarm 11 Away Arm 11 Exit Delay Time Restart 11 Alarm Cancel Window 11 Bell Siren Sounds After Away Arming 12 Audible Exit Fault 12 Arming Error 12 Remote Arming and Disarming 12 Using Your System 12 When Alarm Sounds 12 Int...

Страница 3: ...d maintenance 19 Programmable Attributes 19 Bell Squawk Attribute 19 Partition Assignment 19 Erasing an Access Code 19 Installer Menu 19 User Functions 20 Time and Date 20 Auto Arm Time 20 Enable DLS Allow System Service 20 Event Buffer 20 System Test 20 Auto Arm Disarm Control 21 User Call up 21 Engineer s Reset 21 Keypad Configuration 21 Chime Enabled Disabled 22 Arming 22 Partition Status 22 Ke...

Страница 4: ... Walk Test Mode 28 Allowing Computer Access To Your System 28 Reference Sheets 29 System InformationEnabled 29 For Service 29 Central Station Information 29 Installer Information 29 Battery Installation Service Date 29 Access Codes copy as needed 30 Sensor Zone Information copy as needed 31 Guidelines for Locating Smoke Detectors and CO Detectors 32 Smoke Detectors 32 Carbon Monoxide Detectors 33 ...

Страница 5: ...djoining areas since this may cause the color tone to vary Cleaning l If the display surface is contaminated breathe on the surface and gently wipe it with a soft dry cloth If still not completely clean moisten cloth with isopropyl alcohol l Do not use abrasives water thinners solvents or aerosol cleaners spray polish any aromatic solvents ketones etc that may enter through holes in the HS2TCHP E ...

Страница 6: ...keypad s will be mounted in a convenient location inside the protected premises close to the entry exit door s The security system has several zones of protection each connected to one or more sensors motion detectors glassbreak detectors door contacts etc Alarm Memory on page 14 for information on sensors in alarm for this Touchscreen keypad About Your Security System Your DSC Security System has...

Страница 7: ...ion to prevent an unnecessary response Note The monitoring function must be enabled by the installer before it becomes functional Note There is a communicator delay of 30 seconds in this control panel It can be removed or it can be increased up to 45 seconds at the option of the end user by consulting with the installer Note For CP 01 systems the monitoring function must be enabled by the installe...

Страница 8: ...0 bottom Brightness 280 cd m Operating environment 0 C to 49 C 32 F to 120 F 93 max relative humidity non condensing SD card slot Holds any standard Secure Digital SD card 32 x 24 x 2 1 mm If necessary the SD card can be formatted to file system FAT16 or 32 using a PC The maximum size SD card supported is 32GB Welcome Screen The date and time are displayed in the upper right corner of the screen T...

Страница 9: ...te Medical Medical Assistance Required Press and hold for 2 seconds to activate Panic Police Assistance Required Press and hold for 2 seconds to activate Important The Medical and Panic keys are ON by default The Fire key will not function unless programmed by the Installer Please ask your installer if the Fire Medical and Panic keys are enabled Note These events are recorded in the log 9 ...

Страница 10: ...listed panels the Stay Arming exit delay will be twice as long as the Away Arming exit delay Silent Exit Delay If the system is armed using the Stay Arm button or using the No Entry Arming method 9 access code the audible progress annunciation keypad buzzer is silenced and the exit time doubled for that exit period only CP 01 versions only Note For non CP 01 versions Standard exit time is used Whe...

Страница 11: ...ond urgency interval during the exit delay Then 3 beeps sound in the last 10 seconds Note If Quick Arm is not enabled by the installer a numerical keypad is displayed If Disarm is selected during the exit delay l A numeric keypad is displayed Tap your access code l The Arming sequence is aborted and the system returns to the Home screen l The Armed LED turns OFF At the end of the pre programmed ex...

Страница 12: ...e system will acknowledge the command by sounding a single bell squawk if bell squawk is enabled When disarming using the Disarm button on the wireless key the system will acknowledge the command by sounding two bell squawks if bell squawk is enabled that can be heard from the exterior of the premises To arm the system with a proximity tag l Present your proximity tag to a keypad equipped with a p...

Страница 13: ...ss Carbon Monoxide Alarm Activation of your CO alarm indicates the presence of carbon monoxide CO which can be fatal During an alarm the red LED on the CO detector flashes rapidly and the buzzer sounds with a repeating cadence of 4 quick beeps 5 second pause 4 quick beeps Also during an alarm the siren connected to the control panel produces a repeat ing cadence of 4 quick beeps 5 second pause 4 q...

Страница 14: ...encing difficulties with one or more sensors on the system Press to display the zone Call for service Zone Tamper The system has detected a tamper condition with one or more sensors on the sys tem Press to display the zone Call for service Wireless Low Battery The system has detected a low battery condition with one or more mod ules sensors on the system Press to display the zone keypad wireless k...

Страница 15: ... not program a label button on the Outputs screen If a sensor fails to reset it may still be detecting an alarm condition If the sensor reset is suc cessful the alarm is canceled If unsuccessful the alarm will reactivate or continue Outputs Your installer may have programmed these keys to perform various functions reset smoke detector after an alarm open your garage door etc To activate these func...

Страница 16: ...ct Never to keep the slideshow running until the screen is touched Note Maximum of 255 photos are supported Quick Exit If the system is armed and you need to exit use the quick exit function to avoid disarming and rearming the sys tem To activate this function tap the Quick Exit icon You have 2 minutes to leave the premises through your exit door When the door is closed again the remaining exit ti...

Страница 17: ...passed zones are automatically canceled each time the system is disarmed and must be bypassed again if required before the next arming Note 24 hour zones can only be unbypassed manually Note For security reasons your installer has programmed the system to prevent certain zones from being bypassed e g smoke detectors Bypassing Zones with a HS2TCHP When in the Zone Status page scroll up down through...

Страница 18: ... code s attributes These attributes are changeable Any user code can be made a supervisor code by enabling User Code Attribute 1 see the following for details Duress Codes Duress codes are standard user codes that transmit the Duress Reporting Code when entered to perform any function on the system Any user code can be made a duress code by enabling User Code Attribute 2 see the following for deta...

Страница 19: ...m ing Disarming Bell squawks If desired this option may be used with codes that are manually entered Please con tact your installer to have this programmed Note The Master Code cannot use the Bell Squawk attribute but is required to enable it for other codes Note This feature cannot prevent the Arming Disarming squawks from being generated if an access code assigned to a wireless key is manually e...

Страница 20: ...re are zones in an off nor mal condition Enable DLS Allow System Service If enabled the installer will be able to access Installer Programming via remote DLS The DLS window will remain open for 6 hrs during which time the installer will be able to enter DLS an unlimited number of times After the 6 hr window has expired Installer s Programming will be unavailable again until the window is re opened...

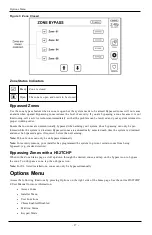
Страница 21: ... Ready light is OFF You will need to contact your installer They will check and reset the system for you This may involve a visit to check your system After the reset is performed your system will function properly again Keypad Configuration Figure 9 Keypad Configuration Display Options sets the brightness and screen timeout of the Touchscreen as well as screen saver options Buzzer Control sets th...

Страница 22: ...he premises when the system is fully armed Ensure that your installer has provided you with a list identifying zones programmed as night 18 zones When the interior zones have been activated i e Night Arm you must enter your access code to disarm the system to gain access to interior areas that have not been programmed as night zones Quick Exit refer to the section Quick Exit Global Away Arm arms a...

Страница 23: ...tition Single partition keypads behave as follows l Displays the armed set state of the partition l Displays open zones if assigned to the partition the keypad is on l Displays bypassed zones and allows zone bypassing or creating bypass groups of zones assigned to the keypad partition l Displays system troubles system low battery system component faults tampers l Displays alarms in memory that occ...

Страница 24: ...all partitions or disarm all partitions The status of each partition will be identified by a partition status icon For an explanation of par tition status icons see the table below The global arm and global disarm buttons will arm or disarm all displayed partitions To Loan a Global Keypad to Another Partition 1 Select Partition Status 2 Select the partition to loan the keypad to Figure 12 Global K...

Страница 25: ...ed to generate an alarm all enabled partitions will go into alarm l One or more fire keypads may be located on any partition l On alarm the fire auto scroll display appears on all partition keypads and on all global keypads Fire alarm silence and fire system reset may be done directly on any partition keypad To silence a fire or CO alarm from a global keypad requires that the global keypad be loan...

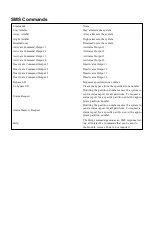
Страница 26: ...lect it 3 Using the numerical pad enter the phone number of the phone you want to authorize and press Save Sending SMS Commands to your System In order to successfully send commands to your system from your cellphone you must send SMS messages in the proper format If configured commands require the inclusion of a User Access Code in your message The access code will be verified by the system befor...

Страница 27: ...put 3 Deactivate Command Output 4 Deactivates Output 4 Bypass 001 Bypasses specified zone number Unbypass 001 Clears the bypass from the specified zone number Status Request Omitting the partition number causes the system to send a status report for all partitions To request a status report for a specific partition enter the appro priate partition number Alarm Memory Request Omitting the partition...

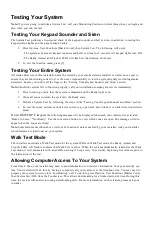
Страница 28: ...ng Your Keypad Sounder and Siren section 4 To test the zones activate each detector in turn e g open each door window or walk in motion detector areas On an HS2TCHP E keypad the following message will be displayed when each zone detector is activated Ready to Force Not Ready Use the zone status button to view which zones are open The message will dis appear when the zones are closed Note Some feat...

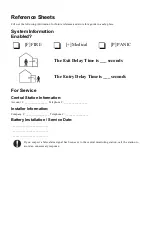
Страница 29: ... seconds For Service Central Station Information Account ________________ Telephone ________________ Installer Information Company ________________ Telephone ________________ Battery Installation Service Date __________________________ __________________________ __________________________ If you suspect a false alarm signal has been sent to the central monitoring station call the station to avoid ...

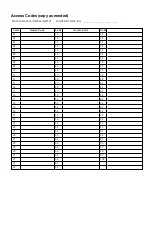
Страница 30: ... Access Code Code 01 35 69 02 36 70 03 37 71 04 38 72 05 39 73 06 40 74 07 41 75 08 42 76 09 43 77 10 44 78 11 45 79 12 46 80 13 47 81 14 48 82 15 49 83 16 50 84 17 51 85 18 52 86 19 53 87 20 54 88 21 55 89 22 56 90 23 57 91 24 58 92 25 59 93 26 60 94 27 61 95 28 62 96 29 63 97 30 64 98 31 65 99 32 66 100 33 67 34 68 ...

Страница 31: ...Sensor Zone Information copy as needed Sensor Protected Area Sensor Type 1 2 3 4 5 6 7 8 9 10 11 12 13 14 15 16 17 18 19 20 21 22 23 24 25 26 27 28 29 30 ...

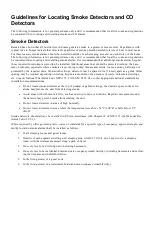
Страница 32: ...uninsulated ceilings etc Consult National Fire Alarm Code NFPA 72 CAN ULC S553 02 or other appropriate national standards for installation recommendations l Do not locate smoke detectors at the top of peaked or gabled ceilings the dead air space in these loc ations may prevent the unit from detecting smoke l Avoid areas with turbulent air flow such as near doors fans or windows Rapid air movement ...

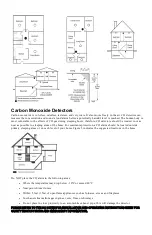
Страница 33: ...larm should be located outside primary sleeping areas or on each level of your home Figure 5 indicates the suggested locations in the home Do NOT place the CO alarm in the following areas l Where the temperature may drop below 10ºC or exceed 40ºC l Near paint thinner fumes l Within 5 feet 1 5m of open flame appliances such as furnaces stoves and fireplaces l In exhaust streams from gas engines ven...

Страница 34: ...s are easily opened Ensure that they are not painted shut and that their locking mechanisms operate smoothly l If opening or using the exit is too difficult for children the elderly or handicapped plans for rescue should be developed This includes making sure that those who are to perform the rescue can promptly hear the fire warning signal l If the exit is above the ground level an approved fire ...

Страница 35: ...oduct is licensed as a single product Its component parts may not be separated for use on more than one HARDWARE unit c Single INTEGRATED PRODUCT If You acquired this SOFTWARE with HARDWARE then the SOFTWARE PRODUCT is licensed with the HARDWARE as a single integrated product In this case the SOFTWARE PRODUCT may only be used with the HARDWARE as set forth in this EULA d Rental You may not rent le...

Страница 36: ...cifications in Subpart B of Part 15 of FCC Rules which are designed to provide reasonable protection against such interference in any residential installation However there is no guarantee that interference will not occur in a particular installation If this equipment does cause interference to television or radio reception which can be determined by turning the equipment off and on the user is en...

Страница 37: ...á příručka dotykové obrazovky HS2TCHP E UPOZORNĚNÍ Tato příručka obsahuje informace o omezení ve využívání výrobku a jeho funkci a také informace o omezení odpovědnosti výrobce Celou příručku si pečlivě přečtěte ...

Страница 38: ...otovostní klávesy 9 Zastřežení a odstřežení systému 10 Částečné zastřežení zastřežení perimetru 10 Prodleva tichého odchodu 10 Odstřežení 11 Zastřežení mimo domov 11 Obnovení času prodlevy odchodu 11 Okno zrušení alarmu 11 Znění zvonku sirény po zastřežení mimo domov 12 Slyšitelná chyba odchodu 12 Chyba zastřežení 12 Vzdálené zastřežení a odstřežení 12 Používání systému 12 Když zazní alarm 12 Nepř...

Страница 39: ...9 Programovatelné atributy 19 Atribut zvukového signálu zvonku 19 Přiřazení oddílů 19 Vymazání přístupového kódu 20 Nabídka instalátora 20 Uživatelské funkce 20 Čas a datum 20 Čas automatického zastřežení 20 Povolit DLS Povolit systémovou službu 20 Vyrovnávací paměť událostí 20 Test systému 20 Ovládání automatického zastřežení odstřežení 21 Požadavek uživatele na servis 21 Resetování technika 21 N...

Страница 40: ... 28 Umožnění přístupu počítače k systému 28 Referenční listy 29 Informace o systémuPovoleno 29 Pro účely servisu 29 Informace o hlavní stanici 29 Informace o instalátorovi 29 Datum instalace servisu baterie 29 Přístupové kódy kopírujte podle potřeby 30 Informace o snímači zóně kopírujte podle potřeby 31 Pokyny pro umisťování detektorů kouře a detektorů CO 32 Detektory kouře 32 Detektory oxidu uhel...

Страница 41: ... změnu barevného tónu Čištění l Pokud je povrch displeje znečištěný dýchněte na něj a jemně jej otřete měkkým suchým hadříkem Pokud to k úplnému vyčištění nestačí navlhčete hadřík izopropylalkoholem l Nepoužívejte abraziva vodu ředidla rozpouštědla ani aerosolové čisticí prostředky laky ve spreji žádná aromatická rozpouštědla ketony apod které by mohly proniknout do otvorů v klávesnici s dotykovou...

Страница 42: ...rostor v blízkosti dveří pro vstup odchod Bezpečnostní systém má několik ochranných zón z nichž každá je připojena k jednomu nebo více snímačům detektory pohybu detektory rozbití skla dveřní kontakty atd Více informací o snímačích v rámci alarmu u této klávesnice s dotykovou obrazovkou Paměť alarmu on page 14 O bezpečnostním systému Bezpečnostní systém DSC byl navržen tak aby poskytoval co největš...

Страница 43: ... abyste zabránili zbytečné reakci Poznámka Aby fungovala musí být monitorovací funkce nejprve aktivována instalátorem Poznámka V této řídicí ústředně činí prodleva komunikátoru 30 sekund Může být odstraněna nebo může být prodloužena až na 45 sekund na základě volby koncového uživatele po poradě s instalátorem Poznámka U systémů CP 01 musí být monitorovací funkce nejprve aktivována instalátorem Údr...

Страница 44: ...280 cd m Provozní prostředí 0 C až 49 C Max 93 relativní vlhkosti bez kondenzace Slot pro kartu SD Může přijmout libovolnou standardní kartu Secure Digital 2 1 32 mm 24 mm 2 1 mm V případě potřeby může být karta SD pomocí PC formátována na souborový systém FAT16 nebo 32 Podporovány jsou karty SD s maximální kapacitou 32 GB Uvítací obrazovka Datum a čas se zobrazují v pravém horním rohu obrazovky S...

Страница 45: ...žadována zdravotní pomoc Pro aktivaci stiskněte a podržte po dobu 2 sekund Nouze Je požadována policejní pomoc Pro aktivaci stiskněte a podržte po dobu 2 sekund Důležité Zdravotní a nouzová klávesa jsou ve výchozím nastavení zapnuté Klávesa Požár nebude fungovat pokud jej instalátor nenaprogramuje Zeptejte se u svého instalátora zda jsou klávesy Požár Zdravotní a Nouze povoleny Poznámka Tyto událo...

Страница 46: ...tifikací SIA FAR bude prodleva odchodu u částečného zastřežení dvakrát delší než prodleva odchodu zastřežení mimo domov Prodleva tichého odchodu Pokud je systém zastřežen tlačítkem částečné zastřežení nebo pomocí metody zastřežení zákaz vstupu 9 přístupový kód zvuková signalizace postupu bzučák klávesnice se utiší a čas odchodu se pouze pro danou dobu odchodu zdvojnásobí pouze verze CP 01 Poznámka...

Страница 47: ...ogramovaná prodleva odchodu l Během prodlevy odchodu dotyková obrazovka vydá pípnutí v 1sekundovém časovém intervalu Poté v posledních 10 sekundách zazní 3 pípnutí Poznámka Pokud instalátor nepovolí Rychlé zastřežení zobrazí se číselná klávesnice Pokud je během prodlevy odchodu zvoleno Odstřežení l Zobrazí se číselná klávesnice Zadejte přístupový kód l Postup zastřežení se přeruší a systém se vrát...

Страница 48: ...potvrdí příkaz tím že vydá jeden zvukový signál zvonku pokud je zvukový signál zvonku povolen Při odstřežení pomocí tlačítka Odstřežení na bezdrátovém klíči systém potvrdí příkaz tím že vydá dva zvukové signály pokud je zvukový signál zvonku povolen které lze slyšet vně prostor Chcete li zastřežit systém pomocí bezkontaktního přívěsku l Přiložte bezkontaktní přívěsek ke klávesnici vybavené bezkont...

Страница 49: ...rů viz část Resetování snímačů Bezdrátový alarm oxidu uhelnatého Aktivace alarmu CO signalizuje přítomnost oxidu uhelnatého CO který může být smrtelně nebezpečný Během alarmu rychle bliká červená kontrolka LED na detektoru CO a bzučák zní v opakujícím se rytmu 4 rychlá pípnutí 5sekundová pauza 4 rychlá pípnutí Během alarmu siréna připojená k řídicí ústředně rovněž vydává v opakujícím se rytmu 4 ry...

Страница 50: ...ystému Stisknutím zobrazíte zónu Tísňové volání Neoprávněná manipulace se zónou Systém zjistil stav neoprávněné manipulace u jednoho nebo více snímačů v systému Stisknutím zobrazíte zónu Tísňové volání Vybitá baterie bezdrátového zařízení Systém zjistil stav vybité baterie u jednoho nebo více modulů snímačů v systému Stisknutím zobrazíte stavy zóny klávesnice bezdrátového klíče bezdrátových klíčů ...

Страница 51: ...stup 2 pokud instalátor nenaprogramoval označení na obrazovce Výstupy Pokud se snímač neresetuje může stále zjišťovat stav alarmu Pokud je resetování snímače úspěšné alarm se zruší Pokud je neúspěšné alarm se opět aktivuje nebo pokračuje Výstupy Instalátor mohl naprogramovat tyto klávesy k provedení různých funkcí resetování detektoru kouře po alarmu otevření garážových vrat atd Chcete li tyto fun...

Страница 52: ...hodin Zvolte Nikdy chcete li prezentaci nechat přehrávat dokud se nedotknete obrazovky Poznámka Je podporováno maximálně 255 fotografií Rychlý odchod Pokud je systém zastřežen a musíte místo opustit použijte funkci rychlého odchodu aby nedošlo k odstřežení a opětnému zastřežení systému Chcete li tuto funkci aktivovat klepněte na ikonu Rychlý odchod Máte 2 minuty na to abyste opustili prostory dveř...

Страница 53: ...í systému a před dalším zastřežením musí být znovu vynechány pokud je to nezbytné Poznámka 24hodinové zóny lze vynechat pouze ručně Poznámka Z bezpečnostních důvodů instalátor naprogramoval systém aby zabránil vynechání některých zón Např detektory kouře Vynechávání zón se zařízením HS2TCHP Když se nacházíte na stránce Stav zóny přejděte nahoru dolů po požadovaných zónách a klepnutím na ikonu vyne...

Страница 54: ...ty hlavního kódu Tyto atributy lze měnit Jakýkoli uživatelský kód může být učiněn kódem správce povolením atributu uživatelského kódu 1 podrobnosti jsou uvedeny níže Tísňové kódy Tísňové kódy jsou standardními uživatelskými kódy které při zadávání pro vykonání jakékoli funkce v systému přenášejí kód pro hlášení tísně Jakýkoli uživatelský kód může být učiněn tísňovým kódem povolením atributu uživat...

Страница 55: ...onku Tento atribut slouží k určení zda má přístupový kód generovat zvukový signál zvonku při zastřežení odstřežení po zadání kódu pro zastřežení mimo domov Bezdrátové klíče s přístupovými kódy které jsou s nimi spojeny mohou generovat zvukové signalizace zastřežení odstřežení Pokud je to požadováno tato možnost může být použita u kódů které jsou zadávány ručně Pro naprogramování této funkce se obr...

Страница 56: ...cké zastřežení dojde následující den ve stejnou dobu Když je proces automatického zastřežení zrušen nebo odložen bude přenášen kód hlášení o zrušení automatického zastřežení pokud je naprogramován Přenos zrušení automatického zastřežení bude předán pokud je zastřežení potlačeno některým z následujících způsobů l Potlačení zastřežení st ss proud l Blokující manipulace se systémem l Porucha správy e...

Страница 57: ...automaticky zastřeží v režimu Mimo domov aktivní zóny částečného zastřežení zastřežení mimo domov nebo se odstřeží každý den ve stejnou dobu Čas automatického zastřežení se programuje tlačítkem Čas automatického zastřežení Automatické odstřežení musí být naprogramováno instalátorem systému Požadavek uživatele na servis Tato volba poskytuje provozovateli služeb dočasný přístup k zabezpečovací ústře...

Страница 58: ... budou nyní zastřeženy kromě zařízení naprogramovaných jako noční zóny Noční zóny jsou zastřeženy pouze v režimu Mimo domov To umožňuje omezený pohyb v prostorách když je systém plně zastřežen Ověřte že vám instalátor poskytl seznam s uvedením zón naprogramovaných jako noční zóny Pro získání přístupu do oblastí interiéru které nebyly naprogramovány jako noční zóny když byly zóny interiéru aktivová...

Страница 59: ...em pracují následujícím způsobem l Zobrazuje stav zastřeženo nastaveno oddílu l Zobrazí otevřené zóny pokud jsou přiřazeny k oddílu ve kterém je klávesnice zapnutá l Zobrazuje vynechané zóny a umožňuje vynechání zón nebo vytváření skupin vynechání zón přiřazených k oddílům klávesnice l Zobrazuje problémy se systémem vybití baterie systému poruchy systémových komponent neoprávněná manipulace s nimi...

Страница 60: ...it všechny oddíly nebo odstřežit všechny oddíly Stav jednotlivých oddílů udává ikona stavu oddílu Vysvětlení ikon stavu oddílu naleznete v následující tabulce Tlačítka pro globální zastřežení a globální odstřežení zastřeží nebo odstřeží všechny zobrazené oddíly Chcete li zapůjčit globální klávesnici jinému oddílu 1 Zvolte Stav oddílů 2 Vyberte oddíl kterému chcete klávesnici zapůjčit Obrázek 12 Re...

Страница 61: ...larmu přejdou všechny povolené oddíly l V jakémkoli oddílu lze umístit jednu nebo více klávesnic l Při alarmu se na všech klávesnicích oddílu a na všech globálních klávesnicích zobrazí hlášení o požáru s automatickým posouváním Utišení požárního alarmu a resetování požárního systému lze provádět přímo na kterékoli klávesnici přiřazené oddílu Utišení požárního nebo CO alarmu z globální klávesnice v...

Страница 62: ...cích nahoru a dolů vyhledejte prázdné telefonní číslo a vyberte jej 3 Pomocí číselné klávesnice zadejte telefonní číslo telefonu které chcete autorizovat a stiskněte tlačítko Uložit Odesílání SMS příkazů do systému Pro úspěšné odesílání příkazů do systému z mobilního telefonu je nutné posílat SMS zprávy ve správném formátu Pokud jsou příkazy nakonfigurovány vyžadují aby byl ve zprávě zahrnutý kód ...

Страница 63: ...tivuje výstup 2 Deaktivovat příkazový výstup 3 Deaktivuje výstup 3 Deaktivovat příkazový výstup 4 Deaktivuje výstup 4 Vynechat 001 Vynechá zadané číslo zóny Zrušit vynechání 001 Odstraní vynechání u zadaného čísla zóny Požadavek na stav Neuvedení čísla oddílu má za následek že systém odešle zprávu o stavu všech oddílů Chcete li požádat o zprávu o stavu u konkrétního oddílu zadejte příslušné číslo ...

Страница 64: ... budete postupovat podle všech kroků v části Zkoušení bzučáku klávesnice a sirény 4 Chcete li zkontrolovat zóny aktivujte postupně každý detektor např otevřete jednotlivé dveře okna nebo projděte oblasti detektoru pohybu Když se aktivuje jednotlivá zóna detektor na klávesnici HS2TCHP E se zobrazí následující zpráva Připraveno k vynucení Nepřipraveno Pomocí tlačítka stavu zóny zobrazíte které zóny ...

Страница 65: ...ly servisu Informace o hlavní stanici Ć účtu ________________ Telefonní č ________________ Informace o instalátorovi Ć společnosti ________________ Telefonní č ________________ Datum instalace servisu baterie __________________________ __________________________ __________________________ Pokud máte podezření že byl na hlavní monitorovací stanici odeslán falešný signál alarmu stanici telefonicky k...

Страница 66: ...d Kód Přístupový kód Kód 01 35 69 02 36 70 03 37 71 04 38 72 05 39 73 06 40 74 07 41 75 08 42 76 09 43 77 10 44 78 11 45 79 12 46 80 13 47 81 14 48 82 15 49 83 16 50 84 17 51 85 18 52 86 19 53 87 20 54 88 21 55 89 22 56 90 23 57 91 24 58 92 25 59 93 26 60 94 27 61 95 28 62 96 29 63 97 30 64 98 31 65 99 32 66 100 33 67 34 68 ...

Страница 67: ...Informace o snímači zóně kopírujte podle potřeby Snímač Chráněná oblast Typ snímače 1 2 3 4 5 6 7 8 9 10 11 12 13 14 15 16 17 18 19 20 21 22 23 24 25 26 27 28 29 30 ...

Страница 68: ...onal Fire Alarm Code NFPA 72 CAN ULC S553 02 Národní protipožární alarmový kodex NFPA 72 CAN ULC S553 02 nebo jiné příslušné národní normy l Neumisťujte detektory kouře na vrchol šikmých nebo sedlových stropů prostor nepohyblivého vzduchu v těchto místech může zabránit tomu aby jednotka detekovala kouř l Vyhněte se místům s turbulentním prouděním vzduchu například v blízkosti dveří ventilátorů neb...

Страница 69: ... co nejblíže k nim Pro maximální ochranu by měl být alarm CO umístěn vně hlavních prostor pro spaní nebo na každé úrovni domácnosti Obrázek 5 ukazuje doporučená umístění v domácnosti Alarm CO NEUMISŤUJTE do následujících oblastí l Tam kde teplota může klesnout pod 10 C nebo překročit 40 C l V blízkosti výparů ředidla l Do vzdálenosti 1 5 metru od zařízení s otevřeným plamenem jako jsou kotle kamna...

Страница 70: ...o otevírají Zajistěte aby nebyly přilepené a zablokované barvou a aby jejich zajišťovací mechanismy řádně fungovaly l Je li otevření nebo použití únikového východu příliš obtížné pro děti starší osoby nebo osoby se zdravotním postižením musí být vypracovány plány na záchranu To zahrnuje zajištění toho aby osoby které mají záchranu provést byly schopné neprodleně slyšet signál varování před požárem...

Страница 71: ... pro zajištění shody s podmínkami této smlouvy EULA b Oddělování komponent Softwarový Produkt je licencován jako jediný produkt Jednotlivé komponenty nelze oddělovat pro použití na více než jedné HARDWAROVÉ jednotce c Jediný INTEGROVANÝ PRODUKT Pokud jste tento SOFTWARE získali s HARDWAREM potom je SOFTWAROVÝ PRODUKT s HARDWAREM licencován jako jediný integrovaný produkt V tomto případě může být S...

Страница 72: ...j provedena zkouška typu a bylo shledáno že vyhovuje limitům pro zařízení třídy B v souladu se specifikacemi v dílčí části B části 15 pravidel FCC která jsou navržena tak aby poskytovala přiměřenou ochranu proti takovýmto rušivým vlivům v jakékoli obytné instalaci Neexistuje však žádná záruka že v určité instalaci nedojde k rušení Pokud toto zařízení vskutku způsobuje rušení televizního nebo rozhl...

Страница 73: ...Dieses Handbuch enthält Informationen hinsichtlich der Einschränkungen bei der Verwendung des Produkts und der Funktionen und Informationen zu den Einschränkungen bezüglich der Haftung des Her stellers Lesen Sie das gesamte Handbuch aufmerksam durch ...

Страница 74: ... Begrüßungsbildschirm 8 Notfalltasten 9 System Scharfschalten und Unscharfschalten 10 Anwesend Scharfschalten Scharfschalten der Außenhaut 10 Stille Ausgangsverzögerung 10 Unscharfschaltung 11 Abwesend scharfschalten 11 Ausgangsverzögerungszeit Neustart 11 Alarm Abbrechen Zeitfenster 11 Sirenentöne nach Abwesend Scharfschalten 12 Akustischer Ausgangsfehler 12 Scharfschaltfehler 12 Scharfschaltung ...

Страница 75: ...bare Attribute 19 Sirenenanschlags Attribut 19 Bereichszuordnung 19 Zugangscode löschen 20 Errichtermenü 20 Benutzer Funktionen 20 Zeit und Datum 20 Automatische Scharfschaltzeit 20 DLS aktivieren System Service zulassen 20 Ereignisspeicher 20 Systemtest 21 Automatische Kontrolle Scharfschaltung Unscharfschaltung 21 Benutzer Aufruf 21 Errichter Rücksetzung 21 Bedienteilkonfiguration 21 Gong aktivi...

Страница 76: ...8 Testen des kompletten Systems 28 Gehtestmodus 28 Computerzugriff zu Ihrem System gestatten 28 Referenzblätter 29 SysteminformationenAktiviert 29 Für Service 29 Notrufzentrale Informationen 29 Errichter Informationen 29 Batterie Installation Wartung 29 Zugangscodes ggf kopieren 30 Sensor Linieninformationen ggf kopieren 31 Richtlinien zur Platzierung von Rauch und CO Meldern 32 Rauchmelder 32 Koh...

Страница 77: ...schirm oder den umgebenden Bereichen auf Das verursacht Farb schwankungen Reinigung l Hauchen Sie auf ein verschmutztes Display und wischen Sie es dann vorsichtig mit einem weichen tro ckenen Tuch ab Ist das nicht ausreichend so feuchten Sie ein Tuch mit etwas Isopropanol an l Verwenden Sie keine Scheuermittel Wasser Verdünner Lösungsmittel oder Aerosolreiniger Sprüh politur keine aromatischen Lös...

Страница 78: ...enstatus Das die Bedienteil e ist sind an gut zugänglicher Stelle im gesicherten Bereich in der Nähe der Zugangstür en installiert Das Sicherheitssystem hat mehrere Linien an die jeweils ein oder mehrere Melder bzw Sensoren angeschlossen sind Bewegungsmelder Glasbruchmelder Türöffnungskontakte usw Alarmspeicher Auf Seite 14 für Infor mationen zu Sensoren im Alarmzustand für dieses Touchscreen Bedi...

Страница 79: ...ngreifen zu vermeiden Hinweis Die Überwachungsfunktion muss durch den Errichter aktiviert werden Hinweis Das Wählgerät in dieser Alarmzentrale hat eine Verzögerung von 30 Sekunden Die Verzögerung kann nach Absprache mit dem Errichter entfernt oder auf 45 Sekunden verlängert werden Hinweis Bei CP 01 Anlagen muss die Überwachungsfunktion durch den Errichter aktiviert werden bevor diese in Funktion t...

Страница 80: ...t 280 cd m Betriebsumgebung 0 C bis 49 C 32 F bis 120 F 93 max relative Luftfeuchtigkeit nicht kondensierend SD Kartensteckplatz Geeignet für jede Standard SD Karte 32 x 24 x 2 1 mm Falls nötig kann die SD Karte auf einem PC im Dateisystem FAT16 oder 32 formatiert werden Die maximale Größe der unterstützten SD Karte beträgt 32 GB Begrüßungsbildschirm Datum Zeit werden in der oberen rechten Ecke de...

Страница 81: ...derlich Halten Sie die Schaltfläche für 2 Sekunden berührt Panik Polizeiliche Hilfe wird angefordert Halten Sie die Schaltfläche für 2 Sekunden berührt Wichtig Die Tasten medizinische Hilfe und Panik sind standardmäßig aktiviert Die Taste Feuer funktioniert nicht wenn sie nicht vom Errichter programmiert wurde Bitte fragen Sie Ihren Errichter ob die Tasten Feuer Medi zinische Hilfe und Panik aktiv...

Страница 82: ...SIA FAR gelistete Alarmanlagen ist die Ausgangsverzögerung Anwesend Scharfschalten doppelt so lang wie die Ausgangsverzögerung Abwesend Scharfschalten Stille Ausgangsverzögerung Wird das System mit Anwesend Scharfschalten oder mit der Kein Eingang Scharfschaltmethode scharfgeschaltet 9 Zugangs Code so ist die hörbare Fortschrittsanzeige Bedienteil Summer stummgeschaltet und die Aus gangszeit nur f...

Страница 83: ...ekunden Notfall Intervall während der Aus gangsverzögerung Dann ertönen 3 Signaltöne in den letzten 10 Sekunden Hinweis Wenn Schnelles Scharfschalten nicht vom Errichter aktiviert wird wird ein Ziffernblock angezeigt Wird Unscharfschalten während der Ausgangsverzögerung gewählt l Ein Ziffernblock wird angezeigt Geben Sie Ihren Zugangscode ein l Die Scharfschaltsequenz wird unterbrochen und das Sys...

Страница 84: ... kann mit der Funk Fernbedienung oder dem Transponder scharf bzw unscharf geschaltet werden Beim Scharfschalten des Systems mit der Scharfschalttaste auf der Fernbedienung bestätigt das System den Befehl mit einem einmaligen Sirenenanschlag wenn Sirenenanschlag aktiviert ist Beim Unscharfschalten mit der Unscharfschalttaste auf der Fernbedienung bestätigt das System den Befehl mit zwei Sirenenansc...

Страница 85: ... um einen Einsatz zu vermeiden Fragen Sie die Errichterfirma ob Ihr System mit Feuer Erkennung ausgerüstet ist Zum Rücksetzen der Melder siehe Abschnitt Melder zurücksetzen Funk Kohlenmonoxidalarm Die Aktivierung Ihres CO Alarms zeigt das Vorhandensein des tödlichen Kohlenmonoxidgases CO an Während eines Alarms blinkt die rote LED auf dem CO Melder schnell und der Summer ertönt im wiederholten Rhy...

Страница 86: ...Linie Sabotage Das System hat einen Sabotageversuch bei einem oder mehreren Gerä ten innerhalb Systems erkannt Drücken Sie zum Anzeigen der Linie Service rufen Drahtlosgerät Batterie schwach Das System hat eine schwache Batterie bei einem oder mehreren Modu len Sensoren innerhalb des Systems erkannt Drücken Sie zur Anzeige einer schwachen Batterie der Linie des Bedienteils der Fernbedienung und de...

Страница 87: ...dschirm Ausgänge Wenn ein Melder sich nicht zurücksetzen lässt kann es sein dass er noch immer einen Alarmzustand erkennt Wird der Melder erfolgreich zurückgesetzt so wird der Alarm abgebrochen Ist die Rücksetzung nicht erfolgreich so wird der Alarm erneut aktiviert bzw fortgesetzt Ausgänge Ihr Errichter hat diese Schaltflächen möglicherweise für weitere Funktionen programmiert Rauchmelder nach Al...

Страница 88: ...ufen zu lassen bis der Bildschirm erneut angetippt wird Hinweis Maximal 255 Fotos werden unterstützt Schnell verlassen Ist das System scharf und Sie möchten den gesicherten Bereich verlassen so benutzen Sie die Funktion Schneller Ausgang um die Unscharfschaltung und erneute Scharfschaltung des Systems zu vermeiden Zur Aktivierung die ser Funktion tippen Sie auf das Symbol Schneller Ausgang Sie hab...

Страница 89: ...jedes Mal aufgehoben wenn das System unscharf geschaltet wird und sie müssen vor dem nächsten Scharfschalten ggf erneut abgeschaltet werden Hinweis Die Umgehung von 24 Stunden Linien kann nur manuell aufgehoben werden Hinweis Aus Sicherheitsgründen hat Ihr Errichter das System so programmiert dass bestimmte Linien nicht abge schaltet werden können z B Rauchmelder Linienabschaltung mit einem HS2TCH...

Страница 90: ...ute haben Nach der Programmierung erhalten die Überwachungscodes die Attribute des Mastercodes Diese Attribute können geändert werden Jeder Benutzercode kann zu einem Überwachungscode gemacht werden indem das Benutzercode Attribut 1 aktiviert wird Einzelheiten nachstehend Nötigungscodes Nötigungscodes sind Standard Benutzercodes welche den Nötigungs Berichtscode an die Not rufzentrale übertragen w...

Страница 91: ...ukünftige Benutzung 3 Linienabschaltung aktiviert 7 Sirenenanschlag bei Scharfschalten Unscharfschalten 4 Fernzugriff 8 Gelegentlicher Benutzer Code Sirenenanschlags Attribut Dieses Attribut dient der Festlegung ob ein Zugangscode einen Scharfschalten Unscharfschalten Sirenenanschlag bei Eingabe für Abwesend Scharfschalten erzeugen soll Die Fernbedienungen mit Zugangscodes können Scharf schalten U...

Страница 92: ...n der Warnzeitraum komplett ist schaltet das System ohne Ausgangsverzögerung und im Abwesendmodus scharf Die automatische Scharfschaltung kann durch Eingabe eines gültigen Zugangscodes nur während des pro grammierten Warnzeitraums abgebrochen oder verschoben werden Die automatische Scharfschaltung wird zur sel ben Zeit am nächsten Tag versucht Wird die automatische Scharfschaltung abgebrochen oder...

Страница 93: ... die Auto Scharf und Auto Unscharf Funktion je Bereich aktiviert drei Signaltöne oder deaktiviert Mit der Aktivierung dieser Funktion schaltet die Alarmzentrale automatisch jeden Tag um dieselbe Zeit im Abwesendmodus scharf Anwesend Abwesendlinien aktiv oder unscharf Die Zeit der automatischen Scharfschaltung wird mit der Schaltfläche Auto Scharf Zeit programmiert Die automatische Unscharfschaltun...

Страница 94: ...endmodus drücken Sie Nacht Scharfschalten Alle Innenraum Linien werden nun scharfgeschaltet außer Geräte die als Nachtlinien pro grammiert wurden Nachtlinien werden nur im Abwesendmodus scharfgeschaltet Dies erlaubt beschränkte Bewe gungsfreiheit im Gebäude wenn das System vollständig scharfgeschaltet ist Achten Sie darauf dass der Errichter Ihnen eine Liste der als Nachtlinien programmierten Lini...

Страница 95: ...nen Bereich oder alle Bereiche steuern können Hinweis Der Zugriff auf diese Funktion muss von Ihrem Errichter konfiguriert werden Einzelbereichsbetrieb Bedienteile für einzelne Bereiche ermöglichen den Zugriff auf Alarmfunktionalitäten für einen zugewiesenen Bereich Bedienteile für einzelne Bereiche verhalten sich wie folgt l Anzeige des Status Scharfgeschaltet des Bereichs l Zeigt offene Linien a...

Страница 96: ...trieb Sobald ein gültiger Zugangscode eingegeben wurde zeigt ein globales Bedienteil den Status aller Bereiche an für die der Benutzer eine Berechtigung zur Anzeige hat In dieser Übersicht können Sie das globale Bedienteil einem Bereich leihen alle Bereiche scharf oder unscharf schalten Der Status jedes Bereichs wird durch ein Bereichs statussymbol gekennzeichnet Eine Erklärung der Bereichsstatuss...

Страница 97: ...slösen eines Alarms benutzt so begeben sich alle aktivierten Bereiche in Alarmzustand l Ein oder mehrere Feuer Bedienteil e kann können sich in einem jeden beliebigen Bereich befinden l Bei Alarm erscheint die automatische Scrollanzeige des Feueralarms auf allen Bereichs Bedienteilen und globalen Bedienteilen Die Zurücksetzung von Feueralarm und Brandmeldeanlage kann direkt von jedem Bedienteil au...

Страница 98: ...mit dem Zahlenfeld die Rufnummer des Telefons ein das Sie autorisieren möchten dann tip pen Sie auf Speichern Senden von SMS Befehlen an die Alarmanlage Die SMS Nachrichten die Sie an Ihre Alarmanlage übermitteln müssen im korrekten Format gesendet werden Bei entsprechender Konfiguration erfordern die Befehle einen Benutzer Zugangscode innerhalb der Nachricht Der Zugangscode wird von der Anlage ve...

Страница 99: ...ausgang 4 Deaktiviert Ausgang 4 Abschaltung 001 Schaltet die angegebene Liniennummer ab Abschaltung aufheben 001 Löscht die Abschaltung der angegebenen Lini ennummer Abfrage Status Das Weglassen der Bereichsnummer führt dazu dass die Anlage einen Statusbericht für alle Berei che sendet Um einen Statusbericht für einen bestimmten Bereich anzufordern geben Sie bitte die entsprechende Bereichsnummer ...

Страница 100: ...dienteils und Sirene testen durch 4 Testen Sie die Linien durch aufeinander folgende Aktivierung jedes einzelnen Melders z B Öffnen jeder Tür jedes Fensters oder gehen Sie in den Abdeckungsbereich der Bewegungsmelder Auf einem Bedienteil HS2TCHP E wird die folgende Meldung angezeigt wenn die einzelnen Linien Mel der aktiviert werden Bereit für erzwungene Scharfschaltung Nicht bereit Mit der Schalt...

Страница 101: ...ngsverzögerung beträgt _______ Sekunden Für Service Notrufzentrale Informationen Konto ___________________ Telefon ________________ Errichter Informationen Firma ___________________ Telefon ________________ Batterie Installation Wartung __________________________ __________________________ __________________________ Wenn Sie vermuten dass ein Fehlalarmsignal an die Notrufzentrale übertragen wurde ...

Страница 102: ...Zugangscode Code 01 35 69 02 36 70 03 37 71 04 38 72 05 39 73 06 40 74 07 41 75 08 42 76 09 43 77 10 44 78 11 45 79 12 46 80 13 47 81 14 48 82 15 49 83 16 50 84 17 51 85 18 52 86 19 53 87 20 54 88 21 55 89 22 56 90 23 57 91 24 58 92 25 59 93 26 60 94 27 61 95 28 62 96 29 63 97 30 64 98 31 65 99 32 66 100 33 67 34 68 ...

Страница 103: ...Sensor Linieninformationen ggf kopieren Sensor Gesicherter Bereich Sensortyp 1 2 3 4 5 6 7 8 9 10 11 12 13 14 15 16 17 18 19 20 21 22 23 24 25 26 27 28 29 30 ...

Страница 104: ... sein Beachten Sie die Nationalen Feueralarmvorschriften NFPA 72 CAN ULC S553 02 oder entsprechende andere nationale Normen für Montageempfehlungen l Platzieren Sie Rauchmelder nicht auf Spitz und Giebeldächern da durch den abgeschlossenen Luft bereich das Gerät eventuell nicht imstande ist Rauch zu erkennen l Vermeiden Sie Bereiche mit lebhafter Luftbewegung in der Nähe von Türen Ventilatoren ode...

Страница 105: ...lte sich ein CO Melder auch außerhalb primärer Schlafbereiche oder auf jeder Ebene Ihres Hauses befinden Abbildung 5 zeigt die empfohlenen Positionen im Haus Platzieren Sie den CO Melder NICHT in folgenden Bereichen l Wo die Temperatur unter 10 C fallen oder über 40 C steigen kann l Nahe Bereichen wo Dämpfe von Farbverdünnern auftreten l Innerhalb von 1 5 m 5 Fuß von Geräten mit offenen Flammen wi...

Страница 106: ... können Stel len Sie sicher dass Fluchtwege nicht mittels Farbe verklebt und dadurch versperrt wurden und dass Schließmechanismen ordnungsgemäß funktionieren l Wenn das Öffnen oder die Verwendung eines Ausgangs für Kinder ältere Menschen oder Behinderte zu schwierig ist sollten Pläne für deren Rettung entwickelt werden Dies sollte beinhalten dass diejenigen die die Rettung durchführen werden den F...

Страница 107: ...on DSC nicht verändern oder modifizieren Sie dürfen keine Eigen tumshinweise Markierungen oder Aufkleber vom Softwareprodukt entfernen Sie müssen auf angemessene Weise dafür sorgen dass die Bedingungen dieser Endverbraucher Lizenzvereinbarung eingehalten werden b Trennung von Komponenten Das SOFTWAREPRODUKT ist als Einzelprodukt lizenziert Seine Komponenten dürfen nicht zur Nutzung auf mehr als ei...

Страница 108: ... DSC genehmigt wurden könnten die Berechtigung des Benutzers zum Betrieb dieses Geräts auf heben Dieses Gerät erzeugt und benutzt Funkfrequenzenergie und kann wenn es nicht gemäß den Anweisungen des Herstellers installiert und benutzt wird Radio und Fern sehempfang beeinträchtigen Das Gerät wurde einer Typenprüfung unterzogen und hält die Grenzwerte für ein Digitalgerät der Klasse B gemäß Unterabs...

Отзывы:

Похожие инструкции для HS2TCHP E