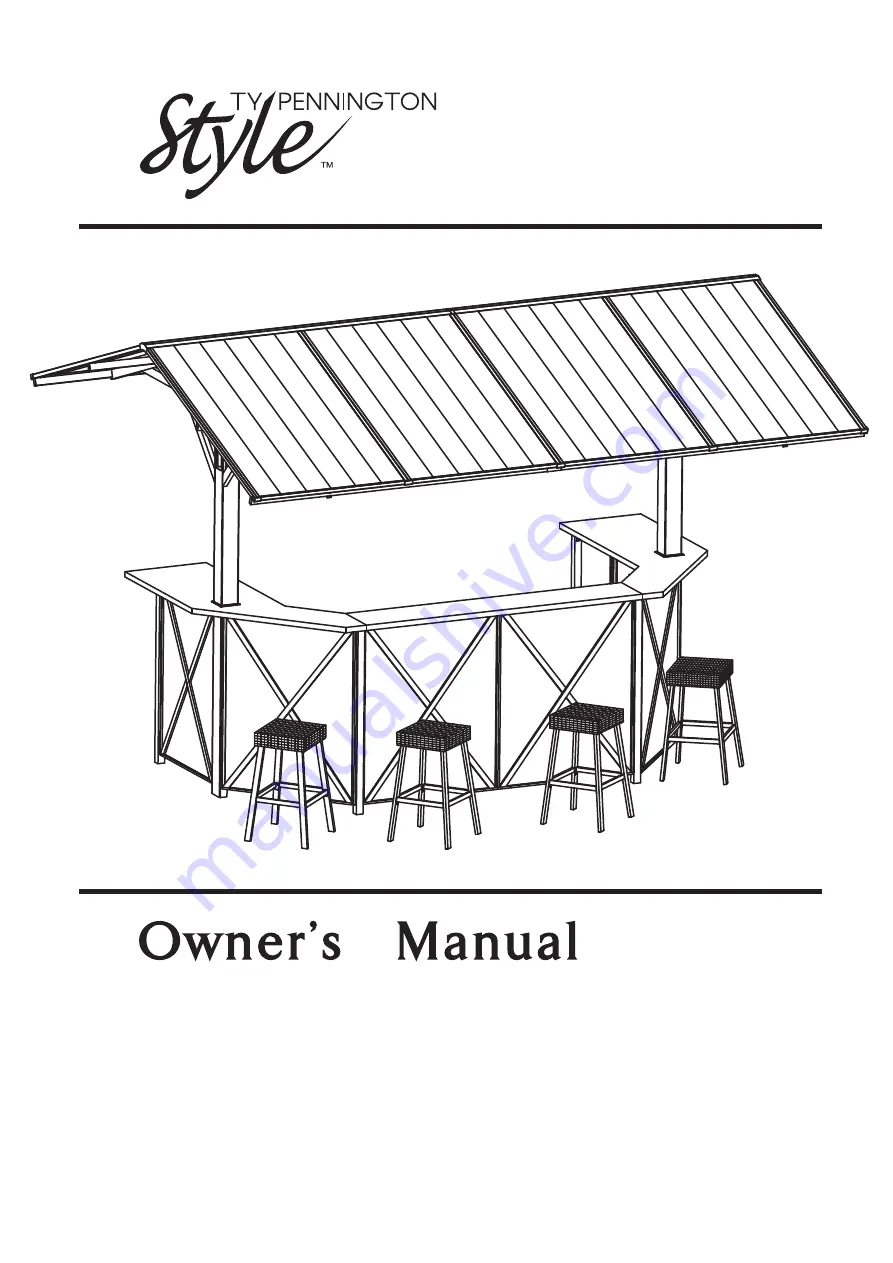
manualshive.com logo in svg
background image

Date of purchase: _____/ _____/ _____

1

Product Code: D71 M33572
UPC Code: 749241314506

SUNSET BEACH DELUXE LIGHTED HARDTOP BAR W/ 4 STOOLS

Содержание Style SUNSET BEACH DELUXE LIGHTED HARDTOP BAR W/ 4 STOOLS

Страница 1: ...Date of purchase _____ _____ _____ 1 Product Code D71 M33572 UPC Code 749241314506 SUNSET BEACH DELUXE LIGHTED HARDTOP BAR W 4 STOOLS...

Страница 2: ...reference Some parts may contain sharp edges Wear protective gloves as necessary Always place the cushions on seat frame of the chair to aviod damage to the piece This outdoor furniture is designed an...

Страница 3: ...AQ AQ AQ AQ AQ AL AM AR AR AO AO AN AN AS AS AT AT AT AT AT AT AP AP AP AP AP AP AJ AK AI AH AF AG AE AD AD AE AG AF AH AI AC AB Z Y X AU AU W V U J L K H I G F E E C D A B N P Q O M T S T T R...

Страница 4: ...AW AX AX AY AY...

Страница 5: ...ription Qty Sketch Front Panel Post Front Panel Side Panel Side Panel Side Panel Back Panel Back Panel Fixed Tube Shelf Shelf 1 1 1 1 2 1 1 1 1 1 1 1 1 1 1 1 1 Post Fixed Tube Fixed Tube Shelf Shelf S...

Страница 6: ...Roof Post Crossbeam Crossbeam Connector Roof Support Bar Roof Side Panel Roof Side Panel Description Sketch 3 2 2 2 2 1 1 1 1 1 2 2 1 1 1 1 1 Qty Support Piece Support Piece Table Top Table Top Roof S...

Страница 7: ...r Crossbeam Tube Upper Crossbeam Tube Upper Crossbeam Cover Upper Crossbeam Cover Roof Tube Rubber Washer Description Sketch 1 1 1 1 2 2 6 8 2 2 6 2 1 Qty 4 8 8 Roof Tube Roof Panel Corner Connector C...

Страница 8: ...Nut Allen Wrench Spanner Description Sketch 1 1 15 8 20 8 27 26 111 M6 X 15 M6 X 25 M6 X 30 M6 X 45 M6 X 55 M6 X 65 4 M6 X 48 4 M6 X 58 Cap Qty 15...

Страница 9: ...A C E C C E E A x 1 BB x 1 x 1 1 1 1 1 1 1 Secure Side Panel E in between Post A and Back Panel C by M6 x 25 BB...

Страница 10: ...B D D E BB 2 Repeat last step Secure Side Panel E in between Post B and Front Panel D by M6 x 25 BB Note Please double check above fig and make sure all the parts in the right direction x 1 x 1 x 1 1...

Страница 11: ...Z AB AC AA AA AC AB Z Z AC Z AC AB x 1 X 1 x 1 AB 3 1 Insert Crossbeam Connector AC into Crossbeam Z then connect wire 3 2 Insert Crossbeam AB into Crossbeam Connector AC and secure by M6 X 15 AA 1 2...

Страница 12: ...AF AG AG AF EE EE AF AG AF AG JJ KK JJ KK x 2 x 2 4 Secure two Roof Support Bar AF AG by M6 X 48 EE with Nut JJ then cover by Cap KK 1 1...

Страница 13: ...AH AI AH AI EE JJ AH AI AH AI KK 5 Secure two Roof Support Bar AH AI together by M6 X 48 EE on the outside hole with Nut JJ then cover with Cap KK x 2 x 2 EE 1 1 JJ KK...

Страница 14: ...AJ AK AJ AK AJ AK AK AJ AA x 1 x 1 AA 6 Secure two Upper Crossbeam Tube AJ AK by M6 X 15 AA 1 1...

Страница 15: ...F G A F A F BB G B x 1 x 1 7 Secure Side Panel F and Post A by M6 X 25 BB Repeat this step on the other side Secure Side Panel G and Post A by M6 X 25 BB 1 1 1 1...

Страница 16: ...H I G F H I H I I G CC JJ x 1 x 1 8 1 Secure Front Panel H I by M6 X 35 CC with nut JJ then cover by cap KK 8 2 Secure Side Panel F G on the two side of Front Panel H I BB 2 1 2 1 2 2 1 KK...

Страница 17: ...A x 1 x 1 J C AA J F 9 1 Secure Fixed Tube J K on Back Panel C D by M6 X 15 AA AA 9 2 Secure Fixed Tube J K on Side Panel F G by M6 X 15 AA x 1 1 1 2 2 3 3 1 2 3 9 3 Secure Fixed Tube L in between Sid...

Страница 18: ...x 1 10 1 Secure Shelf N on Back Panel D and Side Panel E underneath by M6 X 15 AA 10 2 Repeat this step on the other side Secure Shelf M on the Back Panel C and Side Panel E underneath by M6 X 15 AA...

Страница 19: ...O P G B P A F x 1 x 1 O 1 1 11 1 Secure Shelf O on Post A by M6 X 15 AA 11 2 Repeat this step Secure Shelf P on the Post B by M6 X 15 AA P B G AA AA AA 1...

Страница 20: ...Q AA AA Q Q H I H I x 1 12 Secure Shelf Q on Front Panel H I by M6 X 15 AA 1 1...

Страница 21: ...S on Shelf Q P by M6 X 15 AA with Nut JJ cover by cap KK then secure Support Piece S on Side Panel G by M6 X 15 AA 13 3 Secure Support Piece T on Shelf Q by M6 X 15 AA then secure Shelf I by M6 X 35...

Страница 22: ...I V W U DD BB E K V BB DD BB x 1 x 1 x 1 14 Place Table Top U V W on the top of assembled frame then secure Side panel E F G and Front Panel H I underneath with Table Top U V W by M6 x 45 DD and M6 x...

Страница 23: ...er AU into Roof Post X then connect wires Insert Roof Post X into Post A secure by M6 X 15 AA 15 2 Repeat this step on the other side Insert Rubber Washer AU into Roof Post Y then connect wires Insert...

Страница 24: ...I JJ x 2 x 2 16 1 Secure two Roof Side Panel AD AE by M6 X 58 GG with Nut JJ then cover by Cap KK 16 2 Repeat this step on the other side Secure two Roof Side Panel AD AE by M6 X 58 GG with Nut JJ the...

Страница 25: ...AD AE Z AA X X Z AE AE AD AD X Y Z AB AA 17 1 Connect two side of Crossbeam Z AB wires with Roof Post X Y wires 17 2 Secure two side of Crossbeam Z AB with Roof Post X Y by M6 X 15 AA 1 2 1 2...

Страница 26: ...G AF AF AH AH AI AI 18 1 Secure two side of Roof Support Bar AF AG on the top of Roof Side Panel AD AE by M6 x 35 CC 18 2 Secure two Side of Roof Support bar AH AI on the top of Roof Side Panel AD AE...

Страница 27: ...AD AE AE AD AJ AK AE AD AJ AA AA 19 Secure Upper Crossbeam Tube AJ AK on the top of Roof Side Panel AD AE by M6 X 15 AA 1 1 1...

Страница 28: ...AL AM AA AA AJ AK AM AL AK AJ AM AL x 1 x 1 20 Place Upper Crossbeam Cover AL AM on the top of Upper Crossbeam Tube AJ AK then secure by M6 X 15 AA 1 1...

Страница 29: ...AA FF AF AG AP FF AH AI AK x 2 x 2 x 6 21 Secure Roof Tube AP with Upper Crossbeam Tube AK by M6 X 15 AA Then secure with middle and bottom of Roof Support Bar AF AG AH AI by M6 X 55 FF Repeat this s...

Страница 30: ...Panel AQ 22 2 Secure Corner Connect AS on the corner of roof by M6 x 15 AA Warning Please Hold Roof panel still to avoid the roof slid off 22 3 Secure Centre Connector AT on the end of Roof Tube AP b...

Страница 31: ...AV AV AV A A X X x 1 23 Connect AC Adapter on the bottom of Post A and plug into outlet Then turn on the switch 2 1 2 3 1 3 Outlet Switch...

Страница 32: ...AX AY x 1 x 2 x 2 AW 24 Secure two Chair Leg AX with Seat AW underneath by M6 X 35 CC Secure Support Bar AY in between two Chair Leg AX by M6 X 15 AA AX AY AX AX AY AY 1 1 1 1 2 2 2 2 AA AA 2 CC AW AX...

Страница 33: ...C adapter during precipitation or inclement weather Do NOT leave the AC adapter outside place and store in dry place Keep the AC adapter away from babies and children In order to protect the LED light...

Страница 34: ...X AD AE Instruction of LED X Y X AD AE Z Z AB 1 1 Disconnect crossbeam wires and roof post wires 1 2 Release LED lights in counterclockwise Y AD AE AB 1 2 1 2 3...

Страница 35: ...X AD AE X AD AE X AE X AD 2 Replace New LED lights and tighten in clockwise Connect all the wires 1 1 2 3 Old New New...

Отзывы: