background image

Istruzioni d’uso
Operating Manual

Bedienungsanleitung
Mode d’emploi

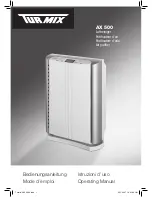
AX 500 

Luftreiniger
Purificateur d'air
Purificatore d'aria
Air purifier

Turmix-AX 500-04.indd   1

22.1.2007   16:41:35 Uhr

Содержание AX 500

Страница 1: ...Istruzioni d uso Operating Manual Bedienungsanleitung Mode d emploi AX 500 Luftreiniger Purificateur d air Purificatore d aria Air purifier Turmix AX 500 04 indd 1 22 1 2007 16 41 35 Uhr ...

Страница 2: ...de an Ihrem Gerät haben Unsere Philosophie basiert auf vier Wörtern Dauerhaft unkompliziert faszinierend verlässlich Das bedeutet dass wir viel Wert auf Qualität Ergonomie Einfachheit und Service legen um Ihnen die besten Produkte und Dienstleistungen anbieten zu können Wir wünschen Ihnen viel Freude an Ihrem TURMIX Produkt DE Turmix AX 500 04 indd 2 22 1 2007 16 41 36 Uhr ...

Страница 3: ...yse 61 8 2 Garantie 62 8 3 Zubehör 63 8 Anhang 4 1 Erste Inbetriebnahme 9 4 2 Aufstellen 9 4 3 Was kann der AX 500 10 4 4 Gerät ans Netz anschliessen 11 4 5 Uhrzeit stellen 11 4 6 Gerät ein ausschalten und Gebläsestufe einstellen 11 4 7 Ionisator 12 4 8 Timer einstellen 12 4 9 Pflege und Reinigung 13 4 10 Aufbewahrung 14 4 Inbetriebnahme 6 1 Technische Daten 15 6 Technische Daten 5 1 Störungen 14 ...

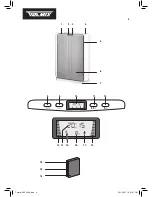
Страница 4: ... 2 4 5 6 7 1 8 9 10 11 12 14 13 15 16 18 19 3 13 17 18 Turmix AX 500 04 indd 4 22 1 2007 16 41 37 Uhr ...

Страница 5: ... 8 Ein Aus Taste 9 Einstelltaste Auf Ab 10 LCD Anzeige 11 Ionisator ein ausschalten 12 Timerfunktion 13 Gebläsestufe 14 Uhrzeit 15 Gebläse in Funktion 16 Timer eingeschaltet 1 8 Std 17 Ionisator eingeschaltet Übersicht der Bedienungs und Geräteteile Übersicht der Zubehörteile 18 Aktivkohle 19 HEPA Filter Turmix AX 500 04 indd 5 22 1 2007 16 41 37 Uhr ...

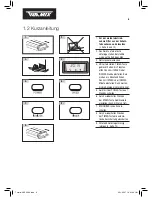
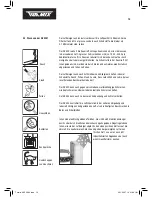
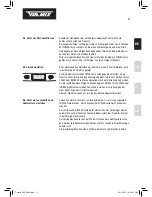
Страница 6: ...EED oder IONIZER Stunde einstellen Kurz warten bis Minuten blinken Dann mit SPEED oder IONIZER Minute einstellen Dann warten bis die Anzeige nicht mehr blinkt 5 Gerät mit der POWER Taste auf Standby schalten 6 Durch wiederholtes Drücken der SPEED Taste Gebläsestufe einstellen hoch mittel od tief 7 Mit IONIZER Ionisation ein schalten 8 Durch wiederholtes Drücken der TIMER Taste die automa tische Au...

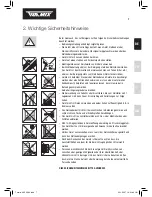
Страница 7: ...der Ersatzteilen die vom Hersteller nicht zugelassen sind kann Feuer Stromschlag und Verletzungen zur Folge haben Gerät nicht im Freien verwenden und keiner hohen Luftfeuchtigkeit z B in Bad aussetzen Das Netzkabel darf nicht mit heissen Flächen in Berührung kommen und sollte nicht von Tischen oder Arbeitsplatten herabhängen Das Gerät nicht in unmittelbarer Nähe von Gas oder Elektroherden oder Gri...

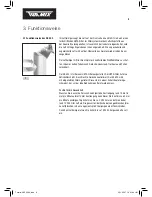
Страница 8: ...tet Der HEPA Filter hat eine Aktivkohleschicht die schlechte Gerüche neutralisiert Der AX 500 wird mit eingesetzten Filtern geliefert Diese sind in einem Schutzbeutel einge schweisst der vor der Inbetriebnahme entfernt werden muss Positiv für die Gesundheit Wussten Sie dass eine Person ohne körperliche Anstrengung rund 14 bis 16 mal pro Minute atmet Unter Anstrengung kann dieser Wert auf bis zu 60...

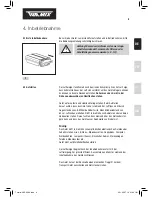
Страница 9: ...dass niemand über das Netzkabel stol pern kann und dass das Gerät ausser Reichweite von Kindern ist Wichtig Das Gerät nicht in die Nähe von empfindlichen elektronischen Geräten oder Zubehör stellen wie z B Video Musikkassetten Floppydisks Computer Armbanduhren Lampen mit Sensor Einschalter Radios Stereoanlagen Telefone Videorecorder etc Gerät nicht auf Metalloberflächen stellen Der Luftreiniger be...

Страница 10: ... Beschwerden reduziert Der AX 500 kann auch gegen verschiedene wetterabhängige Schmerzen wie Kopfschmerzen Übelkeit oder körperliche Schmerzen helfen Der AX 500 kann auch zu besseren Entspannung und Schlaf verhelfen Der AX 500 kontrolliert die Luftzirkulation in der näheren Umgebung und reduziert stickige und abgestandene Luft also die häufigsten Beschwerden in Büros und Arbeitplätzen Ionen sind e...

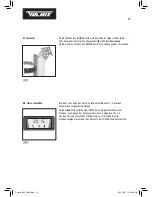
Страница 11: ...nstellen Nach der Einstellung kurz warten bis die rechte Minutenanzeige zu blinken beginnt Mit den Tasten SPEED oder IONIZER die Minute einstellen Danach kurz warten bis die Anzeige nicht mehr blinkt Die Uhrzeit ist jetzt eingestellt Hinweis Die Uhrzeit kann nur im Standby Betrieb eingestellt werden Sofern das Gerät nicht schon in Standby Betrieb ist Uhr wird angezeigt POWER Taste drücken Durch Dr...

Страница 12: ...ann das Gerät in Stundenschritten nach 1 8 Stunden automatisch ausgeschaltet werden Durch wiederholtes Drücken der TIMER Taste die gewünschte Anzahl Stunden nach denen das Gerät ausschalten soll eingeben z B 8 h Um den Timer auszuschalten TIMER Taste so oft drücken bis die Stundenanzeige erlischt oder das Gerät mit der POWER Taste ausschalten 4 7 Ionisator 4 8 Timer einstellen 4 Turmix AX 500 04 i...

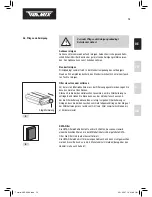
Страница 13: ...hen Sie diese dann aus der Unterseite nach aussen 5 Um die Filterhalterung einzusetzen wie folgt vorgehen Filterhalterung so hinlegen dass die beiden Laschen vom Gerät abgewandt liegen Der Steg auf der Filterhalterung muss rechts vom Griff sein Filter soweit einschieben bis er hörbar einrastet HEPA Filter Die HEPA Filtereinheit 6 besteht aus drei Schichten Aussen aus jeweils einem Aktivkohlenfilte...

Страница 14: ...keln Gerät und Filter reinigen Gerät in Originalverpackung stellen oder vor Staub schützen Gerät in aufrechter Position in einem kühlen trockenen Ort und ausser Reichweite von Kindern aufbewahren 4 10 Aufbewahrung 5 Störungen Wenden Sie sich bei Störungen an den Kundendienst 5 1 Störungen Turmix AX 500 04 indd 14 22 1 2007 16 41 48 Uhr ...

Страница 15: ...ionen negative Ionen pro Sekunde Abmessungen 37 x 18 x 50 cm Nettogewicht 5 4 kg Änderungen ohne vorherige Information möglich Für genauere Angaben Typenschild auf Gerät beachten 7 Entsorgung Ausgediente Geräte können bei einer Verkaufsstelle zur fach gerechten Entsorgung kostenlos abgegeben werden Geräte mit gefährlichem Defekt sofort entsorgen und sicher stellen dass sie nicht mehr verwendet wer...

Страница 16: ...e philosophie est basée sur quatre concepts durée simplicité charme et confiance Cela signifie que la qualité l ergonomie la simplicité et le service réparations sont pour nous de prime importance et nous permettent de vous offrir des produits et des services de qualité optimale Nous vous souhaitons de très agréables moments grâce à votre produit TURMIX FR Turmix AX 500 04 indd 16 22 1 2007 16 41 ...

Страница 17: ...ires 63 8 Pièces jointes 4 1 Première mise en marche 23 4 2 Installation 23 4 3 Que peut faire l AX 500 24 4 4 Branchement de l appareil au réseau branchement 25 4 5 Réglage de l heure 25 4 6 Allumage et extinction de l appareil et réglage de degré de ventilation 25 4 7 Ionisateur 26 4 8 Régler la minuterie 26 4 9 Entretien et nettoyage 27 4 10 Conservation de l appareil 28 4 Mise en marche 6 1 Do...

Страница 18: ...18 18 2 4 5 6 7 1 8 9 10 11 12 14 13 15 16 18 19 3 13 17 18 Turmix AX 500 04 indd 18 22 1 2007 16 41 50 Uhr ...

Страница 19: ...t 8 Touche marche arrêt 9 Ajustage vers le haut vers le bas 10 Voyant LCD 11 Touche marche arrêt du ionisateur 12 Fonction minuterie 13 Degré de ventilation 14 Heure 15 Ventilation en fonction 16 Minuterie en fonction 1 8 heures 17 Ionisateur en fonction Description des éléments de commande et de l appareil Liste des pièces 18 Charbon actif 19 Filtre HEPA Turmix AX 500 04 indd 19 22 1 2007 16 41 5...

Страница 20: ...e SPEED ou IONIZER régler l heure Attendre un peu que le voyant des minutes clignote Ensuite avec la touche SPEED ou IONIZER régler les minutes Attendre que le voyant ne clignote plus 5 Mettre l appareil en veilleuse avec la touche POWER 6 Pour régler la ventilation appuyer plusieurs fois sur la touche SPEED vers le haut au milieu vers le bas 7 Brancher le ionisateur avec la touche IONIZER 8 Pour ...

Страница 21: ...omologués par le fabricant peuvent causer des incendies entraîner des risques d électrocu tion et de blessure Ne pas utiliser l appareil en plein air et ne pas le soumettre à une forte humidité par exemple dans la salle de bain Évitez tout contact du cordon secteur avec des surfaces chaudes et ran gez le de façon à ce qu il ne pende pas de la table ou du plan de travail où vous avez placé l appare...

Страница 22: ...n filtre HEPA Le filtre HEPA est muni d une couche de charbon activé qui neutralise les mauvaises odeurs L AX 500 est livré avec les filtres mis en place Ceux ci se trouvent dans une housse de protection scellée qui doit être retirée avant la première mise en marche Point positif pour la santé Saviez vous qu une personne respire sans effort physique environ 14 à 16 fois par minute Ce nombre peut a...

Страница 23: ...rique et que l appareil soit hors de la portée des enfants Important Ne pas placer le purificateur près d appareils ou d accesssoires électroniques sensibles tels que cassettes vidéo ou audio disques souples ordinateurs montres lampes munies d allumage sensor radios chaines stéreo télépho nes magnétoscopes etc Ne pas placer l appareil sur une surface métallique Dès sa mise en marche le purificateu...

Страница 24: ...peut aussi aider à lutter contre différentes douleurs liées au temps tels que les maux de tête la nausée et les douleurs corporelles L AX 500 peut aider à améliorer la détente et le sommeil L AX 500 contrôle la circulation de l air dans un périmètre rapproché et réduit la présence d air vicié et saturé Présence qui est une des plaintes les plus courantes au bureaux et sur les lieux de travail Les ...

Страница 25: ... ce que les deux chiffres destinés à indiquer les minutes commencent à clignoter à leur tour Réglez maintenant les minutes avec la touche SPEED ou IONIZER Patientez ensuite un bref instant jusqu à ce l afficheur arrête de clignoter L appareil est maintenant mis à l heure Remarque L heure ne peut être réglée qu en mode stand by en attente Si l appareil n est pas déjà en mode de fonctionnement stand...

Страница 26: ...es selon le réglage de la minuterie Pour régler l appareil appuyer plusieurs fois sur la touche TIMER selon le nombre d heures désirées après lesquelles le purificateur s arrêtera par ex 8 Hr Pour éteindre la minuterie appuyer la touche TIMER plusieurs fois jusqu à ce que l affichage des heures s éteigne ou éteindre l appareil en appuyant sur la touche POWER 4 7 Ionisateur 4 8 Régler la minuterie ...

Страница 27: ...du filtre et tirer sur le dessous contre l extérieur 5 Pour introduire le support du filtre procéder comme suit Poser le support du filtre de manière à ce que les deux languettes soient situées de façon oppo sée à l appareil La bride placée sur le support du filtre doit se trouver à droite de la poignée Insérer le filtre jusqu à ce qu on entende le clic du verrouillage Filtre HEPA L unité de filtr...

Страница 28: ...l et le filtre Emballer l appareil dans son emballage d origine ou le protéger de la poussière Déposer l appareil debout dans un endroit frais et sec hors de portée des enfants 4 10 Conservation de l appareil 5 Un problème Lors de dérangements veuillez vous adresser au service après vente 5 1 Dérangements Turmix AX 500 04 indd 28 22 1 2007 16 42 02 Uhr ...

Страница 29: ... protection de l environnement 7 1 Elimination recyclage Alimentation 220 240 V 50 Hz Consommation de courant ventilateur au maximum 45 W Ozone Production nettement inférieure aux limites internationales admises Vitesses du ventilateur Grand moyen et petit Débit d air 150 m h max Surface 40 m Emission de ions Total 2 5 x 10 2 5 billions de ions négatifs par seconde Dimensions 37 x 18 x 50 cm Poids...

Страница 30: ... La nostra filosofia è basata su quattro concetti durevolezza semplicità fascino e fiducia Ciò significa che la qualità l ergonomia la semplicità e il servizio riparazioni sono di fondamentale importanza per noi e ci permettono di offrirvi i prodotti e il servizio migliori Vi auguriamo buon divertimento e successo con il vostro prodotto TURMIX IT Turmix AX 500 04 indd 30 22 1 2007 16 42 02 Uhr ...

Страница 31: ...i difetti 61 8 2 Garanzia 62 8 3 Accessori 63 8 Appendice 4 1 Prima messa in funzione 37 4 2 Posizionare 37 4 3 Le prestazioni dell AX 500 38 4 4 Collegare l apparecchio con la rete 39 4 5 Impostare orario 39 4 6 Accendere e spegnere l apparecchio e impostare il livello del ventilatore 39 4 7 Ionizzatore 40 4 8 Impostare timer 40 4 9 Cura e pulizia 41 4 10 Conservazione 42 4 Messa in funzione 6 1 ...

Страница 32: ...32 32 2 4 5 6 7 1 8 9 10 11 12 14 13 15 16 18 19 3 13 17 18 Turmix AX 500 04 indd 32 22 1 2007 16 42 03 Uhr ...

Страница 33: ... Tasto on off 9 Tasti di impostazione su giu 10 Display LCD 11 Ionizzatore accendere spegnere 12 Funzione timer 13 Livello di ventilazione 14 Orario 15 Ventilazione in funzione 16 Timer acceso 1 8 ore 17 Ionizzatore acceso Panoramica dei comandi e dei componenti dell apparecchio Panoramica degli accessori 18 Filtro carbone attivo 19 Filtro HEPA Turmix AX 500 04 indd 33 22 1 2007 16 42 03 Uhr ...

Страница 34: ...oppure con IONIZER Attendere brevemente finché lampeggiano i minuti Impostare poi i minuti con SPEED oppure IONIZER Attendere finché il display non lampeggia piu 5 Posizionare l apparecchiatura su standby premendo il tasto POWER 6 Premendo ripetutamente sul tasto SPEED impostare il livello di ventilazione alto medio oppure basso 7 Mediante IONIZER inserire il livello di ionizzazione 8 Premendo rip...

Страница 35: ...mbio non consigliati dal produttore possono causare incendi scosse elettriche e incidenti Non utilizzare l apparecchio all aria aperta e non esporlo ad alti livelli di umidità ad esempio in bagno Evitare che il cavo di alimentazione venga a contatto con superfici calde e che penda dal bordo del tavolo o dal piano di lavoro Non posizionare l apparecchio nelle immediate vicinanze di forni a gas forn...

Страница 36: ...di uno strato attivo di carbone che neutralizza i cattivi odori L AX 500 viene consegnato con i fil tri inseriti Questi sono saldati all interno di una tasca di protezione che deve venir tolta prima della messa in funzione Positivo per la salute Sapeva che una persona senza fare fatica fisica respira 14 16 volte al minuto Con l affaticamento questo valore può aumentare fino a 60 volte al minuto Gi...

Страница 37: ...ssuno inciampi sul cavo di rete e che l appa recchiatura rimanga lontana dalla portata dei bambini Importante Il purificatore d aria non deve essere posizionata nelle vicinanze di apparec chiature o accessori elettronici sensibili come ad es cassette video cassette di musica floppy orologi da polso lampade con interruttore a sensore impianti stereo telefoni videoregistratore ecc Non posizionare l ...

Страница 38: ... AX 500 può anche aiutare a prevenire disturbi legati alla metereologia come mal di testa malessere o disturbi fisici L AX 500 può anche servire a rilassarli e a dormire meglio L AX 500 controlla la circolazione dell aria nei paraggi e riduce la presenza di aria pesante che spesso crea disturbi nel lavoro in ufficio o in altri luoghi Gli ioni sono particelle con carica elettrica A causa della loro...

Страница 39: ... indicazione destra dei minuti Impostare i minuti con i tasti SPEED o IONIZER Poi attendere breve mente finché il display non lampeggia più Ora l orario è impostato Indicazione L orario può essere impostato solamente in posizione standby Se l apparecchio si trova già in posizione standby orario viene mostrato nuovamente premere sul tasto POWER Premendo il tasto POWER l appa recchio si rispegne Pre...

Страница 40: ... timer l apparecchio può essere spento ogni 1 8 ore Premendo ripetutamente il tasto TIMER inserire il numero desiderato delle ore dopo cui spegnere l apparecchiatura come ad es 8 ore Per spegnere il timer premere il tasto TIMER finché scompare la visualizzazione dell orario oppure spegnere l apparecchiatura premendo il tasto POWER 4 7 Ionizzatore 4 8 Impostare timer 3 4 Turmix AX 500 04 indd 40 22...

Страница 41: ...a Tirare la parte inferiore verso l esterno 5 Per inserire il supporto del filtro procedere come segue posizionare il supporto del filtro in modo tale che le due linghuette stiano a distanza dal l apparecchio La stanghetta con il supporto del filtro deve trovarsi a destra dell impugnatura Inserire il filtro fino a tal punto da sentire un suono non appena esso viene inserito Filtro HEPA L unità fil...

Страница 42: ...cchio e il filtro Mettere l apparecchio nell imballaggio originale e proteggerlo dalla polvere conversare l apparecchio in posizione eretta in un luogo fresco e secco e lontano dalla portata dei bambini 4 10 Conservazione 5 Guasti In caso di guasti rivolgersi al servizio clienti 5 1 Guasti Turmix AX 500 04 indd 42 22 1 2007 16 42 15 Uhr ...

Страница 43: ...onamento elettrico 220 240 V 50 Hz Consumo di energia elettrica al massimo livello di ventilazione 45 W Ozono produzione livelli molto ridotti e al di sotto dei valori ammessi a livello internazionale Livelli di ventilazione alto medio basso Volume aria 150 m h al massimo livello di ventilazione Superficie ambiente 40 m Emissione ioni totale 2 5 x 10 2 5 billioni di ioni negativi al secondo Misurr...

Страница 44: ...ilosophy can be summed up in just four words lasting uncomplicated fascinating and reliable This means that we lay a great deal of stress on quality ergonomics simplic ity and service and repairs with a view to offering you the very best in the way products and services We hope you will get a lot of pleasure out of your new TURMIX product EN Turmix AX 500 04 indd 44 22 1 2007 16 42 16 Uhr ...

Страница 45: ...8 1 Fault analysis 61 8 2 Warranty 62 8 3 Accessories 63 8 Appendix 4 1 Initial operation 51 4 2 Set up 51 4 3 AX 500 benefits 52 4 4 Electrical connection 53 4 5 Setting clock 53 4 6 Power On off and fan adjustment 53 4 7 Ionizer 54 4 8 Set timer 54 4 9 Maintenance and cleaning 55 4 10 Storage 56 4 Starting operation 6 1 Technical data 57 6 Technical data 5 1 Troubleshooting 56 5 Troubleshooting ...

Страница 46: ...46 46 2 4 5 6 7 1 8 9 10 11 12 14 13 15 16 18 19 3 13 17 18 Turmix AX 500 04 indd 46 22 1 2007 16 42 17 Uhr ...

Страница 47: ...side 7 Base 8 On Off switch 9 Adjustment up down 10 LCD display 11 Ionizer on off 12 Timer 13 Blower setting 14 Clock 15 Blower operation 16 Timer Set 1 8 hours 17 Ionizer indicator Overview of controls and equip ment components Overview of the accessories 18 Charcoal 19 HEPA filter Turmix AX 500 04 indd 47 22 1 2007 16 42 17 Uhr ...

Страница 48: ...ER button to set hour Wait briefly until minute display begins to blink then adjust with SPEED or IONIZER button Wait for display to stop blinking 5 Switch unit into Standby mode by pressing the POWER button 6 Repeatedly press SPEED button to adjust fan setting high medium low 7 Press IONIZER button to turn on ionization 8 Repeatedly press TIMER button to set automatic shut off 9 Regularly clean f...

Страница 49: ...by the manufacturer may result in fires electric shocks or personal injury Do not use the unit outdoors and do not expose it to high humidity exemple in a bathroom The power cable may not come in contact with hot surfaces and should not hang down from tables or working surfaces Do not set up the unit in the immediate vicinity of gas stoves electric stoves or grills Do not enter into the vents with...

Страница 50: ...filter enabling the neutralization of odors The AX 500 is delivered with the filters installed These are sealed in a protective bag which must be removed before initialization Beneficial to your health Did you know that without any physical exertion a person draws approxi mately 14 to 16 breaths per minute This number can rise as high as 60 times per minute under physical exertion In one day you b...

Страница 51: ...lace near radiators or other heating sources Be sure the electrical cord does not pose a tripping hazard and the unit is out of reach of children Important Do not place unit near sensitive electronics such as video or music tapes floppy disks computers watches lamps with sensor switches radios stereo equipment telephones VCR etc Do not place on metal surfaces Upon initialization the unit immediate...

Страница 52: ...s and soot and therefore minimizing resulting symptoms The AX 500 can also help with various weather dependent ailments such as headaches nausea and body aches The AX 500 can help you achieve relaxation and improved sleep The AX 500 checks air circulation in its surroundings and reduces stuffy and stale air a major complaint in offices and work stations Ions are electrically charged particles An e...

Страница 53: ...ED or IONIZER button After setting the desired hour wait a moment until the minute display begins to blink Use the SPEED or IONIZER button to set the minutes Wait until the display stops blinking You have successfully set the clock Note The clock can only be set in Standby mode If the unit is not already in Standby mode clock is displayed press the POWER button Turn the unit off by pressing the PO...

Страница 54: ...e timer function allows for the unit to automatically turn off after 1 8 hours Set the desired number of hours by repeatedly pressing the TIMER button e g 8 hours To cancel the timer press the TIMER button repeatedly until the hour display cancels or use the POWER button to switch the unit off 4 7 Ionizer 4 8 Set timer 3 4 Turmix AX 500 04 indd 54 22 1 2007 16 42 28 Uhr ...

Страница 55: ... filter bracket and pull out from the unit bottom 5 Replace filter bracket as follows Place filter bracket so both clips face away from the unit The bar on the filter bracket must be to the right of the handle Push filter into unit until a locking sound is heard HEPA filter The HEPA filter 6 consists of three layers a folded HEPA filter between two charcoal filters The filters are affixed inside a...

Страница 56: ...plug unit and wind cord Clean unit and filter Store unit in original packaging or otherwise protect it from dust Store upright in a cool dry location out of reach of children 4 10 Storage 5 Troubleshooting Please contact customer service 5 1 Troubleshooting Turmix AX 500 04 indd 56 22 1 2007 16 42 29 Uhr ...

Страница 57: ...with household rubbish for environmental reasons 7 1 Disposing of equipment 6 Technical data Power Supply 220 240 V 50 Hz Energy Use highest setting 45 W Ozone Production significantly below international regulations Fan settings High medium low Air quantity 150 m h on highest setting Area 40 m Ion Emission 2 5 x 10 total 2 5 billion negative ions per second Size 37 x 18 x 50 cm Net Weight 5 4 kg ...

Страница 58: ...58 58 Turmix AX 500 04 indd 58 22 1 2007 16 42 29 Uhr ...

Страница 59: ...58 59 58 DE FR DE IT GB Turmix AX 500 04 indd 59 22 1 2007 16 42 29 Uhr ...

Страница 60: ...60 60 Turmix AX 500 04 indd 60 22 1 2007 16 42 29 Uhr ...

Страница 61: ...ato Date Unterschrift Signature Signature Signature Ja Oui Si Yes Nein Non No No Defekt Analyse Analyse du problème Analisi del guasto Fault analysis Bitte abtrennen Veuillez détacher Stacccare per favore Please cut here Persönliche Angaben Données personnelles Dati personali Personal data Bitte in Blockschrift ausfüllen Ecrire en caractères d imprimerie P f scrivere in stampatello Please fill out...

Страница 62: ...ssersdorf Switzerland Tel 41 0 43 266 16 00 Fax 41 0 43 266 16 27 info sckt ch www turmix ch SERVICE CENTER SZOT Haushaltsgeräte Service Erlaaer Strasse 171 A 1230 Wien Austria Tel 43 0 1 699 90 56 Fax 43 0 1 699 90 57 office turmix at www turmix at DE FR Garanzia Sui suoi elettrodomestici TURMIX concede una garanzia per i 2 anni successivi alla data d acquisto Ci prendiamo a carico la sostituzion...

Страница 63: ... HEPA e filtro a carbone attivo IT HEPA Filterkit Bestehend aus HEPA Filter und Aktivkohle Filter DE HEPA filter kit Consisting of HEPA filter and activated carbon filter EN Kit filtre HEPA Composé d un filtre HEPA et d un filtre charbon actif FR Art A54467 Turmix AX 500 04 indd 63 22 1 2007 16 42 33 Uhr ...

Страница 64: ...www turmix com D0510 10010 01 2007 Änderungen vorbehalten Sous réserve de modifications Con riserva di modifiche Alterations reserved Turmix AX 500 04 indd 64 22 1 2007 16 42 33 Uhr ...

Отзывы: