Maintenance
g012785
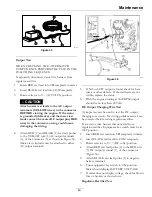
Figure 32
1.
Positive (+) cable on discharged battery
2.
Positive (+) cable on booster battery
3.
Negative (–) cable on the booster battery
4.
Negative (–) cable on the engine block
5.
Booster battery
6.
Discharged battery
7.
Engine block
4.
Connect the other end of the positive cable to the
positive terminal of the booster battery.
5.
Connect the black negative (–) cable to the other
terminal (negative) of the booster battery.
6.
MAKE THE FINAL CONNECTION ON
THE ENGINE BLOCK OF THE STALLED
VEHICLE (NOT TO THE NEGATIVE POST)
AWAY FROM THE BATTERY. STAND BACK.
7.
Start the vehicle and remove the cables in the
reverse order of connection (the engine block
(black) connection is the first to disconnect).
Check for Loose Hardware
Service Interval: Before each use or daily
1.
Stop engine, wait for all moving parts to stop, and
remove key. Engage parking brake.
2.
Visually inspect machine for any loose hardware
or any other possible problem. Tighten hardware
or correct the problem before operating.
Service Air Cleaner
Service Interval: Before each use or
daily—Check air cleaner;
replace if dirty. (May need
more often under severe
conditions.)
Every 100 hours—Replace
the dual element air
cleaner element.
1.
Stop engine, wait for all moving parts to stop, and
remove key. Engage parking brake.
2.
See the Engine Owner's Manual for maintenance
instructions.
Change Engine Oil
Service Interval: After the first 5 hours
Every 100 hours (May
need more often under
severe conditions.)
1.
Stop engine, wait for all moving parts to stop, and
remove key. Engage parking brake.
2.
Drain oil while engine is warm from operation.
3.
The oil drain plug is located on the left side of
the engine.
Place pan under machine to catch oil. Remove
drail oil plug to open and allow oil to drain and
reinstall valve when complete.
4.
Clean around oil fill cap and remove cap. Fill to
specified capacity and replace cap.
5.
Use oil recommended in the
Check Engine Oil
Level
section.
Do Not
overfill. Start the engine
and check for leaks. Stop engine and recheck oil
level.
6.
Wipe up any spilled oil from engine deck
mounting surfaces.
Check Hydraulic Oil and
Tank Level
Service Interval: Every 40 hours
1.
Stop engine and wait for all moving parts to stop,
and remove key. Engage parking brake.
2.
Remove the knee pad.
3.
Clean area around oil overflow tank and remove
cap. Oil level should be between the “add” and
“full” marks on the tank bracket (see Figure 33);
if not, add hydraulic oil. Replace tank cap and
tighten until snug. Do Not overtighten.
45
Содержание Z-SPRAY JUNIOR Series
Страница 1: ...Z SPRAY JUNIOR SERIES For Serial Nos 411 294 212 Higher Part No 4505 818 Rev A...
Страница 60: ...Notes 60...
Страница 61: ...Notes 61...
Страница 62: ...Service Record Date Description of Work Done Service Done By 62...
Страница 63: ...63...


