Operation
The lavender colored air injected tips come standard
on the machine. These tips will apply liquid material
at .34 (1/3) gallons per 1,000 sq. ft. at 5 mph and 40
psi. Each tip has a 5-psi shut-off screen to prevent
drip.
The machine is capable of using tips from 1/4 to 1
gallon in size. See the chart below for the desired
drop rate.
Note:
This chart only applies if using air injected tips.
Using other tips will require different calculations.
Tip Color
MPH
Pressure
Gallons/
1,000 sq. ft.
Yellow
5
40 psi
.27 (1/4)
gallon
Lavender
5
40 psi
.34 (1/3)
gallon
Red
5
40 psi
.54 (1/2)
gallon
Brown
5
50 psi
.76 (3/4)
gallon
Grey
4
40 psi
1 gallon
Note:
Please refer to the spray chart, located on the
backside of the knee pad, for complete calibration.
To determine liquid quantities per tank, verify the tips
installed on the machine (factory set is 1/3 gallon per
1,000 sq. ft. through the Lavender tips).
For example, if the product calls for 1.1 to 1.5 oz
per 1,000 sq. ft., use the median value of 1.3. The
lavender tip is a 1/3 gallon tip, multiply by 3, and
then multiply that number by the gallons added to
the tank. If the tank is 30 gallons the equation would
look like this:
1.3 X 3 X gallons needed.
1.3 median value X 3 X 30 gallons = 117 ounces used
in 30 gallons of water.
Operating the Spreader
The spreader disperses free-flowing granular
substances such as grass seed, fertilizer, ice melt, etc.
When using the spreader, first fill the granule hopper,
then apply to the work area, and finally clean the
hopper. It is important to complete all three of these
steps to avoid damaging the spreader.
Note:
Clean your spreader thoroughly after all
applications.
Before Operating the Spreader
Make sure the spreader has been calibrated for the
material to be spread before starting (see
Calibrating
the Spreader
section).
Important:
Verify that the proper application
rate has been set prior to filling the hopper.
Filling the Spreader Hopper
1.
Stop the machine on a level surface, move motion
control lever to the neutral position, stop the
engine, and set the parking brake.
2.
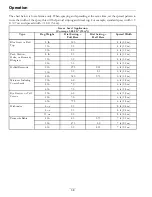
Use the Spreading Chart on the following pages
to determine the rate dial and linkage.
Note:
If the setting is not listed for the type of
material being used, place the setting at a lower
value then adjust as needed.
3.
Drive to the work area.
4.
Stop the spreader-sprayer on a level surface, leave
motion control lever in the neutral position, stop
the engine, and set the parking brake.
5.
Ensure that the hopper gate is closed.
6.
Remove the cover from the hopper, add the
material to be spread, and replace the cover.
Note:
Do Not overload the hopper (refer to the
Maximum Hopper Capacity in
Specifications
section).
Note:
One extra bag of granular product may be
placed in each fertilizer box; however, Do Not
exceed the Maximum Machine Weight as stated
in the
Specifications
section. Overloading the
machine will shorten the life of the transmission
and void the warranty.
Spreading
Spreading Tips:
•
To ensure uniform application, be sure to overlap
the material distribution. The highest amount
of material will dispense from the front of the
hopper and less material from each side. Adjust
the distribution pattern to achieve desired results.
•
Watch for changes in the distribution pattern;
unequal distribution may lead to striping.
31
Содержание Z-SPRAY JUNIOR Series
Страница 1: ...Z SPRAY JUNIOR SERIES For Serial Nos 411 294 212 Higher Part No 4505 818 Rev A...
Страница 60: ...Notes 60...
Страница 61: ...Notes 61...
Страница 62: ...Service Record Date Description of Work Done Service Done By 62...
Страница 63: ...63...


