background image

•  Make sure that you do not exceed your maximum heart rate 

during your workout. If you belong to a risk group, consult a 
physician.

Beginner 
50-60% of maximum heart rate

Suitable for beginners, weight-watchers, convalescents and persons 
who have not exercised for a long time. Exercise at least three times a 
week, 30 minutes at a time.

Advanced 
60-70% of maximum heart rate

Suitable for persons who want to improve and maintain fitness. 
Exercise at least three times a week, 30 minutes at a time.

Expert 
70-80% of maximum heart rate

Suitable for the fittest of persons who are used to long-endurance 
workouts.

Use

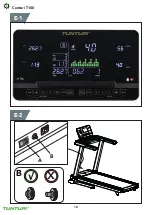
Master power switch (fig. E-2A)

The equipment is equipped with a master power switch to shut down 
the equipment completely.

To start the equipment:


- Insert the mains plug into the equipment.


- Insert the mains plug into the wall socket.


- Set the master power switch to the on position.

To stop the equipment:


- Set the mains power switch to the off position.


- Remove the mains plug from the wall socket.


- Remove the mains plug from the equipment.

Safety key (Fig F-4)

The equipment is equipped with a safety key that must be properly 
inserted into the console to start the equipment. If you remove the 
safety key from the console, the equipment will stop immediately.


- Insert the safety key into the slot in the console.


- Make sure that the clip of the safety key is properly attached to 

your clothing. 
Make sure that the clip is not removed from your clothing before 
the safety key is removed from the console.

 ‼  NOTE

•  Console will show E7 code when safety key is not in (correct) 

position during start up. 

Circuit breaker (Fig. E-2B)

The equipment is equipped with a circuit breaker that interrupts the 
circuit when the electricity load is above the maximum capacity. When 
this occurs, the circuit breaker must be pressed.

 ⚠ WARNING

•  Before pressing the circuit breaker, remove the mains plug from 

the equipment.

If the equipment shuts down, proceed as follows to restart the 
equipment:


- Remove the mains plug from the equipment.


- Press the circuit breaker to restart the equipment.


- Insert the mains plug into the equipment.

 ‼  NOTE

•  Some circuit breakers used in homes are not rated for high inrush 

currents that can occur when a treadmill is first turned on or even 
during normal use. If your treadmill is tripping the circuit breaker 
(even though it is the proper current rating and the treadmill is 
the only appliance on the circuit) but the circuit breaker on the 
treadmill itself does not trip, you will need to replace the breaker 
with a high inrush type. This is not a warranty defect. This is a 
condition we as a manufacture have no ability to control.

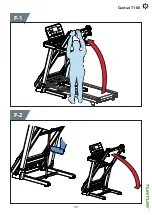
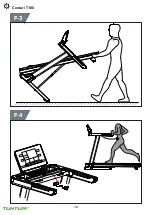
Unfolding and folding the  equipment (fig. F1-F2)

The equipment can be unfolded for use (fig. F1) and folded for 
transport and storage (fig. F2).
Refer to the illustrations for the correct way of unfolding and folding 
the equipment.

 ⚠ CAUTION

•  Before folding the equipment, make sure that the incline is 0. If 

the incline is not 0, folding will damage the mechanism.

Adjusting the support feet

The equipment is equipped with adjustable support feet.
If the equipment feels unstable, wobbly, or not levelled well, these 
support feet can be adjusted to make the required corrections.


- Turn the support feet in/ out as required to put the equipment in a 

stable and as well possible levelled position.


- Tighten the locknut’s* to lock the support feet.

 💡   QUICK  TIP

•  It is easier to do this with two persons, so one person can tilt the 

equipment, while the other makes the needed adjustment.

Click to see our supportive YouTube video
https://youtu.be/E_7agKqaUIc

  ‼  NOTE

•  The equipment is most stable when it is as low to the floor as 

possible. Therefore, start to level the equipment by turning all 
support feet fully in, before turning out the required support feet 
to stabilize and level the equipment.

Console (fig. E-1)

 ⚠ CAUTION

•  Keep the console away from direct sunlight.
•  Dry the surface of the console when it is covered with drops of 

sweat.

•  Do not lean on the console.
•  Only touch the display with the tip of your finger. Make sure that 

your nails or sharp objects do not touch the display.

 ‼  NOTE

•  The console switches to standby mode when the equipment is 

not used for 4 minutes.

Buttons

Stop/ Reset


- Press once, stop workout/ treadmill gently. 


- Press twice, stop workout/ treadmill more rapidly.


- Reset console when press and hold for 2 seconds in “stop mode” 

Start/ Pause


- Start selected workout, or restart pause workout when being in 

pause mode. 


- Pause active workout. 

2 0

English

Содержание Centuri T100

Страница 1: ...rodukts diese Bedienungsanleitung sorgfältig durch Veuillez lire attentivement le présent manuel de l utilisateur avant d utiliser ce produit Lees deze gebruikershandleiding zorgvuldig voordat u dit product gaat gebruiken Leggere attentamente questo manuale dell utente prima di utilizzare il prodotto Antes de utilizar este producto lea atentamente este manual de usuario Läs den här användarhandbok...

Страница 2: ......

Страница 3: ...A 3 Centuri T100 ...

Страница 4: ...B i M8 15 10PCS 6 80 1PCS 6 35 80 1PCS M8 50 20 4PCS 4 Centuri T100 ...

Страница 5: ...C M8 15 10PCS 6 80 1PCS 6 35 80 1PCS M8 50 20 4PCS 100 CM 100 CM 100 CM 100 CM D 0 5 Centuri T100 ...

Страница 6: ...D 1 M8 15 10PCS 6 80 1PCS 6 35 80 1PCS M8 50 20 4PCS 6 Centuri T100 ...

Страница 7: ...D 2 M8 15 10PCS 6 80 1PCS 6 35 80 1PCS M8 50 20 4PCS 7 Centuri T100 ...

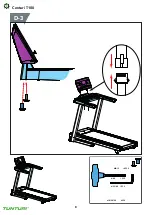
Страница 8: ...D 3 M8 15 10PCS 6 80 1PCS 6 35 80 1PCS M8 50 20 4PCS 8 Centuri T100 ...

Страница 9: ...D 4 M8 15 10PCS 6 80 1PCS 6 35 80 1PCS M8 50 20 4PCS 9 Centuri T100 ...

Страница 10: ...E 1 E 2 A B O I X B 1 0 Centuri T100 ...

Страница 11: ...F 1 F 2 1 1 Centuri T100 ...

Страница 12: ...F 3 F 4 1 2 Centuri T100 ...

Страница 13: ...F 5 F 6 Scan to see YouTube tutorial Scan to see YouTube tutorial 1 3 Centuri T100 ...

Страница 14: ...6 0 6 0 9 0 10 0 6 0 6 0 6 0 11 0 3 0 INCL 2 7 7 7 5 5 5 8 8 8 8 8 8 4 4 4 P11 KM H 4 0 5 0 7 0 9 0 10 0 11 0 9 0 6 0 8 0 9 0 10 0 10 0 11 0 9 0 6 0 5 0 INCL 1 6 6 6 3 3 3 7 7 4 4 4 4 6 6 6 P12 KM H 4 0 6 0 10 0 10 0 7 0 10 0 10 0 10 0 7 0 7 0 10 0 10 0 10 0 10 0 6 0 5 0 INCL 3 8 8 6 9 9 5 5 8 8 8 4 4 4 4 4 P13 KM H 4 0 12 0 4 0 12 0 4 0 12 0 4 0 12 0 4 0 12 0 4 0 12 0 4 0 12 0 4 0 12 0 INCL 4 8 1...

Страница 15: ...13 0 5 0 13 0 5 0 13 0 5 0 13 0 5 0 13 0 5 0 13 0 5 0 13 0 INCL 3 5 6 7 3 5 6 7 3 5 6 7 3 5 6 7 P29 KM H 3 0 3 0 3 0 5 0 7 0 7 0 10 0 12 0 12 0 3 0 5 0 7 0 7 0 12 0 12 0 10 0 INCL 3 5 7 9 11 12 12 12 12 12 12 11 9 7 5 3 P30 KM H 4 0 7 0 4 0 7 0 7 0 4 0 7 0 7 0 4 0 7 0 7 0 4 0 7 0 7 0 4 0 7 0 INCL 3 7 9 3 7 9 3 7 9 3 7 9 3 7 9 3 P31 KM H 5 0 13 0 5 0 13 0 5 0 13 0 5 0 13 0 5 0 13 0 5 0 13 0 5 0 13 ...

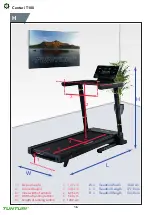
Страница 16: ...7 7 cm 2 Arm rest height 94 5 cm 3 Inner width of armrests 69 5 cm 4 Width of running surface 50 0 cm 5 Length of running surface 140 0 cm W Treadmill Width 83 0 cm L Treadmill Length 177 0 cm H Treadmill Heigth 143 0 cm 1 6 Centuri T100 ...

Страница 17: ...safety warnings and the instructions for future reference WARNING Heart rate monitoring systems may be inaccurate Over exercise may result in serious injury or death If you feel faint stop exercising immediately The equipment is suitable for domestic use only The equipment is not suitable for commercial use Max usage is limited to 5 hrs a day The use of this equipment by children or persons with a...

Страница 18: ...k This product is equipped with a cord having an equipment grounding plug The plug must be plugged into an appropriate outlet that is properly installed and grounded in accordance with all local codes and ordinances WARNING Improper connection of the equipment grounding conductor can result in a risk of electric shock Check with a qualified electrician or serviceman if you are in doubt as to wheth...

Страница 19: ...Weight loss The important factor here is the amount of effort you put in The harder and longer you work the more calories you will burn Effectively this is the same as if you were training to improve your fitness the difference is the goal Heart rate Pulse rate measurement hand pulse sensors The pulse rate is measured by sensors in the handlebars when the user is touching both sensors at the same ...

Страница 20: ... in homes are not rated for high inrush currents that can occur when a treadmill is first turned on or even during normal use If your treadmill is tripping the circuit breaker even though it is the proper current rating and the treadmill is the only appliance on the circuit but the circuit breaker on the treadmill itself does not trip you will need to replace the breaker with a high inrush type Th...

Страница 21: ...hows the target distance when being in programming mode Time Shows the ran time in workout mode Shows left time when workout in countdown mode Shows the target time when being in programming mode Heart Shows the pulse rate in workout mode or P when no pulse is measured Calories Shows the consumed K calories in workout mode Shows left K calories when workout in countdown mode Shows the target K cal...

Страница 22: ...ne for segment 1 Programming mode for incline will open Set your desired incline values for the first segment of the program by using the Incline keys and confirm the setting with Mode button Programming mode for incline segment 2 opens Program all incline segments as done for segment 1 When confirming the 16th segment the time window will blink to set the desired training time Press and hold Mode...

Страница 23: ...Tunturi only provides the option to connect your fitness console throughout a bluetooth connection Therefore Tunturi cannot be held responsible for damage or malfunctioning of products other than Tunturi products Check the website for extra information Cleaning and maintenance WARNING Your trainer requires monthly maintenance even when not being used Before cleaning and maintenance remove the main...

Страница 24: ...running with no one on it After a few minutes of use the running belt should have a tendency to centre itself If during use the belt continues to move toward one side adjustments are necessary EXCEPTION During rehabilitation where the user is using one leg much stronger than the other it might happen that the running belt drifts to one side In these cases you should not adjust unless the running b...

Страница 25: ...g Speed button for 3 seconds Console shows S 01 mode 0 6 When switched to Imperial mode 1 0 When switched to Metric mode Press Mode button to switch setting Press Start Pause button to confirm setting and go back to user mode again Click to see our supportive YouTube video https youtu be KOxl5obz RQ Transport and storage WARNING Before cleaning and maintenance remove the mains plug from the wall s...

Страница 26: ...quipment The warranty does not cover defects arising from the failure to carry periodic maintenance as outlined within the Owner s Manual for the product Furthermore the warranty does not cover defects arising from usage and storage within an unsuitable environment as described within the Owner s Manual which should be indoors dry dust and grit free and within a temperature range of 15 C to 35 C T...

Страница 27: ...se zur Sicherheit und die Anweisungen nicht befolgt kann dies zu Personenverletzungen und Schäden am Gerät führen Bewahren Sie die Warnhinweise zur Sicherheit und die Anweisungen zur künftigen Bezugnahme auf WARNUNG Herzfrequenz Überwachungssysteme können ungenau sein Eine Überanstrengung kann zu schweren Schädigungen oder zum Tod führen Wenn Sie sich schwach oder ohnmächtig fühlen stellen Sie die...

Страница 28: ...Verwenden Sie niemals Wasser oder eine andere Flüssigkeit direkt auf oder in der Nähe des Geräts sondern nur ein feuchtes Tuch wenn das Gerät feucht gereinigt werden muss Die direkte Verwendung von Flüssigkeit ist schädlich für die Komponenten des Geräts und kann zu einem elektrischen Schlag durch einen Kurzschluss führen Dies kann zu schweren Verletzungen oder sogar zum Tod führen Erdungsanweisun...

Страница 29: ...nnung Ihres Herz Kreislaufsystems und Ihrer Muskeln Dabei werden die Aufwärmübungen wiederholt reduzieren Sie zum Beispiel Ihr Tempo und machen Sie ca 5 Minuten weiter Jetzt sollten die Dehnübungen wiederholt werden Denken Sie wiederum daran weder die Dehnungsbewegung zu erzwingen noch die Muskeln dabei ruckweise zu bewegen Wenn Sie fitter werden kann es sein dass Sie länger und härter trainieren ...

Страница 30: ...usgestattet mit dem es komplett abgeschaltet werden kann Um das Gerät zu starten Stecken Sie den Netzstecker in das Gerät Stecken Sie den Netzstecker in die Wandsteckdose Schalten Sie den Hauptschalter ein ON Um das Gerät zu stoppen Schalten Sie den Netzschalter aus OFF Ziehen Sie den Netzstecker aus der Wandsteckdose Ziehen Sie den Netzstecker aus dem Gerät Sicherheitsschlüssel Abb F 4 Das Gerät ...

Страница 31: ...Programmiermodus Zeitvorgabe beim Einstellen der Zeitvorgaben für die Programme P1 P36 zurücksetzen Drücken Sie diese Taste um die angezeigten Multi Display Scan LED Anzeigen einzufrieren wenn Sie sich im Trainingsmodus befinden Durch erneutes Drücken der Taste wird das Einfrieren aufgehoben und der Scanmodus wieder aktiviert Speed Erhöht die Geschwindigkeit 0 8 20 0 km h Bei einmaligem Drücken er...

Страница 32: ...t einzustellen Standard 30 00 Min Umfang 5 00 95 00 1 00 Trainingsmodus 2 Zielwert Distanz Verwenden Sie die Tasten Speed Incline um den Wert einzustellen Standard 1 00 km Rahmen 1 00 99 00 1 0 Trainingsmodus 3 Kalorien Countdown Verwenden Sie die Tasten Speed Incline um den Wert einzustellen Standard 50 Rahmen 20 9990 10 Drücken Sie die Taste Start Pause um Ihr Training direkt nach der Zieleinste...

Страница 33: ...ste Mode drücken Das Display zeigt F4 Gewicht an Das Display zeigt 70 kg an Zur Auswahl die Aufwärts Abwärtstasten drücken 20 bis 150 kg Drücken Sie zur Bestätigung die Taste Mode Das Display zeigt F5 Aktiv an Halten Sie die Kontakthandgriff Herzfrequenzmesspads um die FAT Messung zu aktivieren Das Ergebnis wird nach fünf bis zehn Sekunden angezeigt Siehe Ergebnisberechnung ACHTUNG Für diese Funkt...

Страница 34: ...gdüse Prüfen Sie regelmäßig ob alle Schrauben und Muttern fest sind ACHTUNG Wir empfehlen Ihnen auf Ihrem Laufband nur Hallenschuhe zu verwenden Wenn Sie diese nicht haben empfehlen wir Ihnen die Sohlen Ihrer Schuhe zu überprüfen bevor Sie sie auf dem Laufband benutzen um sicherzustellen dass sie sauber sind da das Laufband nicht für Straßenschmutz geeignet ist Allgemeine Reinigung Dreck Staub und...

Страница 35: ...tral Einstellung der Gurtspannung Die Einstellung wird an der hinteren Rolle vorgenommen Die Einstellungsschrauben befinden sich am Ende der Schienen in den Endkappen Ziehen Sie die hinteren Rollenschrauben im Uhrzeigersinn soweit fest dass ein Abrutschen von der vorderen Rolle verhindert wird Drehen Sie beide Laufband Zugspannungs Einstellungsschrauben stufenweise um 1 4 Umdrehung und überprüfen ...

Страница 36: ...gkeit nicht den Erwartungen entspricht ist das Gerät evtl nicht richtig eingestellt Metrisch Min Max Geschwindigkeit 0 8 Km h 20 0 km h Angelsächsisch Min Max Geschwindigkeit 0 5 Mls h 12 5 Mls h Einheiten ändern Im Modus ON Halten Sie die Tasten Prog Speed 3 Sekunden lang gedrückt Konsole zeigt S 01 Modus 0 6 bei Wechsel in den angelsächsischen Modus 1 0 bei Wechsel in den Metrische Modus Drücken...

Страница 37: ... sind Die Garantie betrifft auch nicht solche Schäden die durch natürlichen Verschleiß fehlerhaften Gebrauch Benutzung unter für das Gerät nicht vorgesehenen Umständen Korrosion Verladung oder Transport hervorgerufen wurden Ersatzleistungen aufgrund von Geräuschen die beim Einsatz des Geräts auftreten sind von der Garantie ausgeschlossen sofern diese Geräusche den Gebrauch des Geräts nicht wesentl...

Страница 38: ...ujours être respectées Avertissements de sécurité AVERTISSEMENT Lisez les avertissements de sécurité et les instructions Le non respect des avertissements de sécurité et des instructions est une source de blessure et de dégâts de l équipement Conservez les avertissements de sécurité et les instructions pour référence ultérieure AVERTISSEMENT Les systèmes de suivi de la fréquence cardiaque peuvent ...

Страница 39: ...ide directement sur ou à proximité de l équipement mais uniquement à l aide d un chiffon humide si cela est nécessaire pour nettoyer la machine L utilisation directe de liquide est nocive pour les composants de l équipement et peut entraîner un choc électrique causé par un court circuit Cela pourrait entraîner des blessures graves voire mortelles Instructions de mise à la terre Ce produit doit êtr...

Страница 40: ... et vos muscles reprendre leur rythme normal Il s agit d une répétition de l exercice d échauffement Baissez le rythme et continuez pendant environ 5 minutes Vous devez ensuite refaire les exercices d étirement et souvenez vous de ne pas forcer ou trop étirer un muscle dans une certaine position À mesure que vous améliorerez votre forme vous ressentirez peut être le besoin de vous entraîner plus l...

Страница 41: ...nes les plus en forme abituées aux exercices d endurance prolongés Usage Interrupteur d alimentation principale fig E 2A L équipement comporte un interrupteur d alimentation principale pour le mettre complètement hors tension Démarrage de l équipement Insérez la fiche secteur dans l équipement Insérez la fiche secteur dans la prise murale Positionnez l interrupteur d alimentation principale sur ma...

Страница 42: ...entraînement actif en pause Prog Appuyez pour parcourir les options de programme P0 P1 P36 U01 U03 HRC1 HRC3 FAT Mode Parcourir les paramètres de définition des objectifs en mode programmation Réinitialiser la durée cible lors de lé définition de l objectif de temps pour les programmes P1 P36 En mode exercice appuyez sur ce bouton pour bloquer l affichage LED à écrans multiples Appuyez à nouveau p...

Страница 43: ...nez le bouton Stop Reset pendant 2 secondes pour mettre le tapis de course en mode de démarrage Appuyez sur le bouton Mode pour sélectionner le mode compte à rebours cible Mode d entraînement 1 Durée cible Utilisez les touches Speed Incline et pour ajuster la valeur 30 00 min par défaut Plage 5 00 95 00 1 00 Mode d entraînement 2 Distance cible Utilisez les touches Speed Incline et pour ajuster la...

Страница 44: ... le bouton Mode pour confirmer L écran indique F2 Âge L écran indique 25 Appuyez sur les boutons Haut Bas pour sélectionner 1 99 appuyez sur le bouton Mode pour confirmer L écran indique F3 Taille L écran indique 170 cm Appuyez sur les boutons Haut Bas pour sélectionner 100 220 cm appuyez sur le bouton Mode pour confirmer L écran indique F4 Poids L écran indique 70 kg Appuyez sur les boutons Haut ...

Страница 45: ... AVERTISSEMENT Votre appareil d entraînement nécessite un entretien mensuel même lorsqu il n est pas utilisé Avant le nettoyage et la maintenance retirez la fiche secteur de la prise murale N utilisez aucun solvant pour nettoyer l équipement Ne bloquez pas les ouvertures de ventilation Débarrassez les ouvertures de ventilation de toute poussière salissure ou obstruction Nettoyez l équipement avec ...

Страница 46: ...rse Le niveau de performance de votre tapis de course dépend de la planéité de la surface sur laquelle il fonctionne Lorsque le châssis n est pas horizontal le rouleau avant et le rouleau arrière ne peuvent pas rester parallèles et le tapis devra être centré sans cesse Cet appareil est conçu de façon à ce que le tapis reste raisonnablement centré lorsqu il est en service Il est normal que certains...

Страница 47: ...iste contactez immédiatement le revendeur Oil OIL n est pas un code d erreur voir Lubrification E7 La console affichera le code E7 lorsque la clé de sécurité n est pas en position pendant le démarrage E7 n est pas un code d erreur voir Clé de sécurité Système métrique impérial Si la vitesse affichée ne correspond pas à vos attentes la machine est peut être mal paramétrée Métrique Vitesse Min Max 0...

Страница 48: ...ri New Fitness BV La garantie ne s applique pas aux défauts provenant d une usure normale d une utilisation inadaptée d une utilisation dans des conditions non prévues par le fabricant de la corrosion ou d un dommage intervenu lors du chargement ou du transport La garantie ne couvre pas les sons ou les bruits émis par l équipement s ils ne gênent pas son utilisation et s ils ne sont pas provoqués ...

Страница 49: ...eid waarschuwingen en de instructies Het niet opvolgen van de veiligheid waarschuwingen en de instructies kan persoonlijk letsel of beschadiging van het toestel veroorzaken Bewaar de veiligheid waarschuwingen en instructies voor toekomstig gebruik WAARSCHUWING Hartslag bewakingssystemen kunnen onnauwkeurig zijn Overmatig trainen kan leiden tot ernstig letsel of de dood Als u zich duizelig voelt st...

Страница 50: ...irect gebruik van vloeistof op de apparatuur is schadelijk voor de onderdelen en kan leiden tot een elektrische schok als gevolg van kortsluiting Dit kan leiden tot ernstig persoonlijk letsel of zelfs de dood Aardingsinstructies Dit product moet worden geaard Als het elektrische systeem van de loopband niet goed niet meer werkt vormt aarding een pad van minste weerstand voor elektrische stroom waa...

Страница 51: ...s drie keer per week te trainen en zo nodig uw oefeningen gelijkmatig over de week te verspreiden Spierversteviging Als u uw spieren wilt verstevigen met behulp van dit fitnessapparaat stelt u de weerstand in op hoog Zo komt er meer spanning op uw beenspieren Mogelijk kunt u niet zo lang trainen als u zou willen Als u ook uw conditie wilt verbeteren moet u het trainingsprogramma aanpassen Tijdens ...

Страница 52: ...org ervoor dat de clip pas van uw kleding wordt gehaald wanneer de veiligheidssleutel uit de console is verwijderd LET OP Monitor laat code E7 zien als veiligheidssleutel niet of niet juist is geplaatst Circuitonderbreker Fig E 2B Het toestel is uitgerust met een circuitonderbreker die het circuit onderbreekt wanneer de elektrische belasting boven de maximale capaciteit komt Wanneer dit gebeurt mo...

Страница 53: ...mmeringsmodus kunt u door programma s scrollen en waarden wijzigen Speed Hiermee wordt de snelheid verlaagd 0 8 20 0 km h Door eenmaal op de knop te drukken wordt de snelheid met 0 1 km h verlaagd Als u de knop gedurende twee seconden ingedrukt houdt wordt de snelheid sneller verlaagd In de programmeringsmodus kunt u door programma s scrollen en waarden wijzigen Sneltoetsen voor de snelheid De sne...

Страница 54: ...ogelijk om één doel in te stellen Workout beëindigen U kunt uw workout op elk moment pauzeren door eenmaal de knop Start Pause in te drukken In de pauzemodus ziet u op het display de aanduiding PAUS Max pauzetijd is 4 30 min Druk op de knop Start Pause om in de PAUS modus de training te hervatten Druk eenmaal op de knop STOP om de workout te stoppen Druk tweemaal op de knop STOP om de console te r...

Страница 55: ...ntage 9 typen FAT 0 17 Ondergewicht FAT 18 24 Standaard FAT 28 28 Overgewicht FAT 29 Up Obesitas BF Body Fat lichaamsvetpercentage in verhoudingspercentage De foutmelding ER wordt weergegeven als er tijdens het BF metingsproces geen hartslag werd geregistreerd Druk op de knop Stop Reset om het lichaamsvetprogramma te verlaten HRC programma Het HRC programma is een programma waarbij de snelheid wor...

Страница 56: ...zich op de band ophopen U moet maandelijks onder de loopband stofzuigen om ophoping te voorkomen HAAL EERST DE STEKKER UIT HET STOPCONTACT VOORDAT U DIT DOET Stof op band Dit treedt op tijdens normaal eerst gebruik of totdat de band is gestabiliseerd Verwijder het stof met een vochtige doek om ophoping van stof te minimaliseren Band en loopvlak De loopband maakt gebruik van een zeer efficiënt loop...

Страница 57: ...centreren Als tijdens gebruik de band nog steeds naar de zijkant beweegt is afstelling noodzakelijk UITZONDERING tijdens revalidatie waarbij het ene been van de gebruiker sterker is dan het andere kan het voorkomen dat de band naar de zijkant beweegt In dat geval moet u de bandloop niet opnieuw afstellen tenzij de band zich bij normaal gebruik niet centreert Loopmat spanning afstellen U dient afst...

Страница 58: ... overeenkomt met uw verwachtingen is de machine wellicht niet goed ingesteld Metriek Min Max snelheid 0 8 Km h 20 0 km h Imperiaal Min Max snelheid 0 5 Mls h 12 5 Mls h Wijzig eenheid In modus ON Houd de knoppen Prog Speed 3 seconden lang ingedrukt Console toont S 01 modus 0 6 als u naar modus Imperiaal schakelt 1 0 als u naar modus Metriek schakelt Druk op de knop Mode om de instelling te wijzige...

Страница 59: ...gd zonder toestemming van Tunturi New Fitness BV De garantie dekt geen defecten tengevolge van normale slijtage onjuist gebruik gebruik in omstandigheden waarvoor het toestel niet is bedoeld corrosie of schade ontstaan tijdens laden of transport De garantie geldt niet voor geluiden die ontstaan door het gebruik als ze het gebruik van het apparaat niet wezenlijk belemmeren en niet veroorzaakt zijn ...

Страница 60: ...ultare un medico Per evitare dolori muscolari e sforzi iniziare ogni allenamento con una fase di riscaldamento e terminare ogni allenamento con una fase di defaticamento Ricordarsi di eseguire lo stretching al termine dell allenamento L apparecchio è adatto esclusivamente per un uso in interni L apparecchio non è idoneo per un uso all aperto Utilizzare l apparecchio in un ambiente con ventilazione...

Страница 61: ...la macchina L uso diretto di liquidi è dannoso per i componenti dell attrezzo e può provocare una scossa elettrica causata da un cortocircuito Ciò potrebbe causare lesioni personali gravi o addirittura la morte Istruzioni per la messa a terra Questo prodotto va messo a terra Se il sistema elettrico del tapis roulant non funziona bene o rompersi la messa a terra fornisce un percorso di resistenza i...

Страница 62: ...nto cioè riduce il vostro ritmo e continua per circa 5 minuti Gli esercizi di stretching adesso andrebbero ripetuti ricordandosi sempre di non forzare o strappare i vostri muscoli nello stretching A mano a mano che sarete più in forma potreste aver bisogno di allenarvi di più e più a lungo Si consiglia di allenarsi almeno tre volte alla settimana e se possibile spalmare gli esercizi in Tono muscol...

Страница 63: ...uttore di alimentazione su off Togliere la spina elettrica dalla presa elettrica Togliere la spina elettrica dall apparecchio Chiave di sicurezza Fig F 4 L apparecchio è dotato di una chiave di sicurezza che deve essere inserita correttamente nella console per avviare l apparecchio Se togliete la chiave di sicurezza dalla console l apparecchio si fermerà immediatamente Inserire la chiave di sicure...

Страница 64: ... rapidamente Scorrere i programmi e cambiare i valori nella modalità di programmazione Velocità Diminuisce la velocità 0 8 20 0 km h Premendo una sola vola si diminuisce la velocità di 0 1 km h Tenendo premuto per due secondi si diminuisce la velocità più rapidamente Scorrere i programmi e cambiare i valori nella modalità di programmazione Tasti di scelta rapida I tasti di scelta rapida sono impos...

Страница 65: ...sta un target il tapis roulant si fermerà automaticamente una volta raggiunto il target preimpostato È possibile impostare un solo target Terminare l allenamento Mettere in pausa l allenamento in qualsiasi momento premendo una volta il pulsante Start Pausa Il display visualizzerà PAUSA mentre si è in modalità pausa Il tempo massimo di pausa preimpostato è di 4 30 min Premere il pulsante Start Paus...

Страница 66: ... Stop Reset per uscire dal programma Grasso corporeo Programma HRC Il programma HRC è un programma a velocità controllata basato sulla frequenza cardiaca La velocità aumenta automaticamente quando la frequenza cardiaca è al di sotto dell obiettivo e diminuisce quando viene superato Premere i pulsanti Prog per selezionare HRC HRC1 Il limite di velocità massimo preimpostato è di 8 km h HRC2 Il limit...

Страница 67: ...a la pedana e il tappeto scorrevole danneggiano la superficie della pedana compromettendo le prestazioni e la durata del prodotto Come pulire la pedana Usare un panno morbido e asciutto per pulire il bordo della pedana e l area tra il bordo del tappeto di scorrimento e il telaio Cercare di arrivare anche sotto i bordi del tappeto di scorrimento per rimuovere l accumulo di sporco anche sui bordi Co...

Страница 68: ...a pedana fig F 5 Il centraggio della pedana è necessario quando questa non scorre al centro della superficie di corsa Questo si nota facilmente quando lo spazio tra la piattaforma laterale e la pedana è decisamente maggiore su un lato rispetto all altro Questo può essere causato da CAUSA 1 Si sta usando una gamba più potente in fase di spinta durante l allenamento Questo fa sì che la pedana venga ...

Страница 69: ... su una base protettiva per evitare danni alla superficie del pavimento Spostare l apparecchiatura con attenzione sulle superfici irregolari Non spostare l apparecchio al piano superiore utilizzando le ruote ma sostenerlo per le impugnature Riporre l apparecchio in posizione verticale fig E2 Riporre l apparecchio in un luogo asciutto con la minore variazione di temperatura possibile Informazioni a...

Страница 70: ...te autorizzato Tunturi Se sbagliate a seguire le istruzioni del manuale d uso decade subito la garanzia sul prodotto Dati tecnici Parametrro Unità di misura Valore Tensione di alimentazione Vca 210 240 Frequenza di alimentazione HZ 50 60 Velocità Km H 0 8 20 0 Inclinazione Step 0 15 Lunghezza ripiegato Cm 177 0 102 0 Lunghezza ripiegato Inch 69 7 40 2 Larghezza Cm 83 0 Larghezza Inch 32 7 Altezza ...

Страница 71: ...ias de seguridad y las instrucciones pueden producirse lesiones personales o daños en la máquina Conserve las advertencias de seguridad y las instrucciones para su consulta posterior ADVERTENCIA Los sistemas de motorización de frecuencia cardíaca pueden ser imprecisos Un exceso de ejercicio puede provocar lesiones graves o incluso la muerte Si se siente mareado deje de hacer ejercicio inmediatamen...

Страница 72: ...ucciones de toma de tierra Este producto deberá tener una toma de tierra Si el sistema eléctrico de la cinta se averiara o fallara la toma de tierra proporciona una ruta de menos resistencia para la corriente eléctrica reduciendo el riesgo de descarga eléctrica Este producto está equipado con un cable que tiene un enchufe de toma de tierra de equipo El enchufe se deberá enchufar en una toma adecua...

Страница 73: ...amiento evitando de nuevo forzar los músculos o hacer movimientos bruscos A medida que vaya mejorando su forma física es posible que el entrenamiento tenga que ser más largo e intenso Es aconsejable entrenarse al menos tres veces a la semana espaciando de manera uniforme en la medida de lo posible los entrenamientos durante la semana Tonificación muscular Si quiere tonificar los músculos mientras ...

Страница 74: ...nchufe de red en la máquina Inserte el enchufe de red en la toma de pared Sitúe el interruptor de alimentación principal en la posición de encendido ON Para parar la máquina Sitúe el interruptor de alimentación principal en la posición de apagado OFF Retire el enchufe de red de la toma de pared Retire el enchufe de red de la máquina Llave de seguridad fig F 4 La máquina está equipada con una llave...

Страница 75: ...ejercicio Vuelva a pulsarlo para desbloquear y activar el modo de escaneo de nuevo Speed Aumenta la velocidad 0 8 20 0 km h Cada pulsación aumenta la velocidad 0 1 km h Si se mantiene pulsado durante dos segundos la velocidad aumenta más rápidamente Desplácese por los programas y cambie los valores en modo de programación Speed Reduce la velocidad 0 8 20 0 km h Cada pulsación reduce la velocidad 0...

Страница 76: ...miento 2 Objetivo de distancia Use las teclas Speed Incline y para ajustar el valor Predeterminado 1 00 km Rango 1 00 99 00 1 0 Modo de entrenamiento 3 Cuenta atrás de calorías Use las teclas Speed Incline y para ajustar el valor Predeterminado 50 Rango 20 9990 10 Pulse el botón Start Pause para empezar la sesión directamente cuando ajuste el objetivo que desea NOTA Si establece un objetivo la cin...

Страница 77: ...jetar las almohadillas de medición del ritmo cardíaco situadas en las empuñaduras Cálculo del resultado TIPO DE CUERPO Relación de grasa corporal 9 tipos GRASA 0 17 Peso bajo GRASA 18 24 En su peso GRASA 25 28 Sobrepeso GRASA 29 en adelante Obesidad BF Grasa corporal en relación de Aparecerá el código de error ER si no se detecta el ritmo cardíaco durante el proceso de medición de BF Pulse el botó...

Страница 78: ...S Polvo de la cinta Esto ocurre durante una interrupción normal o hasta que la cinta se estabilice Si limpia el exceso de polvo con un paño húmedo se minimizará la acumulación de éste Cinta y cubierta de correr La cinta de correr utiliza una base de baja fricción muy eficiente El rendimiento se maximiza cuando la plataforma de funcionamiento se mantiene limpia y sin polvo y suciedad La suciedad y ...

Страница 79: ...misión del motor debajo de la cubierta delantera No apriete en exceso Si se aprieta en exceso se podrá dañar la cinta y provocar un fallo prematuro de los cojinetes Haga clic para ver nuestro video de ayuda en YouTube https youtu be pp4_4bL1MXo Centrado de la cinta de correr fig F 5 Es necesario centrar la cinta de correr cuando esta no sigue el centro de la superficie de correr Esto se nota fácil...

Страница 80: ...se escucha el bloqueo de la máquina en su posición para evitar que se pueda desplegar PRECAUCIÓN Antes de plegar la máquina asegúrese de que la inclinación sea 0 Si la inclinación no es de 0 el mecanismo sufrirá daños durante el plegado Mueva la máquina como se muestra fig F3 Mueva la máquina y bájela con cuidado Coloque la máquina sobre una base protectora para evitar daños en la superficie del s...

Страница 81: ... mismo La garantía no cubre las actividades de mantenimiento tales como limpieza lubricación o el ajuste normal de las piezas ni los procedimientos de instalación que el cliente pueda realizar por sí mismo y que no requieran un desmontaje montaje especial del equipo de ejercicio Estos procedimientos son por ejemplo el cambio de contadores pedales o de otras piezas simples similares No se reembolsa...

Страница 82: ... kan det medföra skador på personer eller utrustningen Behåll säkerhetsvarningarna och instruktionerna för framtida bruk VARNING System för övervakning av hjärtfrekvensen är inte alltid exakta Överträning kan medföra allvarlig skada eller död Sluta omedelbart att träna om du känner dig svag Utrustningen är endast anpassad för hemmabruk Utrustningen är inte anpassad Maximal användning är begränsad ...

Страница 83: ...t uttag som installerats enligt gällande regler och föreskrifter VARNING Fel i apparatens jordanslutningen innebär en ökad risk för elektrisk chock Om du är osäker på anslutningen bör du kontakta en elektriker eller servicemontör för att kontrollera att apparaten är ordentligt jordad Försök inte sätta i en stickpropp som inte passar i uttaget anlita en elektriker för installation av passande väggu...

Страница 84: ...Detta är i princip detsamma som om du tränade för att förbättra din kondition skillnaden är målet Hjärtfrekvens Pulsmätning handpulssensorer Pulsen mäts av sensorer i handtagen när användaren vidrör båda sensorerna samtidigt Bäst pulsmätning fås när skinnet är en aning fuktigt och i ständig kontakt med handpulssensorerna Om skinnet är för torrt eller för fuktigt kan pulsmätningen bli mindre exakt ...

Страница 85: ... användning Om löparband gör att säkringen går hemma hos dig trots att rätt spänning används och löparbandet är den enda apparaten i gruppen och löparbandets säkring inte bryter måste du byta ut säkringen till en typ som klarar större spänningstoppar Detta är inte en defekt som täcks av garantin Detta är ett förhållande som tillverkaren inte kan råda över Fälla upp och fälla ihop utrustningen fig ...

Страница 86: ...gsläge Visar kvarvarande tid vid träning i nedräkningsläge Visar måltiden när i programmeringsläge Hjärta Visar pulsen i träningsläge eller P när ingen puls uppmäts Kalorier Visar förbrukade kalorier i träningsläge Visar återstående kalorier vid träning i nedräkningsläge Visar målet för kalorier när i programmeringsläge OBS Denna data är en grov vägledning för jämförelse av olika träningspass och ...

Страница 87: ...t för det första segmentet i programmet med hjälp av knapparna Hastighet och bekräfta inställningen med knappen Läge Programmeringsläge för hastighetssegment 2 öppnas Programmera alla segment så som gjorts för segment 1 Programmeringsläge för lutningen kommer öppnas Ställ in önskade lutningsvärden för programmets första segment med hjälp av knapparna Lutning och bekräfta inställningen med knappen ...

Страница 88: ...ttas i viloläge efter 4 30 minuter stillastående Skärmen visar 2222 för att indikera Av läge Maskin kommer att sättas i viloläge efter 4 30 minuter stillastående VARNING Vi rekommenderar att alltid ställa in ERP funktionen till På läge Bluetooth APP Denna panel kan ansluta APP Fit Hi Way på den smarta enheten med Bluetooth iOS Android Upprätta Bluetooth anslutningen endast via anslutningsläget på ...

Страница 89: ...ande YouTube video https youtu be ceaOYnofY5k Justera bältet Öparbandets prestanda är beroende på den yta som ramen står på Om golvet inte är plant kan rullarna fram och bak inte löpa parallellt och ständig justering kan behövas Löparbandet har designats för att hålla bandet i mitten under användningen Det är normalt att ett band kan dras åt ena sidan när det inte belastas Efter några minuters anv...

Страница 90: ...ckel Metrisk Imperial inställning När den visade hastigheten inte matchar dina förväntningar kan maskinen vara inställd i fel inställning Metrisk Min Max Hastighet 0 8 Km h 20 0 km h Imperial Min Max Hastighet 0 5 Mls h 12 5 Mls h Byt enheter genom I läge ON Håll knappen Prog Speed intryckt i 3 sekunder Konsolen visar S 01 läge 0 6 När bytte till Imperial läge 1 0 När bytte till Metriska läge Tryc...

Страница 91: ...nande Garantin gäller ej för fel som beror på normalt slitage felaktig användning användning i förhållanden som inte är avsett för redskapet korrosion eller lastnings och transportskador Garantin täcker inte ljud som uppstår under användning såvida dessa inte väsentligt hindrar utrustningens användning eller har orsakas av ett fel i utrustningen Garantin gäller inte för underhållsarbete som rengör...

Страница 92: ...töä varten VAROITUS Sykkeenvalvontajärjestelmät saattavat olla epätarkkoja Liiallinen harjoittelu saattaa aiheuttaa vakavia vammoja tai kuoleman Jos tunnet olosi heikoksi lopeta harjoittelu heti Laite on sopiva vain kotikäyttöön Laite ei ole sopiva kaupalliseen käyttöön Enimmäiskäyttö on rajoitettu 5 tuntiin päivässä Tämän laitteen käyttö lasten tai fyysisesti aistillisesti henkisesti tai liikunna...

Страница 93: ...pätevältä sähkömieheltä tai huoltoasentajalta Jos kuntolaitteen mukana toimitettu pistoke ei sovi pistorasiaan älä yritä tehdä pistokkeeseen muutoksia Ota yhteyttä valtuutettuun sähkömieheen ohjeiden mukaisen pistorasian asentamiseksi Kokoamisohjeet Kuvan A kuvaus Kuvassa on esitetty miltä harjoituslaite näyttää kun asennus on saatu valmiiksi Voit käyttää tätä viitteenä asennuksen aikana mutta tee...

Страница 94: ...ykkeesi pysyy tavoitealueella Painon pudotus Ratkaisevaa on se miten rasittavaa harjoittelu on Mitä enemmän ja mitä pidempään harjoittelet sitä enemmän poltat kaloreita Vaikutus on sama kuin jos harjoittelisit kunnon kohentamiseksi vaikka tavoite on nyt toinen Syke Pulssinopeuden mittaus käsipulssianturit Pulssinopeus mitataan käsitukien antureilla käyttäjän koskettaessa kumpaakin anturia samanaik...

Страница 95: ...orkeaan käynnistyssysäysvirtaan jota voi esiintyä kun juoksumatto kytketään päälle ja jopa normaalin käytön aikana Jos juoksumattosi aktivoi katkaisimen vaikka luokitus on oikea ja juoksumatto on virtapiirin ainoa laite mutta juoksumaton oma katkaisin ei aktivoidu sinun pitää vaihtaa katkaisin korkealle käynnistyssysäysvirralle tarkoitettuun tyyppiin Tämä vika ei kuulu takuun piiriin Kyseessä on a...

Страница 96: ...tilassa Kulma Näyttää juoksumaton tämänhetkisen kulman harjoittelutilassa Näyttää tavoitekulman ohjelmointitilassa Matka Näyttää juostun matkan harjoittelutilassa Näyttää jäljellä olevan matkan laskuritilassa Näyttää tavoitematkan ohjelmointitilassa Aika Näyttää tähänastisen juoksuajan harjoittelutilassa Näyttää jäljellä olevan ajan laskuritilassa Näyttää tavoiteajan ohjelmointitilassa Syke Näyttä...

Страница 97: ... 30 00 min Arvoväli 5 00 95 00 1 00 Paina Start Pause painiketta aloittaaksesi harjoituksesi Profiilin ohjelmointitila Valitse U 1 U 2 tai U 3 painamalla Prog painiketta Avaa ohjelmointitila ensimmäisen profiilin osion nopeudelle painamalla Mode painiketta Aseta haluamasi nopeusarvot ohjelman ensimmäiseen osioon Speed painikkeilla ja vahvista asetus Mode painikkeella Ohjelmointitila osan 2 nopeude...

Страница 98: ...Voit ottaa tämän toiminnon käyttöön ja poistaa sen käytöstä seuraavasti Kun juoksumatto on käynnistystilassa paina Mode painiketta yhtäjaksoisesti 3 sekunnin ajan vaihtaaksesi Päällä ja Pois päältä tilan välillä Näytöllä näkyvä 1111 kertoo tilan olevan Päällä Laite menee valmiustilaan kun sitä ei käytetä 4 30 minuuttiin Näytöllä näkyvä 2222 kertoo tilan olevan Pois päältä Laite menee valmiustilaan...

Страница 99: ... täysin imeytymään hihnaan ja leviämään tasaisesti HUOMAUTUS Jos 5 km h on sinulle liian nopea vauhti kävele haluamallasi nopeudella mutta pidennä kestoa vähintään 5 minuuttiin Katso YouTube ohjevideomme napsauttamalla https youtu be ceaOYnofY5k Maton säädöt Juoksumaton hyvä toiminta riippuu siitä lepääkö runko riittävän tasaisella alustalla Jos runko ei ole aivan vaakasuorassa etu ja takatela eiv...

Страница 100: ...di edelleen näytöllä Jos virhekoodi näkyy edelleen näytöllä ota välittömästi yhteys jälleenmyyjään Oil OIL ei ole virhekoodi katso Voitelu E7 Konsoli näyttää E7 koodin kun turva avain ei ole paikallaan käynnistyksen aikana E7 ei ole virhekoodi katso Turvallisuusavain Metrinen keisarillinen asetus Kun näytetty nopeus ei vastaa odotuksiasi laite saattaa olla asetettu väärään asetukseen Metrinen Min ...

Страница 101: ...onnollisesta kulumisesta virheellisestä käytöstä käytöstä olosuhteissa joihin kuntolaitetta ei ole tarkoitettu korroosiosta tai lastaus tai kuljetusvahingoista Takuu ei koske käyttöääniä jotka eivät olennaisesti haittaa laitteen käyttöä eivätkä johdu laitteessa olevasta virheestä Takuu ei myöskään sisällä kunnossapitotoimenpiteitä kuten puhdistusta voitelua tai sen osien normaalia tarkistamista ei...

Страница 102: ...l thread screw M6 30 Ø16 6 24 Philips C K S full thread screw M5 10 2 25 Philips C K S full thread screw M4 10 10 26 Philips C K S self taping screw ST4 16 16 27 Philips pan head full thread screw M4 12 5 28 Philips washers head and tail cut self taping screw ST4 12 14 29 Philips pan head self taping screw ST3 10 2 30 Philips countersunk head self taping screw ST3 10 4 31 Philips countersunk head ...

Страница 103: ...0 Ø17 529 578 1 67 Curved open tube plug 40 60 t2 0 2 68 Gas Spring Compl Assy Incl 8 35 87 850 350 Ø10 Ø8 2 400N 1 69 Motor 1300W DC180V 5450RPM 1 70 Incline motor 1 18HP 75mm AC220V 195mm 1 71 Running deck 1300 604 t18 1 72 Running belt 2930 500 t1 6 1 73 Drive belt 174 442 PJ6 1 74 Motor cover 367 5 673 36 7 1 75 Rear cover 673 79 97 1 76 Side landing 87 34 5 1342 2 77 Console housing 818 426 1...

Страница 104: ...rotective ring Ø21 Ø12 9 2 96 Magnet ring Ø29 Ø17 t7 5 2 97 Cable clamp 3 8 2 98 Silicone oil 30Ml 1 99 Filter 10A 1 100 Inductance 10A L 500 1 101 Power connection Red L 200mm 1 5mm 1 102 Connecting wire ground wire L 150MM 1 103 Plastic flat washer Ø12 Ø6 6 HK Hardware kit 1 B O M 1 0 4 Centuri T100 ...

Страница 105: ...8 29 29 30 30 31 31 31 31 31 31 31 31 31 31 32 32 32 32 32 32 34 34 34 35 37 38 38 38 38 38 40 40 40 40 40 40 40 40 40 40 41 42 43 44 46 45 98 47 49 50 53 52 54 55 100 99 56 57 11 58 59 62 63 64 65 66 67 67 68 69 70 71 72 73 74 75 76 76 77 78 80 81 82 83 84 85 86 86 86 86 86 86 86 86 86 86 87 89 89 89 89 89 89 90 90 90 90 91 91 91 92 92 92 92 92 93 94 94 95 95 96 25 97 101 102 104 104 104 104 104 ...

Страница 106: ...20221118 W ...
Отзывы: