background image


25 

5. TSC Console


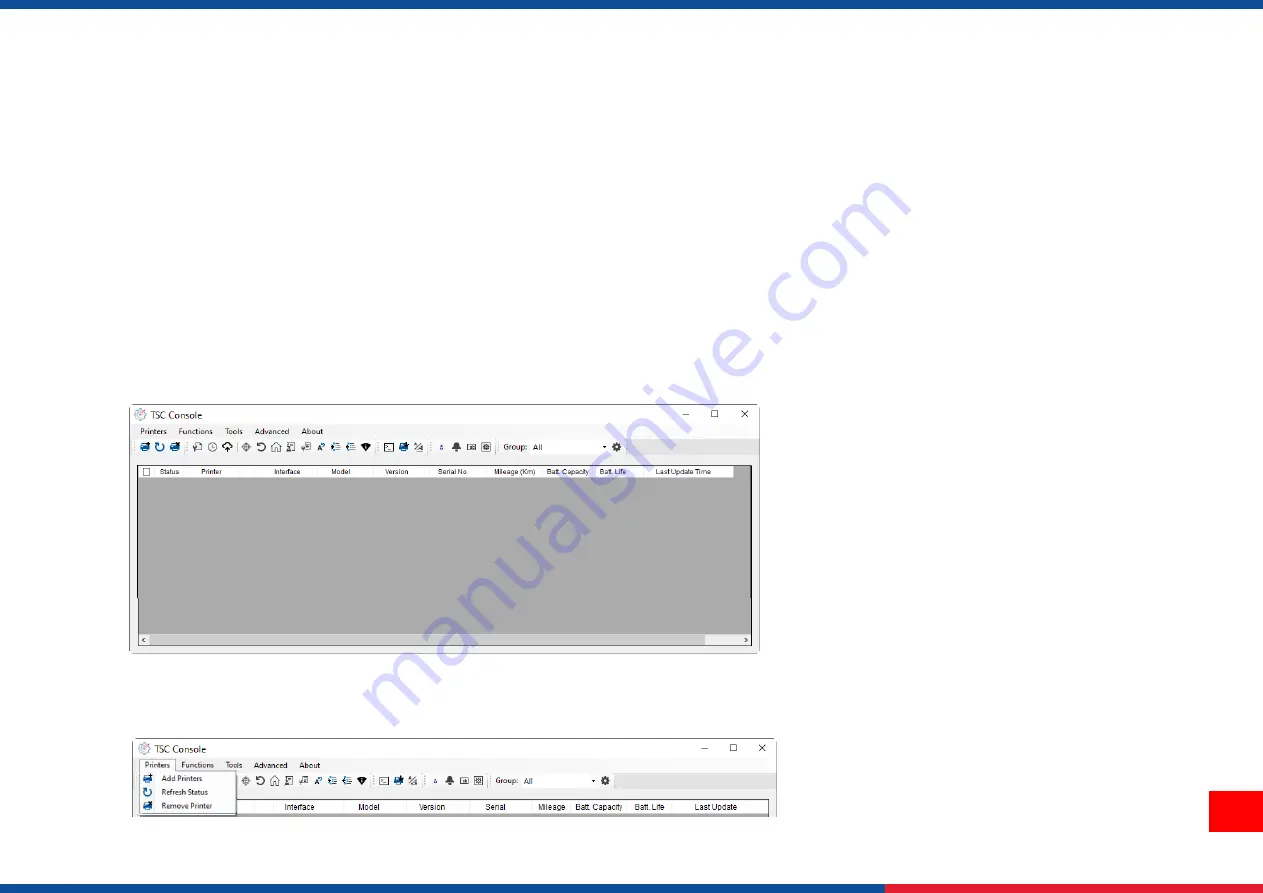
TSC Console is a management tool combining the Printer Management, Diagnostic Tool, CommTool and Printer Webpage settings, 
which enables you to adjust printer’s settings/status; change printers’ settings; download graphics, deploy fonts, graphics, label 

templates or upgrade the firmware to the group of printers, and send additional commands to printers at the same time

※ 

Printer firmware version before A2.12 will only use 9100 Port as command port; Printer firmware after A2.12 will use 

6101 Port as command port. 


5.1 Start TSC Console 


1.


Double click TSC Console icon to start the software. 


2.


Manually add the devices by clicking 

Printer > Add Printers


Содержание TTP-244 Pro Series

Страница 1: ...TTP 244 Pro Series Desktop Barcode Printers User Manual Series Lists TTP 244 Pro Thermal Transfer Direct Thermal ...

Страница 2: ...from the Monotype Corporation Windows is a registered trademark of Microsoft Corporation All other trademarks are the property of their respective owners Information in this document is subject to change without notice and does not represent a commitment on the part of TSC Auto ID Technology Co No part of this manual may be reproduced or transmitted in any form or by any means for any purpose othe...

Страница 3: ... 3 Print Specification 4 1 4 Ribbon Specification 4 1 5 Media Specification 6 1 6 Various Sensor 7 2 Operation Overview 9 2 1 Unpacking and Inspection 9 2 2 Printer Overview 10 2 2 1 Front View 10 2 2 2 Interior View 11 2 2 3 Rear View 12 3 Setup 13 3 1 Setting up the Printer 13 3 2 Loading the Ribbon 14 3 3 Loading the Media 16 ...

Страница 4: ...4 1 LED Indication 19 4 2 Regular Button Function 20 4 3 Power on Utilities 21 5 TSC Console 25 5 1 Start TSC Console 25 5 2 Printer Function 27 5 3 Setting Post Print Action 28 6 TroubleShooting 29 7 Maintenance 31 8 Angency Compliance and Approvals 33 9 Revise History 36 ...

Страница 5: ...Pro easily outperforms the competition With its small compact footprint and dual motor design the TTP 244 Pro is perfect for a wide variety of label and tag printing applications everything from shipping labels to compliance and general purpose product identification labels tags This document provides an easy reference for operating this printer TSC printers include the Windows labeling software f...

Страница 6: ...notype Imaging true type font engine with one CG Triumvirate Bold Condensed scalable font Fonts and bar codes can be printed in any one of the four directions 0 90 180 270 degree Downloadable fonts from PC to printer memory Downloadable firmware upgrades Bar code graphics image printing Supported bar code 1D barcode Code 39 Code 93 Code 128UCC Code 128 subset A B C Codabar Interleave 2 of 5 EAN 8 ...

Страница 7: ...ternal roll mount media OD 214 mm 8 4 on a 1 or 3 core V SD card reader for memory expansion up to 4G V 3 core label spindle V KP 200 Plus keyboard V KU 007 Plus programmable smart keyboard V 1 2 General Specification Physical dimensions 232 mm W x 156 mm H x 288 mm D Enclosure ABS plastic Weight 2 5 kg 5 51 lbs Power External universal switching power supply Input AC 100 240V 2 5A 50 60Hz Output ...

Страница 8: ... mm 1 mm 8 dots Max print speed 5 ips 127 mm sec Max print width 4 25 108 mm Max print length 90 2286 mm 1 4 Ribbon Specification Ribbon Specifications Ribbon outside diameter Max 67 mm OD Ribbon length 300 m Ribbon core inside diameter 1 core Ribbon width 40 mm 110 mm 1 6 4 3 Ribbon wound type Ink coated outside Note The maximum length of ribbon depends on its thickness and core outside diameter ...

Страница 9: ...5 The formula below defines the correlation between ribbon roll length and ribbon core diameter t 4 d D L 2 2 where L Ribbon length D Max roll diameter d Ribbon core outside diameter t Ribbon thickness ...

Страница 10: ...acity 110 mm 4 33 OD Media core diameter 25 4 76 2 mm 1 3 Media type Continuous die cut black mark External fan fold notched Media wound type Outside wound Media width 25 4 112 mm 1 0 4 4 Media thickness 0 06 0 19 mm 2 36 7 48 mil Label length 10 2 286 mm 0 39 90 ...

Страница 11: ...of the next label The sensor is mounted 4 mm off the center line of the main mechanism Black Mark Sensor The black mark sensor locates the position of label by emitting infrared rays onto the black mark at the back of the ticket The sensor is mounted 5 75 mm off the center line of the mechanism ...

Страница 12: ... shown on the figure below To change to the 2 position the customer should notify the manufacturer in advance There can be only one position for the sensor Ribbon End Sensor The sensor detects the end portion of the ribbon The ribbon end must be transparent ...

Страница 13: ...ease retain the packaging materials in case you need to reship the printer 1 printer unit 1 Windows labeling software Windows driver CD disk 1 quick installation guide 1 external auto switching power supply 1 power cord 1 label spindle 2 fixing tabs 2 ribbon spindles 1 paper core for ribbon rewind spindle If any parts are missing please contact the Customer Service Department of your purchased res...

Страница 14: ...10 1 PAUSE button 2 PWR ON LINE and ERR indicators 3 FEED button 4 Cover release button 5 Label dispense opening 2 2 Printer Overview 2 2 1 Front View 1 2 3 4 5 ...

Страница 15: ... rewind spindle 5 Printer cover in open position 6 PAUSE button 7 PWR ON LINE ERR indicators 8 FEED button 9 Ribbon supply spindle 10 Printer carriage release lever 11 Media sensor 12 Adjustable label guide 13 Platen roller 2 2 2 Interior View 9 1 5 7 8 6 10 2 4 11 13 12 3 ...

Страница 16: ...12 2 2 3 Rear View 1 Power on off switch 2 Power supply DC jacket 3 RS 232C interface 4 Label insert opening For use with external media 5 USB interface 6 Centronics interface Factory option 5 2 3 6 4 1 ...

Страница 17: ...e the POWER switch is OFF 4 Connect the printer to the computer with RS 232C or USB cable 5 Plug the power cord into the power jacket at the rear of the printer and then plug the power cord into a properly grounded receptacle Note Please switch OFF the printer before plugging in the power cord to printer power jack ...

Страница 18: ...on the front hubs Please be noted that the bigger hub side with 4 ribs must be installed toward the right side of ribbon mechanism 3 Install a ribbon on the ribbon supply spindle Mount the ribbon supply spindle on the rear hubs Please be noted that the bigger hub side with 4 ribs must be installed toward the right side of ribbon mechanism ...

Страница 19: ...pty paper core on the ribbon rewind spindle with a tape 7 Rotate the ribbon rewind spindle until the ribbon overlaps the ribbon leader and stretches tight 8 Close the printer carriage 9 Close the printer cover and press the FEED button until the green ON LINE LED illuminates Note Please install ribbon and media and close print head mechanism before turing on the power Printer will determine direct...

Страница 20: ... 1 Open the printer cover then disengage the printer carriage 2 Place the label roll into the label roll mount or external label roll mount Feed the label under the carriage and over the platen External Label Roll Mount Option ...

Страница 21: ...s the FEED button three or four times until the green ON LINE indicator illuminates 7 When the printer is out of ribbon or media the ON LINE LED will not illuminate and the ERR LED will flash Reload the ribbon or media without turning off the printer power Press the FEED button three or four times until the ON LINE LED illuminates The printing job will be resumed without data loss ...

Страница 22: ...tall SD Memory Card Option 1 Open the memory card cover 2 Make sure the direction of the memory card is correct 3 Plug in the SD memory card module on the main board 4 Close the print head mechanism as indicated ...

Страница 23: ...the POWER switch is turned on ON LINE Indicator The green ON LINE indicator illuminates when the printer is ready to print When PAUSE button is pressed the ON LINE indicator flashes ERR Indicator Error Paper Empty The red ERR indicator illuminates in the event of a printer error such as memory error syntax error and so forth ...

Страница 24: ... label 2 the PAUSE LED flashes 3 the printer will hold all data in memory This allows for trouble free replacement of label stock and thermal transfer ribbon Press again the button will restart the printer Note If the PAUSE button is held down for more than 3 seconds the printer will be reset and all data of the previous printing job will be lost FEED Button Press the FEED button to feed the label...

Страница 25: ...n utilities to set up and test hardware These utilities are activated by pressing the FEED or PAUSE button and turning on the printer power simultaneously The utilities are listed as below 1 Self test 2 Gap sensor calibration 3 Printer initialization ...

Страница 26: ... 2 Print out thermal print head check pattern 3 Print the internal settings 4 Enter dump mode Dump Mode After the self test the printer enters the dump mode In this mode any characters sent from the host computer will be printed in two columns The characters received will be shown in the first column and their corresponding hexadecimal values will be shown in the second coloum Reset the printer by...

Страница 27: ...calibrate gap sensor 1 Turn off the printer power install blank labels Hold the PAUSE button Turn on printer power 2 Release PAUSE button when printer feeds labels Do not turn off printer until the printer stops and two green LED lights on Note Black mark sensor has fixed sensitivity It is no need to calibrate the black mark sensor ...

Страница 28: ... set automatically at the activation of printer power When printer initialization is done sensor sensitivity will be reset to default Sensor calibration is required before printing labels Printer configuration will be restored to defaults as below after initialization Parameter Default setting Speed 76 2 mm sec 3 ips Density 8 Media Width 4 101 6 mm Media Height 4 101 6 mm Sensor Type Gap sensor G...

Страница 29: ...aphics deploy fonts graphics label templates or upgrade the firmware to the group of printers and send additional commands to printers at the same time Printer firmware version before A2 12 will only use 9100 Port as command port Printer firmware after A2 12 will use 6101 Port as command port 5 1 Start TSC Console 1 Double click TSC Console icon to start the software 2 Manually add the devices by ...

Страница 30: ... 3 Select the current interface of the printer 4 The printer will be added to TSC Console s interface 5 Select the printer and set the settings For more information please refer to TSC Console User Manual ...

Страница 31: ... Factory Default Initialize the printer to default settings Reset Printer Reboot printer Print Test Page Print test page according to the specified label size and sensor type Configuration Page Print printer configurations Dump Text Activate the printer to dump mode Ignore AUTO BAS Restart the printer and Ignore AUTO BAS file for once Exit Line Mode Exit the line mode to page mode Enter Line Mode ...

Страница 32: ...finishing the calibration Follow below procedure to set the post action for the printing Refer Chp 5 1 to connect the printer with TSC Console Double click the printer Printer Configuration Page will pop up Click Get to load information Go to Common Tab Find Post Print Action Select the mode for the application Click Set to finish setting ...

Страница 33: ...ty 1 Clean the thermal print head 2 Adjust the print density setting 3 Ribbon and media are not compatible 4 Media thickness is over spec 5 Check if correct power supply is connected with printer Power indicator on printer does not illuminate 1 Check the power cord see whether it is properly connected 2 Check if the LED on the power supply is illuminated If it is not lit on then the power supply i...

Страница 34: ...orrectly in the mechanism Is paper core installed on the ribbon take up spindle 2 Calibrate the sensitivity of gap sensor Continuous feeding when printing labels 1 Check the driver or command script setting if sensor type is set properly 2 Calibrate the gap sensor again if die cut media is used for printing ...

Страница 35: ...ectrostatic damage Do not wear rings or other metallic objects while cleaning any interior area of the printer Use only the cleaning agents recommended in this document Use of other agents may damage the printer and void its warranty Do not spray or drip liquid cleaning solutions directly into the printer Apply the solution on a clean lint free cloth and then apply the dampened cloth to the printe...

Страница 36: ...printer II Rotate the platen roller and wipe it thoroughly with the lint free 99 Isopropyl Alcohol Clean the platen roller when changing a new label roll Peel Bar Use the lint free cloth with 99 Isopropyl Alcohol to wipe it As needed Sensor Use brush with soft non metallic bristles or a vacuum cleaner to remove paper dust Clean upper and lower media sensors to ensure reliable Top of Form and Paper...

Страница 37: ...energy and if not installed and used in accordance with the manufacturer s instruction manual may cause harmful interference with radio communications Operation of this equipment in a residential area is likely to cause harmful interference in which case you will be required to correct the interference at your own expense This Class A digital apparatus complies with Canadian ICES 003 Cet appareil ...

Страница 38: ...tructions on the product 3 Disconnect the power plug from the AC outlet before cleaning or if fault happened Do not use liquid or aerosol cleaners Using a damp cloth is suitable for cleaning 4 The mains socket shall be installed near the equipment and easily accessible 5 The unit must be protected against moisture 6 Ensure the stability when installing the device Tipping or dropping could cause da...

Страница 39: ... the battery in fire 2 DO NOT short circuit the contacts 3 DO NOT disassemble the battery 4 DO NOT throw the battery in municipal waste 5 The symbol of the crossed out wheeled bin indicates that the battery should not be placed in municipal waste Caution The printhead may be hot and could cause severe burns Allow the printhead to cool CAUTION Any changes or modifications not expressly approved by ...

Страница 40: ...36 9 Revise History Date Content Editor ...

Страница 41: ......

Отзывы: